
Shipping Samples to a Biorepository
Ovation Research Network (ORN) Overview
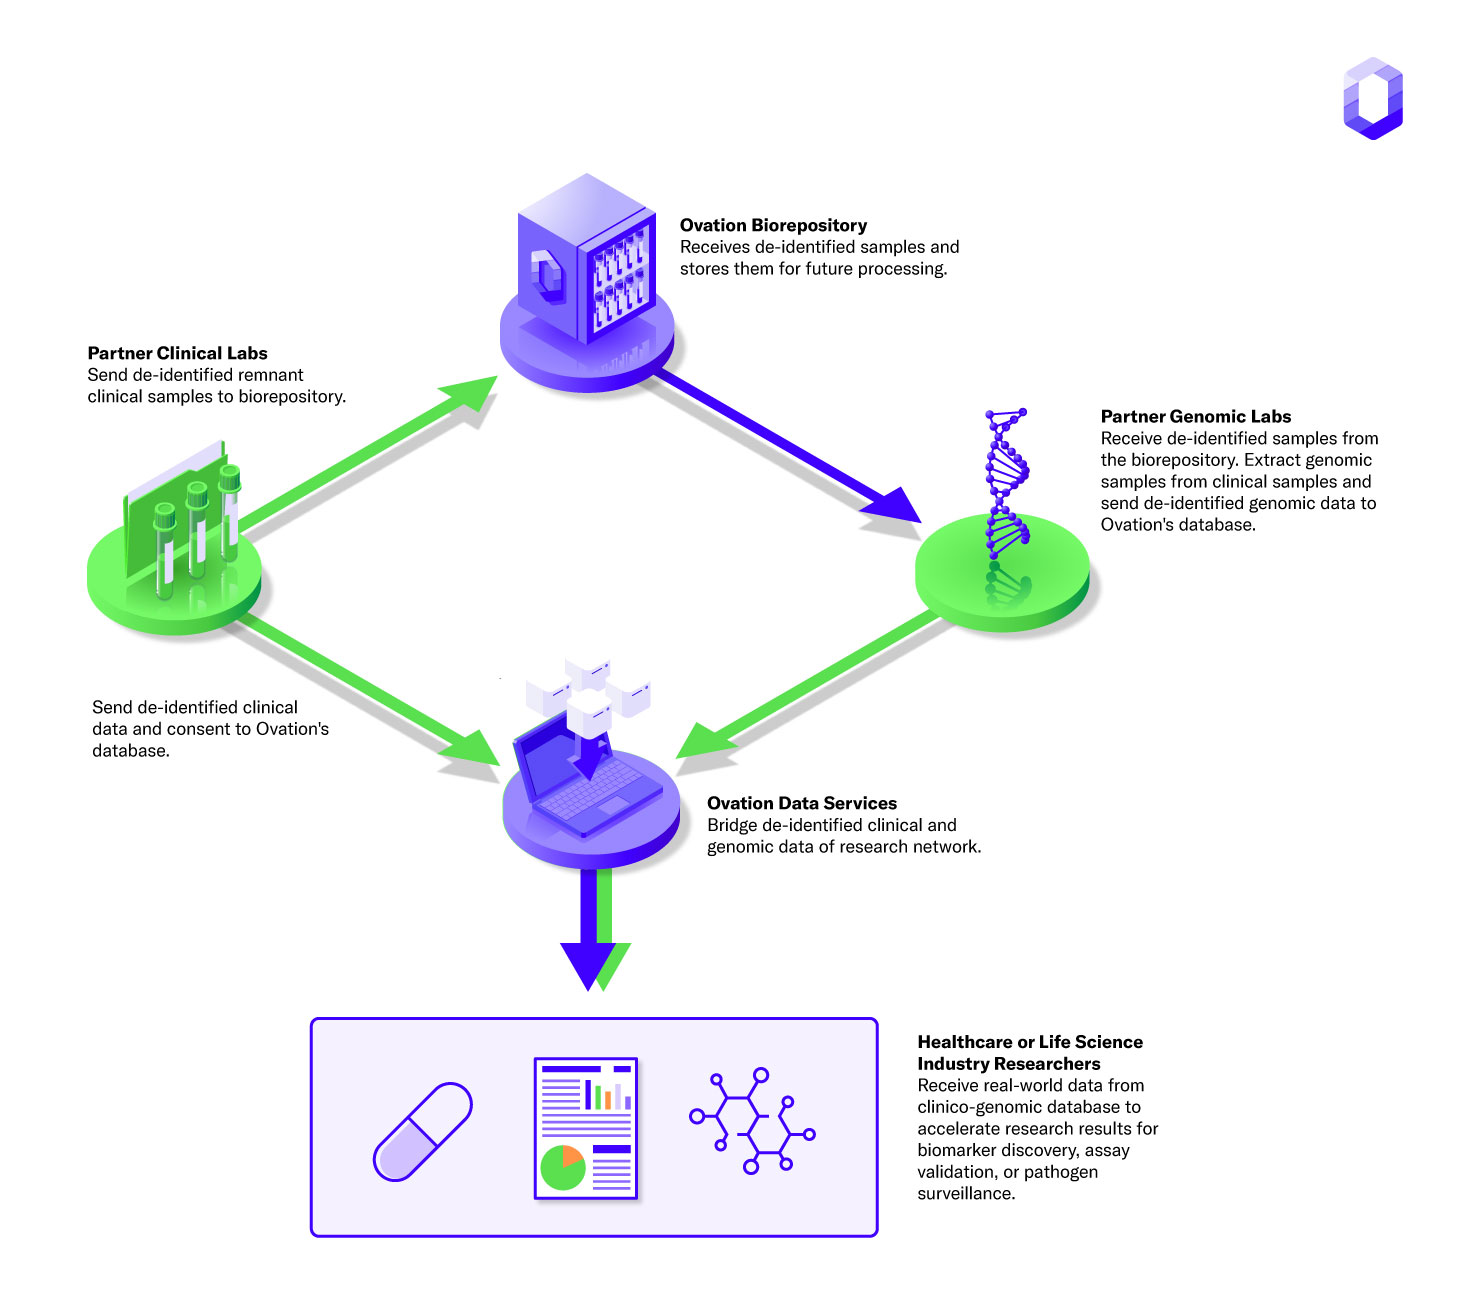
By collaborating and participating in the Ovation Research Network (ORN), you are helping to close gaps and drive cutting edge research to meet the needs of the evolving healthcare life sciences industry.
With Ovation’s help, your lab will contribute to a diverse biorepository. The biorepository contains remnant samples from diagnostic labs worldwide. Samples in the biorepository are tokenized in the process of de-identification. De-identification allows Ovation to securely bridge powerful genomic and clinical data from partner labs and create one of the world’s largest, comprehensive clinicogenomic databases, all while protecting patient privacy.
Our database further facilitates research testing, such as whole genome sequencing for biomarker diversity, assay validation for the development of precision diagnostics, and everything in between. Our shared goal is to use the ORN to stimulate partnerships and share resources that result in faster, improved patient outcomes. Thank you for being a part of our network and welcome aboard.
This guide covers the following steps to ship a sample for biorepository storage:
- Glossary
- Method of De-Identification
- Sample Biobanking Eligibility
- Print Ovation Global IDs
- Prep your Workstation
- Evaluate Sample Integrity
- Aliquot and Relabel your Samples
- Create a Shipment in OvDx
- Ship by Courier Mail
Glossary
Ovation Research Network (ORN) - The Ovation Research Network is a program that enables diagnostic labs to support healthcare through collaborations with life science industry researchers. This collaboration helps to empower partner labs with the support and scale they need to mobilize remnant samples. This helps us all to meet our shared goal of expanding real-world data opportunities by assisting research-related testing on biorepository samples. Biorepository samples are therefore used to accelerate the discovery of targeted therapies and treatment options for patients.
Sample ID - The Identifier on the original sample container (sometimes generated within the OvDx LIMS). This identifier also may contain Protected Health Information (PHI) that will be removed from the de-identified sample.
Global ID - TheIdentifier on pre-printed labels that Ovation generates and sends directly to the client. De-identification removes PHI from the samples and is a condition of entering the biorepositories. Only de-identified samples are able to participate in the ORN. Global IDs can be generated within the Ovation Platform Shipments Module or acquired from the Ovation Research Team by contacting success@ovation.io
De-identification - De-identification creates a token identifier, blinds the associated protected health information (PHI), and allows the sample to be a part of the future research of the ORN. The process of transferring clinical patient samples to new tubes labeled with a Global ID may also be part of your laboratory’s sample de-identification process (see graphic below).
Containers - There are four types of containers referenced in this document
1. Original Sample Container - Original container that contains the sample, often with a Sample ID that contains PHI
- Collection Tube
- Cryovial
- 96-well plate
- 384-well plate
2. Biorepository Sample Container - The container that receives an aliquot of the original sample and is labeled with the Global ID for sample de-identification
- Cryovial
3. Shipment Batch Containers (1, 2, 3, etc.) - Individual containers within one shipment that hold biorepository sample containers. There may be multiple shipment batch containers per shipment within a courier container
- Bag
- 6X6 Box
- 6X12 Box
- 8X8 Box
- 9X9 Box
- 10x10 Box
- 12X8 Box
- 5X12 Rack
4. Courier Container (overall shipping box) - The outer packaging that contains individual shipment batch containers
- UPS Box

Method of De-identification
There are currently three sample de-identification methods that are used when shipping patient samples to ORN biorepositories.
1. No de-identification
2. Partial de-identification
3. Full de-identification
Refer to the diagram below to determine your laboratory’s method of sample de-identification.

All samples in the ORN are fully de-identified before the associated clinical and genomic data can be included in the ORN. De-identification can be performed in the shipping or receiving modules of OvDx. Labs performing full de-identification before shipping will do so in OvDx. Ovation Biorepositories performing de-identification will do so when receiving samples in OvDx.
Note: The figure above highlights most common use cases. Your lab may have slight differences from the chart above. If you are unsure from this figure which type of de-identification your lab performs, contact your ORN coordinator at supplies@ovation.io
Sample Biobanking Eligibility
Sample Eligibility is displayed within the OvDx LIMS. Current sample eligibility can be seen from the Samples Page, at the Create Batch activity step of a Workflow, or in the Shipments Module when creating a shipment. Note that eligibility for a sample is not static and can change with addition or revision to information or processes that the sample undergoes.
Where to find Eligible Samples in OvDx
The Ovation platform has been designed to indicate which of your samples within the system meet the minimum requirements for biobanking. Where to find eligible samples in OvDx depends on which aspects of the Ovation platform your organization is using.
1. In the Shipments module (ORN and OvDx LIMS partners)
Within the Shipments module, samples that are biobank eligible will be able to be added to a shipment and/or de-identified. For samples that are ineligible for biobanking, a red error message will be displayed that describes why the sample is currently ineligible.

2. Within your Workflows (OvDx LIMS partners only)
Samples that are biobank eligible will be listed in your Workflow’s Create Batch Activity Step. Scroll down to the bottom of the Create Batch page to see a table of all available samples and their biobank eligibility status.


3. On Global Samples or Project Samples Page (ORN and OvDx LIMS partners)
Samples that are biobank eligible will be listed in the Samples Summary Table on the Samples Page. See the last column in the Samples Summary Table.
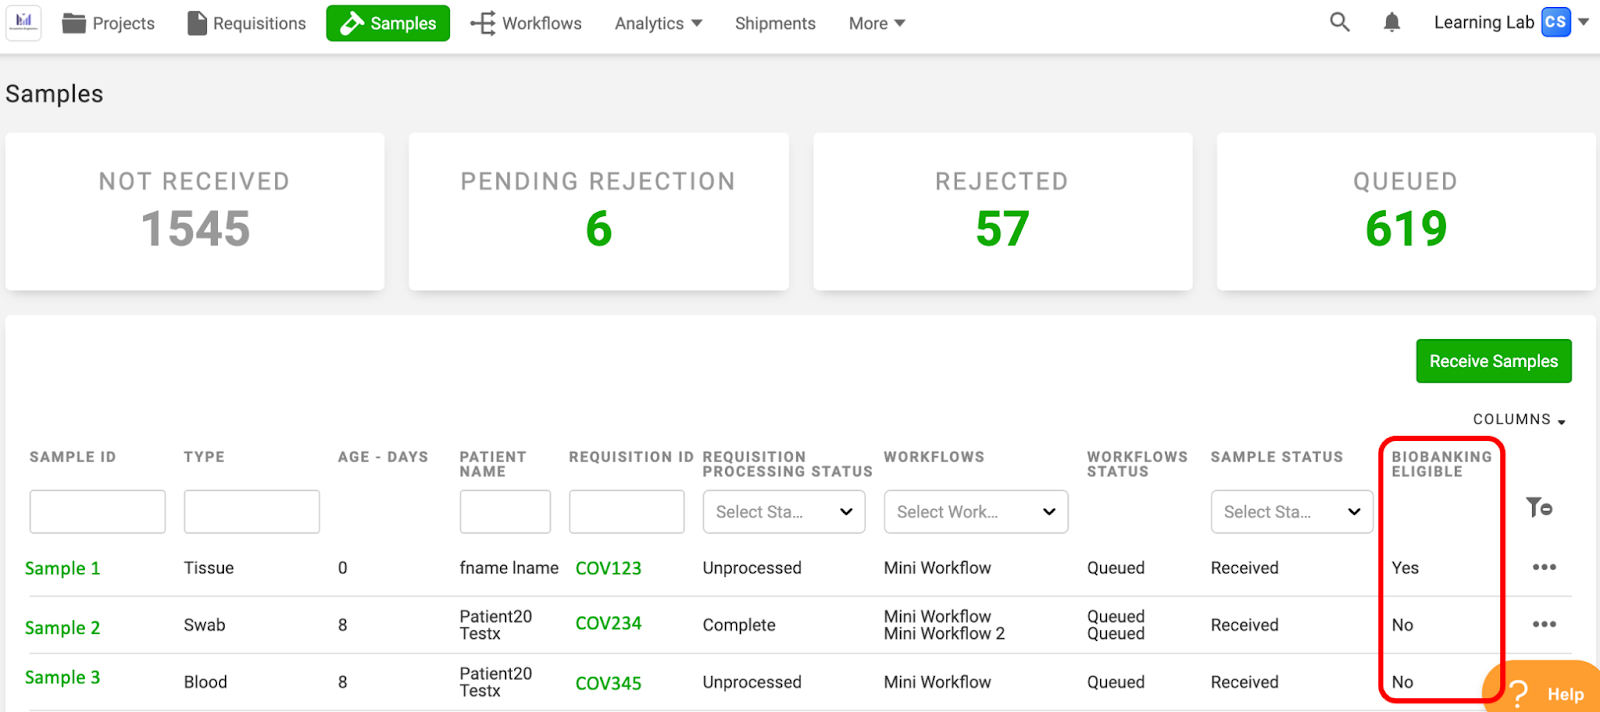
Tip: You can sort sample eligibility on the Samples Page by clicking the “Biobanking Eligible” column header in the Samples Summary Table. Clicking once will pull all Samples with a “No” eligible status to the top of the list. Clicking twice will pull all Samples with a “Yes” eligible status to the top of the list
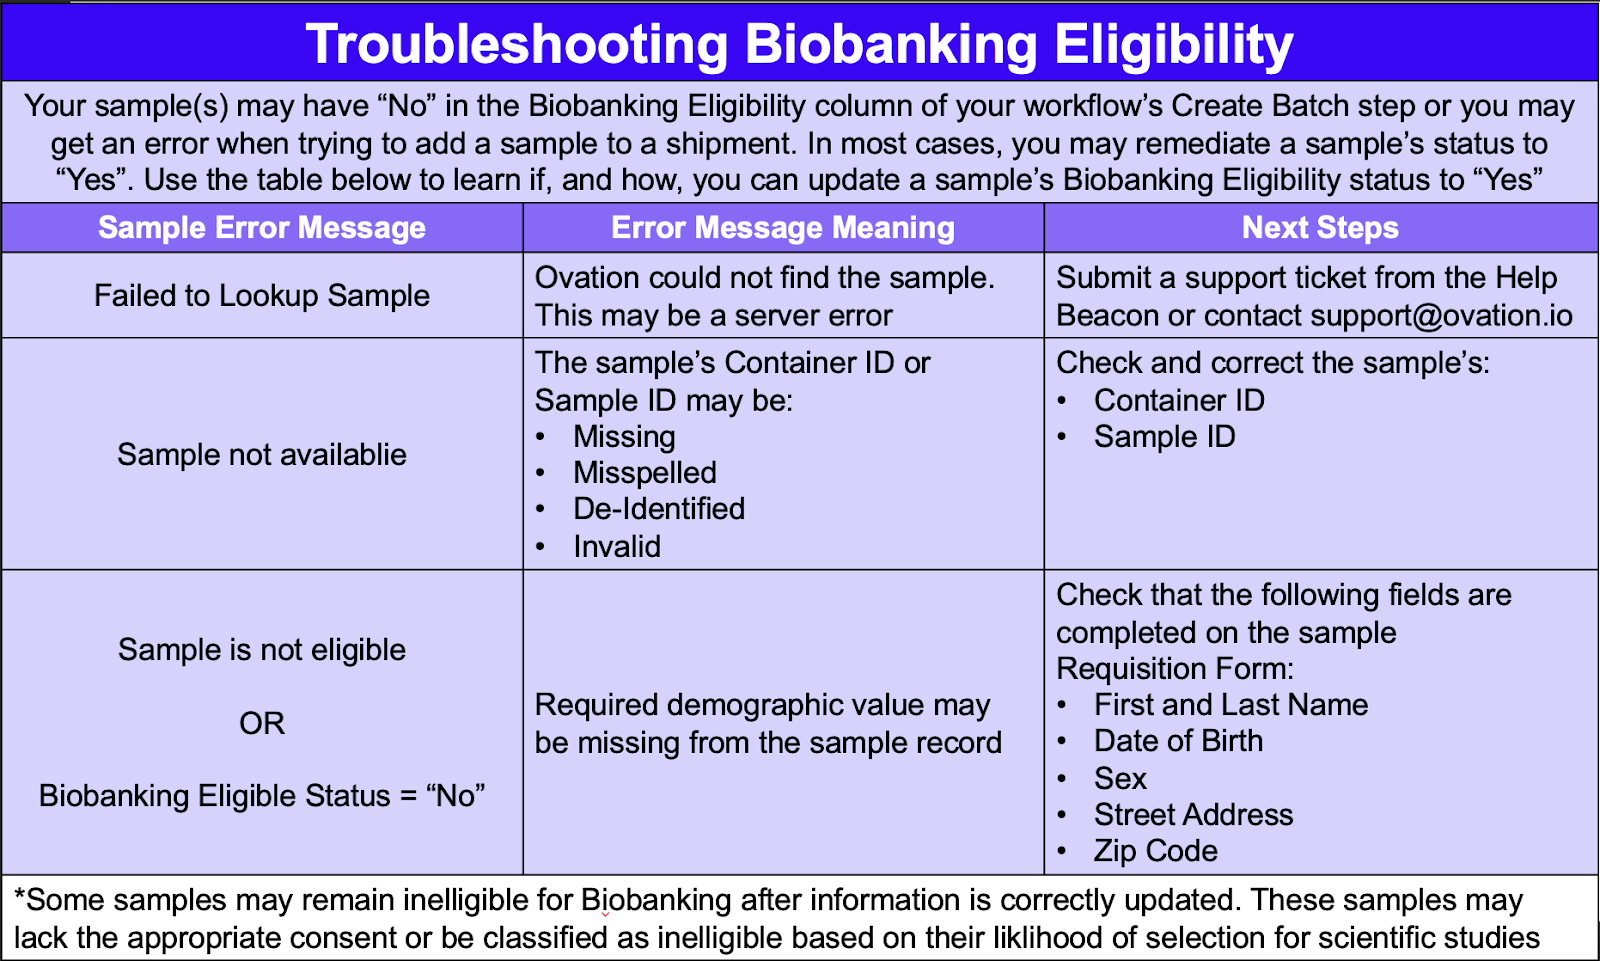
Troubleshooting Sample Eligibility - OvDx LIMS Partners Only
Use the chart below to troubleshoot sample eligibility.
Print Ovation Global IDs
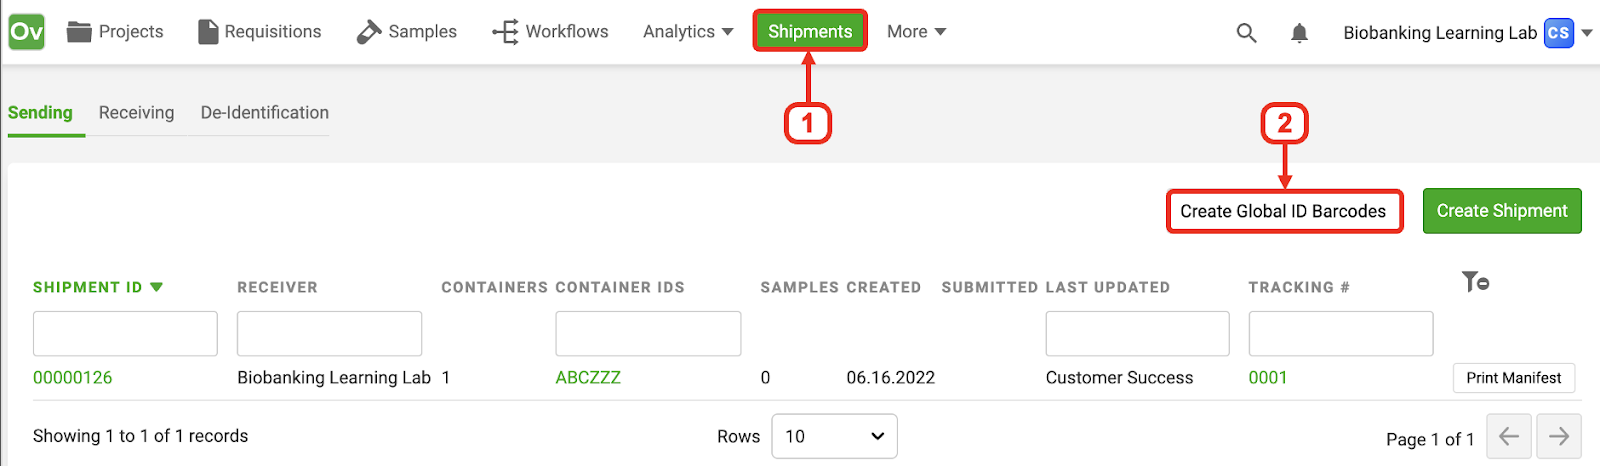
Shipments require Global IDs for all de-identified samples. Additionally, some labs may use Global IDs for their required shipment batch Container ID (container that holds the samples). Users can generate Ovation Global IDs within the Shipments Module of OvDx LIMS once their Printers are enabled during Biobanking Implementation. Within the Shipments Module, Global IDs can be generated and printed from the Sending or De-Identification tab.
Note: Not all labs require Global IDs. Your Ovation Research Team will confirm your process during Biobanking Implementation. To enable a new printer, enable a different size label for samples, or request Global IDs in bulk, contact the Ovation Research Team at supplies@ovation.io
1. Click Shipments in the top Dashboard
2. If you have the Sending Tab: Select the “Create Global ID Barcodes” button
If you do not have the Sending Tab: Click the De-identification Tab, then select “Create Global ID Barcodes”
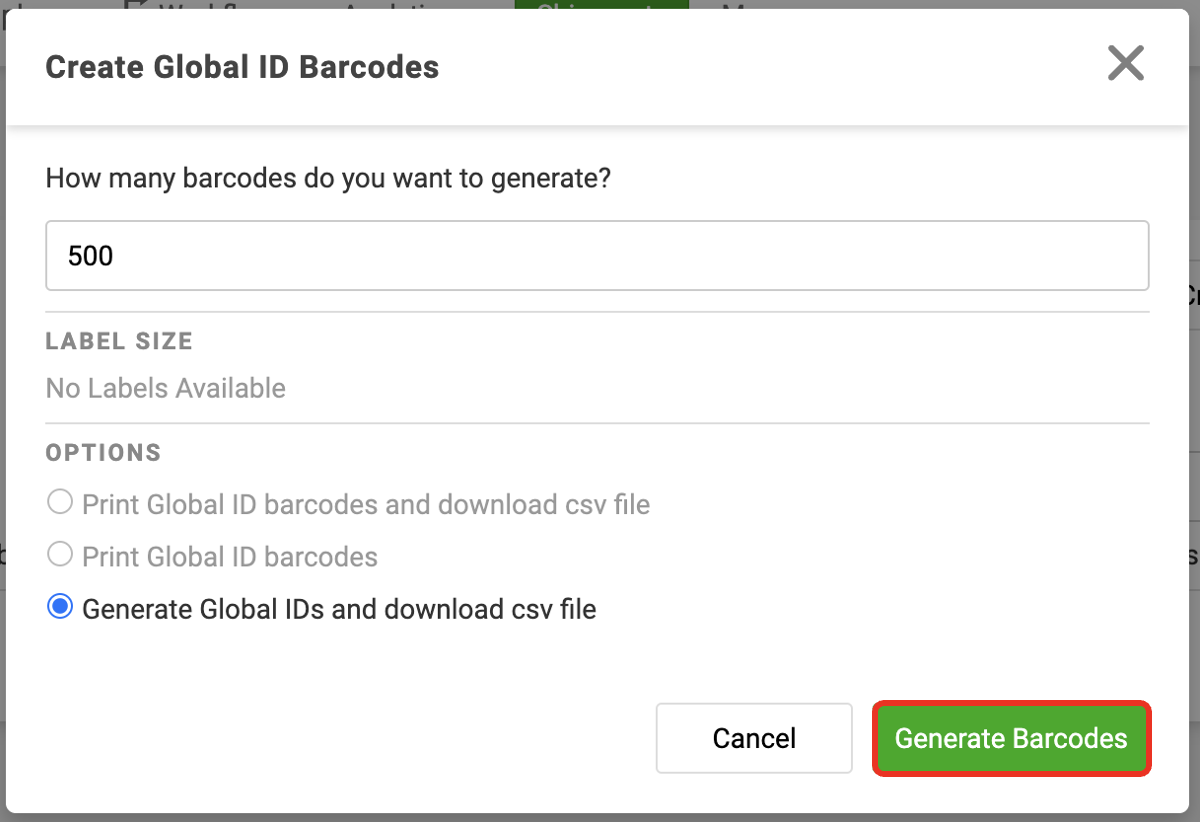
3. Enter the number of labels you wish to print in the modal
Tip: Up to 2000 labels can be generated at a time
4. Choose the option that best fits your printing needs
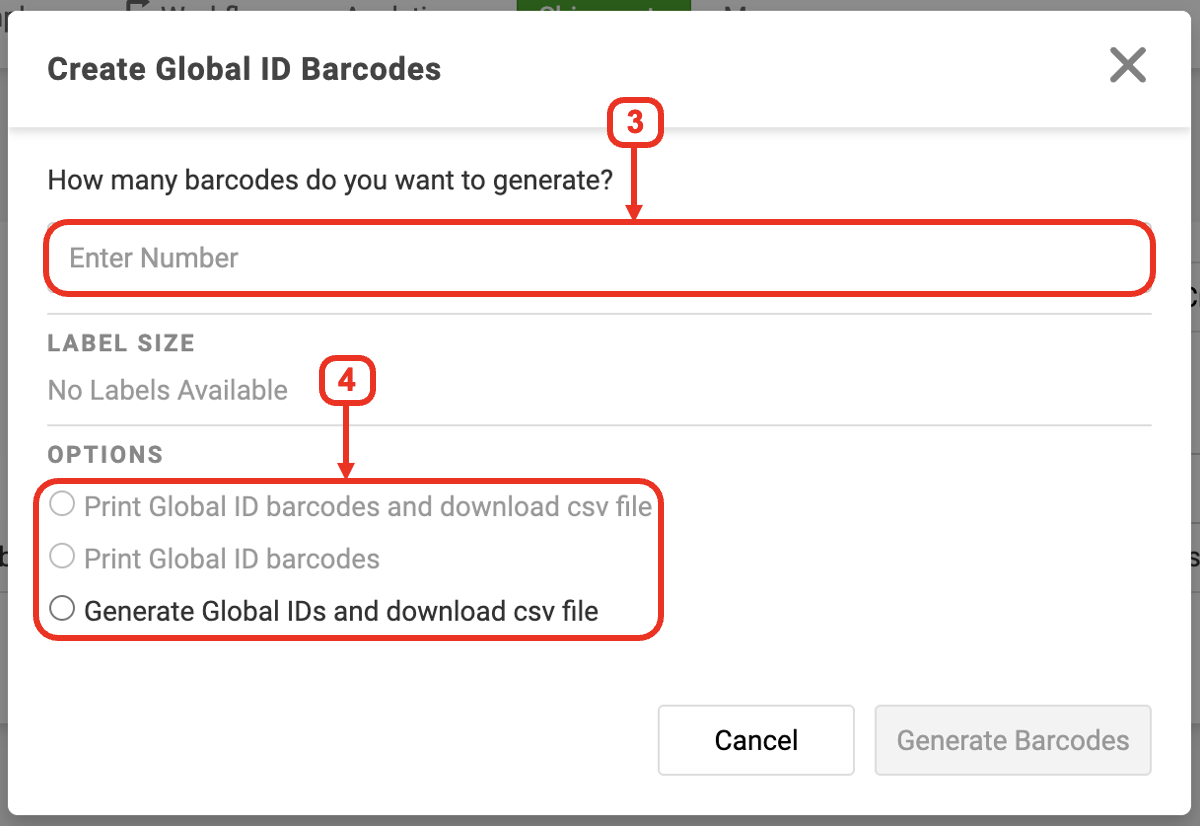
Tip: Some options will remained grayed out if you do not have an enabled printer. To enable Biobanking printers, contact success@ovation.io
5. Click the green Create button
Prep your Workstation
Bring the required equipment, below, and samples to your workstation (recommended to use a biological safety cabinet). Consider all samples biohazardous and handle according to your laboratory’s best practices and standard operating procedures.

Note: Some labs biobanking on-site or holding samples for short term storage will use partially de-identified labels as seen above. The partial de-identified labels are replaced with a Global ID when those samples are called up for genomic research or if they are to be sent to a long term storage biorepository.
Evaluate Sample Integrity
1. Place samples at appropriate temperature. Put samples currently at -20℃ are on wet ice or put samples currently at -80℃ on dry ice
Note: Samples should not be left out of their previous storage temperature for more than 2 minutes each. Failure to handle samples at their storage temperature may result in sample loss
2. Use the flowchart below to determine if the samples are viable and should be shipped

3. If you are not relabeling your samples because they are frozen, skip to “Create a Shipment in OvDx”below. If you are relabeling samples, go to “Aliquot and Relabel Samples” below
Note: If your samples are already frozen, then you will not relabel your samples for shipment. Instead you will ship the samples with their current labels. The biorepository receiving your samples will de-identify the samples with a Global ID
Aliquot and Relabel Samples
1. For samples that will be relabeled with:
A. Sample ID only (partial de-identification):
- Print labels needed and set them aside at your workstation.
- Bring enough biorepository sample containers (cryovials) to aliquot all samples
- Bring an Ovation Global IDs for each shipment batch container (ex. Bag or box) that will hold biorepository sample containers
B. Ovation Global ID (full de-identification):
- Take the number of labels needed from your Ovation provided stock of Global IDs and set them aside at your workstation.
- Bring enough biorepository sample containers (cryovials) to aliquot all samples.
- Bring an Ovation Global IDs for each shipment batch container (ex. Bag or box) that will hold biorepository sample containers
2. Give each biorepository sample container (cryovial) a label for the sample that is to be aliquoted. (Sample ID only label for partial de-identification or an Ovation Global ID for full de-identification).
- For groups doing partial de-identification: go to step 3
- For groups doing full de-identification: go to step 4
Note: Ovation provides your group with Global IDs. If you are low on Global IDs or require a different size label for samples, contact the Ovation Research Team at supplies@ovation.io
3. For partial de-identification, aliquot the samples from their original tube to their new tube. New tubes will have the Sample ID only label and no PHl. Be sure sample IDs match on the original tube and new tube. Aliquot all samples and skip to “Create a Shipment in OvDx”
Note: Labs performing partial de-identification will relabel samples with a Global ID when samples come out of short term storage to ship to another facility. Relabeling may also include aliquoting. For more details regarding your lab’s process, contact supplies@ovation.io
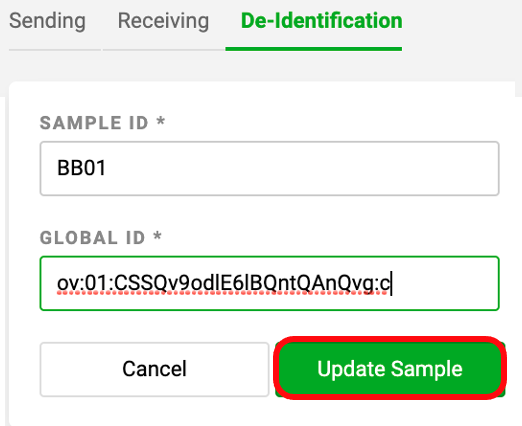
4. For full de-identification, open OvDx on a computer near the workstation by going to https://lab.ovation.io/ and entering your login information
5. Click Shipments in the top bar
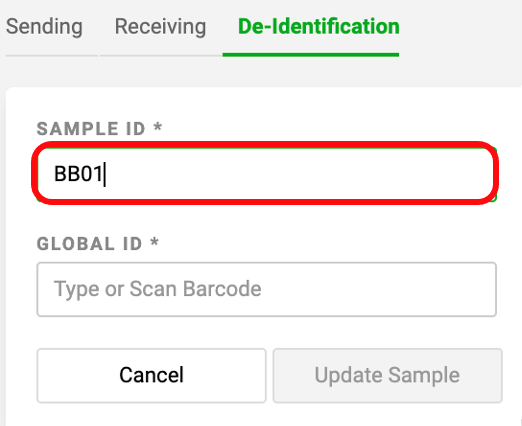
6. Click the De-Identification tab

7. Take the current tube of your first sample, and scan the Sample ID into the sample ID box
8. Take one of the biorepository sample containers (cryovials) that you labeled with an Ovation Global ID in step 2. Aliquot the sample from its current container to the new cryovial labeled with an Ovation Global ID
9. In OvDx, scan the Global ID on the new tube containing the sample into the Global ID box
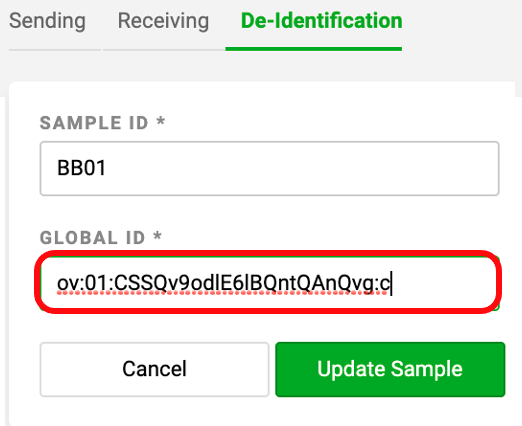
10. Click Update Sample
Note: If you cannot assign your Sample ID a Global ID, check to see that the sample’s requisition has the appropriate consent. Only samples marked on the requisition for patient notification will be eligible for biobanking and shipment.
11. Continue scanning sample IDs and Global IDs until all samples are de-identified, then proceed to “Create a Shipment in OvDx”
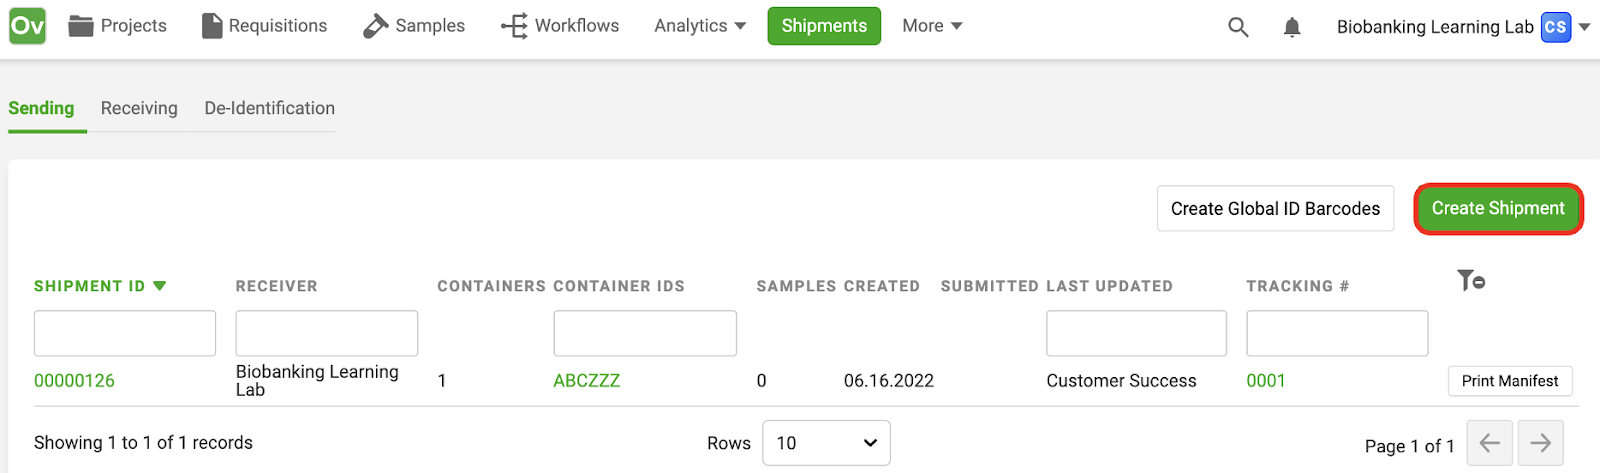
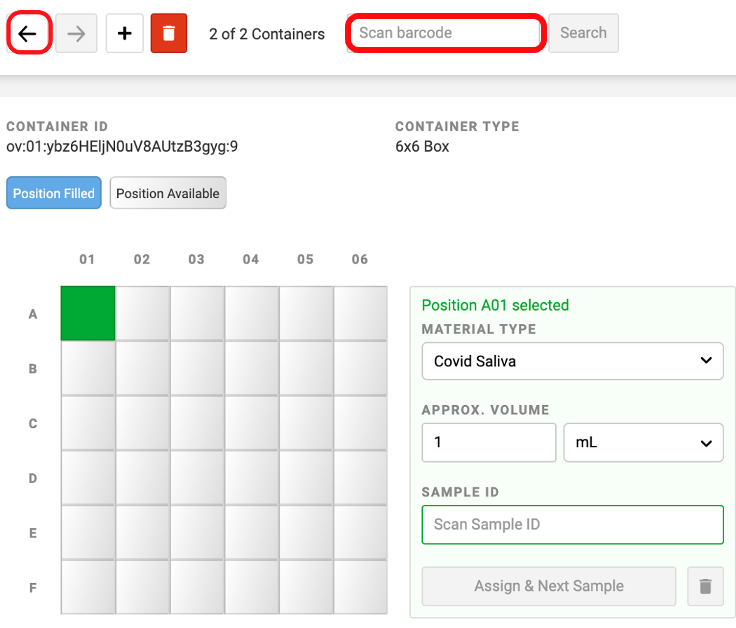
Create a Shipment in OvDx
1. Open OvDx on a computer near the workstation by going to https://lab.ovation.io/ and entering your login information
2. Click Shipments in the top bar
3. Click Create Shipment
4. Select the appropriate options as applies to your shipment

- Select the appropriate sample description for your lab process: leave toggle off if you are doing partial or no de-identification of your samples in the shipment; or turn toggle to send de-identified samples if your samples are de-identified
- Select "Allow receiver to add samples" checkbox: this allows the biobank to add any samples that were in the shipment but didn't get scanned by the lab
- Choose appropriate Receiver, Shipping Condition and Carrier
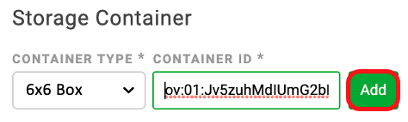
5. Click the Container Type* box and choose your shipment batch container type
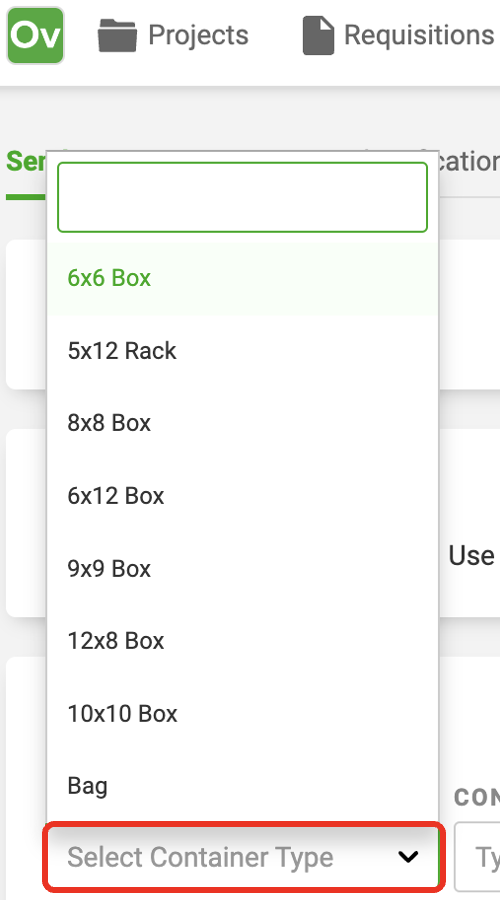
Note: If samples are being placed in a bag, then the bag is the container. If the samples are being directly placed into a box, then the box is the container.
6. Place a Global ID barcode label, or an alternate Container ID, on the Shipment Batch Container directly. If using a box, label well A01 with sharpie inside the box.
Note: If you are preparing a shipment with multiple Shipment Batch Containers and labeling those with Global IDs, you will need a Global ID for each container in the shipment
7. Click Container ID* box and scan the Global ID/Container ID barcode label on the Shipment Batch Container into the box
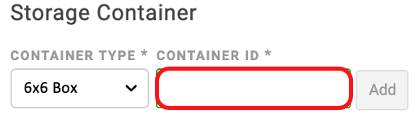
8. Click the green Add button
9. If using a box container, select the first position in the container grid. Selected positions are green.
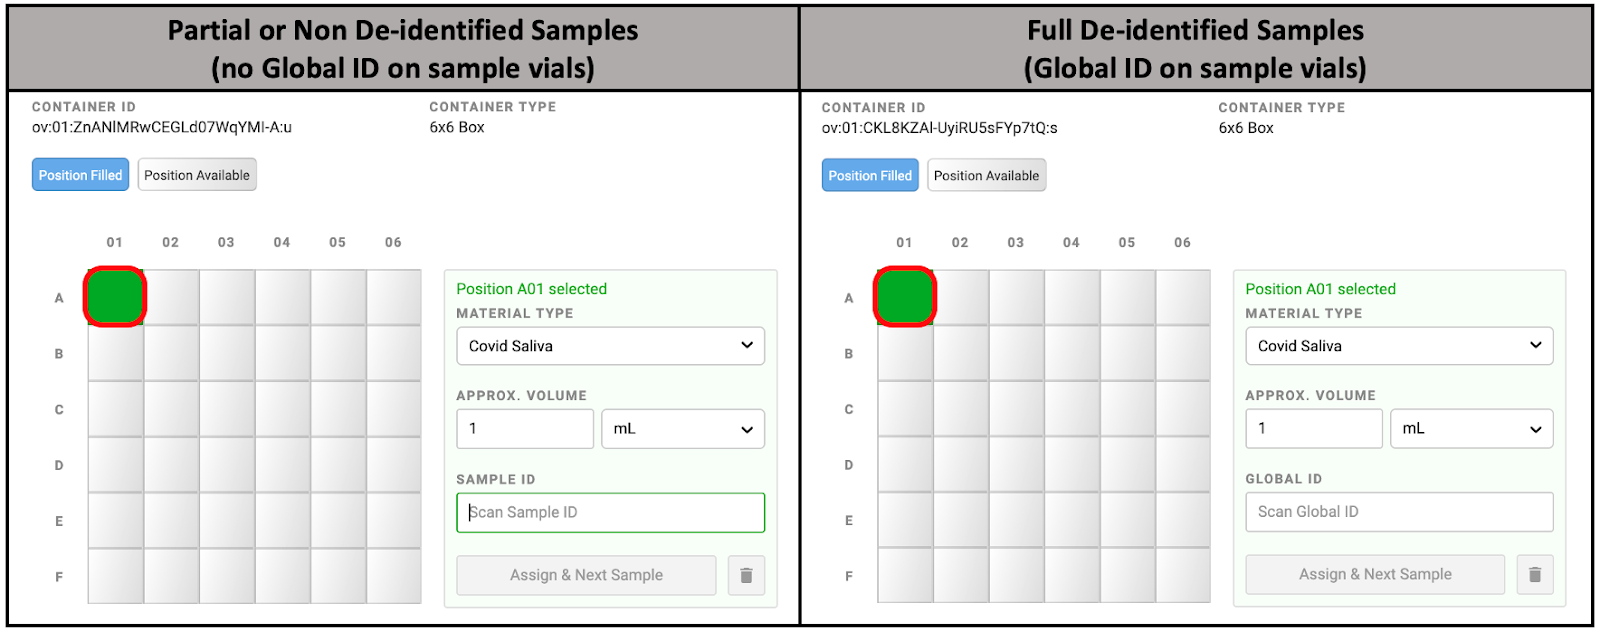
10. Select the Material Type

11. Approximate sample volume
A. Enter the volume amount
B. Enter the units

12. Click the Sample ID/Global ID box

13. Scan the barcode label on the sample vial
14. Click Assign & Next Sample

Note: If you see a red error message, this means the sample is not eligible for biobanking and should not be included in the shipment.
15. See that the position for the sample now has a blue checkmark
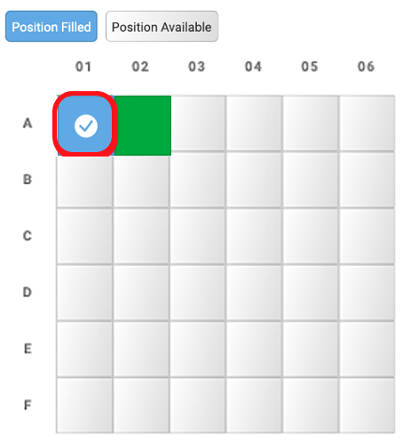
16. Place the sample in its assigned location of the Shipment Batch Container. Here, our first sample was assigned to A01. Make sure that the sample is in its assigned position before proceeding.
Note: Make sure sample temperature conditions are maintained. Frozen samples should not be off ice for more than 2 minutes. Be sure that the shipping container is on the appropriate ice for frozen samples (wet ice for -20℃ samples and dry ice for -80℃ samples)
17. Scan in the remaining samples that will be shipped. Continue adding samples to the shipment batch container until the entire shipment is complete or the Shipment Batch Container is full
18. If additional batch containers are needed, click the plus sign at the top of the page, select the batch container type, and add the batch containers’ Global ID
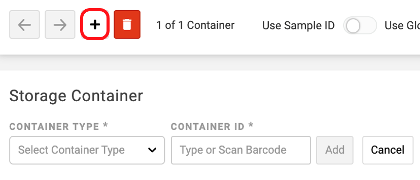
Note: If you add multiple Shipment Batch Containers, you can scroll through the individual containers by clicking the arrow signs. You can also scan the Global ID/Container ID on the Shipment Batch Container (outside of box/bag) and then click search to navigate to that Shipment Batch Container’s contents
19. Continue this process until you have finished adding all samples
20. When ready to complete the shipment, return to this window and enter the tracking number, then click Submit

Note: Once a shipment is submitted, it cannot be altered or undone
21. Click Print Manifest, download the document, and save until ready to ship

If you are shipping immediately, go to the next step. If you are shipping later, store the samples in their shipping batch container(s) or courier container at the appropriate temperature to maintain their documented storage condition
Ship by Courier Mail
Courier services are currently coordinated through Ovation and the biorepository. The courier will arrive with shippers appropriate for the sample types and transportation conditions required to accommodate the samples to be shipped. Prepare the shipment for the courier using the steps below as close to courrier arrival as possible. Be sure to maintain sample temperatures; if the courier is late, store the shipment in the appropriate temperature-controlled environment to maintain sample integrity.
1. Collect or re-print your shipment Print Manifest
2. Verify that the number of samples on the Print Manifest is the same as the number of samples in the shipment
3. Provide the shipping manifest to the courier
A. If samples will be shipped by traditional courier: Place the manifest inside each prepared package
B. If samples will be shipped using a special courier: Provide the manifest to the courier personnel at time of pickup
4. Label the shipping container/package with the appropriate shipping hazard labels for courier service
5. Once the courier arrives, place the shipping containers or shipment package inside the courier shipper
Note: Minimize the amount of time between removal of the sample containers from temperature controlled environment to placement in the courier shipper.