
Billing Settings - Maintenance
This article is for Billing Specialists or Consultants to maintain and edit a lab’s billing system using the Billing Settings: Administration Page(s). Use this guide with your 3rd party Billing Integration to add/edit/delete individual components of your billing settings after initial implementation. For initial setup, see our Billing Settings - Implementation article.
The following sections are contained in this guide. Read the entire article or skip to your section of interest.
- User Permissions
- Navigate to Billing Settings: Administration Page
- Add/Edit/Delete Insurance Providers/Carriers
- Add/Edit/Delete Insurance Providers/Carriers to Groups
- Add/Edit/Delete Physicians/Providers (3rd Party Integration Dependent)
- Add/Edit/Delete Billing Rules (3rd Party Integration Dependent)
- Check Billing Submission Log (Optional)
User Permissions
Roles and Permissions must be enabled in both OvDx LIMS Sandbox ( https://lab-sandbox.ovation.io) and OvDx LIMS Production (https://lab.ovation.io) environments for users to access the two Billing Settings: Administration Pages. Both Billing Settings: Administration pages are needed to complete the setup of a billing system.
Users must have the User Role of “Billing Consultant” to access Billing Settings: Administration Pages. Additionally, The Billing Consultant Role must have the Permission of “Billings Settings” set to the Permission Level of “Write” or “Admin”.
Give appropriate users access to the Billing Settings: Administration Pages using the steps below. From any page in the OvDx LIMS…
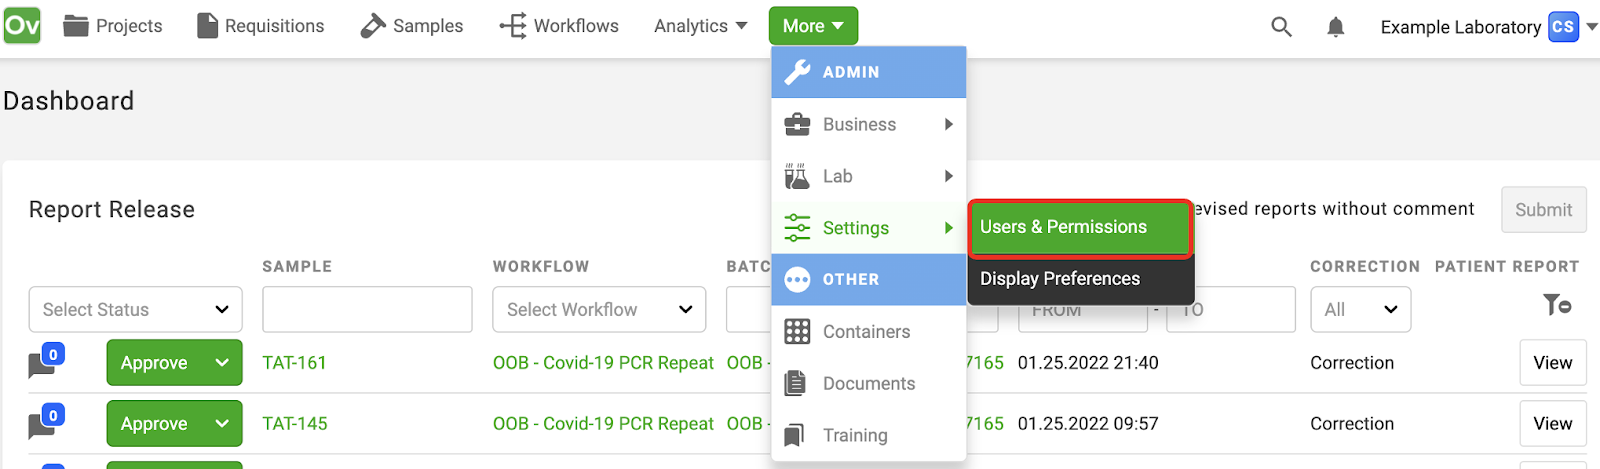
1. Click on More > Settings > Users & Permissions
2. Click on Roles and Permissions
3. Type “Billing” into the Find Permission box
4. Type “Billing” into the Find Role box
5. Click on the green current Permission Level of the Billing Consultant Role (“None” shown below)
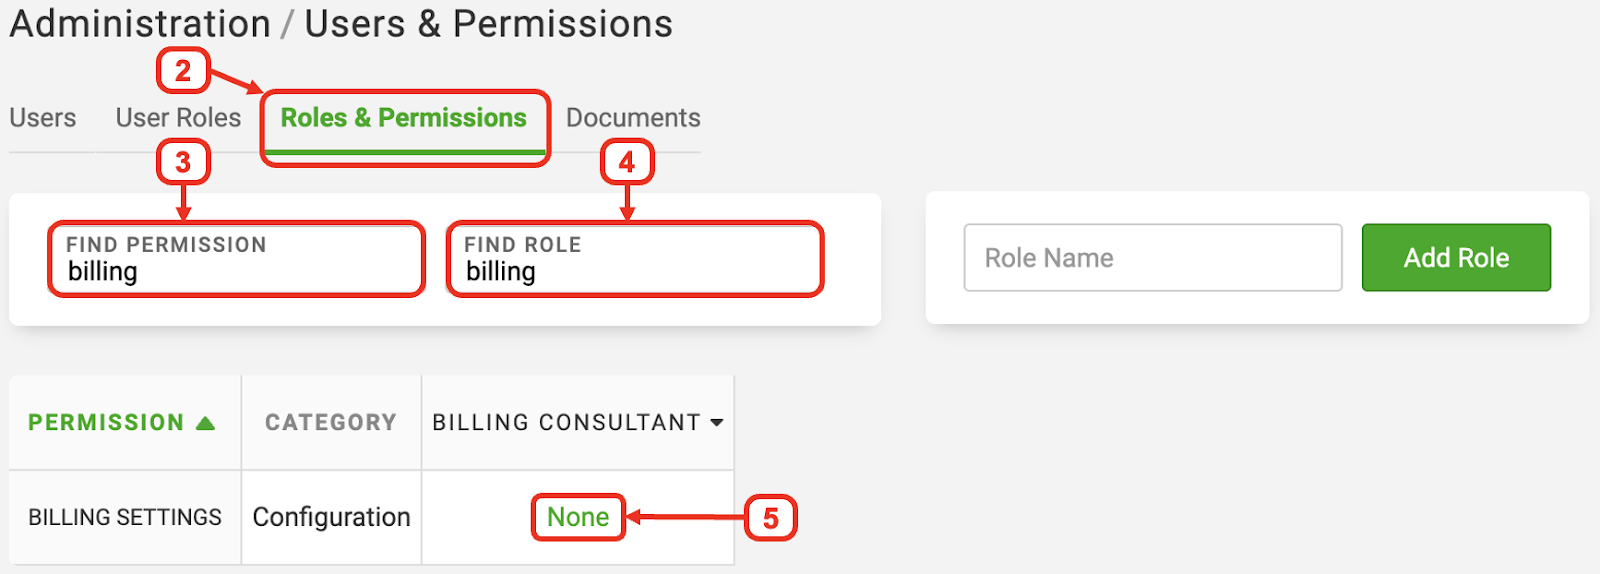
6. Change the Permission Level to “Write” or “Admin” in the Permission Level ModalNote: Both “Write” and “Admin” Permission Levels grant the same access. The Permission Level of “Read” will allow the user to see the Billing Settings: Administration Page, but they will be unable to make any changes.
7. Click the X in the top right corner

Navigating to Billing Settings: Administration Page
Billing Settings: Administration Page(s) are accessed via your OvDx LIMS Sandbox ( https://lab-sandbox.ovation.io) and OvDx LIMS Production (https://lab.ovation.io) environments.
We recommend that users complete initial edits and testing in the Sandbox environment before exporting and populating the changes to the Production environment.
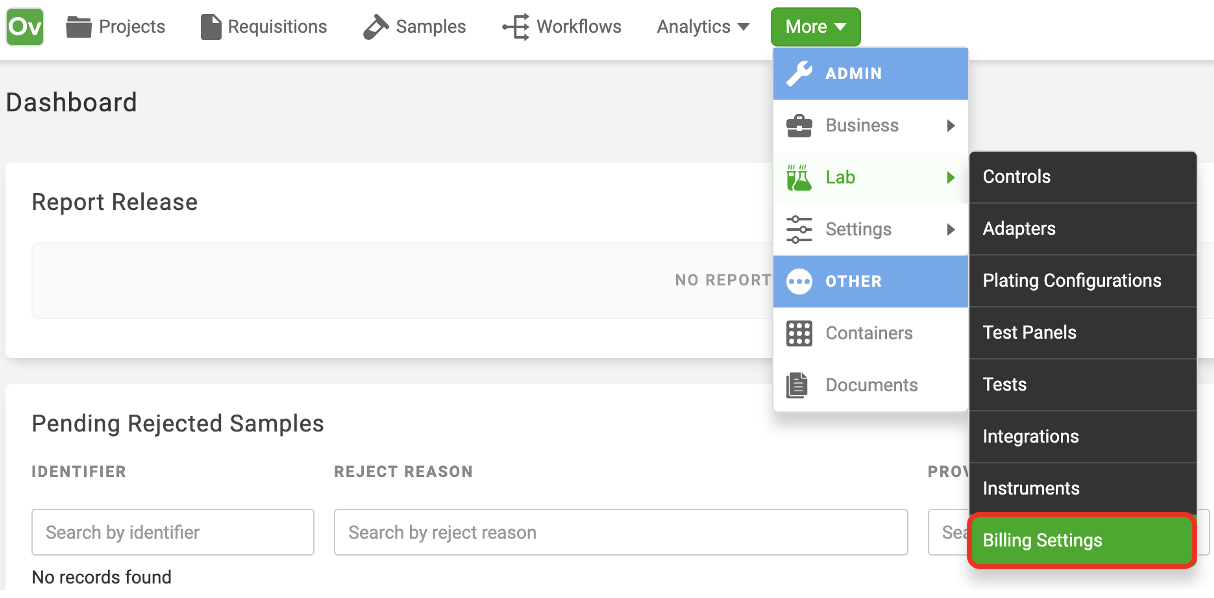
From any page in your OvDx LIMS Sandbox, click on More > Lab > Billing Settings
This will bring you to the Sandbox Billing Settings: Administration Page where you will need to Sign In again with your Ovation username and password.
Note: If your only User Role in the OvDx LIMS is Billing Consultant, your view may be more restricted and resemble the image below

The Billing Settings: Administration Page has 5 main tabs…

Note: Depending on your 3rd Party Integration(s), you may not need to use all tabs on the Billing Settings: Administration Page. Users without 3rd Party Integrations may use the Insurance Providers tab to alter the list of available Insurance Providers displayed within their OvDx LIMS.
Add/Edit/Delete Insurance Providers/Carriers
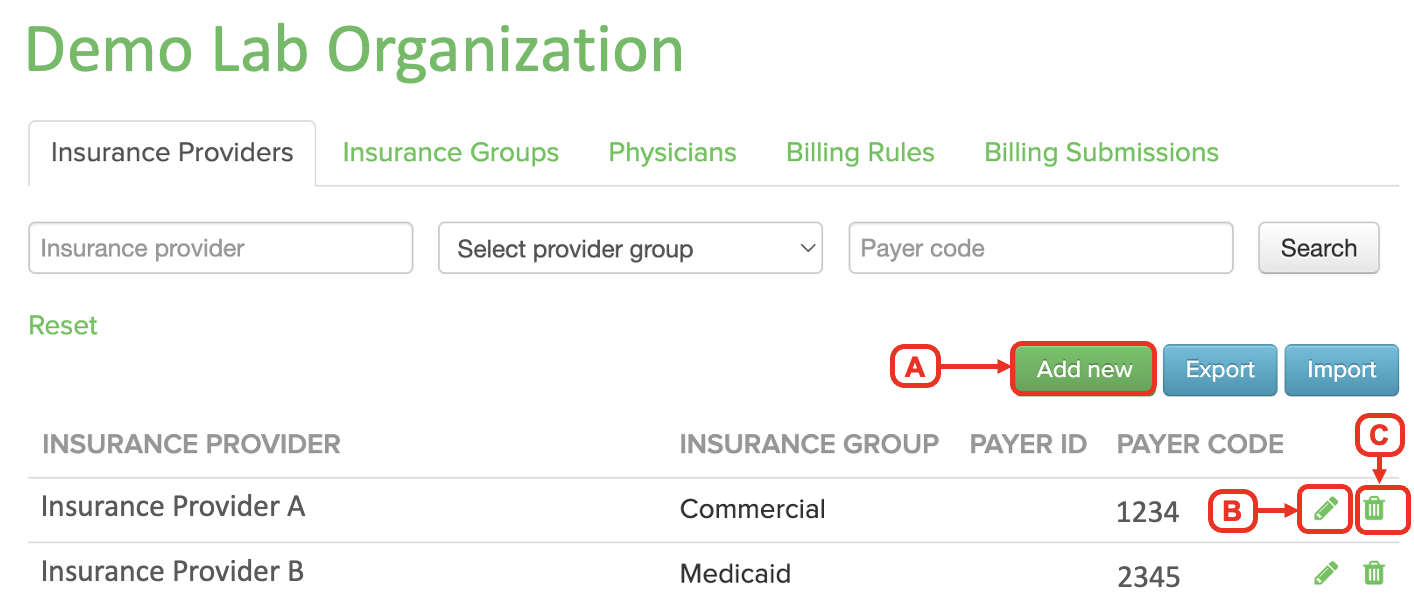
Entries populated under the Insurance Providers tab determines which Insurance Providers/Carriers are available for selection on Requisition Forms in your OvDx LIMS (selected in the ‘Billing Information’ section of a Requisition Form).
These entries can be modified manually or via CSV file upload.
To Modify Manually:
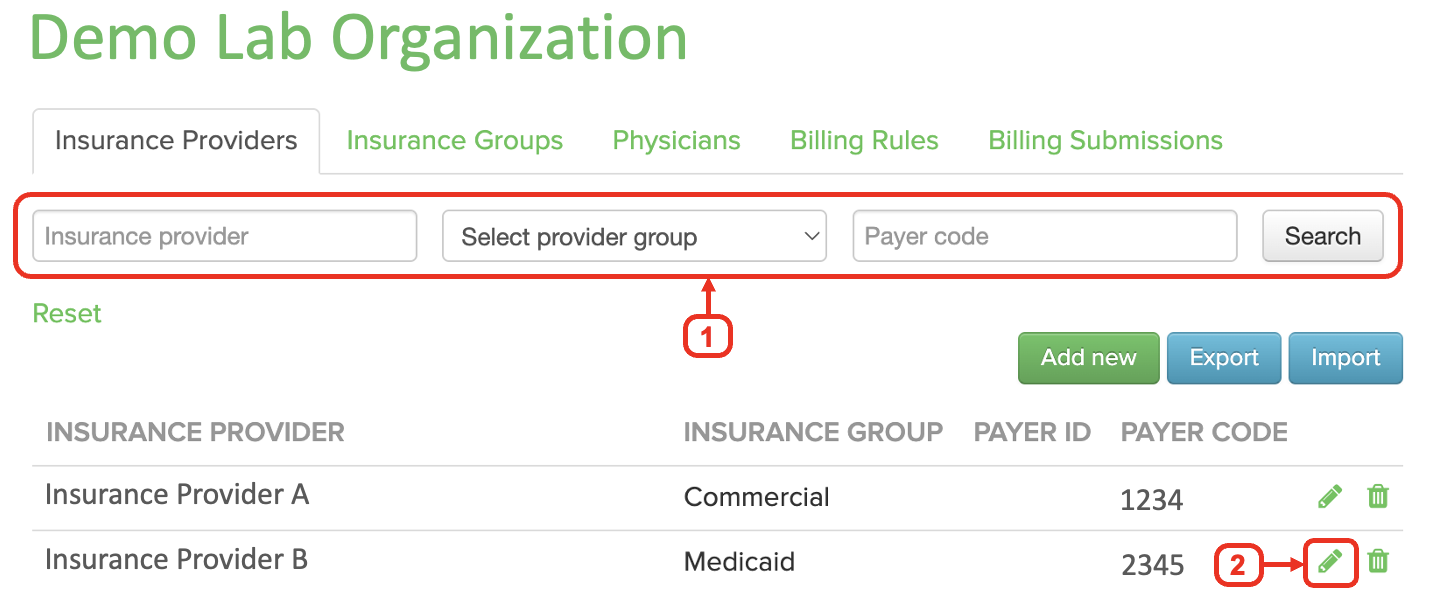
1. Choose the appropriate option based on your goal:
A. Click the green “Add new” button to add an individual Insurance Provider
B. Click the pencil button to edit an existing Insurance Provider
C. Click the trash can button to delete an existing Insurance Provider
2. Enter or alter the relevant Insurance Provider details
3. Hit save
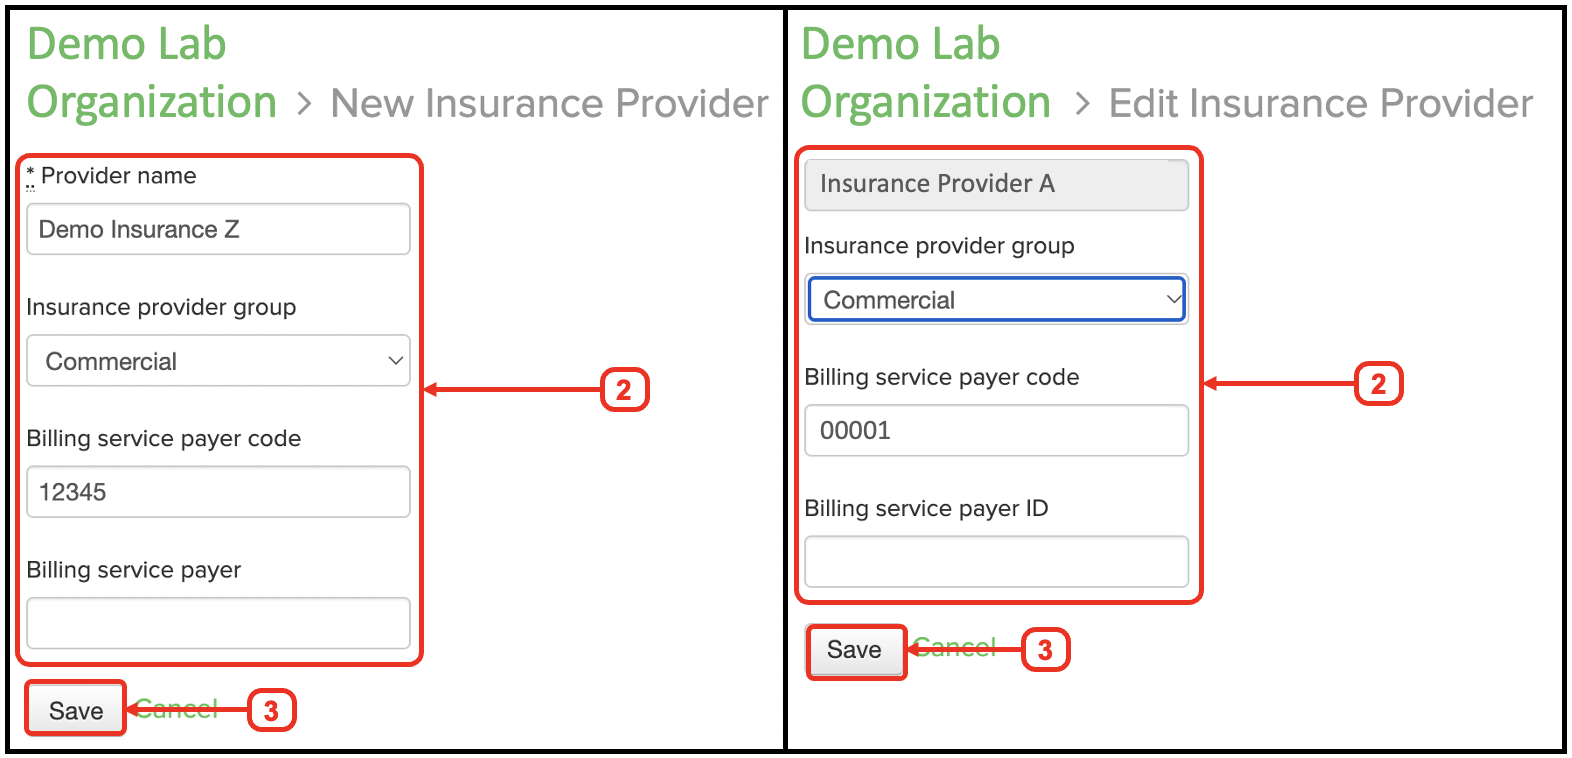
Tip: The top line states if you are in a New Insurance Provider or Edit Insurance Provider window
4. After completing changes in Sandbox, repeat steps 1-3 to make the same changes to your OvDx LIMS Production environment (https://lab.ovation.io)
To Modify via CSV Upload:
1. Export the existing Insurance Provider List by clicking the Export button
2. Open the exported CSV file, and add or modify insurance providers, as needed
Note: When adding insurance providers, be sure to check that the file doesn't already contain that insurance provider. Uploading a file with duplicate insurance providers will cause errors.
3. Save the updated CSV file
4. Import the new CSV file by clicking the Import button, choosing the modified CSV file, and click Import

Add/Edit/Delete Insurance Groups
Use Insurance Groups to selectively group Insurance Providers together. Groups can then be used to filter Insurance Providers for export. Groups can also be used to apply different Billing Rules to separate groups. Common groups are “Commercial” and “Medicaid”. Insurance Groups can be added manually or in bulk through Insurance Providers Import. See our Billing Settings Implementation Article to Import or edit multiple Insurance Groups.
1. Click the Insurance Groups tab

2. Choose the appropriate option based on your goal
A. Click the green “Add new” button to add an Insurance Group
B. Click the pencil button to edit an existing Insurance Group

3. Add or edit the name of the Insurance Group and click Save

The Insurance Group can now be associated with Insurance Providers. From the Insurance Providers tab…
4. Use the filters to find the Insurance Provider of choice
5. Click the Edit Pencil button next to your Insurance Provider of choice
6. Select the appropriate Insurance Group from the drop down menu
7. Click Save
Tip: Once Insurance Groups have been added, they cannot be deleted. To remove an Insurance Group from an Insurance Provider, click the edit pencil of that Insurance Provider and in the Group section choose the blank in the dropdown menu, then save.

8. After completing changes in Sandbox, repeat steps 1-7 to make the same changes to your OvDx LIMS Production environment ( https://lab.ovation.io)
Add/Edit/Delete Physicians/Providers (3rd Party Integration Dependent)
Physicians/Providers must be added to BOTH the Billing Settings: Administration Page> ‘Physicians’ tab AND in the OvDx LIMS for proper billing mapping to 3rd Party Integrations. This step is dependent on your 3rd Party Integration requirements.
Note: Only Physicians/Providers with valid 10-digit National Provider Identifiers (NPIs) can be added to the Physicians tab.
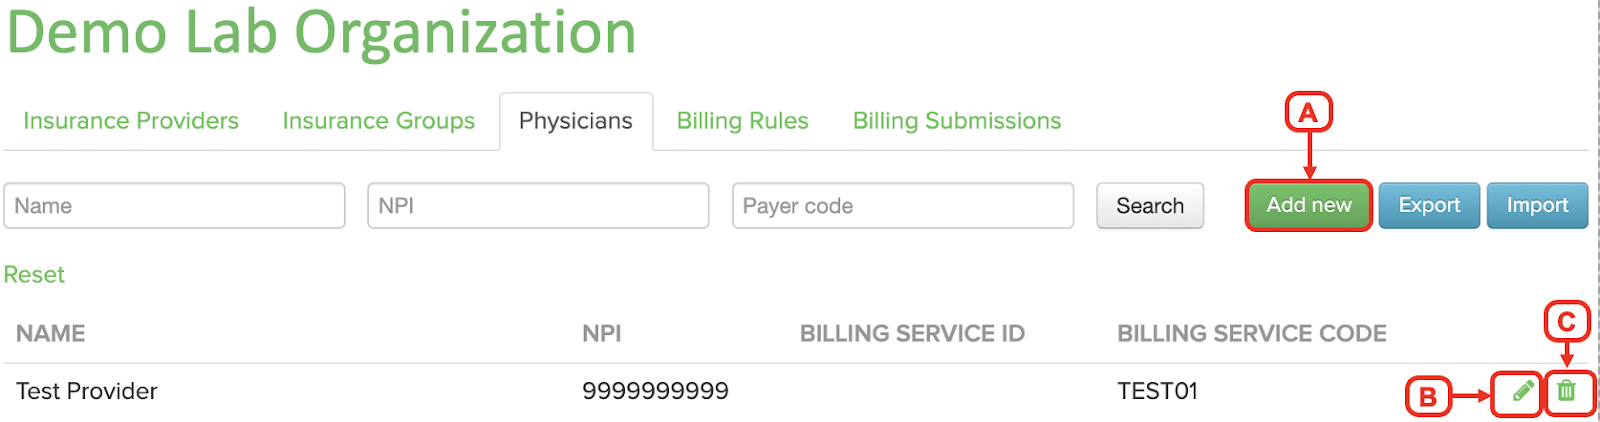
1. Click the Physicians tab

2. Choose the appropriate option based on your goal
A. Click the green “Add new” button to add an individual Provider
B. Click the pencil button to edit an existing Provider
C. Click the trash can button to delete an existing Provider
3. Enter or alter the relevant Physician details
4. Hit save
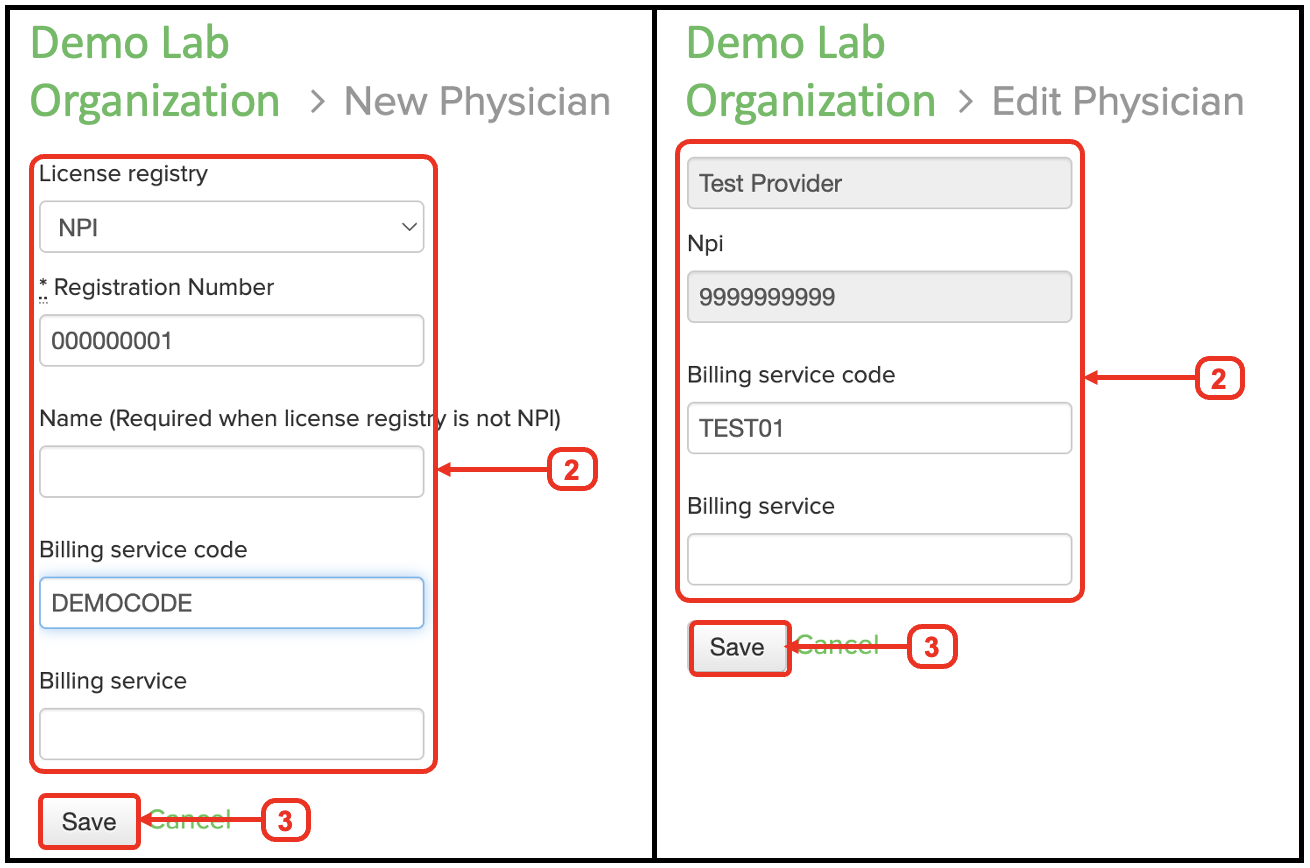
Tip: The top line states if you are in a New Insurance Provider or Edit Insurance Provider window. Billing Service Code and Billing Service come from 3rd Party Integrations.
5. After completing changes in Sandbox, repeat steps 1-4 to make the same changes to your OvDx LIMS Production environment ( https://lab.ovation.io)
Add/Edit Billing Rules (3rd Party Integration Dependent)
Macros populated under the Billing Rules tab by 3rd Party Integration representative(s) enable billing for test panels. This step is dependent on your 3rd Party Integration requirements.
1. Click the Billing Rules tab

2. Click Choose the appropriate option based on your goal
A. Click the green “Add new” button to add an individual Billing Rule
B. Click the pencil button to edit an existing Billing Rule
C. Click the trash can button to delete an existing Billing Rule

3. Enter or alter the relevant Billing Rule details, see list below for explanation of fields
- Test Panel Code - Must match the panel code that is listed in the OvDx LIMS Test Panels Page
- Procedure Code - The name of the macro or the individual CPT Code associated with the Test Panel from the 3rd Party Integration
- Code Type - Required for every Billing Rule with a Procedure code (macro or cpt)
- Insurance Group - Applies a Billing Rule to a specific Insurance Group only. If no Insurance Group is listed, then the Billing Rule will apply to all Insurance Providers/Carriers
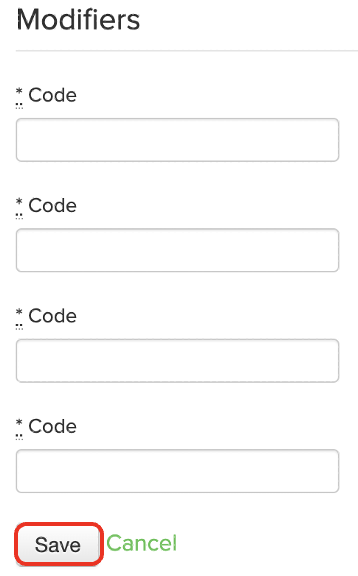
- Max Units, Modifiers, and Profile ID - Defined by 3rd Party Integrations
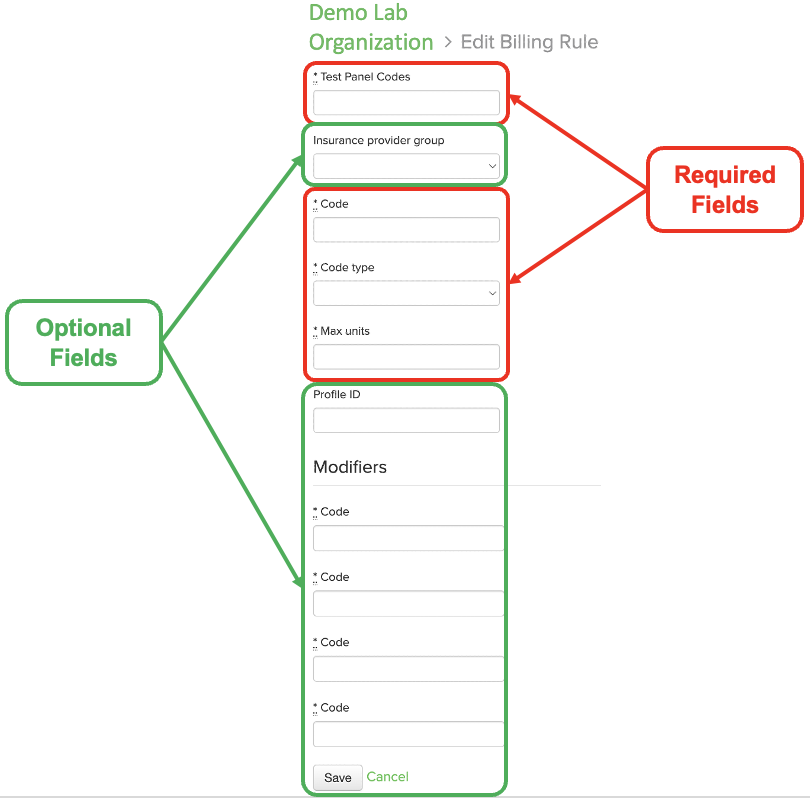
Tip: Test Panel code, Code, Code Type, and Max Units are required fields. Optional fields include Insurance Provider Group, Profile ID, and all “ * Code ” fields listed under Modifiers.
4. Click save
5. After completing changes in Sandbox, repeat steps 1-4 to make the same changes to your OvDx LIMS Production environment ( https://lab.ovation.io)
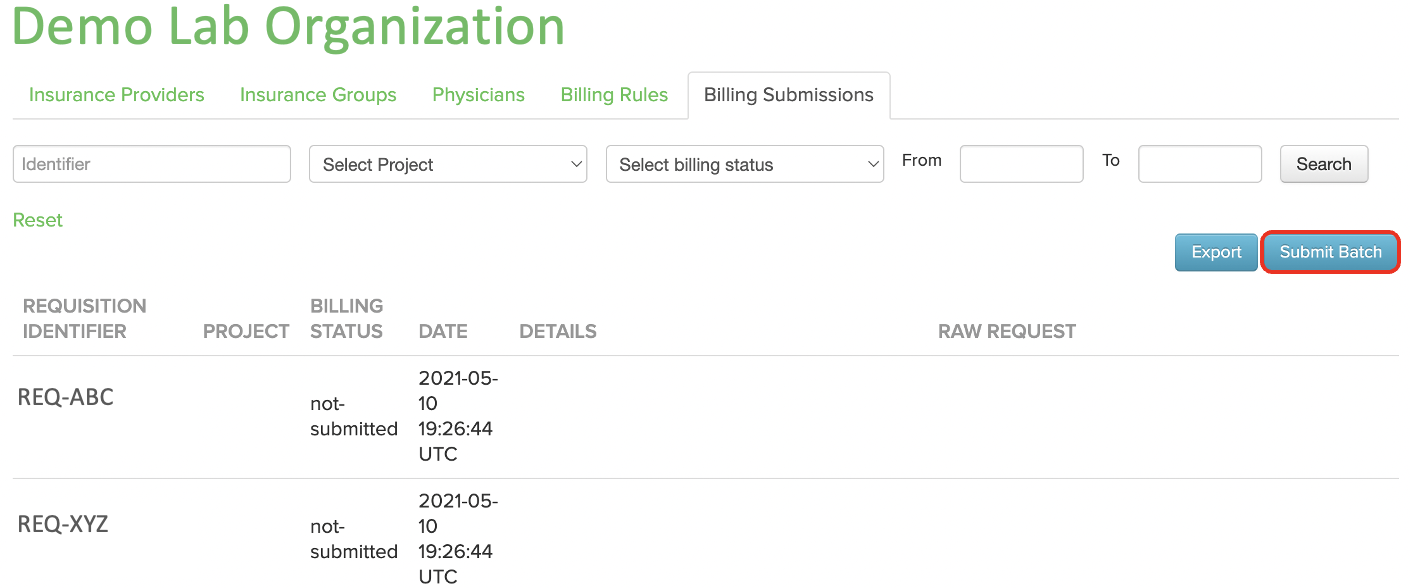
Check Billing Submission Log (Optional)
The Billing Submissions Log feature allows for monitoring Billing Submissions and resubmission of Billing Events. There is a more comprehensive Billing Event Log available within the OvDx LIMS. The feature allows users to…
- Use Search Filters to review Billing Submissions
- Export Billing Submissions
- Submit a Batch of Billing Events
Note: Checking the Billing Submissions Log is an optional part of Implementation. Use the feature depending on your billing monitoring, and your 3rd Party Integration(s), needs.
Search Log
Users can use the Search Filters under Billing Submissions to locate records of interest

1. Enter all relevant Search Filters for your search
- Use the Identifier Filter to narrow search for a specific, or partial, Requisition ID
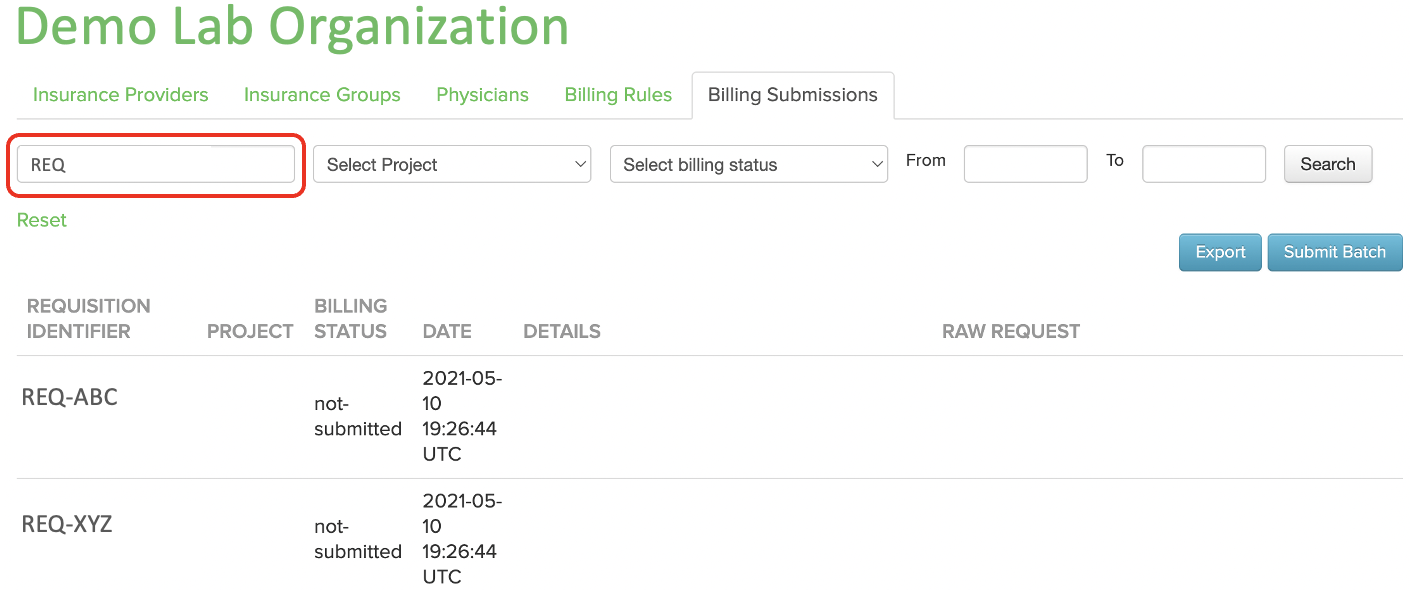
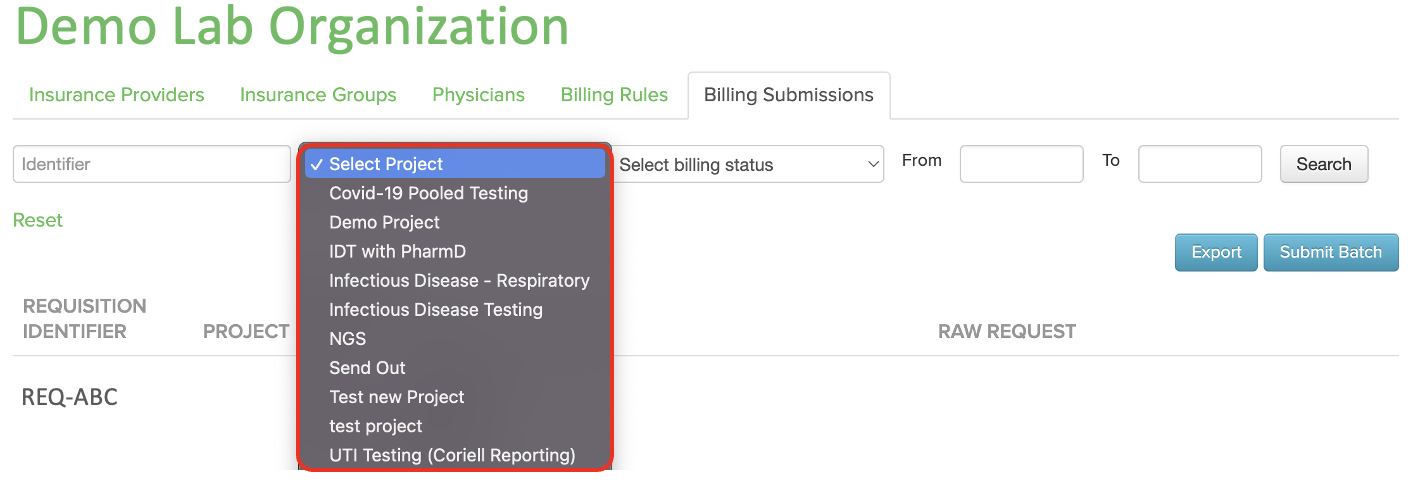
- Use the Select Project Filter to narrow search to a specific project
- Use the Select Billing Status Filter to narrow search to a specific Billing Status

- Use the Date Range Filters to narrow search to results obtained within the selected Date Range

2. Hit Search to apply all Search Filters

This will return only relevant results. The filtered data can then be exported.Tip: Clicking “Export” after filtering Billing Submissions will create a CSV file with only filtered results.
Export Log
The Export function under the Billing Submission tab can be used to export records of Billing Submissions.
- From the ‘Billing Submissions’ tab, click Export

- The Export file will contain the following column headers

Submit Batch of Billing Events
The Submit Batch button allows resubmission of multiple requisitions for billing by bulk CSV import.
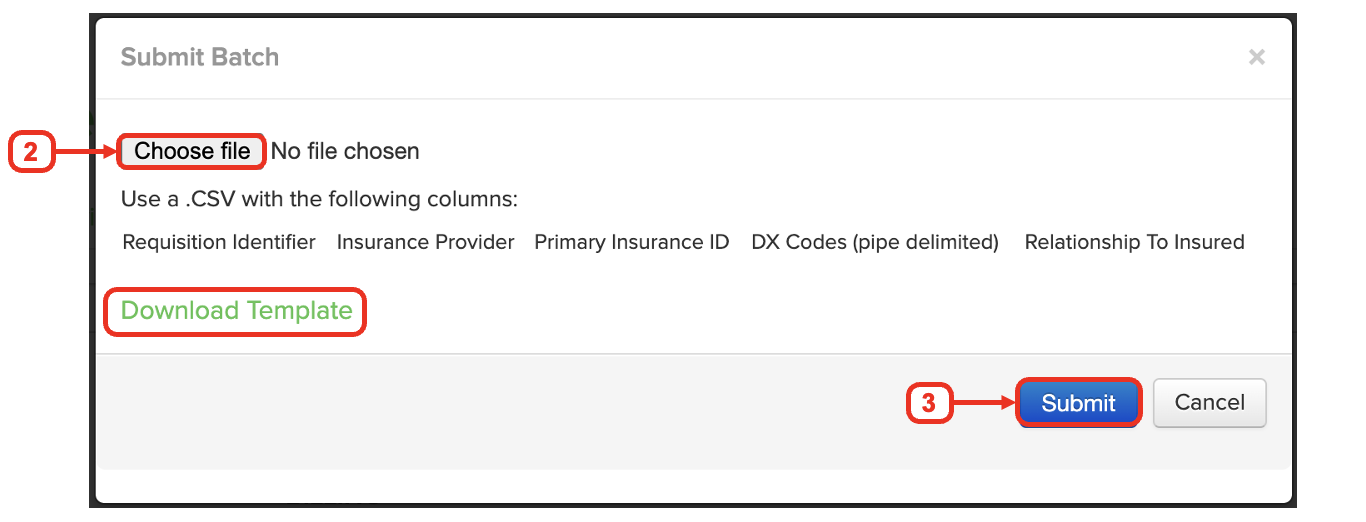
1. Click Submit Batch
2. Click “Choose file” and select your populated CSV file
Tip: Click Download Template file to get a CSV template
3. Click “Submit” button
This will resubmit the requisitions. Users can then check the Billing Submissions tab to see the status for the resubmitted requisitions.