Receiving Samples
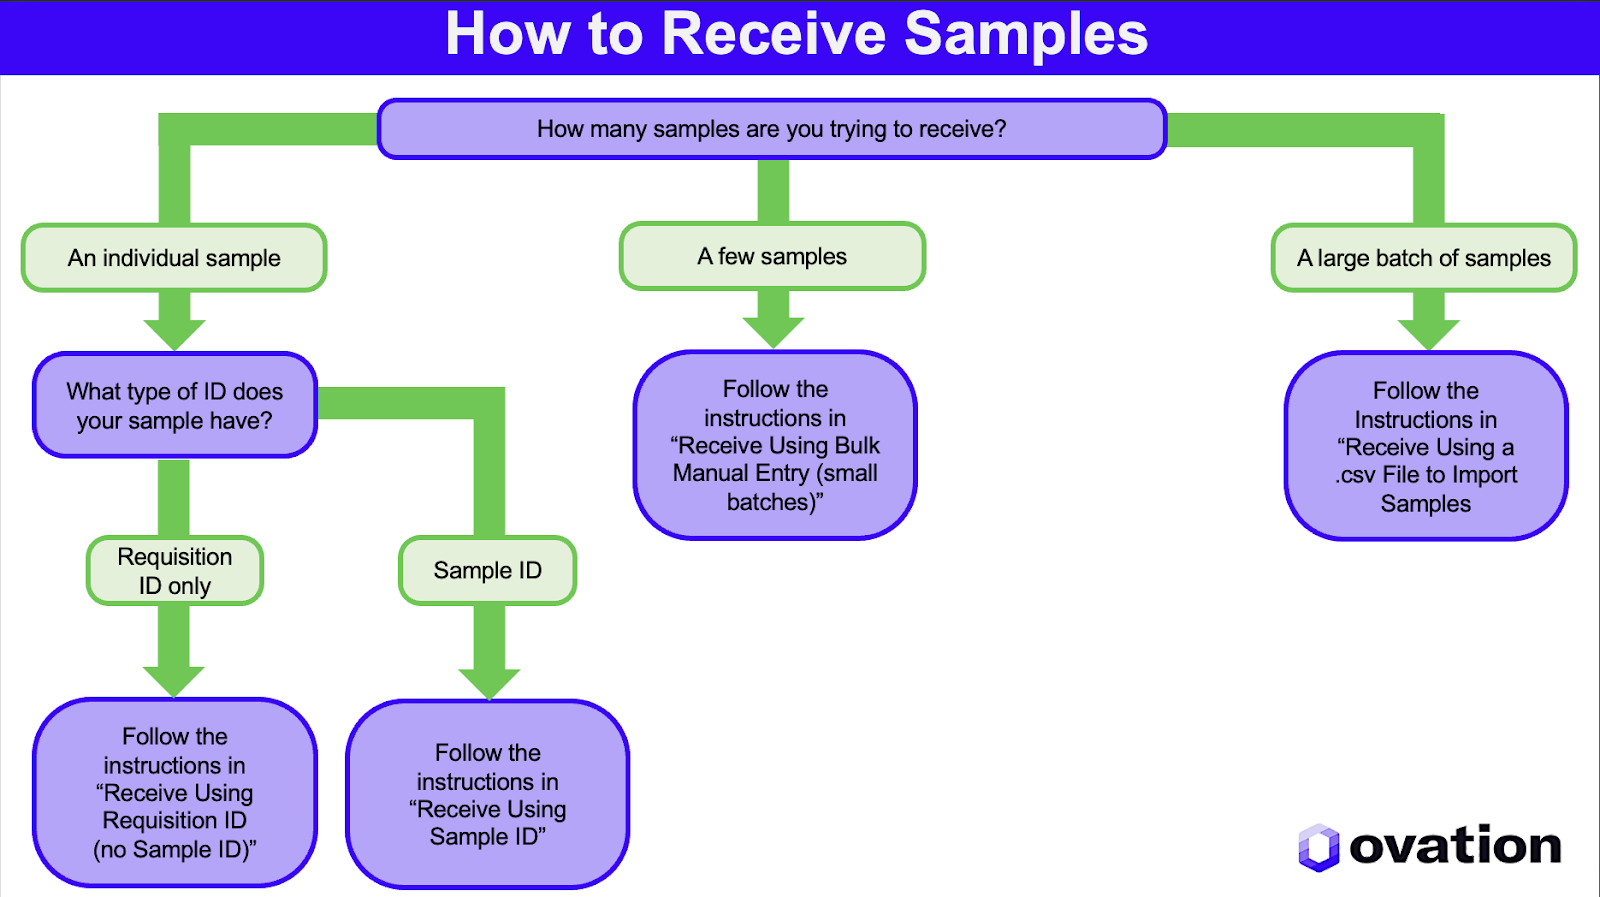
This article describes how to record the receipt of samples on existing Orders/Requisitions in the Ovation LIMS. Use the chart below to determine your lab’s best sample receiving method, then navigate to the appropriate instructions using the link(s) provided below the chart.
Note: If you are manually entering requisitions and receiving samples at the same time, please refer to the Adding a New Requisition article.
Receiving an Individual Sample
Use this method when you have a low volume of samples coming into the lab. The type of ID associated with your sample will help you determine how to receive the sample. Samples with an existing Sample ID can be found and received from the Global Samples Page. Samples with an existing Requisition ID, but no Sample ID, can be found and received from the Global Requisitions Page.
Receive Using Sample ID
1. Click the Samples tab in the top dashboard to navigate to the Global Samples Page
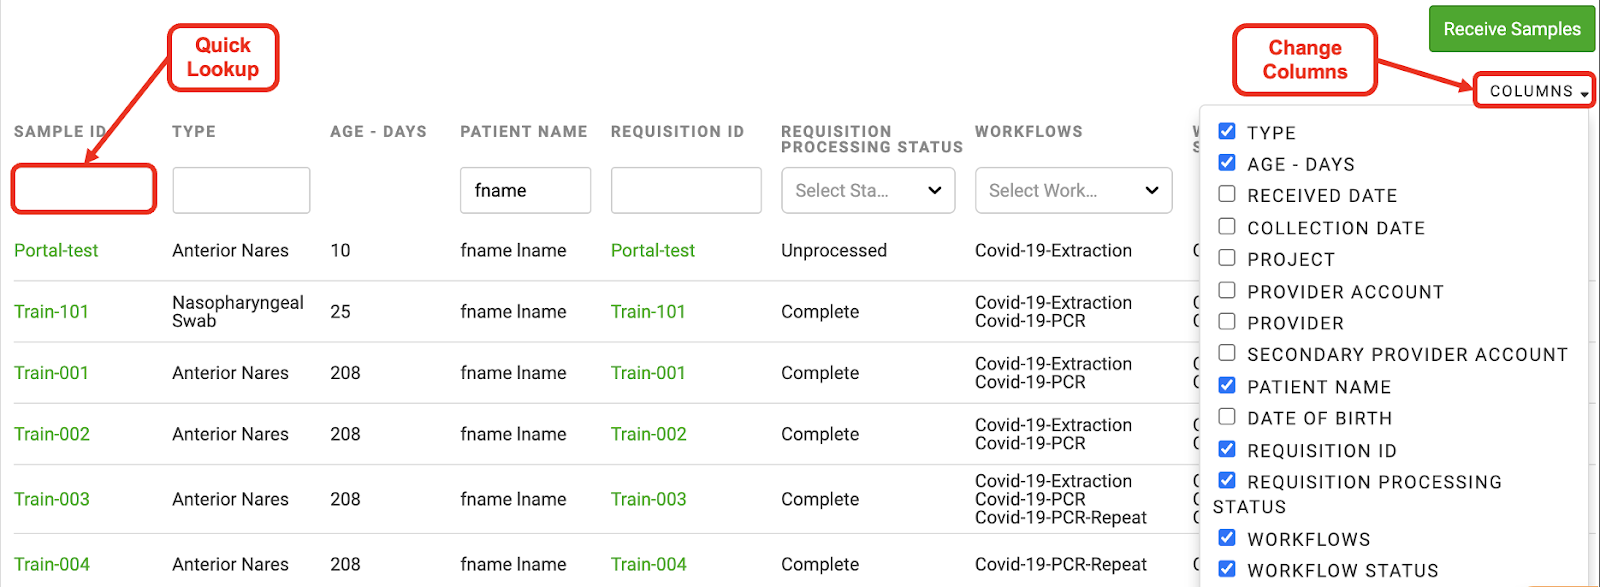
A table will display with all samples and filterable fields
Tip: You can use the Sample ID field to enter your Sample ID for a quick lookup. You can also click on the columns dropdown menu to select which filterable fields display. Selected fields have a blue checkbox. Once you have your sample pulled up, skip to step 3 below.
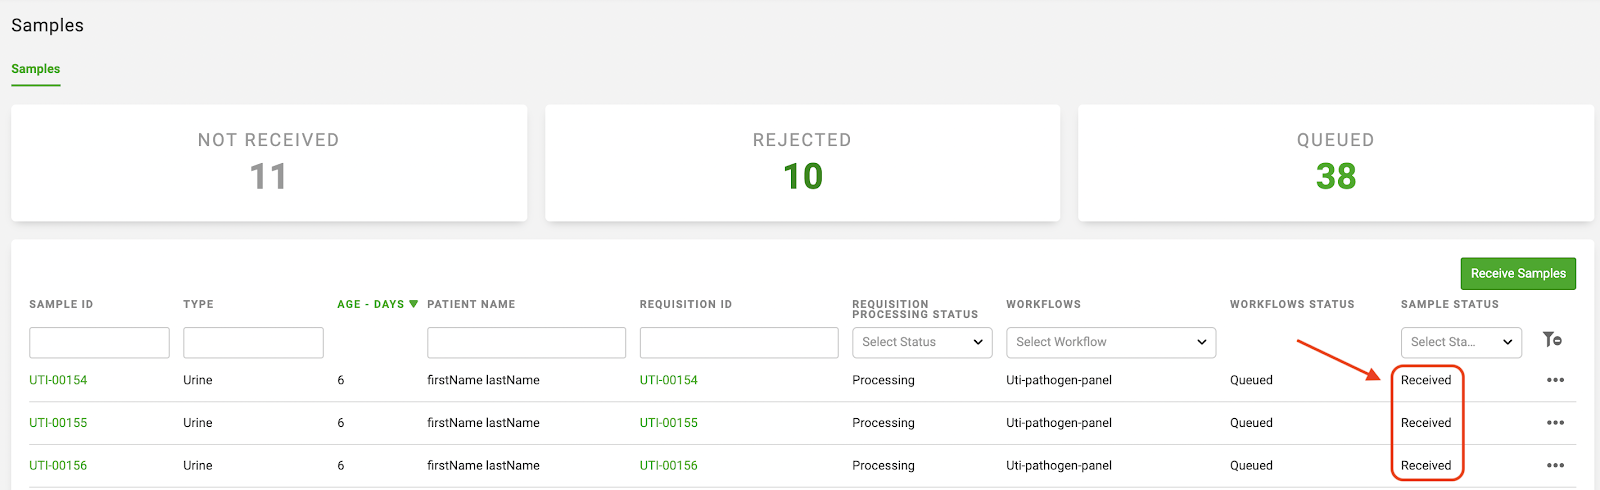
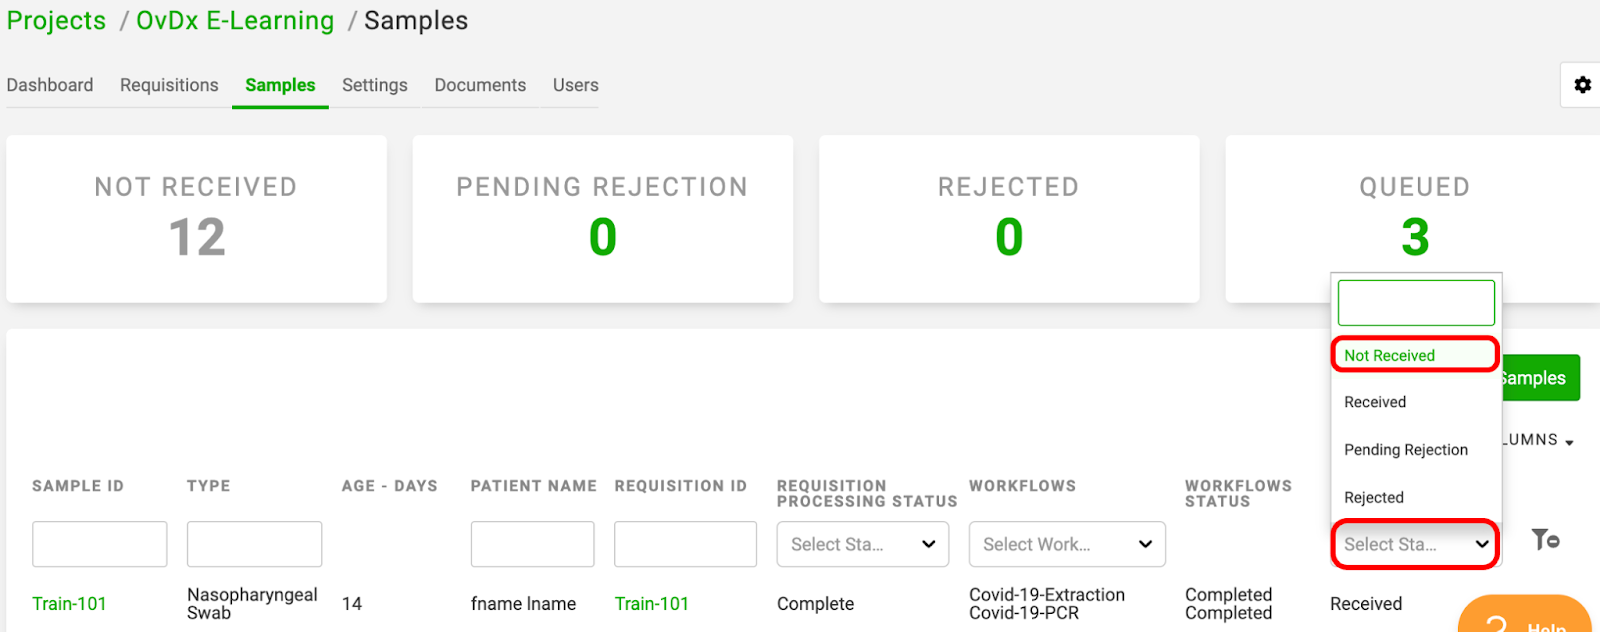
2. Click the “Sample Status” dropdown and choose “Not Received”
3. Click the green Sample ID of the sample you wish to receive

Tip: If you are receiving multiple samples individually (a small number), you can open a new window by right clicking on the Sample ID and receive the individual sample in a new window. This allows you to return to your original window to receive your remaining samples. Alternatively, if you have a large number of samples to receive, you can use the Bulk Sample Receipt method described later in this article.
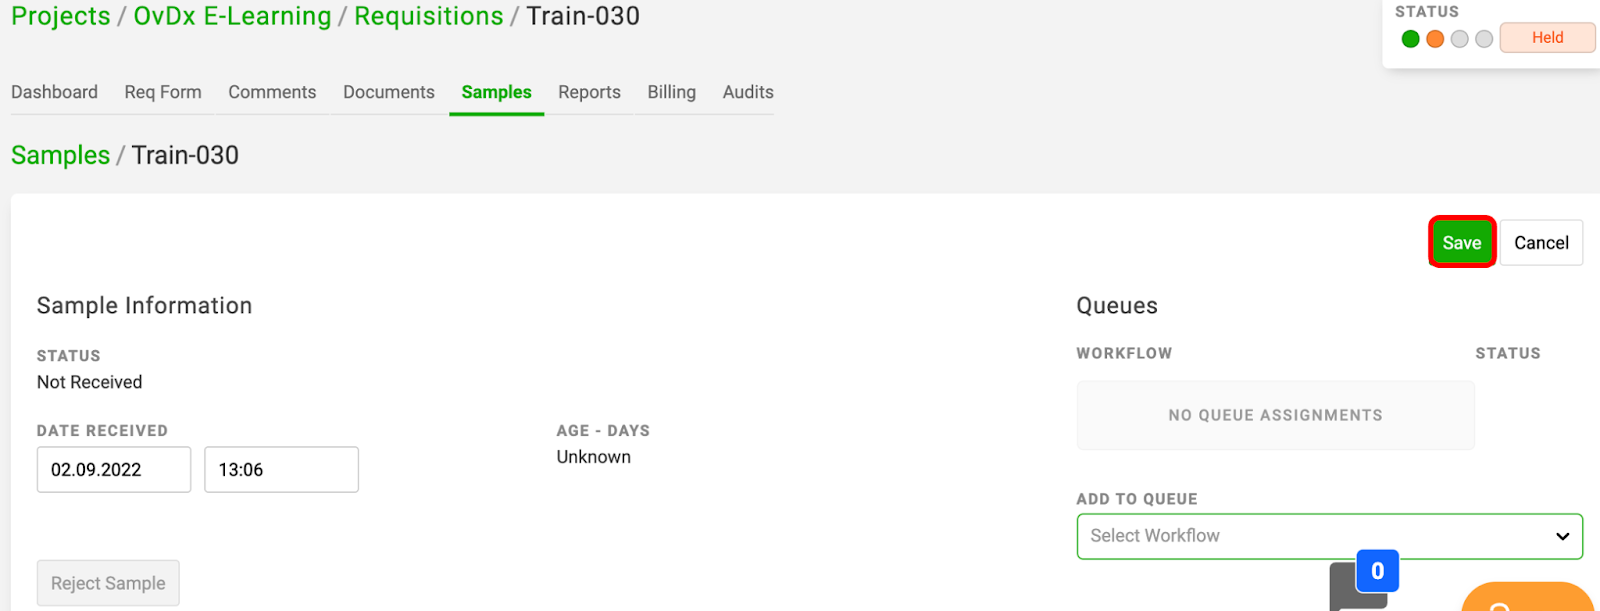
4. Enter the Received Date/Time

Tip: You can tab through the Date/Time fields to enter the current date/time
5. Hit the green Save button
Receive using Requisition ID (no Sample ID)
1. Click the Requisitions tab in the top dashboard to navigate to the Global Requisitions Page
Tip: You can use the Identifier field to enter your sample’s Requisition ID for a quick lookup. You can also click on the columns dropdown menu to select which filterable fields display. Selected fields have a blue checkbox. Once you have your sample pulled up, skip to step 4 below.

2. Click the “Status” dropdown and choose “Overall Status”

3. Click the sub-status dropdown menu and choose the “Held” status
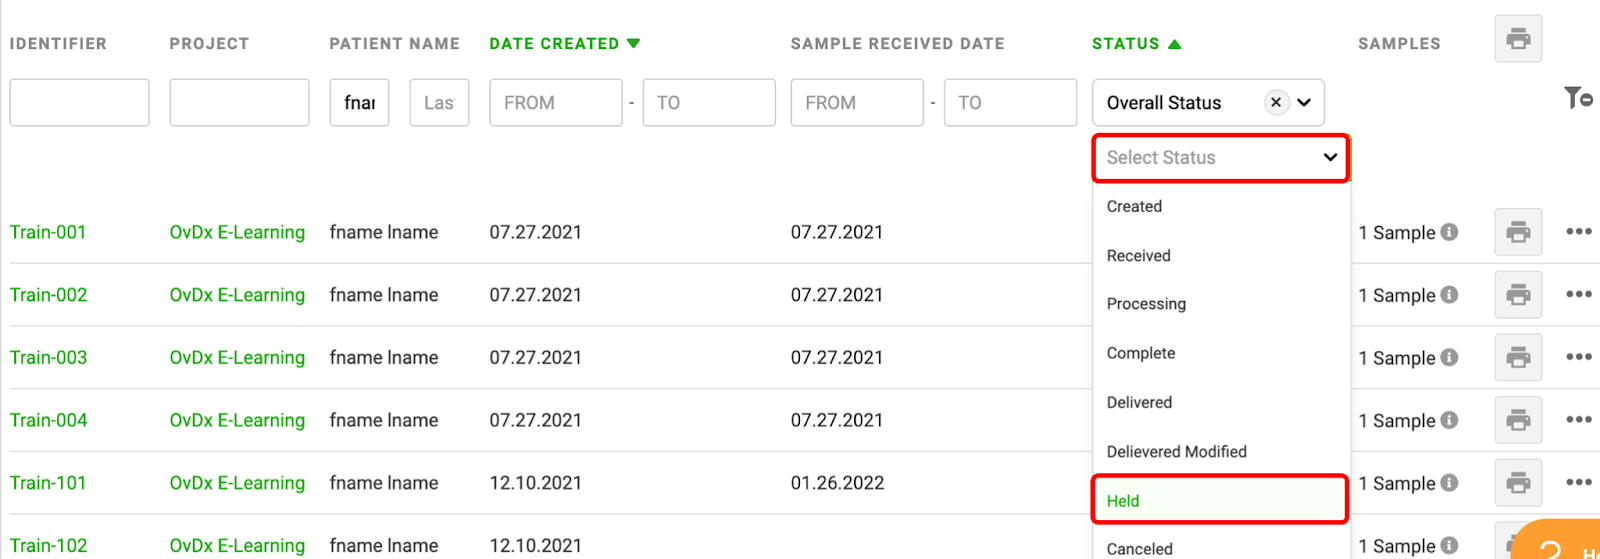
4. Click the green Requisition Identifier of your sample of interest

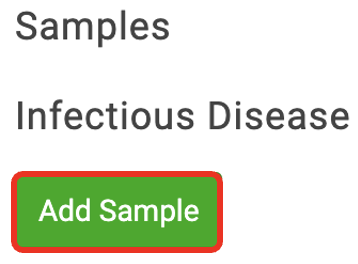
5. Click the Req Form tab, then scroll down to the Samples section

6. Click the green Add Sample button
7. Fill in the sample details
A. Enter the Sample ID and Sample Type (these may be auto-selected for you depending on your Requisition Form Template Settings)

B. Enter the collection date/time

C. Select a container type (this may be auto-selected for you depending on your Requisition Form Template Settings)

D. Answer the question below to add the Container ID
Do you already have an existing Container ID?
Yes, the sample has an existing Container ID…
- Leave the toggle set to green
- Optional: add a current location
- Click the green Assign Container button
No, the sample does not have an existing Container ID…
- Leave the toggle set to gray
- Type or barcode scan the Container ID (123 shown)
- Optional: add a current location
- Click the green Assign Container button

E. Click the Received toggle to green and enter the received date/time
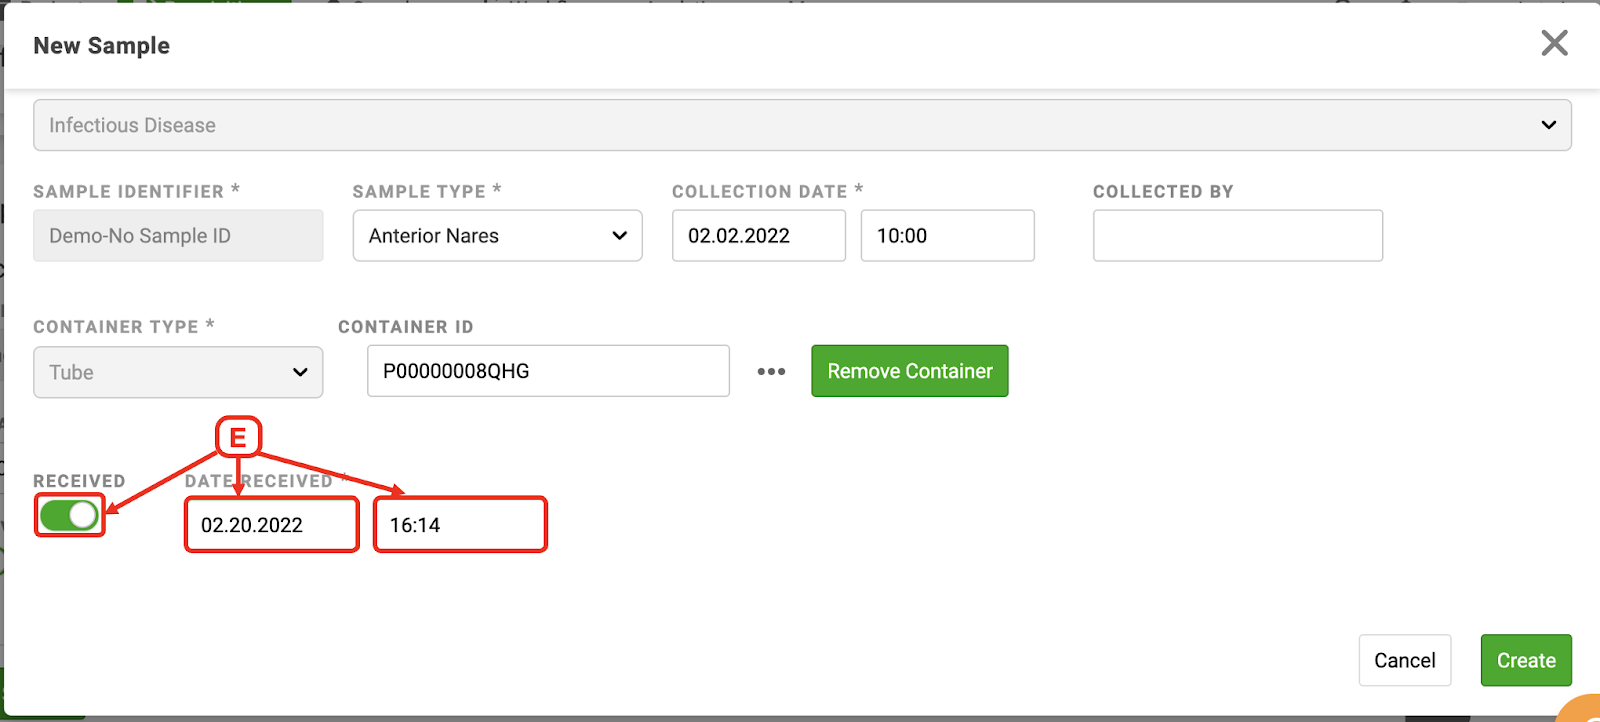
Tip: You can tab through the Date/Time fields to enter the current date/time
F. Hit the green Create button

8. Scroll up to the top of the requisition form and click the green Verify button, if displayed. If there is no Verify button, click the green Save button

The sample’s status will now be “Received”. The sample will also automatically appear in the appropriate Workflow queue(s).
Bulk Sample Receipt
Use this method when you have a high volume of samples coming into the lab and know the Sample ID or Container ID associated with the sample. This method may be used directly to receive samples with a barcode scanner.
- Receive Using Bulk Manual Entry (small batches)
- Receive Using a .csv File to Import Samples (large batches)
Receive Using Bulk Manual Entry (small batches)
1. Click the Samples tab in the top dashboard to navigate to the Global Samples Page
2. Click the green “Receive Samples” button

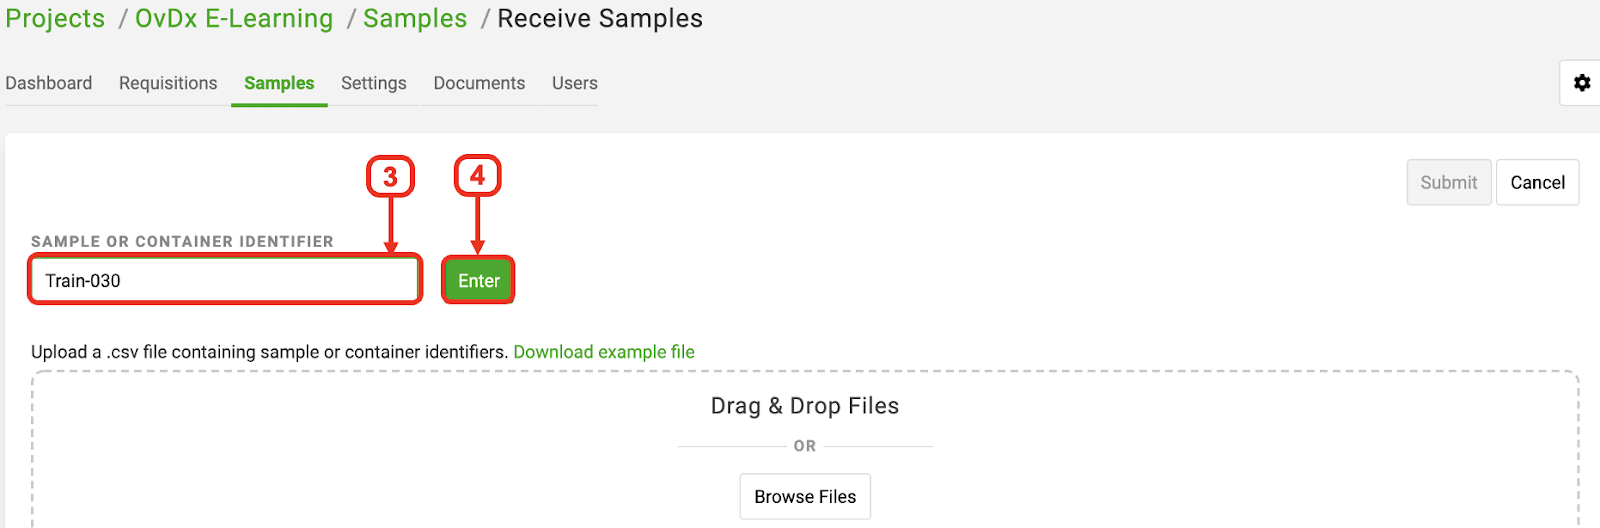
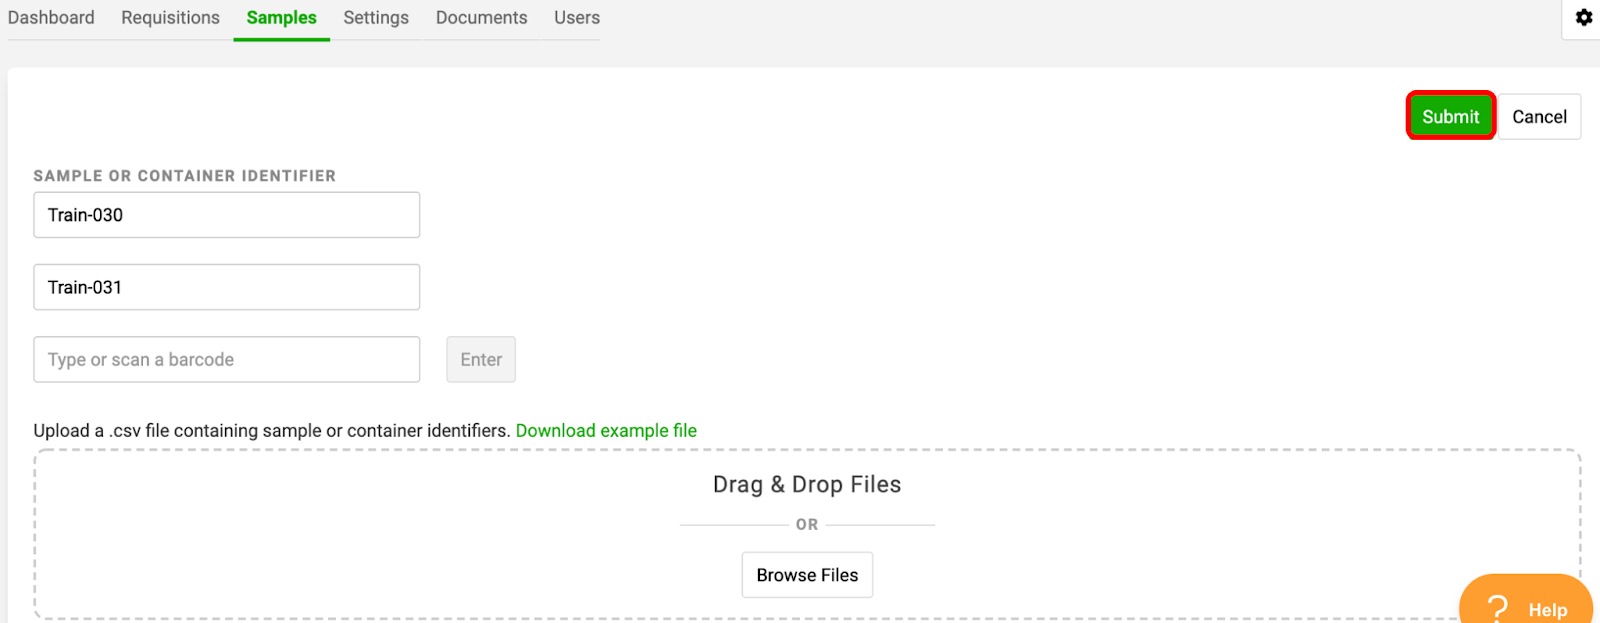
3. Scan or type the Sample or Container ID of the sample you wish to receive
4. Hit the green Enter button
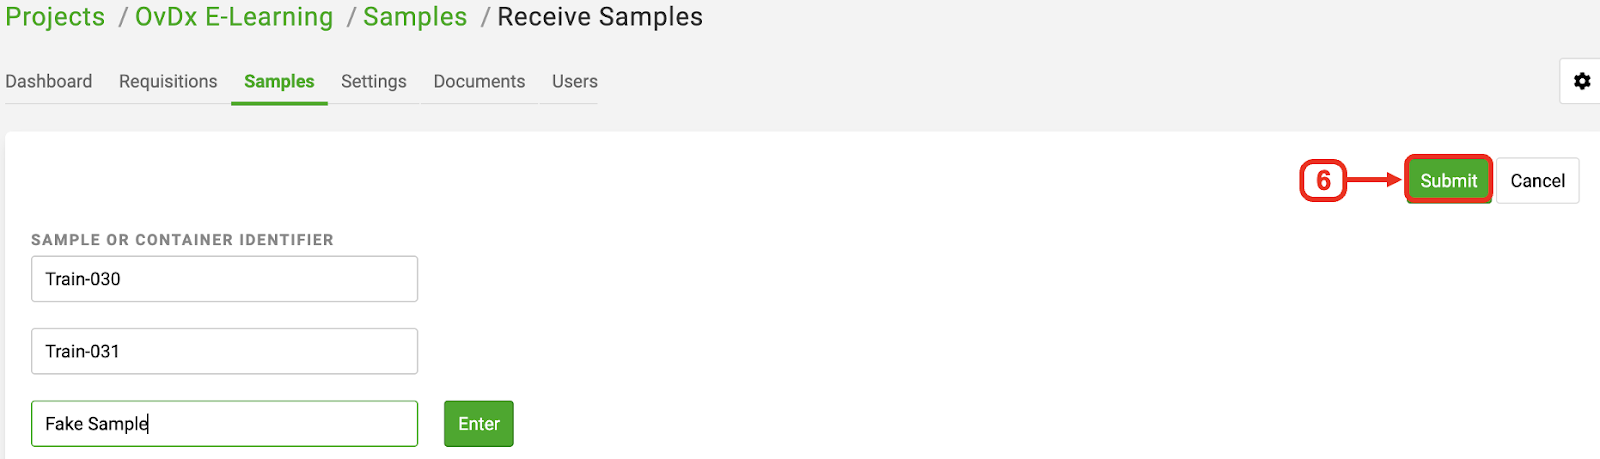
5. Repeat steps 3 and 4 for all samples in the batch
Note: You must hit Enter after scanning of each sample
6. Click the green Submit button
7. Skip to Confirm Samples in the Batch below
Receive Using a .csv File to Import Samples (large batches)
1. Click the Samples tab in the top dashboard to navigate to the Global Samples Page
2. Click the green “Receive Samples” button
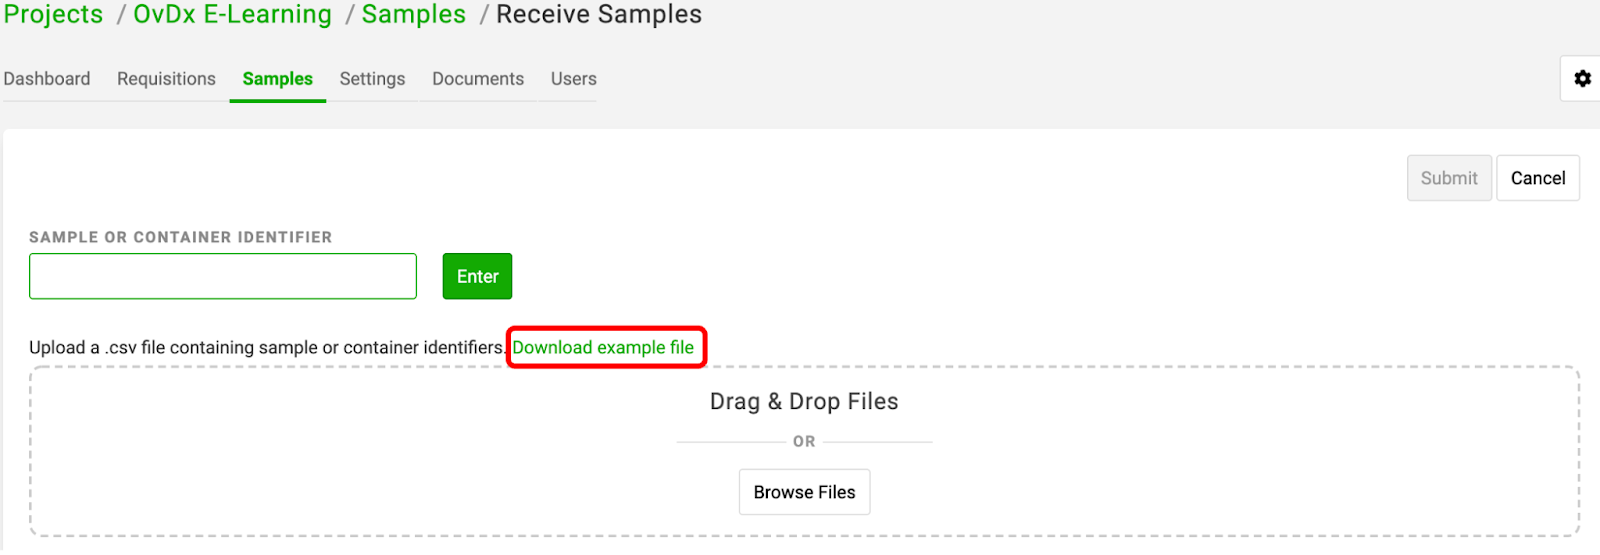
Tip: Click the green Download Example File on the Receive Samples page to use a template of the import file
3. Type or scan the Sample or Container IDs of all samples into your spreadsheet

Note: Your file must have the column header “Identifier” above your list of Sample/Container IDs.
4. Save your file as a .csv (comma separated values or comma delimited)
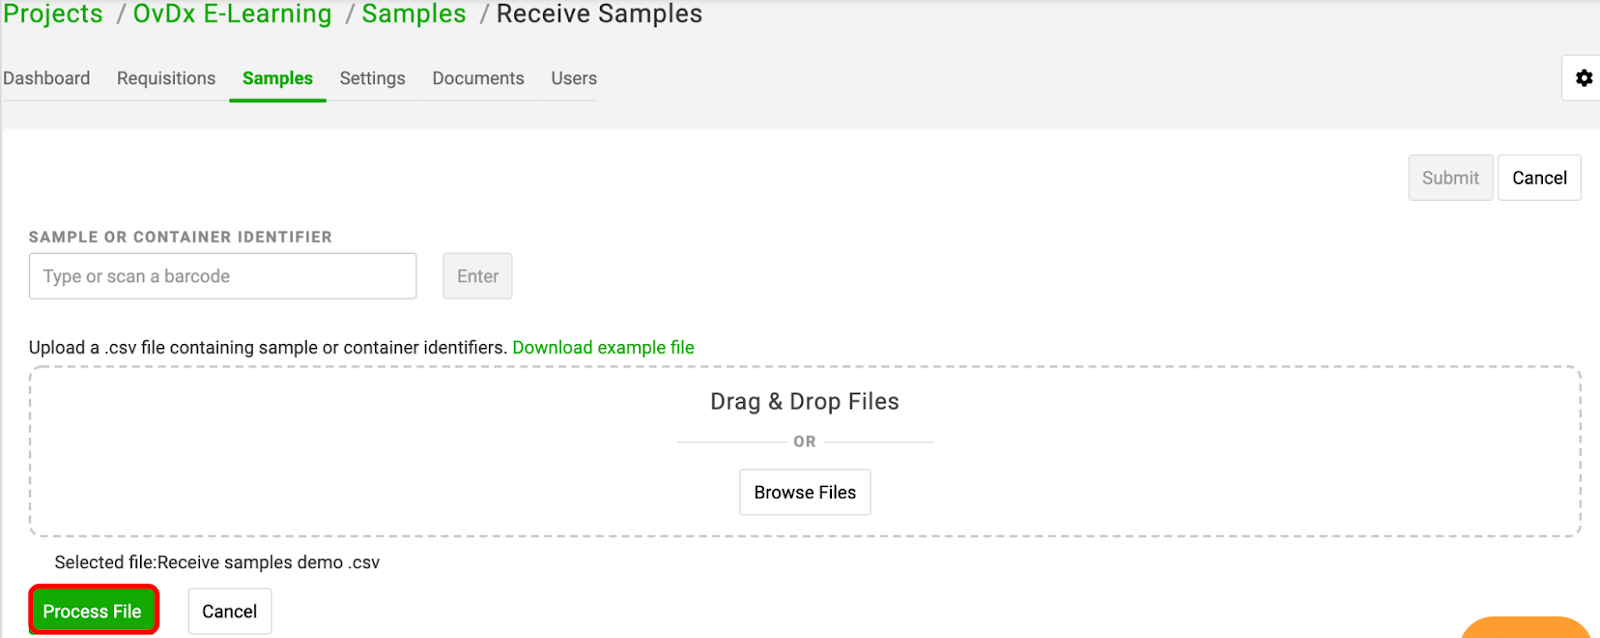
5. Drag and drop or click Browse Files and select your file to upload
6. Click the green Process File button
7. Your sample list will display after processing the import file. Click the green Submit button
Confirm Samples in the Batch
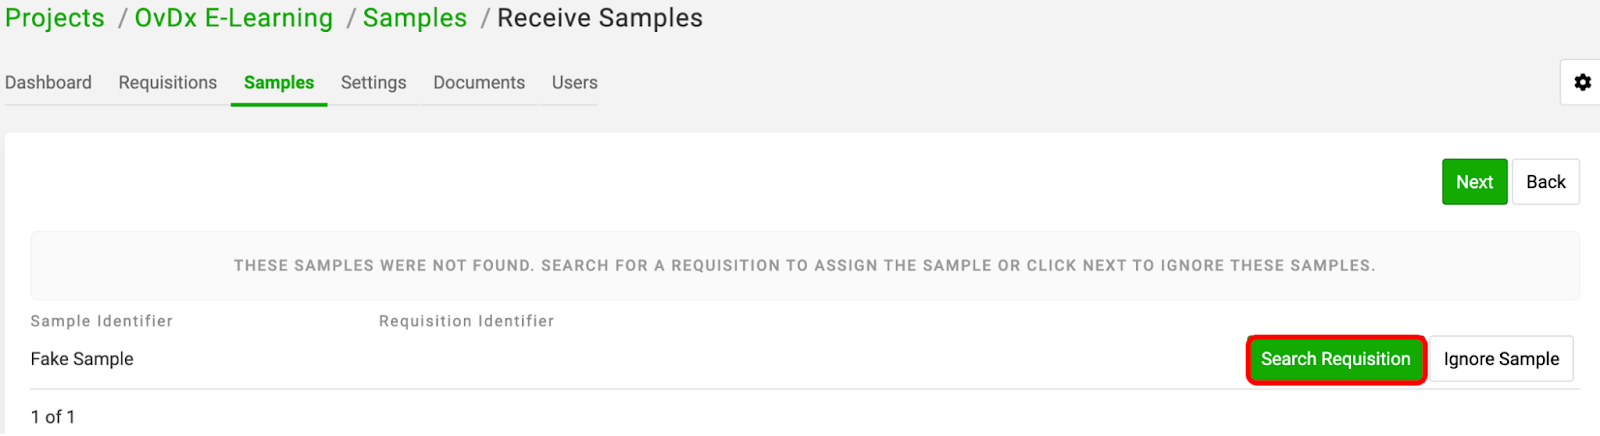
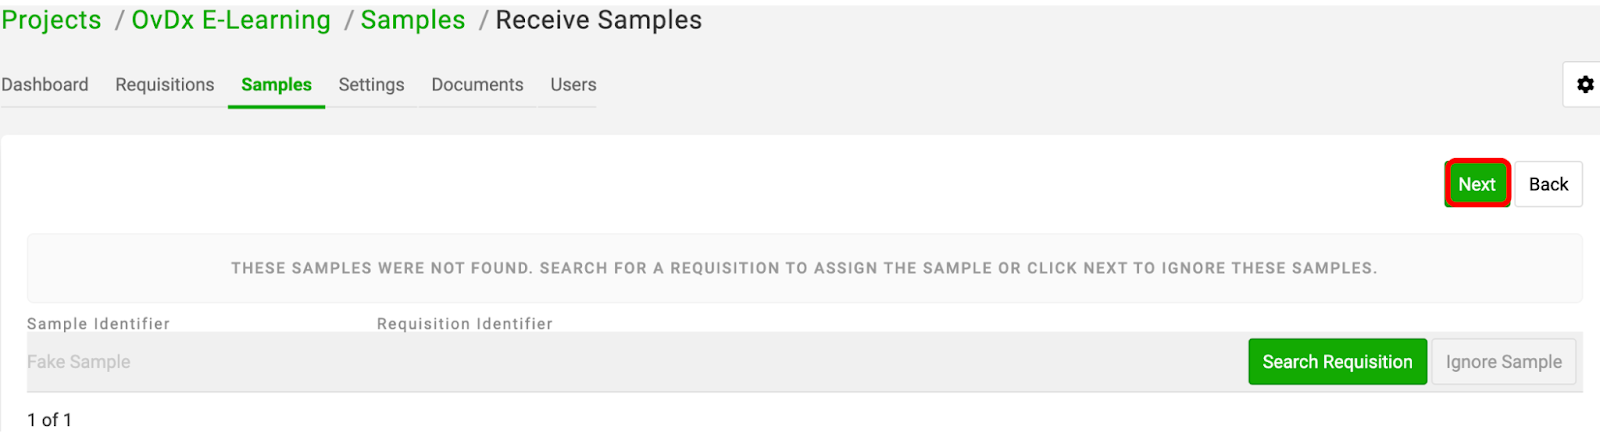
You must review any samples that were not found in the system in order to confirm the batch. If all of your samples were found, skip to Receive the Batch.
1. If a sample is not found, answer the following question:
Do you want to try to look up the missing sample by other identifying information (patient details or Requisition ID) or ignore the missing sample and exclude it from the batch?
A. Click the green Search Requisition button
B. Click the dropdown menu and select to search by Requisition ID or Patient Details
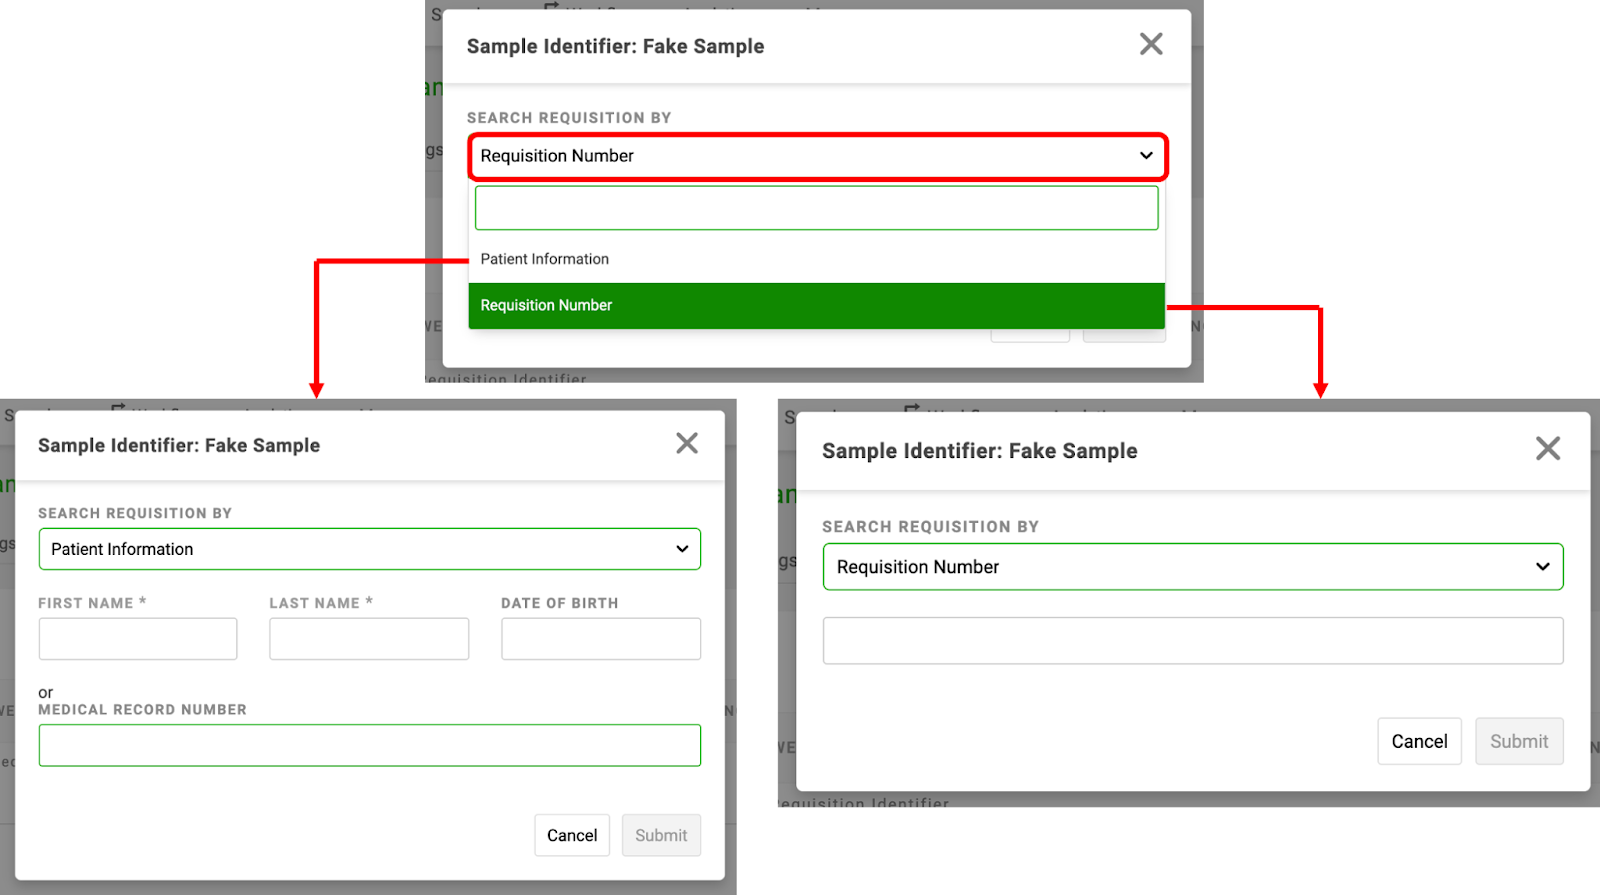
C. Enter the information in the Sample lookup modal and hit the green Submit button
D. Repeat for all samples that were not found
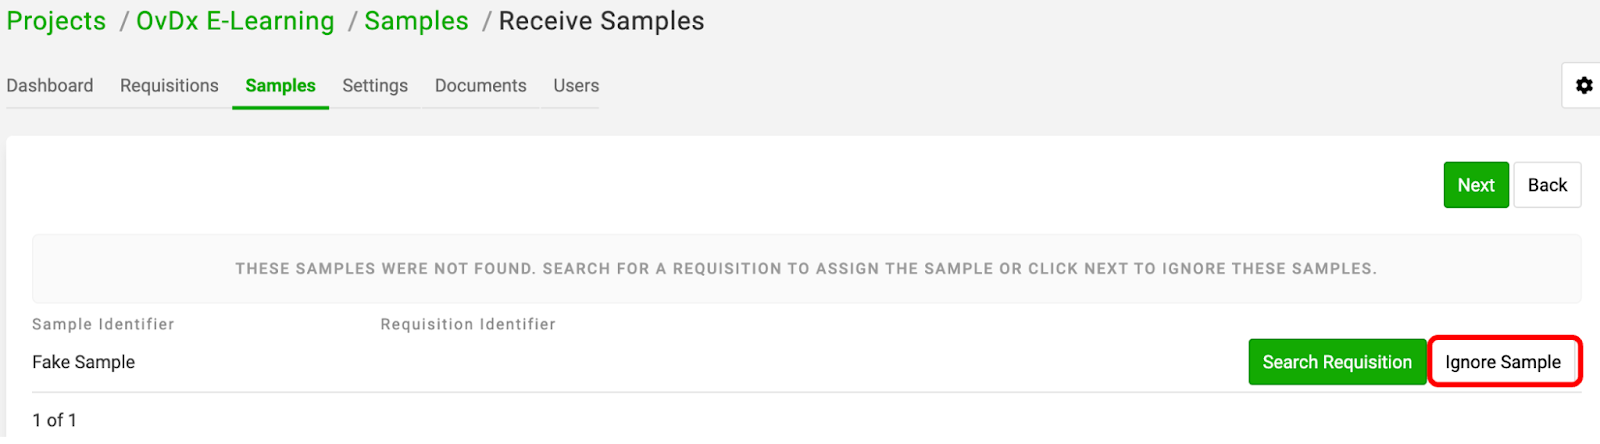
2. Click the green Next button when you have finished reviewing all missing samples in the batch
Receive the Batch
1. Click the green Mark Received button

2. Enter the date and time received in the Receiving Modal
3. Hit the green Receive button
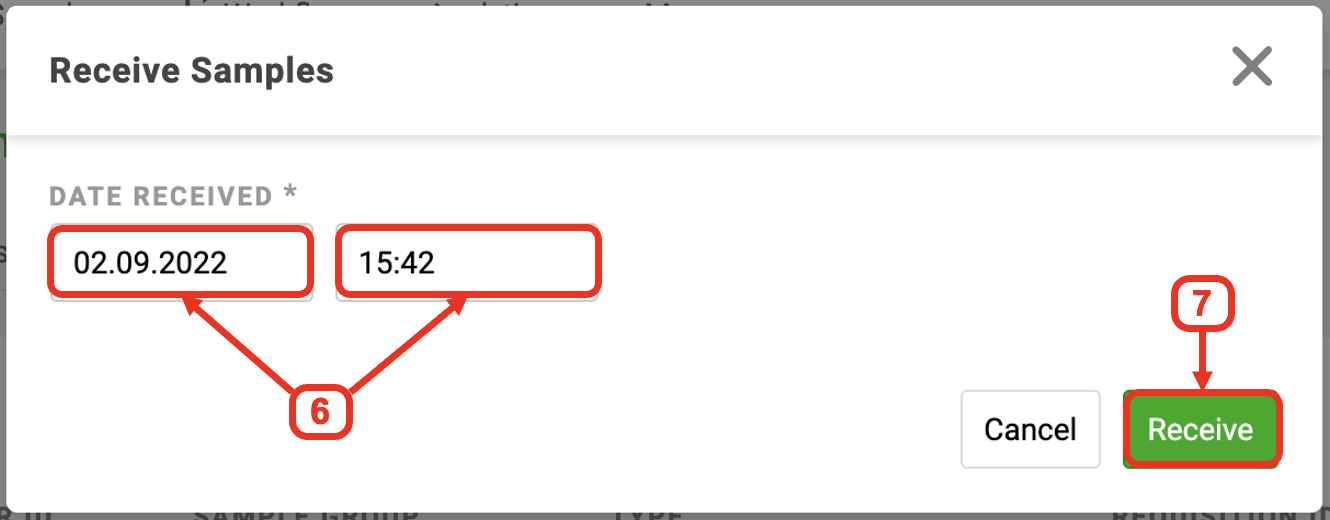
Tip: You can tab through the Date/Time fields to enter the current date/time
You will now see “Received” as the sample status