
Adding a Provider Account
This article describes steps for setting up your Provider accounts and is organized as follows:
- Adding provider accounts manually
- Importing provider accounts
- Adding providers
- Adding provider contacts
- Associating order forms to provider accounts (optional)
- Video walkthroughs showing how to add provider accounts and provider contacts
Important: The Sales Rep MUST be added before creating the Provider Account in OvDx. If your lab does not have Sales Reps, you must create a place-holder sales rep before adding any provider accounts. For more details, please see Setting up Accounts - Full Guide or Adding a Sales Rep article in our knowledge base.
Adding Provider Accounts Manually
1. Go to More > Business > Provider Accounts

2. Click the green “Add Provider Account” button

3. Choose “Add New Provider Account,” then fill in the account information:
A. Fill in the demographic information, noting that the account name is a required field.
Tip: Select the “Use Street Address” checkbox if the mailing address is the same as the street address. The mailing address is what will be used as the auto-fill option on requisition forms.
B. Select the Sales Rep(s) who will be responsible for this account.
C. Choose whether the account will receive faxed and/or emailed reports under Report Delivery Preferences.
Tip: If adding a fax number, enter only numbers (no dashes) and be sure to include the country code. For example, add a “1” at the beginning of US fax numbers.
Tip: For any contacts to receive emailed reports, the Email Report Delivery Preference must be turned on at this Provider Account page, as well as on the contact page - see Adding Provider Contacts, below.
D. Click the green “Create” button.

Importing Provider Accounts
1. Go to More > Business > Provider Accounts
2. Click the green “Add Provider Account” button
3. Choose “Import Provider Accounts.”
A. If a template file is needed, click “Download Template File”
B. Drag & drop or Browse to upload a .csv file with the provider account information
C. Click the “Submit” button

Adding Providers
In OvDx, a Provider is defined as the person ordering a diagnostic test for a patient. Providers will need a National Provider Identifier (NPI), which is a unique 10-digit identification number issued to health care providers in the United States by the Centers for Medicare and Medicaid Services (CMS). Non-US providers can also be added by selecting the appropriate category from the orange License Registry drop down menu.
1. Select the Providers tab to add providers to this account.
2. Click the green “Add Provider” button.

3. Enter the NPI# in the search box provided (the Provider name will appear automatically once a valid NPI# is entered).
4. Click the green “Create” button

Note: If your Provider doesn’t have an NPI, you can select “ex-US / clinical trial” from the License Registry drop-down and fill in any registration number (will not be validated) and the Provider Name.

Adding Provider Contacts
A Provider Contact is an individual that will be given Portal access on a Provider’s behalf
1. Select the Contacts tab to add provider account contacts
2. Click the green “Add Contact” button

3. Enter the contact information, noting that first name, last name, email and communication preference fields are required

4. Choose the appropriate role for this Provider Contact.
Note: The Provider Contact role determines if the contact can use the Portal Provider Signature feature. The Portal Provider Signature feature allows labs to require a signature from Providers or Provider Delegates for orders to be submitted. To enable this feature for your order forms, contact support@ovation.io
If you are using the Portal Provider Signature feature,
A. Click Role
B. Choose either the “Provider” or “Provider Delegate” role in the drop down menu
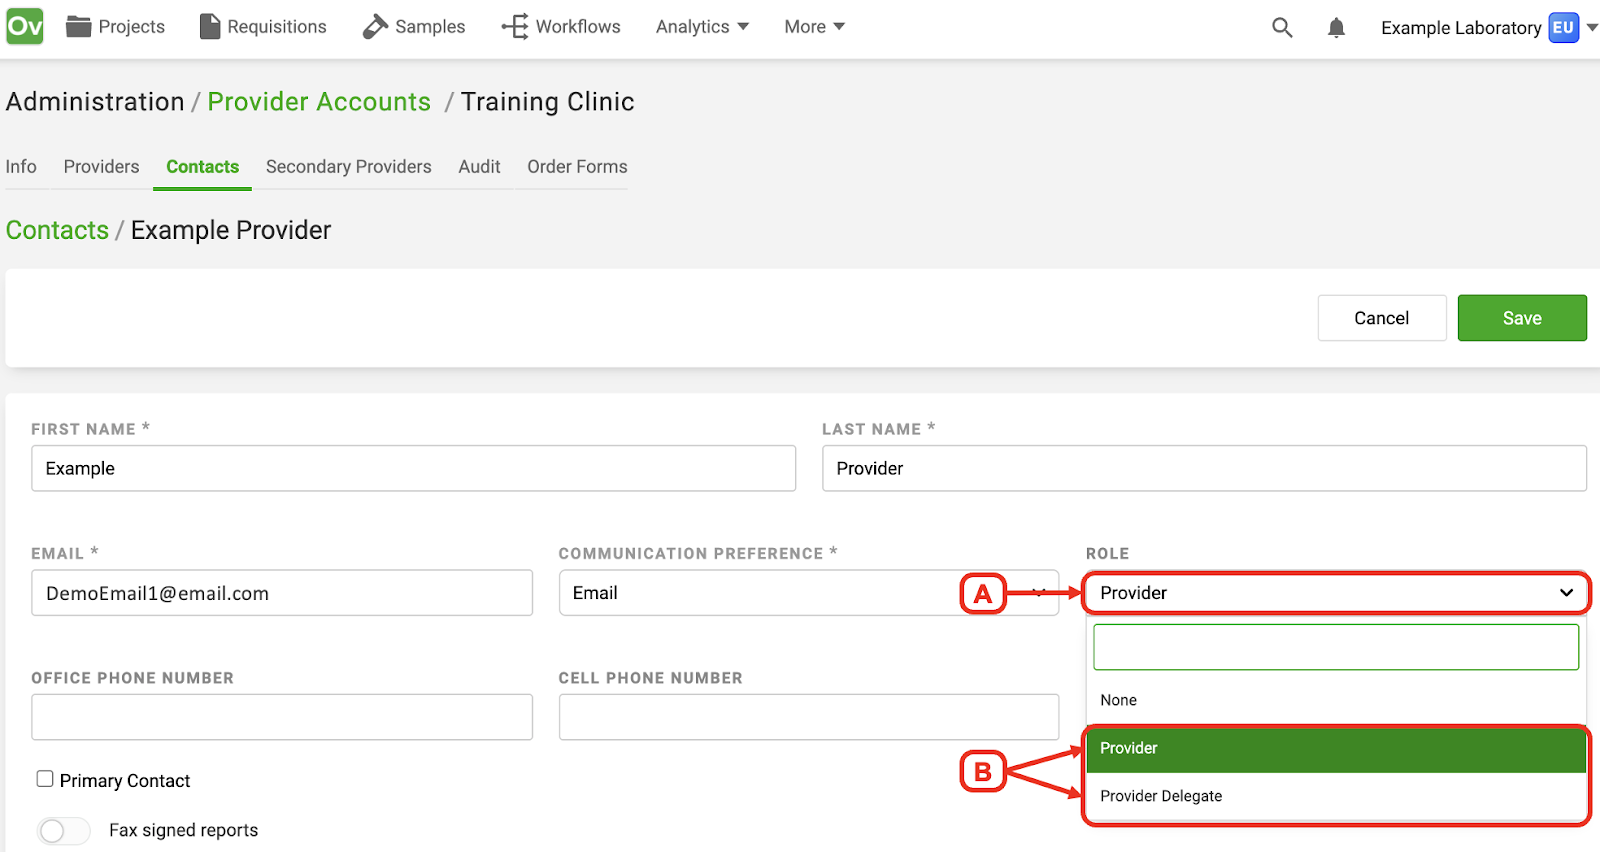
If you are not using the Portal Provider Signature feature, leave the Role as “None.”
5. If needed, select the Primary Contact checkbox to allow access to the Analytics page in the Portal
6. If reports should be delivered to this contact, select the delivery preference of Fax and/or Email
Note: If reports will be emailed to this contact, then the Email toggle must be turned on in this screen, as well as the Email toggle in the Info tab of the Provider Account - see step 4, above.
7. Associate Providers to this Contact in the Choose New Providers drop down menu
Note: At least one Provider must be associated in order for that contact to receive an email prompting them to set up their password for the Provider Portal.
8. Click the green “Create” button

Tip: If adding a fax number, enter only numbers (no dashes) and be sure to include the country code. For example, add a “1” at the beginning of US fax numbers.
Tip: Contact fields can be edited/updated after the new contact is created. If the email field is edited, a notification will be sent to that new email to prompt the contact to set up a new password for the Provider Portal.
Tip: Portal password emails can be resent by clicking the 3 dots to the far right of the contact on the Contacts page.
Prefer video format?
You can watch this 3 minute comprehensive video covering Provider Accounts.
Tip: Use the pop-out arrow on the top-right of the video screen to expand the video window.
You can also watch this 7 minute video covering Provider Contacts.
Tip: Use the pop-out arrow on the top-right of the video screen to expand the video window.
dashboard