Improved Provider Accounts Management - Setting Up Accounts Full Guide
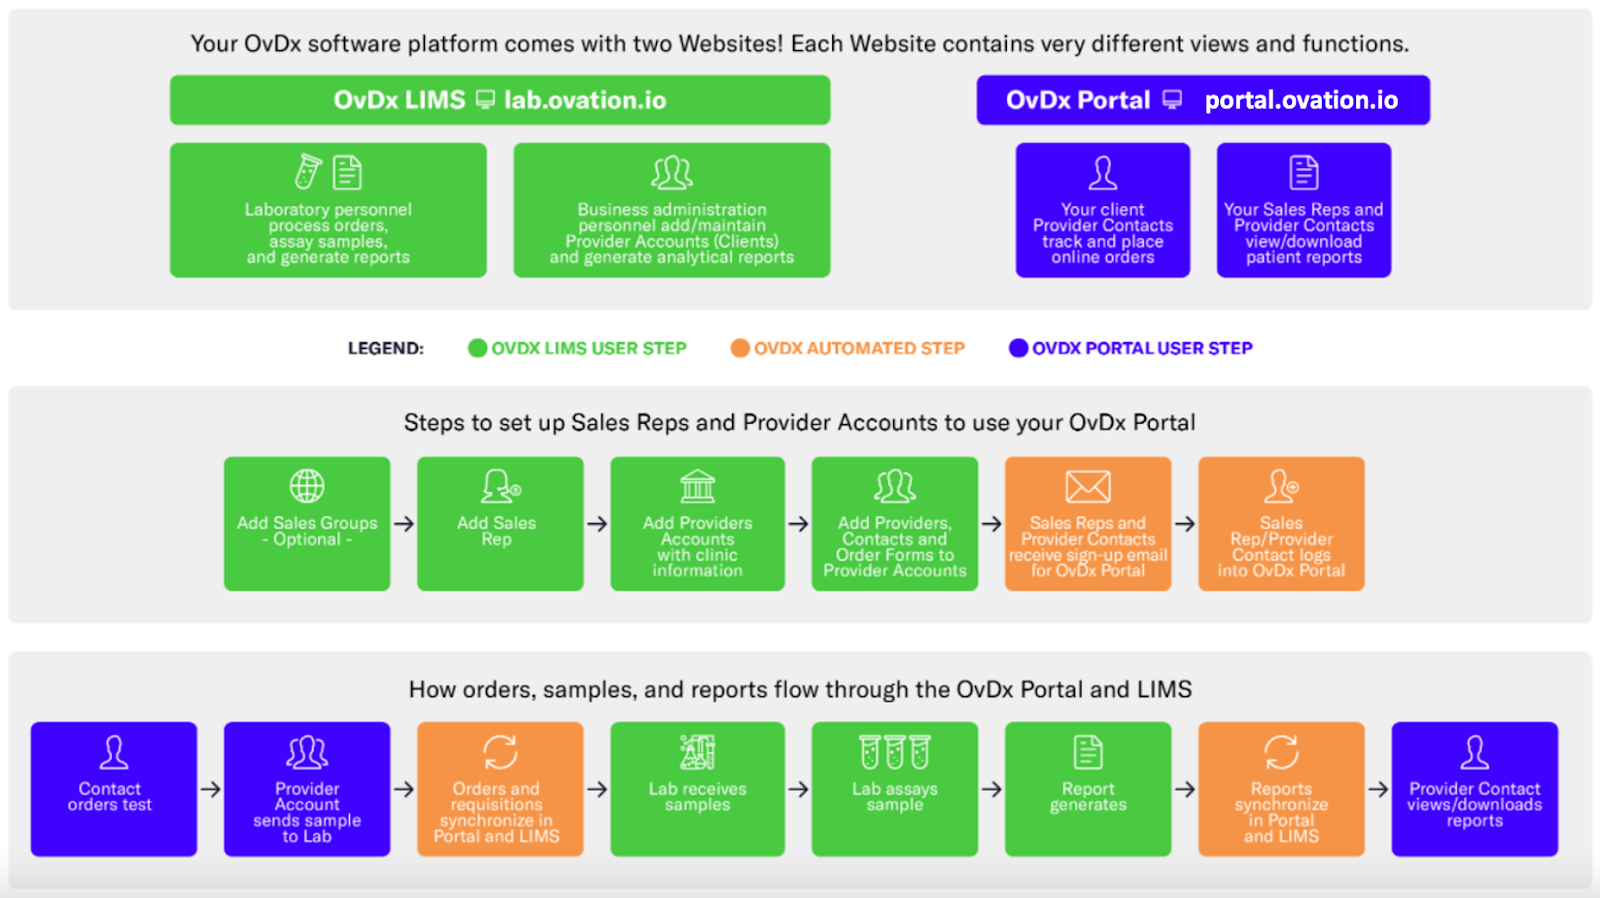
This guide describes the process for Business Administrators (Admins) to set up accounts in the Ovation LIMS. Account setup enables report delivery to the appropriate people. Admins set up accounts by adding Sales Reps, Provider Accounts, Providers, and Contacts, which also grants access to the Ovation Portal.
The Ovation Portal ( portal.ovation.io) is a separate website url from the Ovation LIMS (lab.ovation.io) that provides Sales Reps and (Provider) Contacts with visibility to Orders and Patient Reports. The Ovation Portal can also be configured to allow Contacts from your Provider Accounts to place Online Orders. Online Orders automatically connect and sync to your Ovation LIMS.
This guide contains the following sections. Read the entire Guide or skip to your section of interest.
- Add a Sales Rep (Optional)
- Add Provider Account Groups (Optional)
- Add Provider Accounts
- Add Providers to Provider Accounts
- Add Contacts
- Manage Contacts
Account Setup Flow
Client Account setup is summarized below. Optional and Required Steps are indicated. Each step listed describes the reason to perform that step.
Note: Once Improved Provider Accounts is turned on in your Production environment, it cannot be turned off. If your organization is not using Improved Provider Accounts Management, refer to our existing article Setting Up Accounts - Full Guide.
1. Add Sales Groups and Group Manager (Optional)
- Sales Reps can be grouped by region with this function
2. Add Sales Reps (Optional)
- Adding a Sales Rep gives access to the Ovation Portal to review submitted Orders from associated Provider Accounts
3. Add Provider Account Groups (Optional)
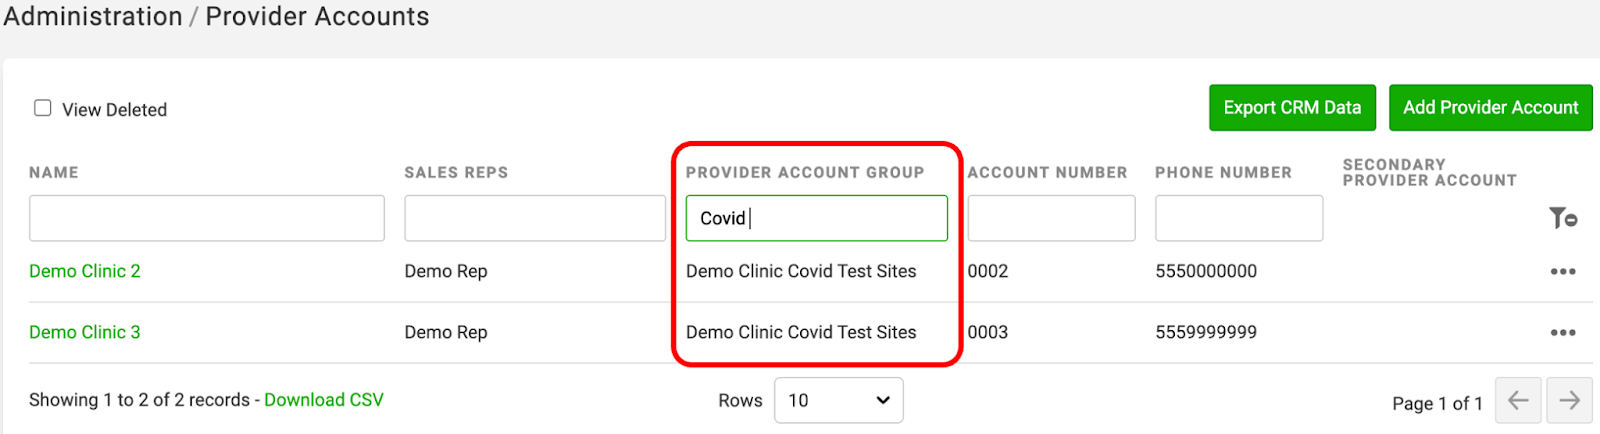
- Adding Provider Account Groups allows multiple Provider Accounts to be searched by group
4. Add Provider Accounts (Required)
- Adding Provider Accounts documents account details and allows Providers and Provider Contacts to be grouped by organization
5. Add Providers (Required)
- Add Providers (the person ordering a diagnostic test for a patient) and their License Registry Number to Provider Accounts enables the Provider association to Orders/Requisition Forms
6. Add Contacts (Required)
- Add Provider Contacts to give access to the Ovation Portal where Contacts can view/download signed Patient Reports
7. Associate Contacts to Provider Accounts (Required)
- Associate the Contacts to the Provider Accounts for Contact management
8. Associate Contacts to Providers (Optional if “Associate all Contacts with All Providers” toggle is set to ON in Provider Account)
- Associate the Contacts to Providers to enable Contacts to view Patient Reports of their Providers
9. Set Contact Patient Report Delivery Preferences (Optional if managed at Provider Account level)
- Override email and fax report delivery preferences of Provider Accounts at the individual Contact level
10. Set Contact Role (Optional)
- Add a Contact Role of Provider or Provider Delegate to enable electronic signature for Orders/Requisition Forms.
11. Set Primary Contact for Provider Account (Optional)
- Add a Primary Contact to a Provider Account to grant Contact(s) access to Portal Analytics
Adding a Sales Group and Group Manager (Optional)
Sales Groups in the Ovation LIMS can serve as a way to organize Sales teams and assign dedicated Group Managers to the team. Group Managers can use the external Ovation Portal to see the activity of all Sales Reps in the Sales Group. You can also create Sub Groups which are visible to the Group Manager.
Tip: Think of Sales Groups as territories or regions, and Sub Groups as states or areas within a territory or region
Note: All steps under the Sales Group section are optional. Use this functionality if it suits your organization.
Add a Sales Group
Add a Sales Group to organize Sales Reps into discrete groups (regions, businesses, etc).
1. Navigate to the Sales Groups Page
A. Click the “More” button in the Dashboard bar
B. Hover over “Business”
C. Select “Sales Groups”

3. Type the Sales Group name in the box (ex. West Coast)
4. Click “Create”
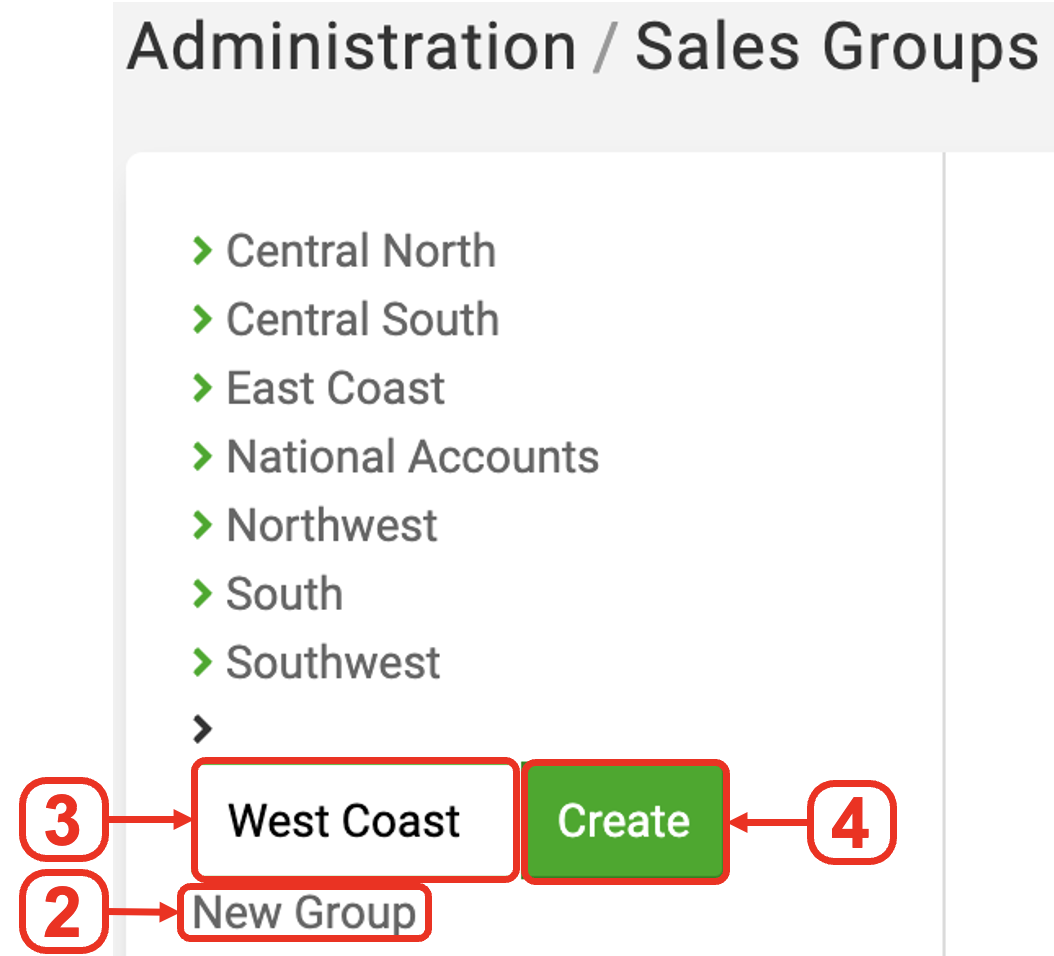
Add a Sub Group to the Sales Group
Sub Groups can be used to further differentiate Sales Reps.
1. Click the arrow next to the Sales Group
2. Click “New Group” under the existing Sales Group

3. Type the new Sub Group name in the box (ex. California)
4. Click “Create”

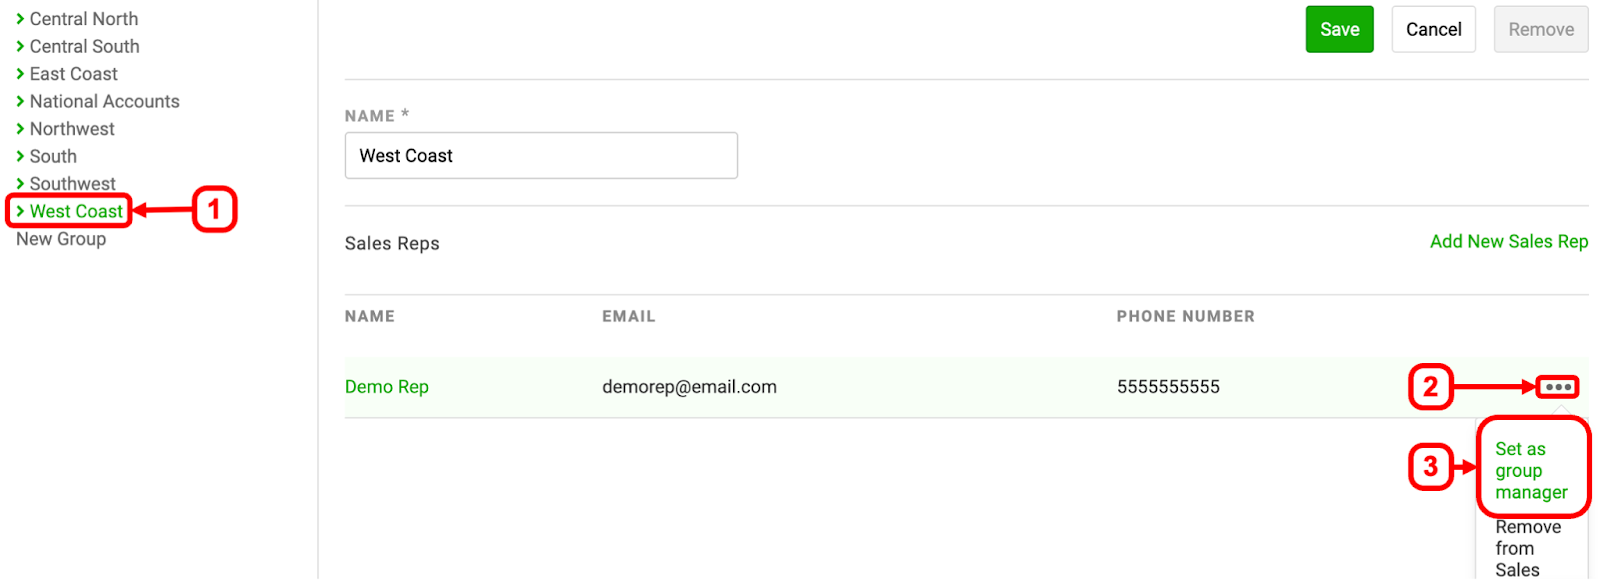
Set a Sales Rep as a Group Manager
Group Managers can see all the activity of the Sales Reps in their Group by using the Ovation Portal.
1. Choose the Sales Group where you will designate the Group Manager
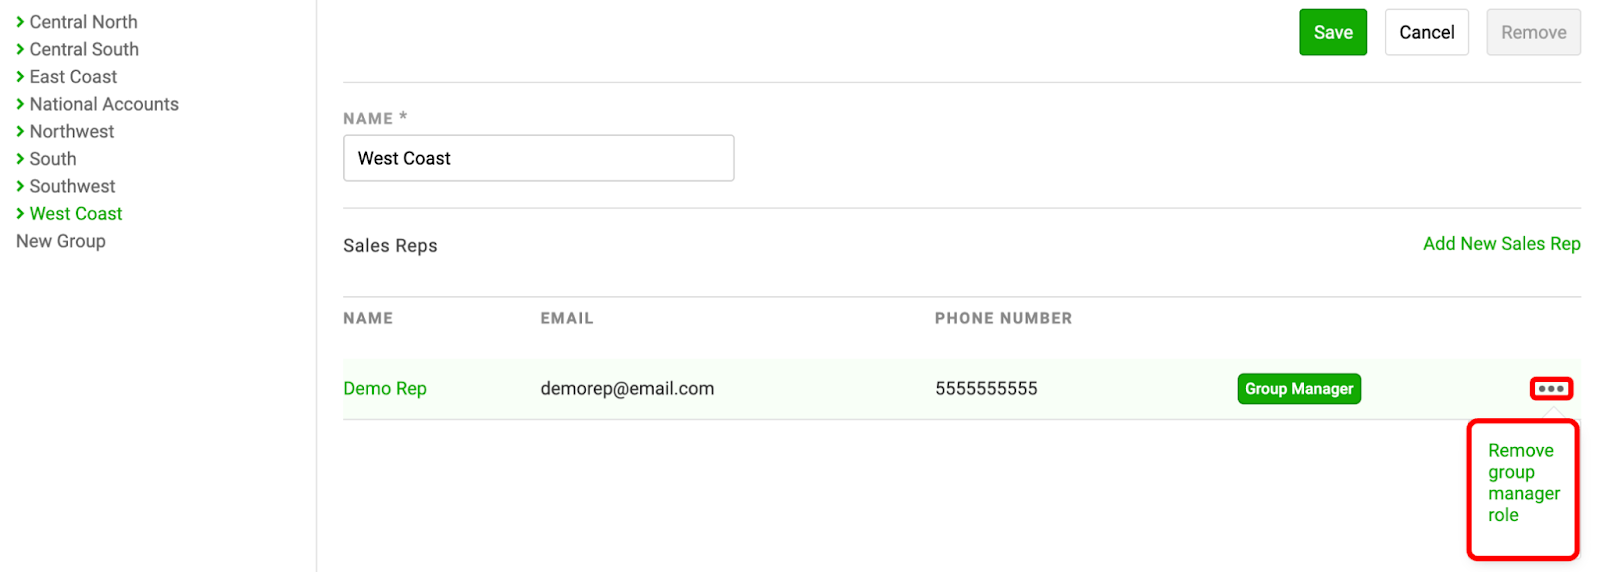
2. Click the ellipses next to the Sales Rep that will become the Group Manager
Note: Sales Reps can be added to Sales Groups from this page. See Add a Sales Rep via the Sales Group Feature below.
3. Click “Set as group manager”
Tip: Sales Group Managers must be removed as Group Managers before they can be removed from Sales Groups
Note: Remove a Group Manager by clicking the ellipses next to the Group Manager and selecting “Remove group manager role”
Remove a Sales Group
Disassociate any Sales Reps and Sales Sub Groups to remove a Sales Group.
1. Click the Sales Group or Sub Group you wish to remove
Note: Sub Groups, and any Sales Reps within the Sub Group, must be removed before removing a Sales Group
2. Click the ellipses next to any Sales Rep
3. Click “Remove from Sales Group”

4. Repeat steps 1-3 for all Sales Reps associated with the Sales Group or Sub Group, then click the red “Remove” button

Add a Sales Rep (Optional)
Adding a Sales Rep to the Ovation LIMS will give them access to the Ovation Portal. In the Ovation Portal, Sales Reps can view submitted orders and completed reports for associated Provider Accounts.
There are three options to add a Sales Rep in Ovation
- Option 1: Add a Sales Rep from the Sales Rep Page
- Option 2: Import a list of Sales Reps from the Sales Rep Page
- Option 3: Add a Sales Rep from the Sales Groups Page
Once you add a Sales Rep, they will receive an email invitation to the Ovation Portal that will be active for 72 hours. For help on resending the email invitation, see the Resetting Passwords article.
Tip: Sales Rep fields can be edited/updated after the Sales Rep is created. If the email field is edited, a notification will be sent to the new email to prompt the Sales Rep to set up a new password for the Sales Portal.
Note: Sales Reps must first be added to the system before they can be associated to Provider Accounts. Assigning Sales Reps to a Sales Group is optional.
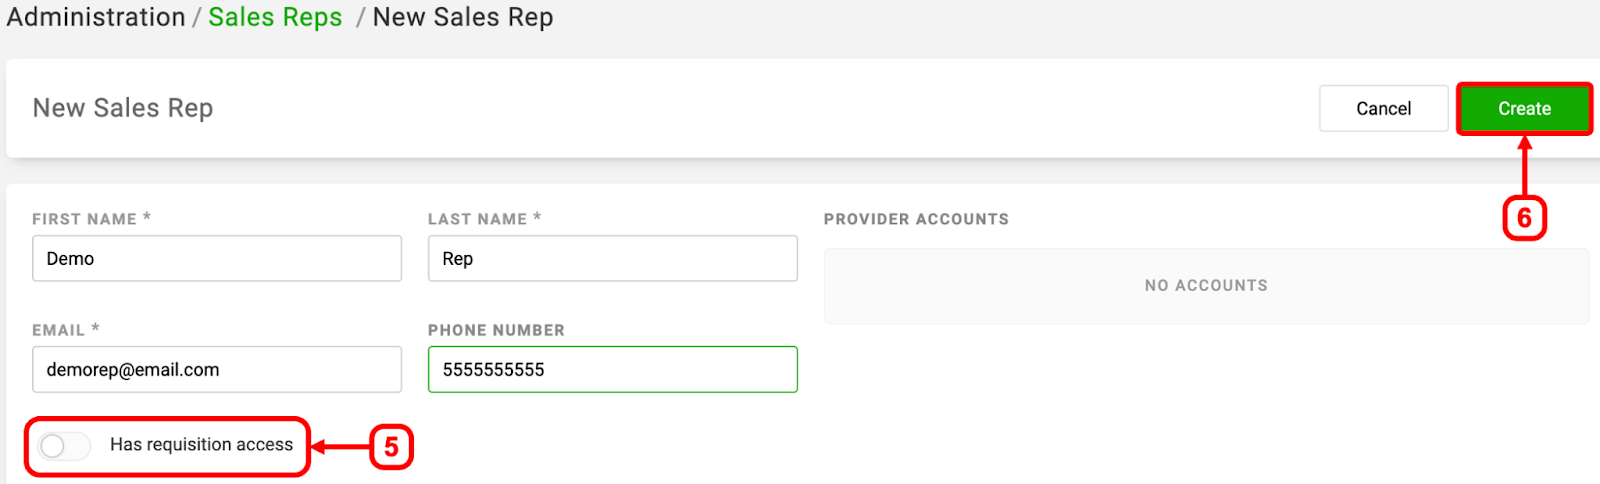
Option 1: Add an Individual Sales Rep from the Sales Reps Page
1. Navigate to the Sales Reps Page
A. Click the “More” button in the Dashboard bar
B. Hover over “Business”
C. Select “Sales Reps”


3. Complete the fields for the Sales Rep (first name, last name, email, phone number)

Note: Phone numbers must be digits only
4. Optional: Turn on the “Has requisition access” toggle if you want the Sales Reps to see requisition information within the Ovation Portal
5. Click Create

Option 2: Import Sales Reps from the Sales Rep Page
1. Navigate to the Sales Reps Page
A. Click the “More” button in the Dashboard bar
B. Hover over “Business”
C. Select “Sales Reps”

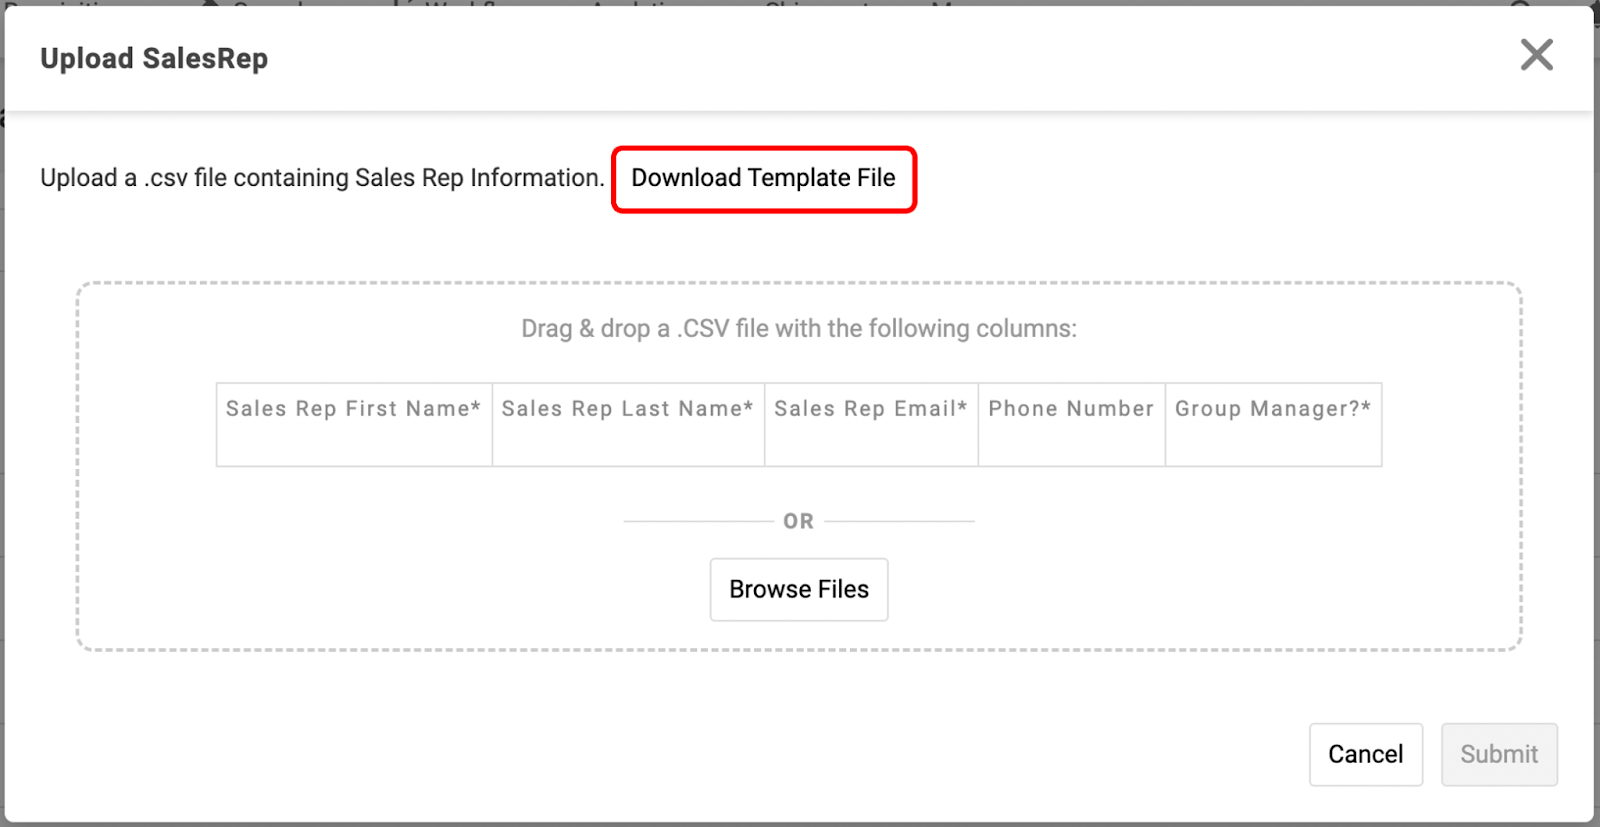
3. Optional: Click the “Download Temple File” button
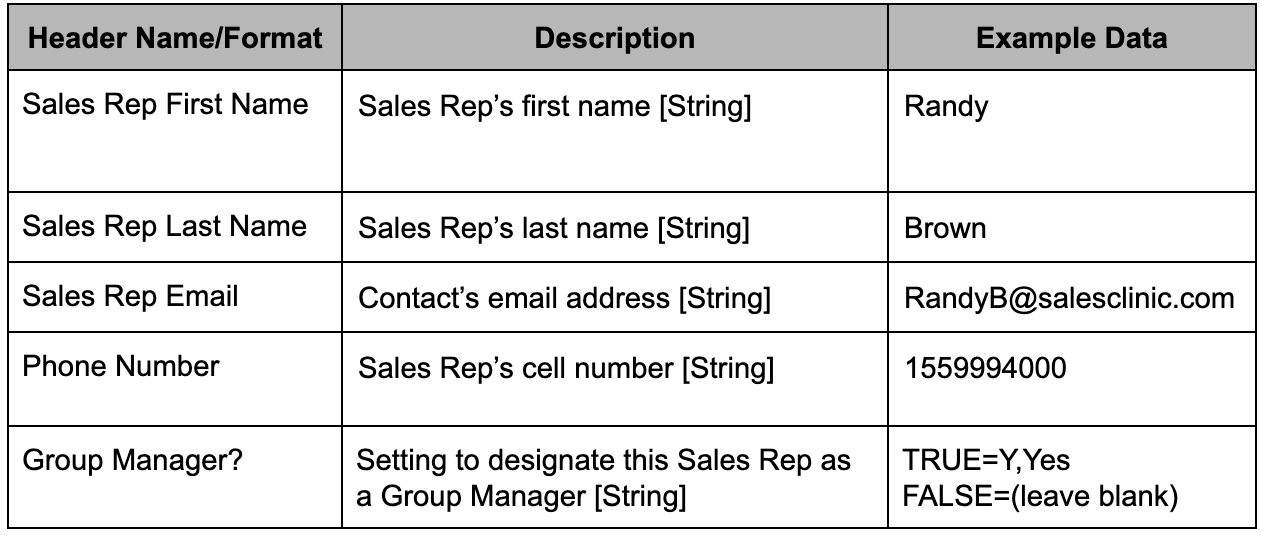
4. Populate your file with information of the Sales Reps. See the Sales Reps Import Formatting table below for formatting guidelines. See the Sales Reps Import Troubleshooting section for additional assistance.
Tip: Each row in the batch file will become a new Sales Rep in your organization. The columns of the batch file represent fields in the Sales Rep’s Page and required fields will be indicated by an asterisk. (ex: “First Name*” column data is required but “Phone Number” column data is not).
Note: Do not modify Row 1 of the file. The headers (Row 1) in the file must remain the same as the template for your import to populate.
5. Save the file as a CSV file.
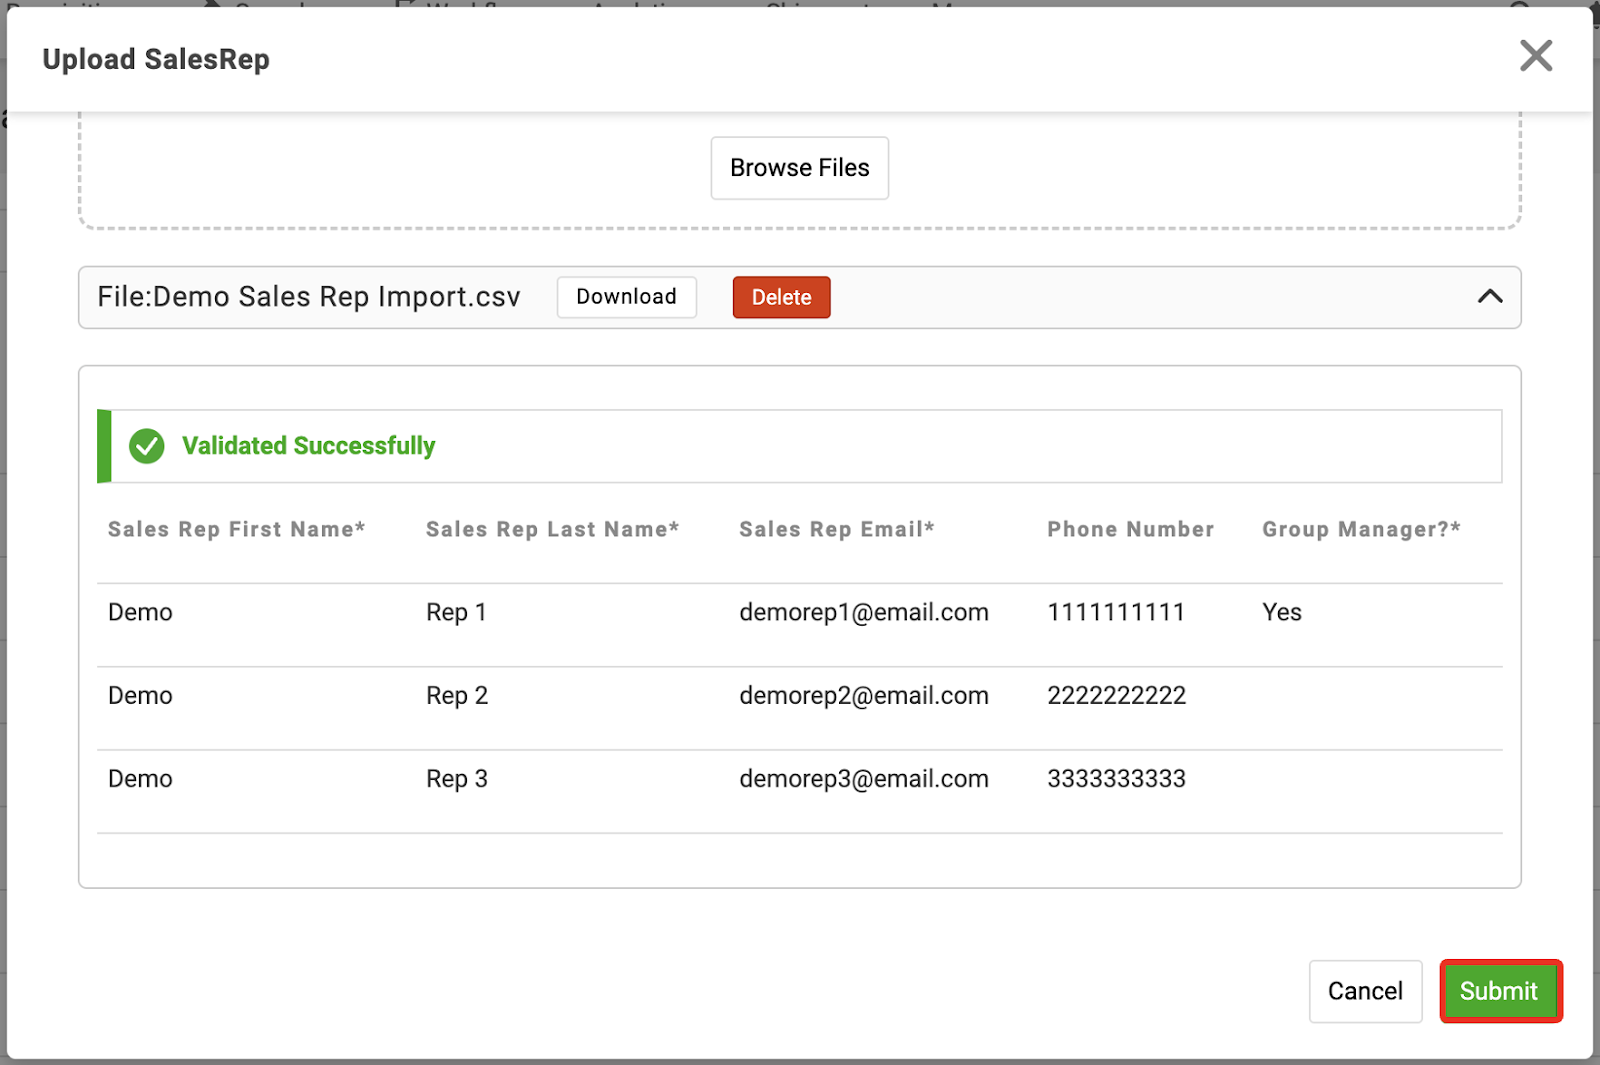
6. Upload your file
- Drag and drop your populated CSV file into the box
OR
- Click “Browse Files” and choose your populated CSV file
7. Click “Submit”
Import Formatting
The table below lists the formatting for Contact headers, descriptions, and example data to use in each column.
Import Troubleshooting
The following reasons may cause an error and cause import to fail
- If the File Type is not Comma Separated Value (CSV)
Option 3: Add an Individual Sales Rep from the Sales Group Page
Tip: Sales Groups are optional and allow for the organization of Sales Reps into regions or classes.
1. Navigate to the Sales Groups Page
A. Click the “More” button in the Dashboard bar
B. Hover over “Business”
C. Select “Sales Groups”
3. Click the green Add New Sales Rep
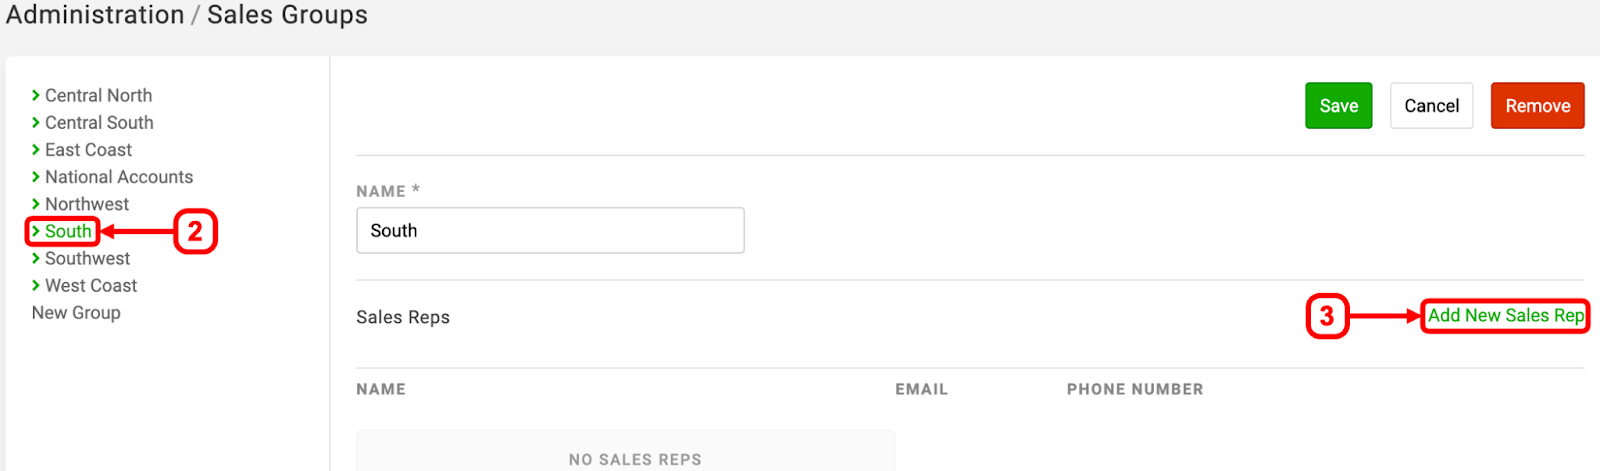
4. Complete the fields for Sales Rep (first name, last name, email, phone number)
Note: Phone numbers must be digits only
5. Optional: Turn on the “Has requisition access” toggle if you want the Sales Reps to see requisition information within the Ovation Portal
6. Click Create
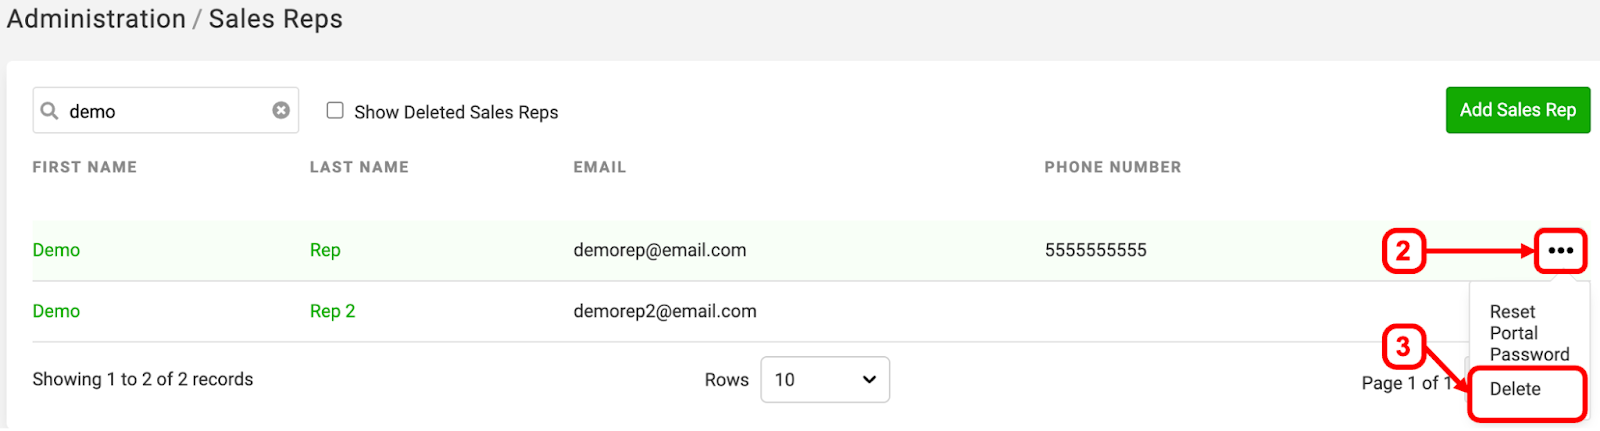
Delete/Undelete a Sales Rep
Sales Reps can be deleted. Deleted Sales Reps will no longer have access to the Ovation Portal. Sales Reps can be undeleted if they are deleted in error.
Delete a Sales Rep
1. Navigate to the Sales Reps Page
A. Click the “More” button in the Dashboard bar
B. Hover over “Business”
C. Select “Sales Reps”
3. Click Delete in the dropdown menu
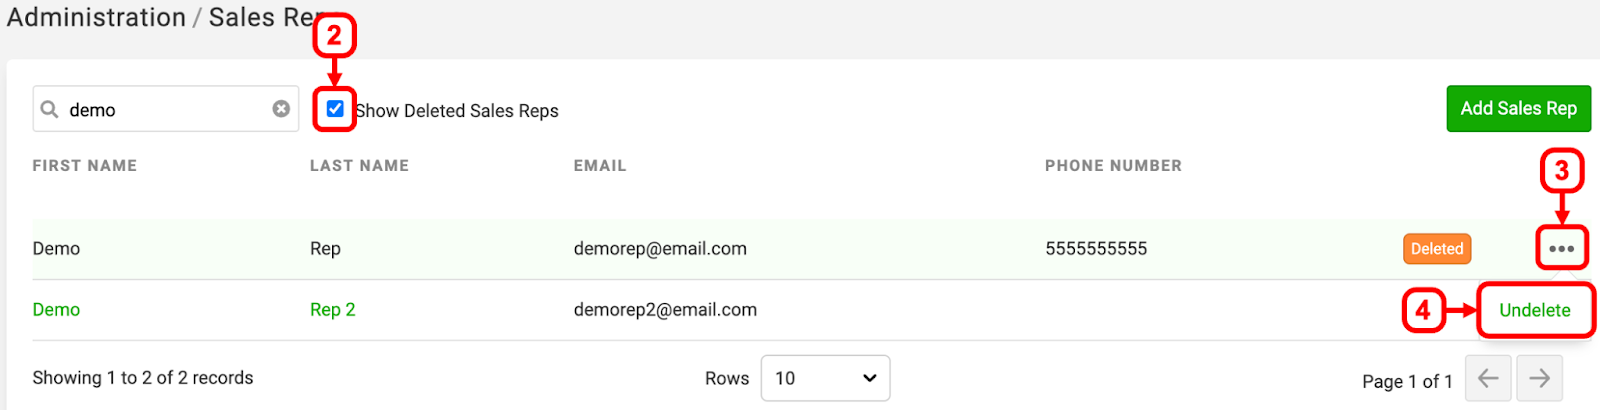
Undelete a Sales Rep
1. Navigate to the Sales Reps Page
A. Click the “More” button in the Dashboard bar
B. Hover over “Business”
C. Select “Sales Reps”
3. Click on the ellipses next to the Sales Rep you want to undelete
4. Click Undelete in the dropdown menu
Add Provider Account Groups (Optional)
Provider Accounts Groups can be created to group multiple Provider Accounts. For example, multiple Provider Accounts may part of the same organization, but have different locations. Provider Account Groups also can be used throughout the Ovation LIMS to look up all shared Provider Accounts within a group.
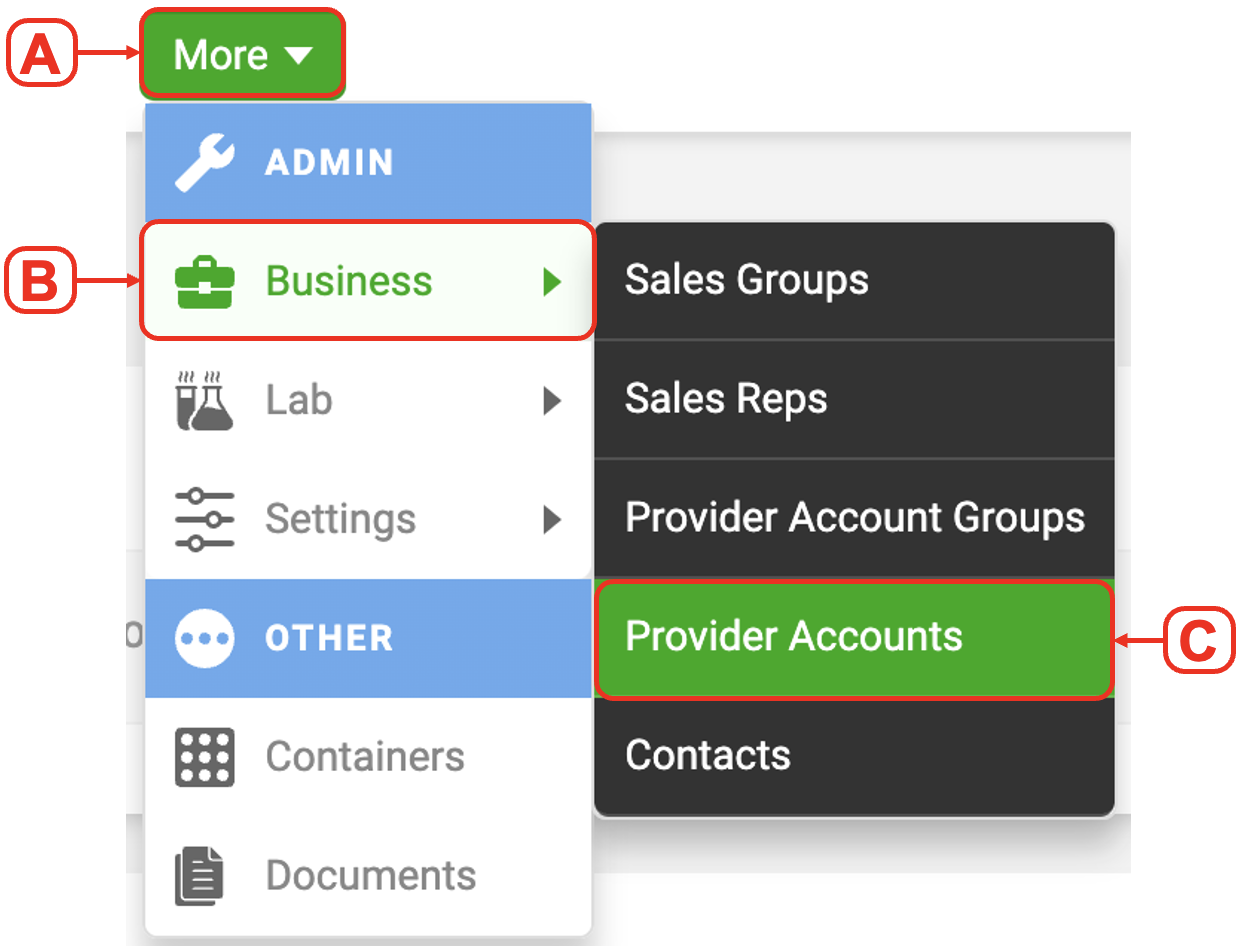
1. Navigate to the Provider Account Groups Page
A. Click the “More” button in the Dashboard bar
B. Hover over “Business”
C. Select “Provider Account Groups”

3. Name the Provider Account Group and click the green “Create” button

Provider Account Groups can now be selected within individual Provider Account Info pages

Provider Account Groups can now also be searched on the Provider Accounts page
Delete/Undelete Provider Account Groups
Provider Account Groups can be deleted. Provider Account Groups can be undeleted if they are deleted in error.
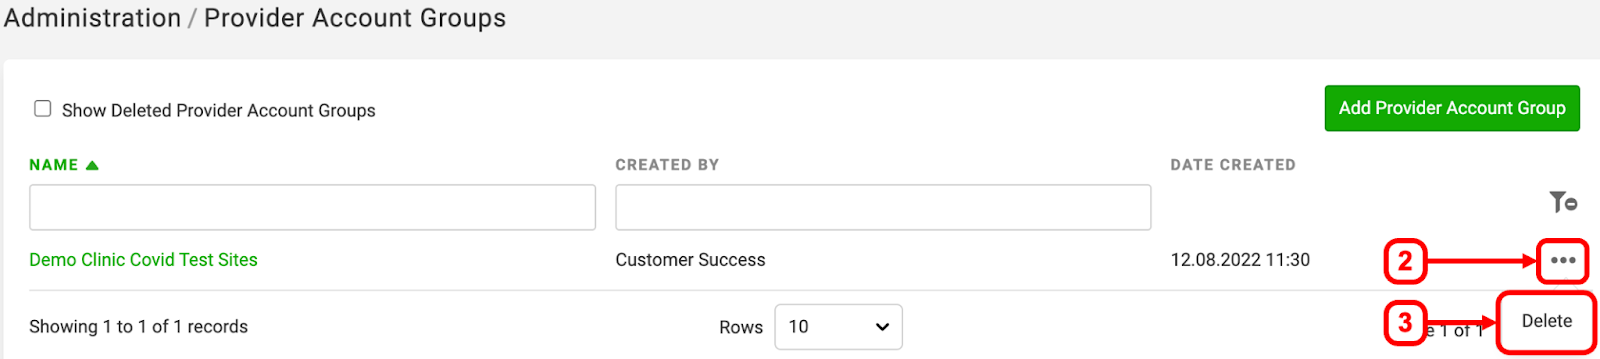
Delete a Provider Account Group
1. Navigate to the Provider Account Groups Page
A. Click the “More” button in the Dashboard bar
B. Hover over “Business”
C. Select “Provider Account Groups”
3. Click Delete in the dropdown menu
Undelete a Provider Account Group
1. Navigate to the Provider Account Groups Page
A. Click the “More” button in the Dashboard bar
B. Hover over “Business”
C. Select “Provider Account Groups”
3. Click on the ellipses next to the Provider Account Group you want to undelete
4. Click Undelete in the dropdown menu

Add Provider Accounts
Adding Provider Accounts in the Ovation LIMS records the details and settings of the account(s). Then associate Providers and Provider Contacts with the account(s) to enable Requisition Forms/Orders and the delivery of reports to the appropriate parties.
Note: Populate data for Sales Groups and Sales Representatives prior to adding Provider Accounts (if your lab uses them).
There are two options to add Provider Accounts in the Ovation LIMS
Option 1: Add an Individual Provider Account
1. Navigate to the Provider Accounts Page
A. Click the “More” button in the Dashboard bar
B. Hover over “Business”
C. Select “Provider Accounts”

3. Add the Provider Account contact details: account name, account number, website, phone number, and fax number

Note: The Provider Account ‘Name’ is required and must be unique.
Tip: If adding a fax number, enter only numbers (no dashes) and include the country code. For example, add a “1” at the beginning of US fax numbers.
4. Search and select the Sales Rep(s) you want to associate to this account

5. Add the Provider Account address details
- If the Street and Mailing Address are the same: Set the toggle to “USE STREET ADDRESS” and enter the Street address details

- If the Street and Mailing Address are different: Leave the toggle set to “MAILING ADDRESS” and enter the details for both addresses
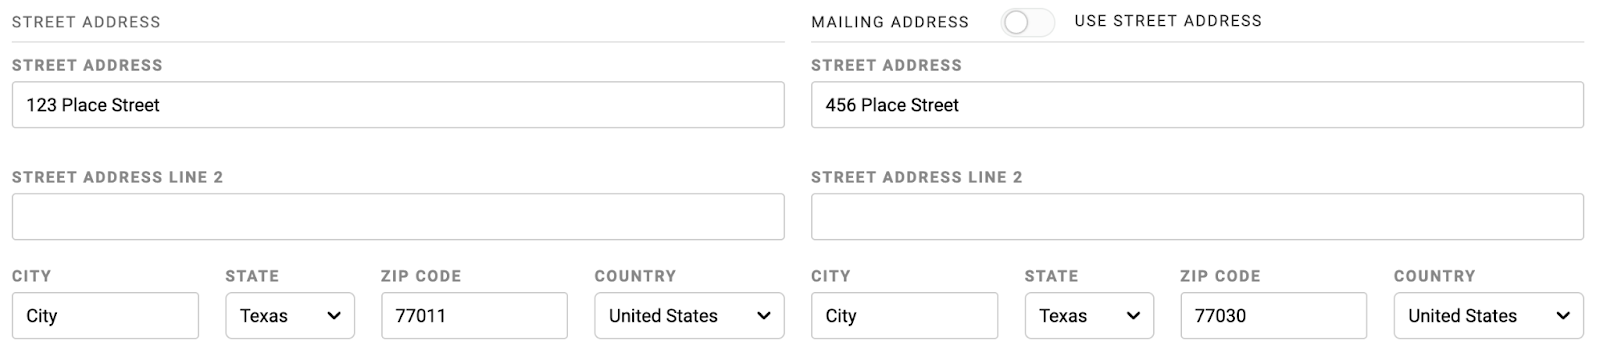
Note: The street address will be displayed on Ovation-generated reports and the mailing address will auto-fill for the requisition billing section if ‘facility pay’ is selected.
6. Set the Secondary Use Notification and Medical toggles
- Leave Off: If you are not and Ovation Research Network (ORN) Participant or do not need to override secondary use notification/medical consents
- Turn On: If your lab is an ORN (Ovation Research Network) member and this is a part of your biobanking plan.
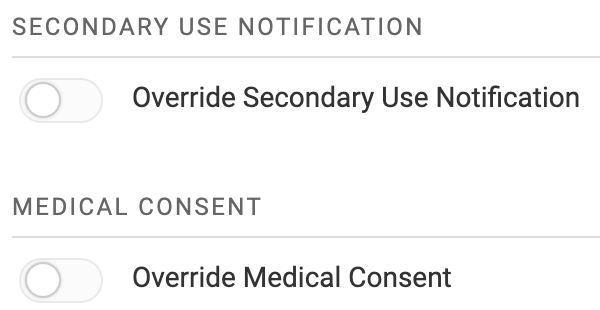
Tip: If you do not know if your Provider Account(s) should use these settings, consult your Biobanking Implementation Team or contact success@ovation.io
Note: If your lab is overriding Secondary Use Notification and Medical Consent as part of your Biobanking Plan, then the toggles must be turned on for each Provider Account.
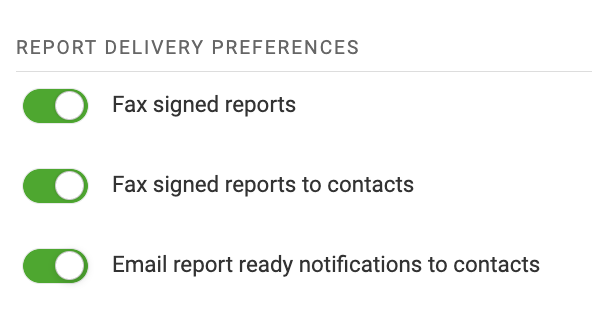
7. Set Report Delivery Preferences - Use any combination of delivery preferences
- Turn on the ‘Fax signed reports’ toggle to have the Ovation LIMS automatically fax signed patient reports to the Fax Number listed on the account.
- Turn on the ‘Fax signed reports to contacts’ toggle to have the Ovation LIMS automatically fax signed patient reports to ALL the individual Contacts associated to this Provider Account. (In this case the Contact’s Fax Number must be included on the Contact record)
- Turn on the ‘Email report ready notifications to contacts’ toggle if you would like the Contacts associated with the Provider Account to receive email notifications when signed reports are available to view/download in the Ovation Portal.
All toggles are set to on in the image below

8. Decide if you want to automatically associate all new Contacts that are added to this Provider Account to all associated Providers of this account.
- Leave Off: Individual Providers will need to be associated to each new Contact of this account.
- Turn On: the Ovation LIMS will automatically create an association to all Providers when a new Contact is added to the Provider Account

Note: If your Provider Account has specific Contacts for each Provider, turning this toggle to ON will eliminate the unique associations already created and associate ALL Providers with all Contacts. See Adding Contacts for more information.
9. Scroll up and click the green “Create” button

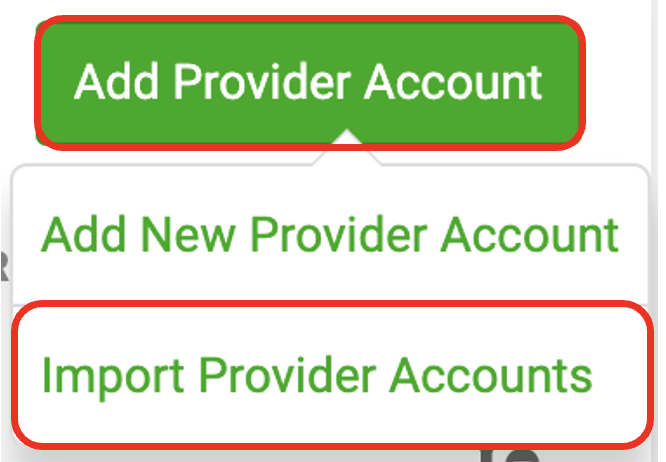
Option 2: Import Provider Accounts
1. Navigate to the Provider Accounts Page
A. Click the “More” button in the Dashboard bar
B. Hover over “Business”
C. Select “Provider Accounts”
3. Optional: Click the “Download Temple File” button
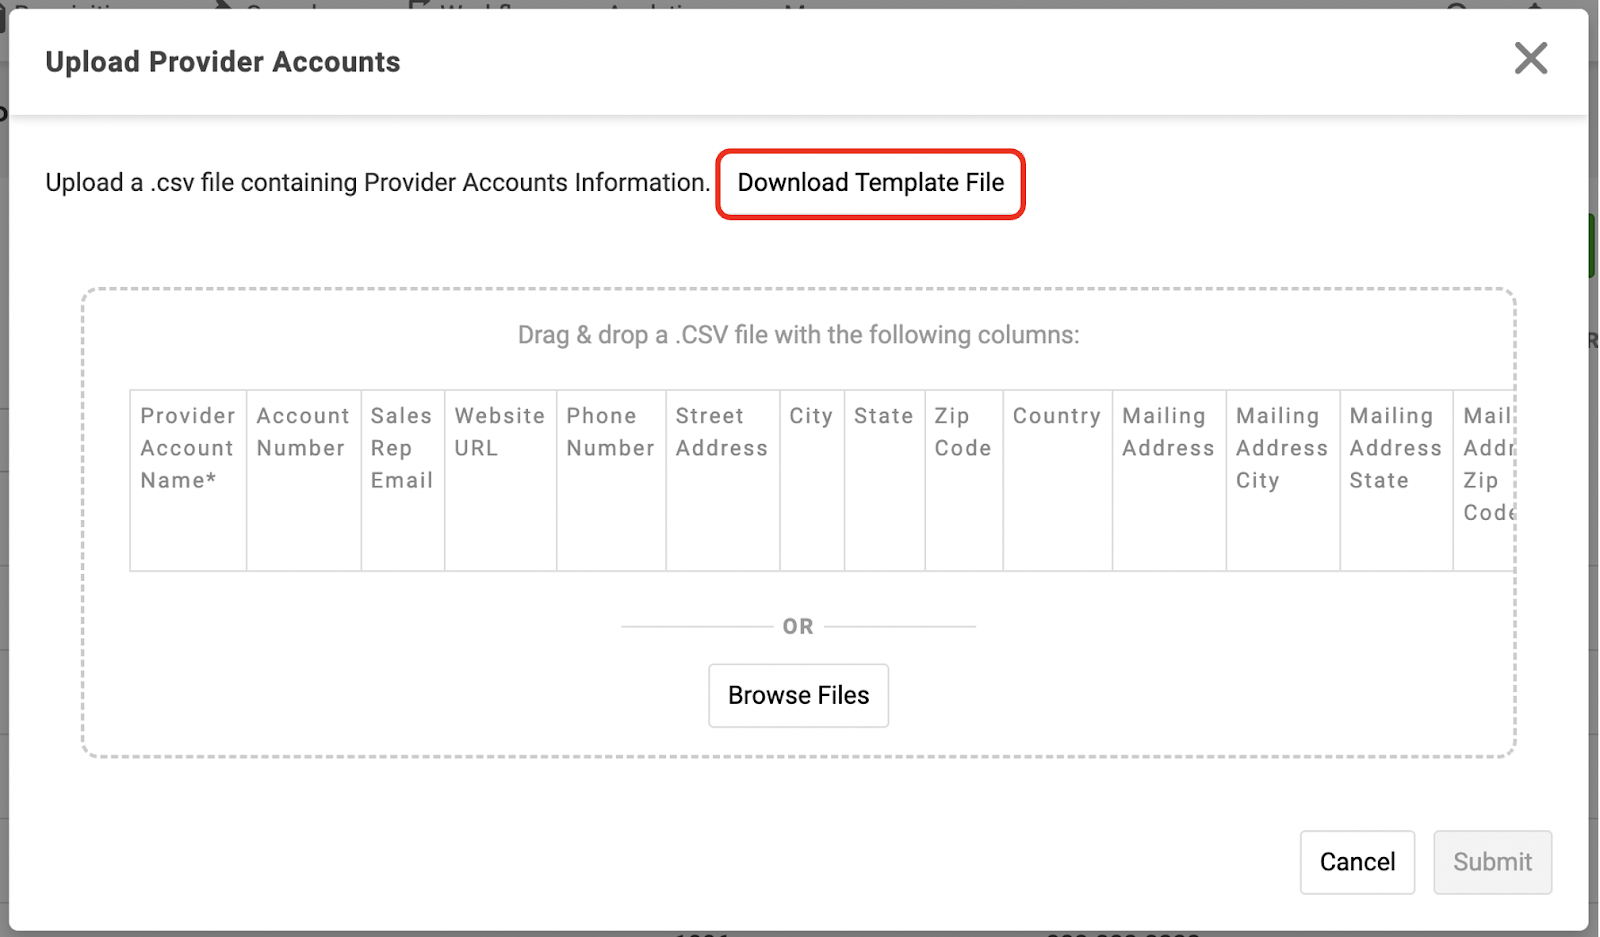
4. Populate your file with the Provider Accounts’ information. See the Provider Accounts Import Formatting table below for formatting guidelines. See the Provider Accounts Import Troubleshooting section for additional assistance.
Tip: Each row in the import file will become a new Provider Account added to your organization. The columns of the batch file represent fields in the individual Provider Account info pages. Required fields will be indicated by an asterisk. (ex: “Provider Account Name*” column data is required but “Account Number” column data is not).
Note: Do not modify Row 1 of the file. The headers (Row 1) in the file must remain the same as the template for your import to populate.
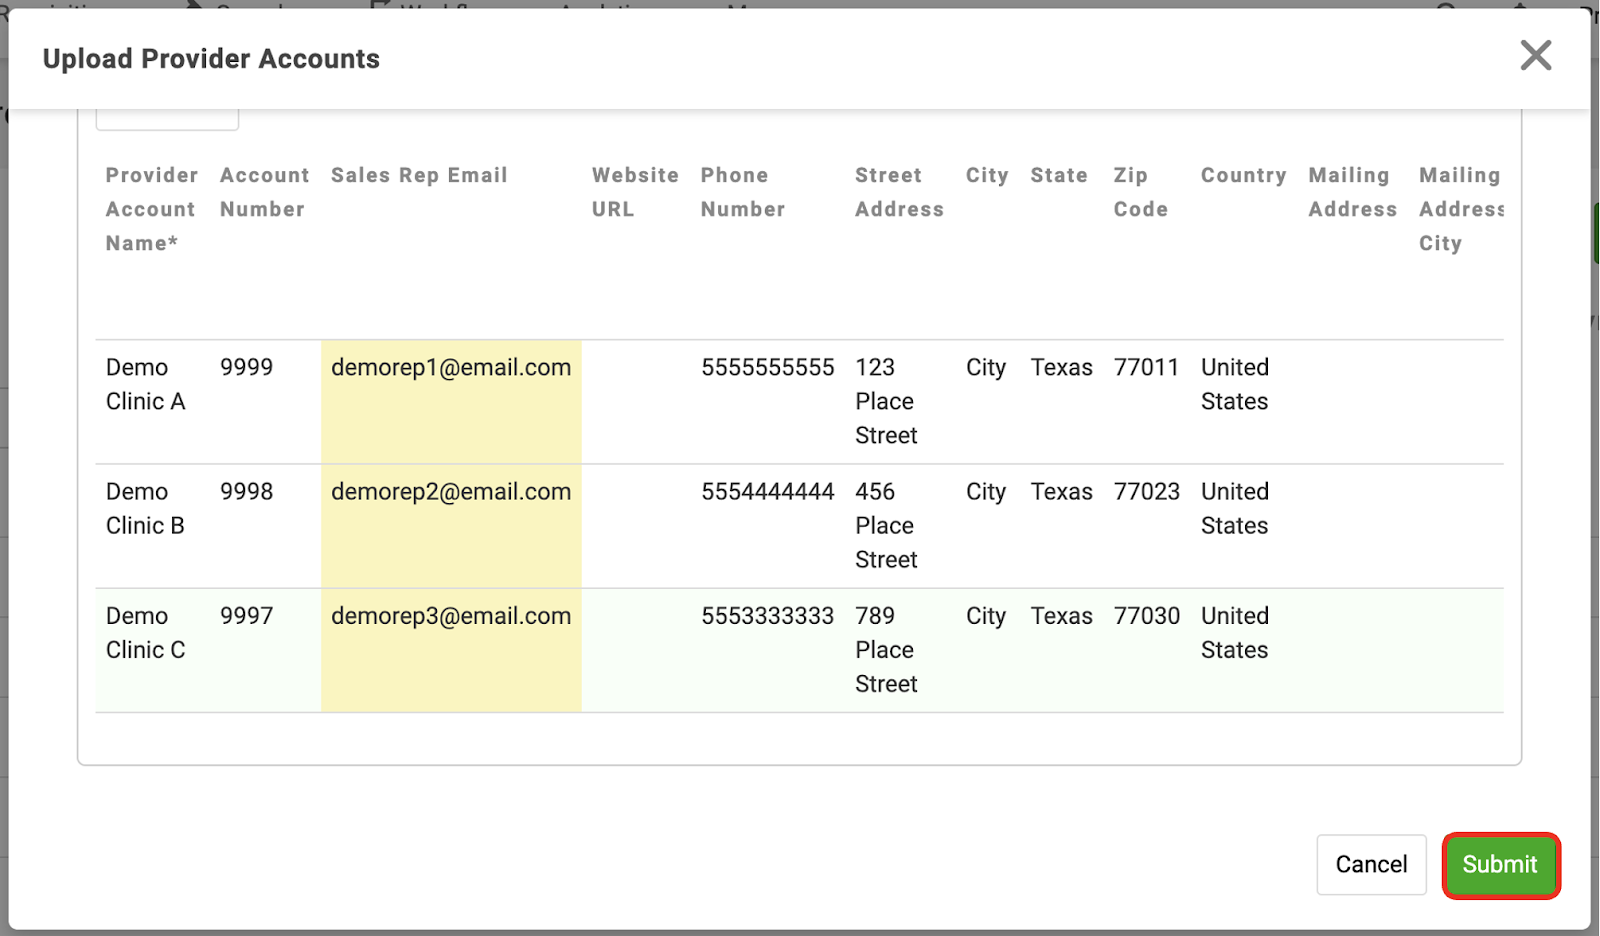
5. Save the populated file as a CSV file
6. Upload your file
- Drag and drop your populated CSV file into the box
OR
- Click “Browse Files” and choose your populated CSV file
7. Click “Submit”
Import Formatting
The table below lists the formatting for Provider Account headers, descriptions, and example data to use in each column.

Tip: If adding a fax number, enter only numbers (no dashes) and include the country code. For example, add a “1” at the beginning of US fax numbers.
Import Troubleshooting
The following reasons may cause a warning to display
- If your CSV includes an email address for a Sales Rep which does not already exist in the LIMS, a warning will appear and the sales rep will not be associated
The following reasons may cause an error and cause import to fail
- If the File Type is not Comma Separated Value (CSV)
- If there is a Provider Account Name in the import file that matches an already existing Provider Account in your organization (case-sensitive match)
- If a Fax Number is missing for an account and “Fax Signed Reports” is set to “true” for that account. Also, if length is less than 11 numbers or if non-numeric characters are present
- If the account’s country address is in the United States and the Street/Mailing Address State is not valid
- If the account’s country address is in the United States and the Street/Mailing Address Zip Code is not a valid or does not match the selected state
- If any NPIs are not 10 numbers. Additionally, the NPI number will not be matched to a Provider if the number cannot be found in the NPI registry
Note: Any error in the CSV is also an error in the API. Calls with offending data get a 422 response code with the response body enumerating the text of the errors.
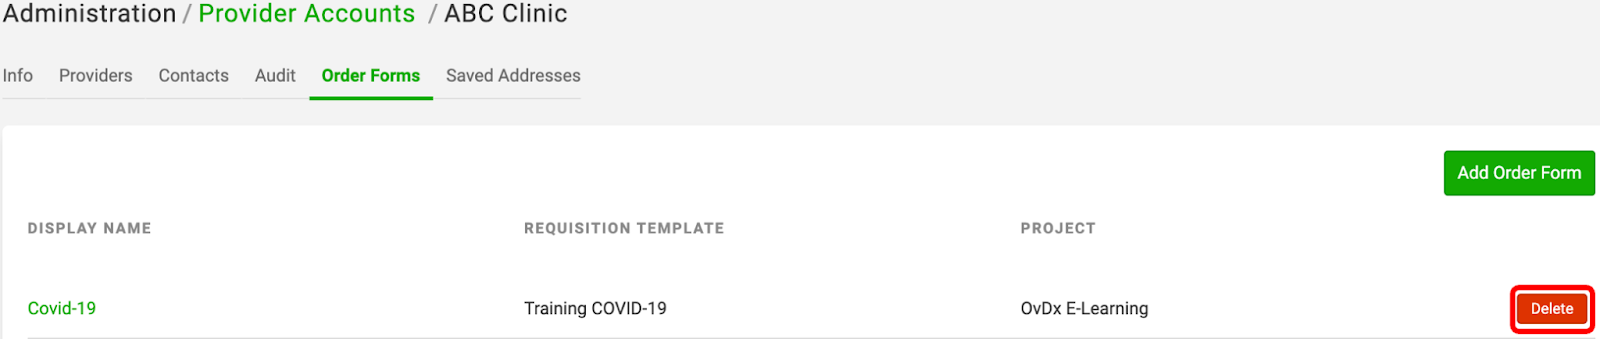
Optional: Associate Order Forms to Provider Accounts
Order Forms added to Provider Accounts to enable Orders to be placed in the Ovation Portal. Add Order Forms to Provider Accounts by selecting available Requisition Form Templates.
1. Navigate to the Provider Accounts Page
A. Click the “More” button in the Dashboard bar
B. Hover over “Business”
C. Select “Provider Accounts”

3. Click the “Order Forms” tab of the Provider Account
4. Click the “Add Order Form” button

5. Assign the Order Form:
A. Enter a Display Name. This will be the name of the Order Form in the Ovation Portal
B. Choose which Project will be associated with this Order Form
C. Choose the Requisition Form Template in the selected Project that the Order Form will copy in format.
D. Click “Submit”

Tip: Order Forms can be deleted from this page. Deleting an Order Form will remove that form from the Ovation Portal for the selected Provider Account’s Contacts.
Optional: Add Saved Addresses to Provider Accounts
Saved Addresses added to Provider Accounts can be selected on Orders/Requisition Forms. Saved Addresses allows rapid entry of an additional address on an Order/Requisition Form.
Tip: Requisition Template Forms must have the General Settings of “Enable Provider Accounts” and “Additional Addresses” toggles turned ON to enable Saved Addresses.

1. Navigate to the Provider Accounts Page
A. Click the “More” button in the Dashboard bar
B. Hover over “Business”
C. Select “Provider Accounts”
3. Click the “Saved Addresses” tab of the Provider Account
4. Click the “Add Address” button
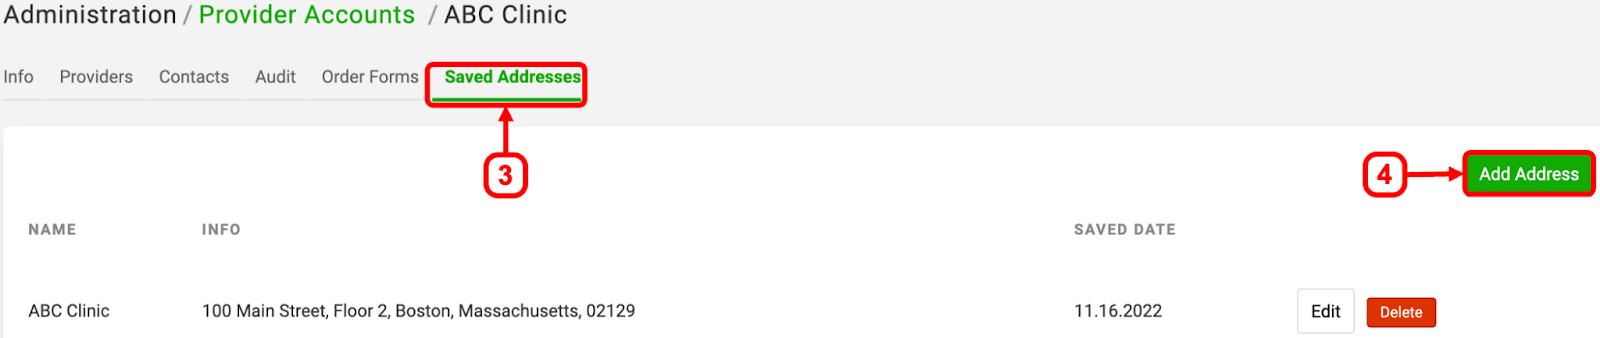
5. Add the address details: name, street address, city, state, zip code, country, email, phone number, fax number, and notes
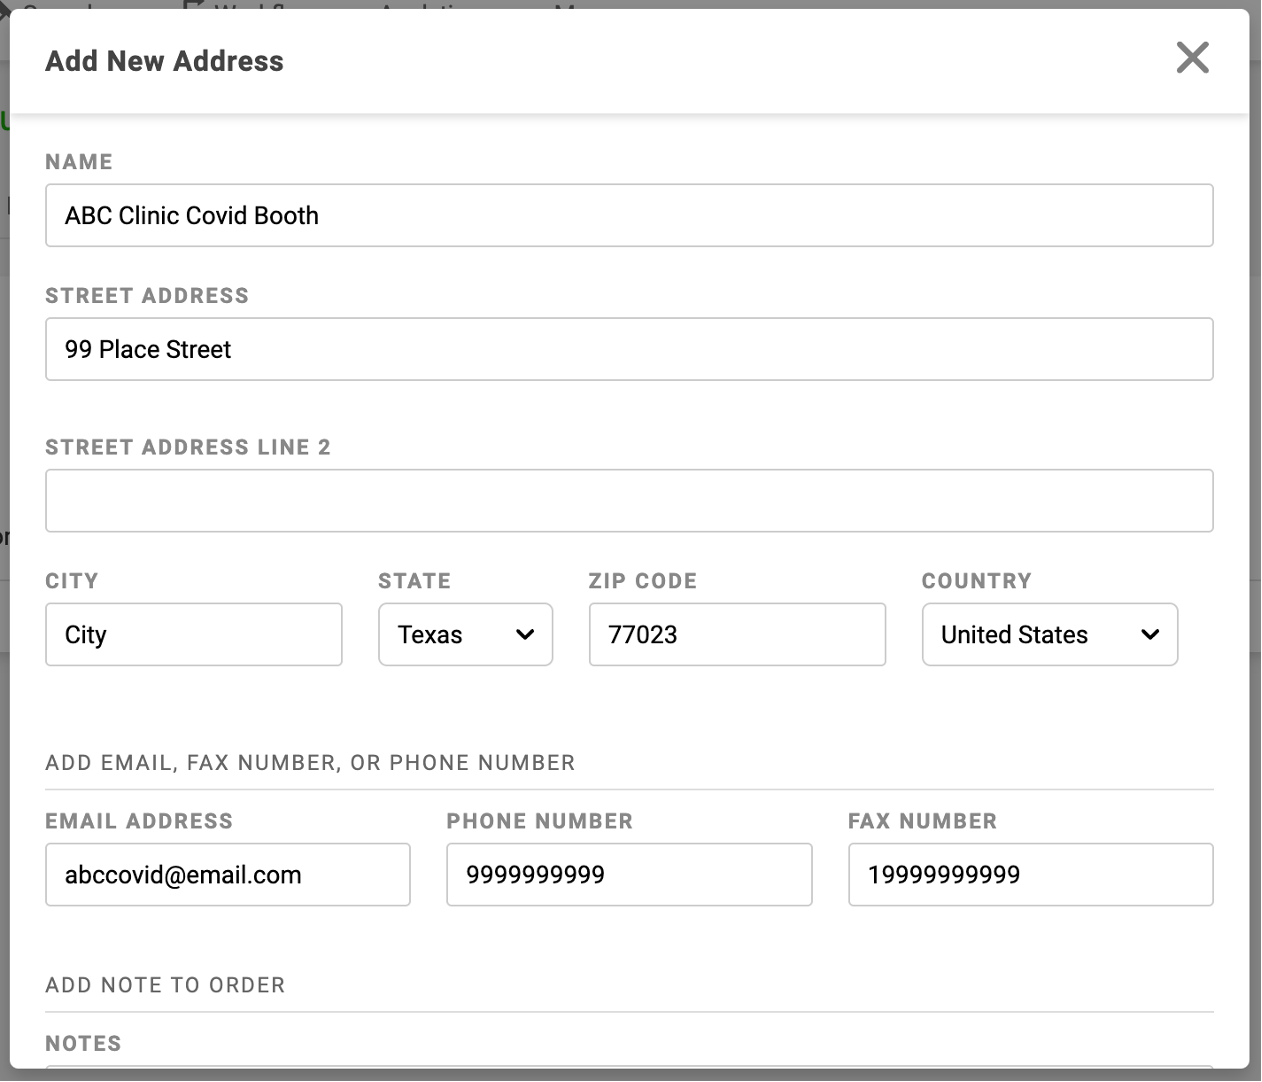
6. Scroll down and click the green “Submit” button

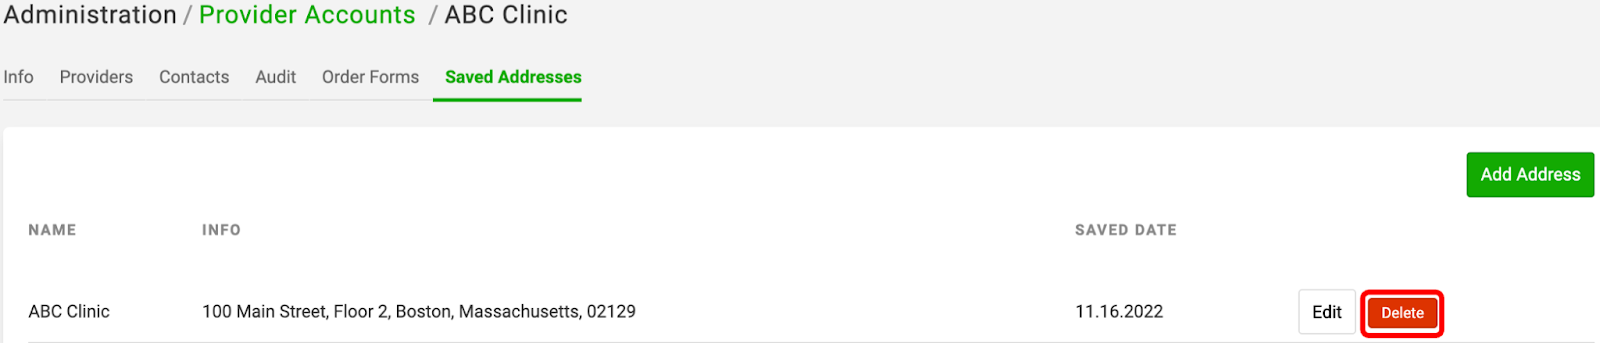
Tip: Saved Addresses can be deleted from this page. Deleting a Saved Address will remove that Address from Orders/Requisition Forms.
Delete/Undelete Provider Accounts
Provider Accounts can be deleted. Provider Accounts can be undeleted if they are deleted in error.
Delete a Provider Account
1. Navigate to the Provider Accounts Page
A. Click the “More” button in the Dashboard bar
B. Hover over “Business”
C. Select “Provider Accounts”
3. Click Delete in the dropdown menu

Undelete a Provider Account;
1. Navigate to the Provider Accounts Page
A. Click the “More” button in the Dashboard bar
B. Hover over “Business”
C. Select “Provider Accounts”
3. Click on the ellipses next to the Provider Account you want to undelete
4. Click Undelete in the dropdown menu
Add Providers to Provider Accounts
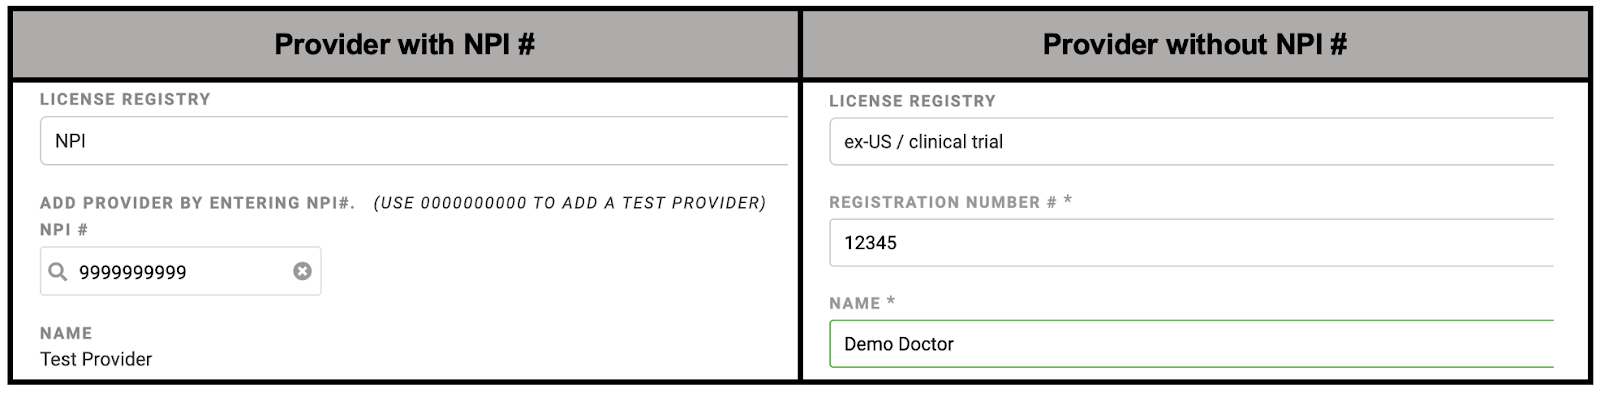
In the Ovation LIMS, a Provider is defined as the person ordering a diagnostic test for a patient. In most cases, Providers will need a National Provider Identifier (NPI). NPIs are the unique 10-digit identification numbers issued to health care providers in the United States by the Centers for Medicare and Medicaid Services (CMS). NPI numbers entered for Providers in the Ovation LIMS will be validated against the registry and, if found, the Provider’s name will auto-populate. Non-US or research Providers can also be added by selecting the appropriate category from the License Registry drop down menu.
There are two options to add Providers within individual Provider Accounts in the Ovation LIMS
Option 1: Add an Individual Provider
1. Navigate to the Provider Accounts Page
A. Click the “More” button in the Dashboard bar
B. Hover over “Business”
C. Select “Provider Accounts”
3. Click the “Providers” tab of the Provider Account

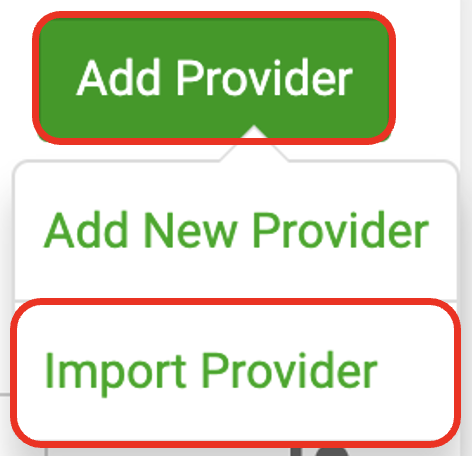
4. Click “Add Provider” > “Add New Provider”

5. Optional: Click the dropdown menu and select the license registry format if not using

Tip: You can select “ex-US / clinical trial” from the License Registry drop-down if your Provider does not have an NPI number
6. Enter the License Registry Number
- If using a non-NPI Registry Number: Enter the number and name of the Provider. The Provider name will not be validated.
- If using an NPI Number: Enter the NPI number in the search provided. The Provider’s name will appear automatically if a valid NPI# is entered.
7. Scroll up and click the green “Create” button
Option 2: Importing Providers
1. Navigate to the Provider Accounts Page
A. Click the “More” button in the Dashboard bar
B. Hover over “Business”
C. Select “Provider Accounts”
3. Click the “Providers” tab of the Provider Account
4. Click “Add Provider” > “Import Provider”
5. Optional: Click the “Download Temple File” button

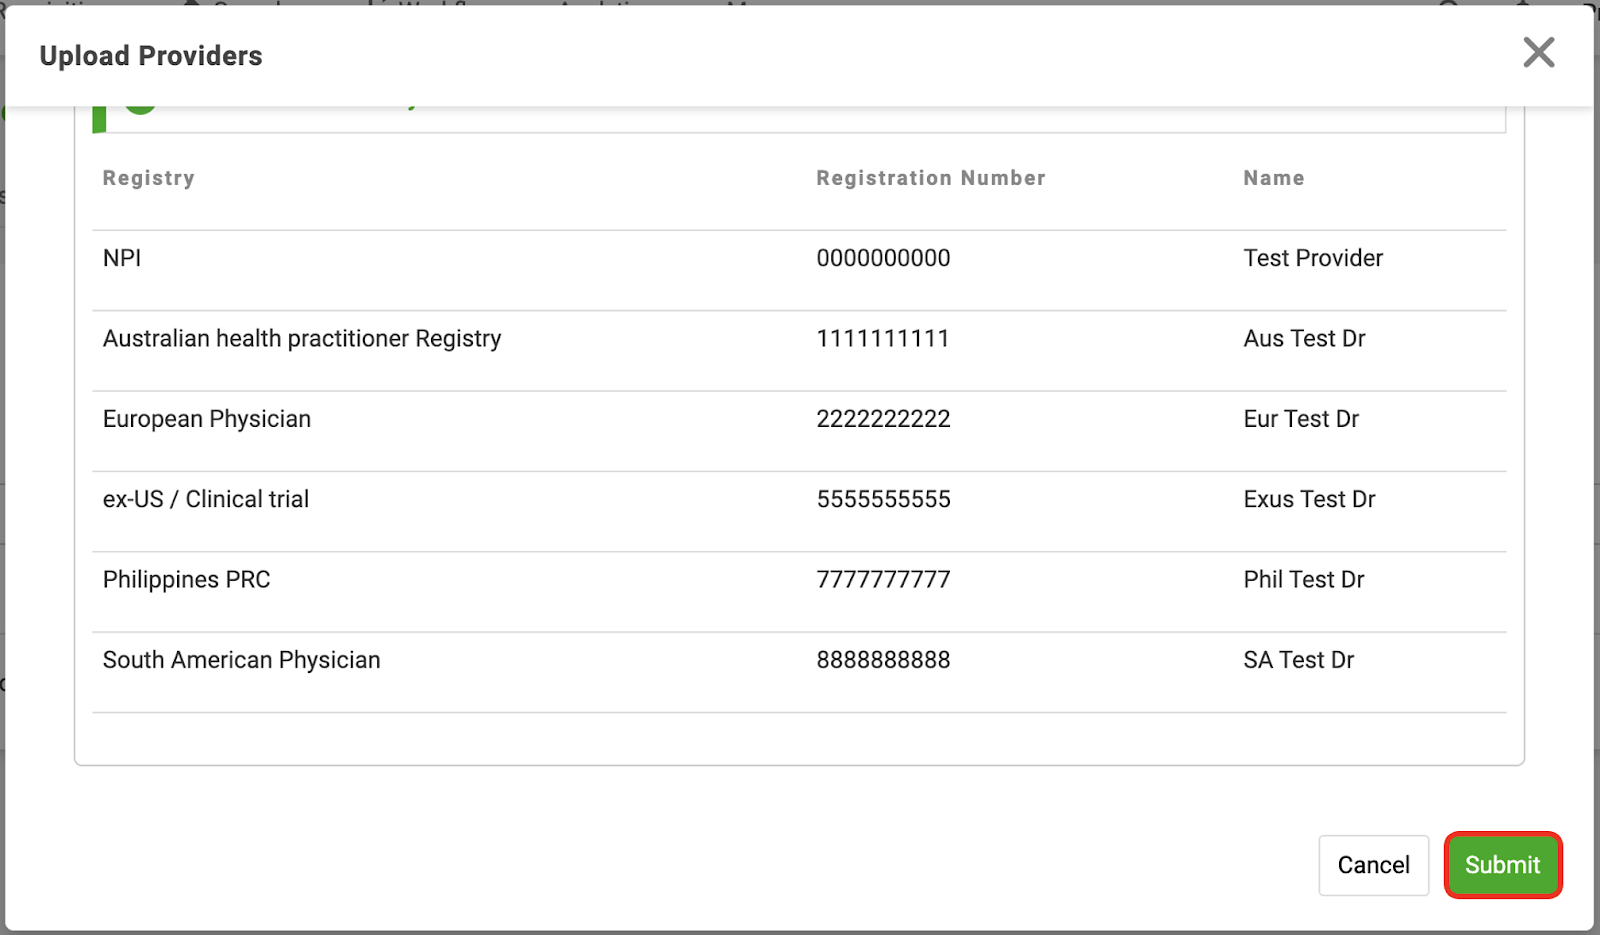
6. Populate your file with the Providers’ information. See the Providers Import Formatting table below for formatting guidelines. See the Providers Import Troubleshooting section for additional assistance.
Tip: Each row in the import file will become a new Provider associated with the Provider Account.
Note: Do not modify Row 1 of the file. The headers (Row 1) in the file must remain the same as the template for your import to populate. The columns of the file represent fields in the Add Provider page. All columns are required.
7. Save the populated file as a CSV file
8. Upload your file
- Drag and drop your populated CSV file into the box
OR
- Click “Browse Files” and choose your populated CSV file
9. Click “Submit”
Import Formatting
The table below lists the formatting for Provider headers, descriptions, and example data to use in each column.

Import Troubleshooting
The following reasons may cause an error and cause import to fail
- If the File Type is not Comma Separated Value (CSV)
- If the Registry is missing or not a valid selection from the list of supported options (not case-sensitive)
- If a Registration Number…
- is missing for a Provider in the file
- is an NPI that is not 10 numbers or entered with non-numeric characters. Additionally, the NPI number will not be matched to a Provider if the number cannot be found in the NPI registry
- in the file is already present within this Provider Account
- is a duplicate entry in the import file for a specific registry (not case-sensitive)
- If a Name is missing for a Provider in the file, regardless of registry specified
Tip: Name will be ignored if the registry is NPI or if a physician was already added with a matching registry and registration number.
Note: Any error in the CSV is also an error in the API. Calls with offending data get a 422 response code with the response body enumerating the text of the errors.
Delete/Undelete Providers
Providers can be deleted. Providers can be undeleted if they are deleted in error.
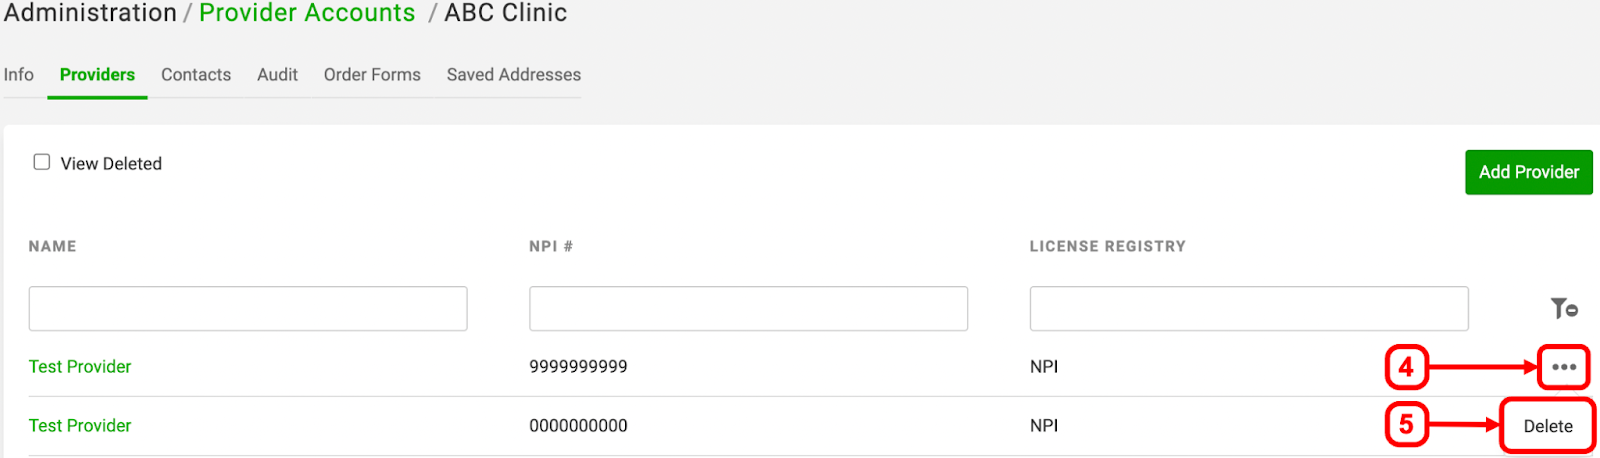
Delete a Provider
1. Navigate to the Provider Accounts Page
A. Click the “More” button in the Dashboard bar
B. Hover over “Business”
C. Select “Provider Accounts”
3. Click the “Providers” tab of the Provider Account
4. Click on the ellipses next to the Provider you want to delete
5. Click Delete in the dropdown menu
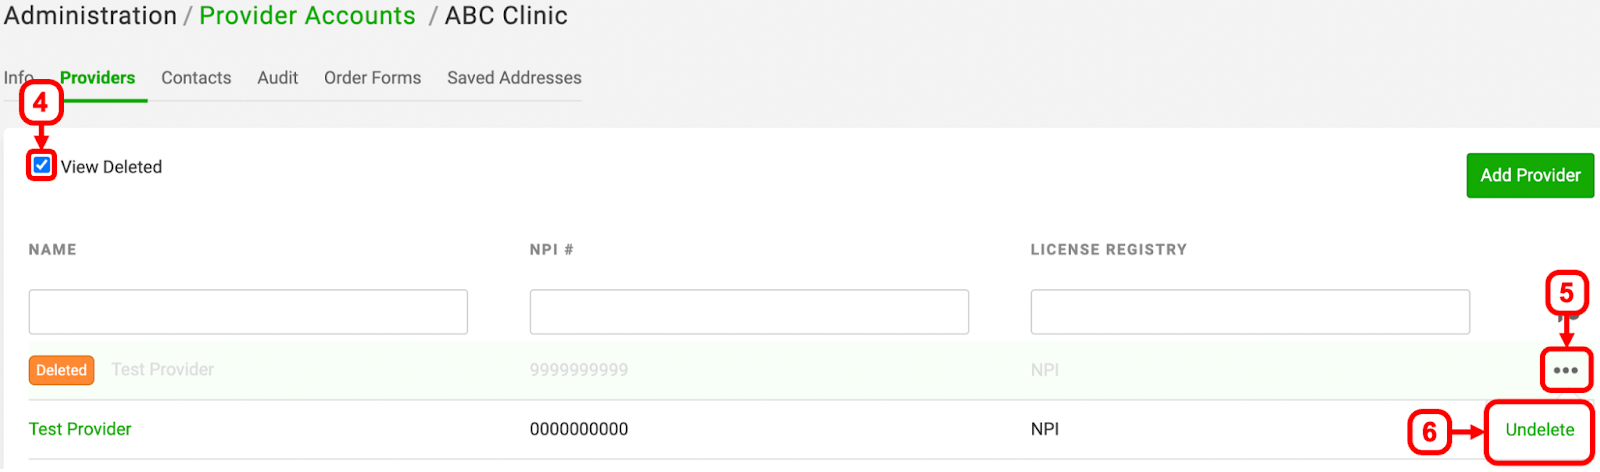
Undelete a Provider
1. Navigate to the Provider Accounts Page
A. Click the “More” button in the Dashboard bar
B. Hover over “Business”
C. Select “Provider Accounts”
3. Click the “Providers” tab of the Provider Account
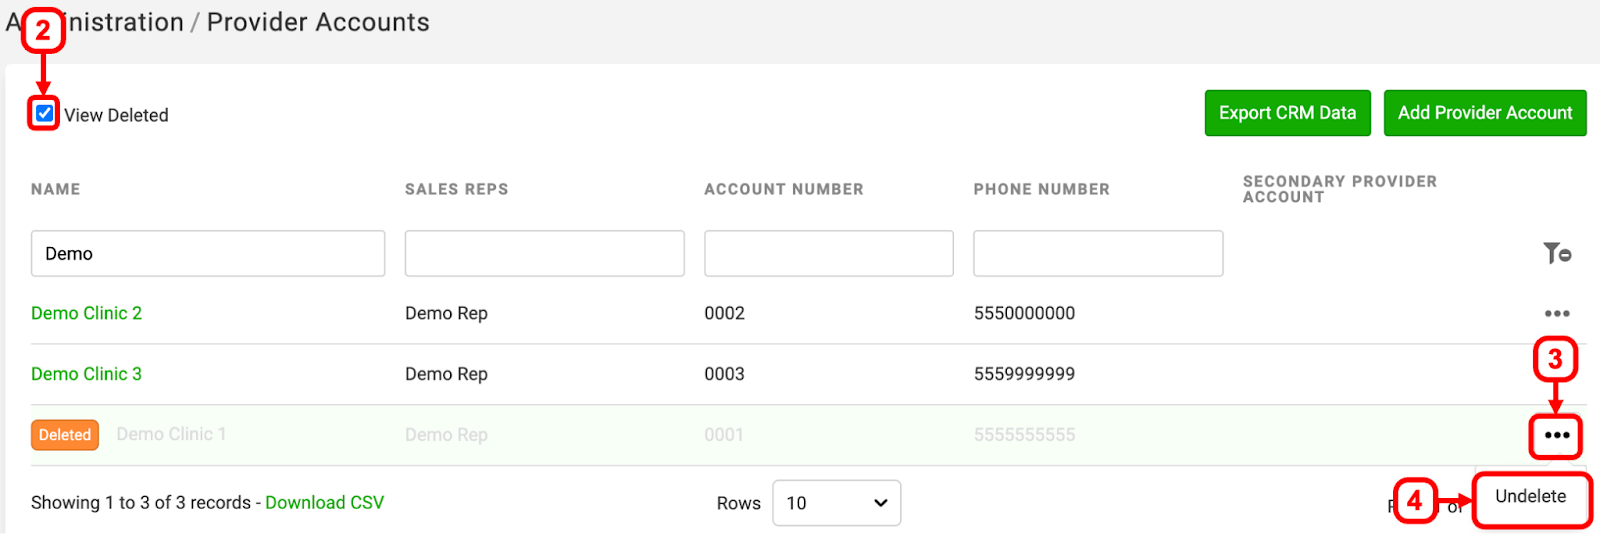
4. Select the checkbox next to “View Deleted”
5. Click on the ellipses next to the Provider Account you want to undelete
6. Click Undelete in the dropdown menu
Add Contacts
A Contact (also known as Provider Contact) is an individual that can be given access to the Ovation Portal on a Provider’s behalf. Contacts with appropriate settings for the Ovation Portal can place Orders and view or download Patient Reports.
Note: Providers must be added as Provider Contacts and associated with themselves as a Provider in the Ovation LIMS to access the Ovation Portal and view/download reports.
There are three options to add Contacts in the Ovation LIMS
- Option 1: Add an Individual Contact within a Provider Account
- Option 2: Add an Individual Contact from the Contacts Page
- Option 3: Import a list of Contacts from the Contacts Page
Option 1: Add an Individual Contact within a Provider Account
This option is recommended for adding an individual Contact to a single Provider Account.
1. Navigate to the Provider Accounts Page
A. Click the “More” button in the Dashboard bar
B. Hover over “Business”
C. Select “Provider Accounts”
3. Click the “Contacts” tab of the Provider Account

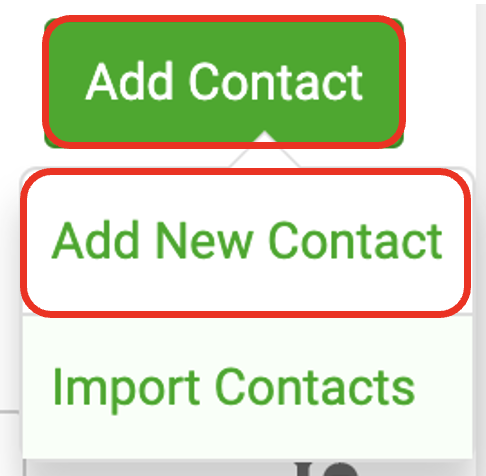
4. Click “Add New Contact”

5. Add the Contact details: first name, last name, email, cell phone number, office phone number, fax number, and notes
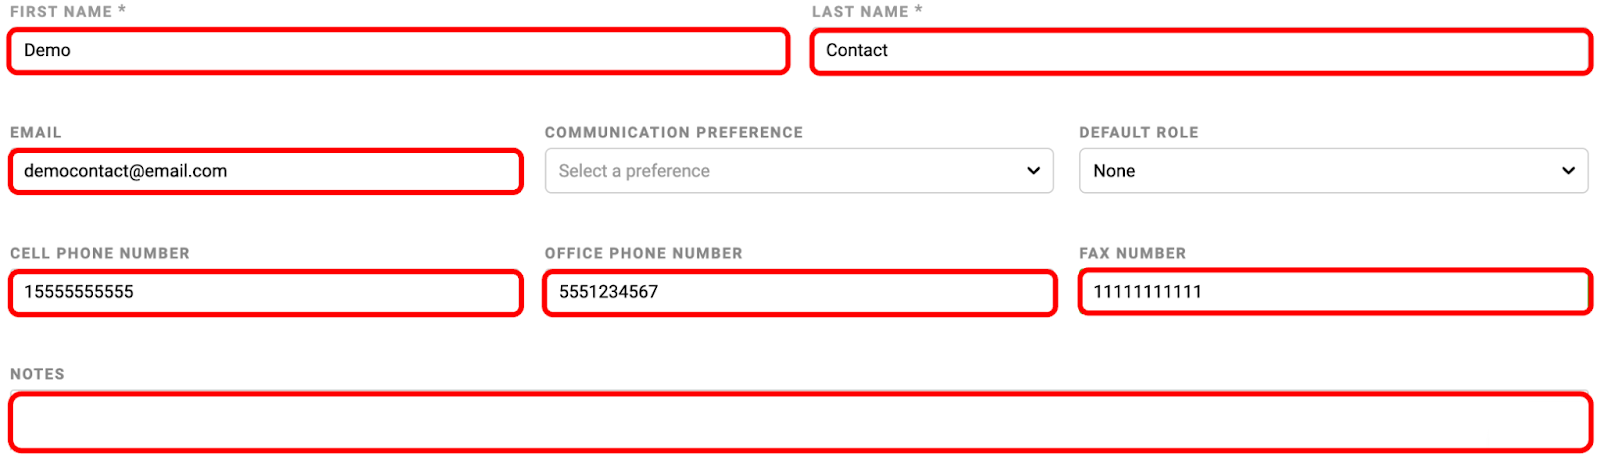
Tip: If adding a fax number, enter only numbers (no dashes) and include the country code. For example, add a “1” at the beginning of US fax numbers.
Note: The Contact “FIRST NAME” and “LAST NAME” are required. An email address must be entered If the Contact will receive patient “email report ready notifications”. A fax number must be entered if the Contact will receive patient reports by fax delivery and if they have a different fax number than the one listed on a Provider Account’s Info tab.
6. Optional: Select the Contact’s Communication Preference

Note: A Communication Preference selection other than “No Preference” will require the corresponding field be completed to save the Contact record: Enter a “Phone Number” for Cell or Text, enter an “Office Phone Number” for Office, and an “Email” for email.
7. Optional: Select the Contact’s Default Role

Note: A Role of “Provider” or “Provider Delegate” is required if the Contact will be using Electronic Signature for Order Forms.
8. Click the green “Create” button
Option 2: Add an Individual Contact from the Contacts Page
This option is recommended to add an individual Contact to multiple Provider Accounts.
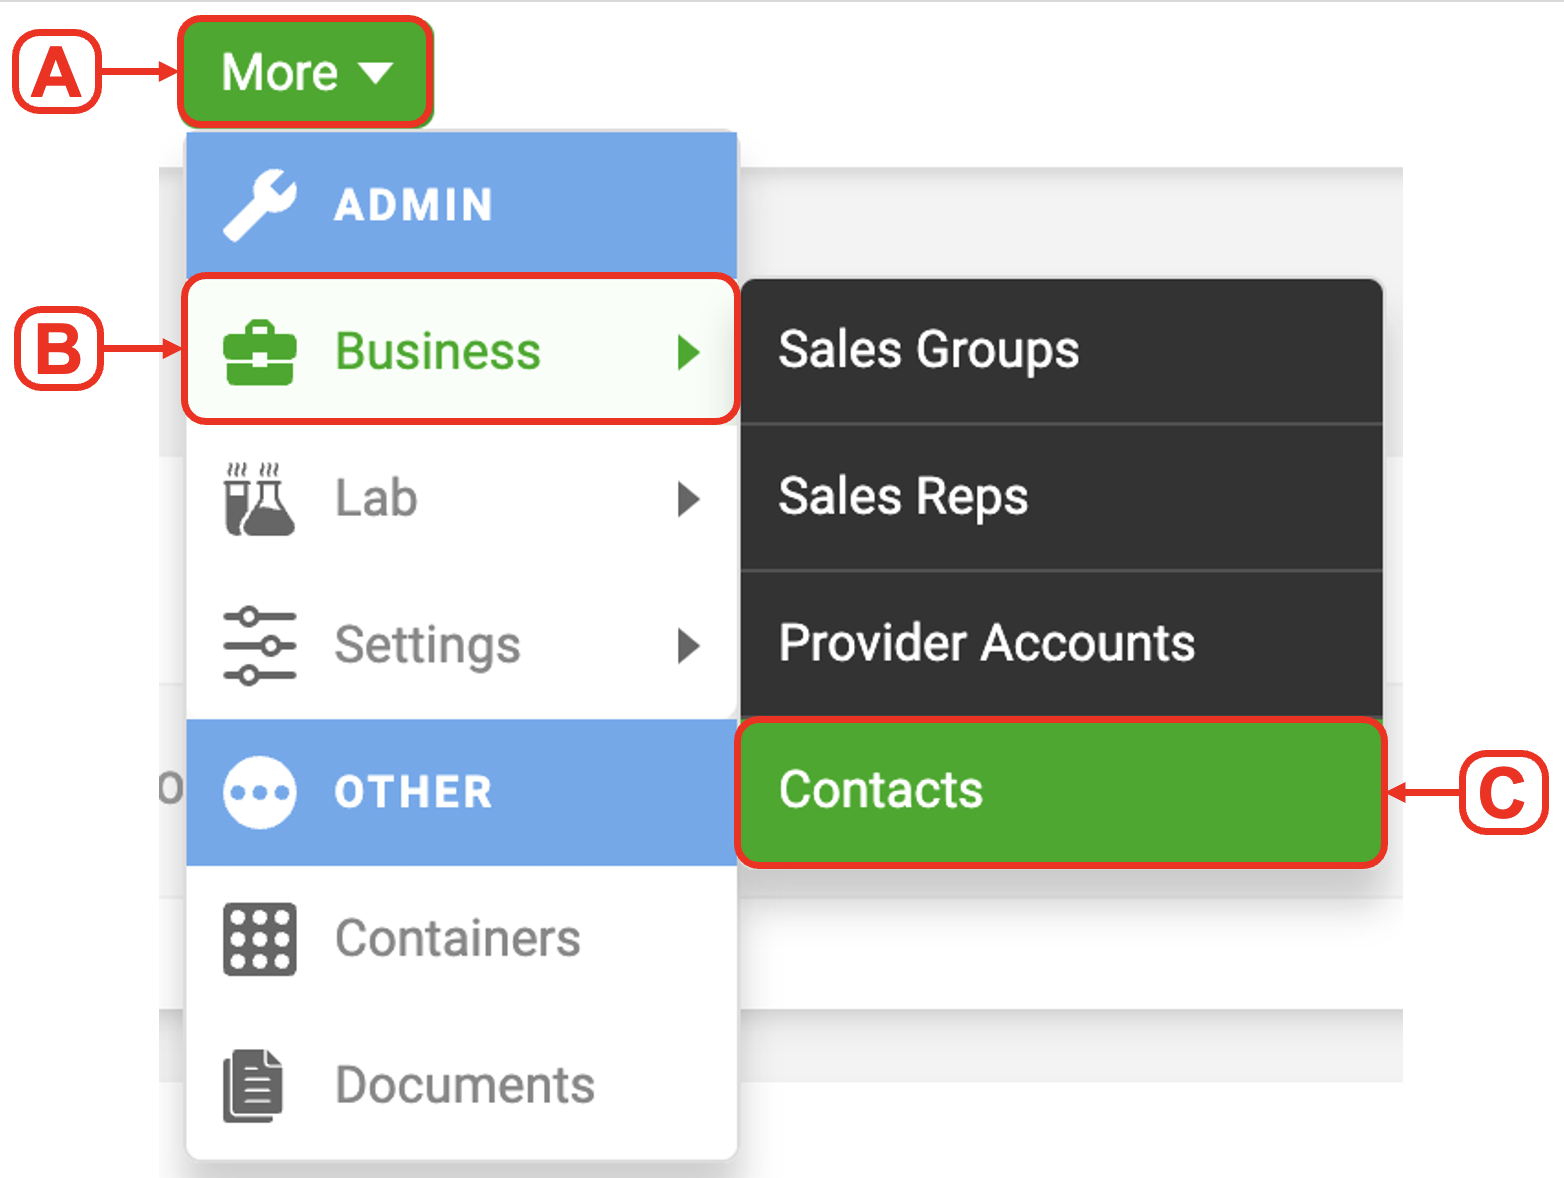
1. Navigate to the Contacts Page
A. Click the “More” button in the Dashboard bar
B. Hover over “Business”
C. Select “Contacts”

3. Add the Contact details: first name, last name, email, cell phone number, office phone number, fax number, and notes
Tip: If adding a fax number, enter only numbers (no dashes) and include the country code. For example, add a “1” at the beginning of US fax numbers.
Note: The Contact “FIRST NAME” and “LAST NAME” are required. An email address must be entered If the Contact will receive patient “email report ready notifications”. A fax number must be entered if the Contact will receive patient reports by fax delivery and if they have a different fax number than the one listed on a Provider Account’s Info tab.
4. Optional: Select the Contact’s Communication Preference
Note: A Communication Preference selection other than “No Preference” will require the corresponding field be completed to save the Contact record: Enter a “Phone Number” for Cell or Text, enter an “Office Phone Number” for Office, and an “Email” for email.
5. Optional: Select the Contact’s Default Role
Note: A Role of “Provider” or “Provider Delegate” is required if the Contact will be using Electronic Signature for Order Forms.
6. Click the green “Create” button
Option 3: Import Contacts from the Contacts Page
This option is recommended for adding many Contacts simultaneously.
1. Navigate to the Contacts Page
A. Click the “More” button in the Dashboard bar
B. Hover over “Business”
C. Select “Contacts”

3. Optional: Click the “Download Temple File” button
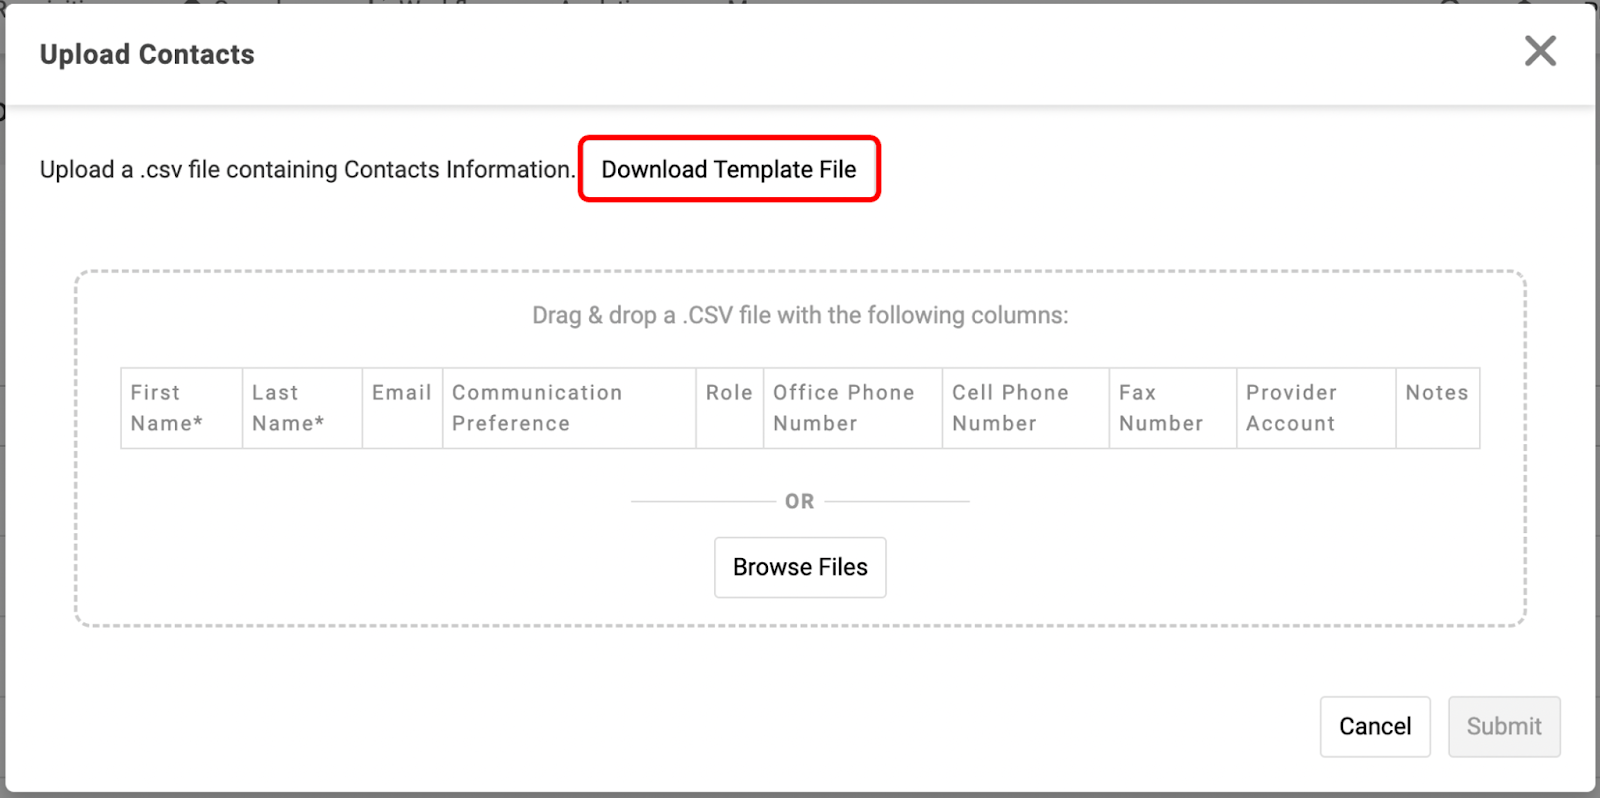
4. Populate your file with the Contacts’ information. See the Contacts Import Formatting table below for formatting guidelines. See the Contacts Import Troubleshooting section for additional assistance.
Tip: Each row in the batch file will become a new Contact in your organization. The columns of the batch file represent fields in the Contact’s Page and required fields will be indicated by an asterisk. (ex: “First Name*” column data is required but “Role” column data is not).
Note: Do not modify Row 1 of the file. The headers (Row 1) in the file must remain the same as the template for your import to populate.
5. Save the populated file as a CSV file
6. Upload your file
- Drag and drop your populated CSV file into the box
OR
- Click “Browse Files” and choose your populated CSV file
7. Click “Submit”
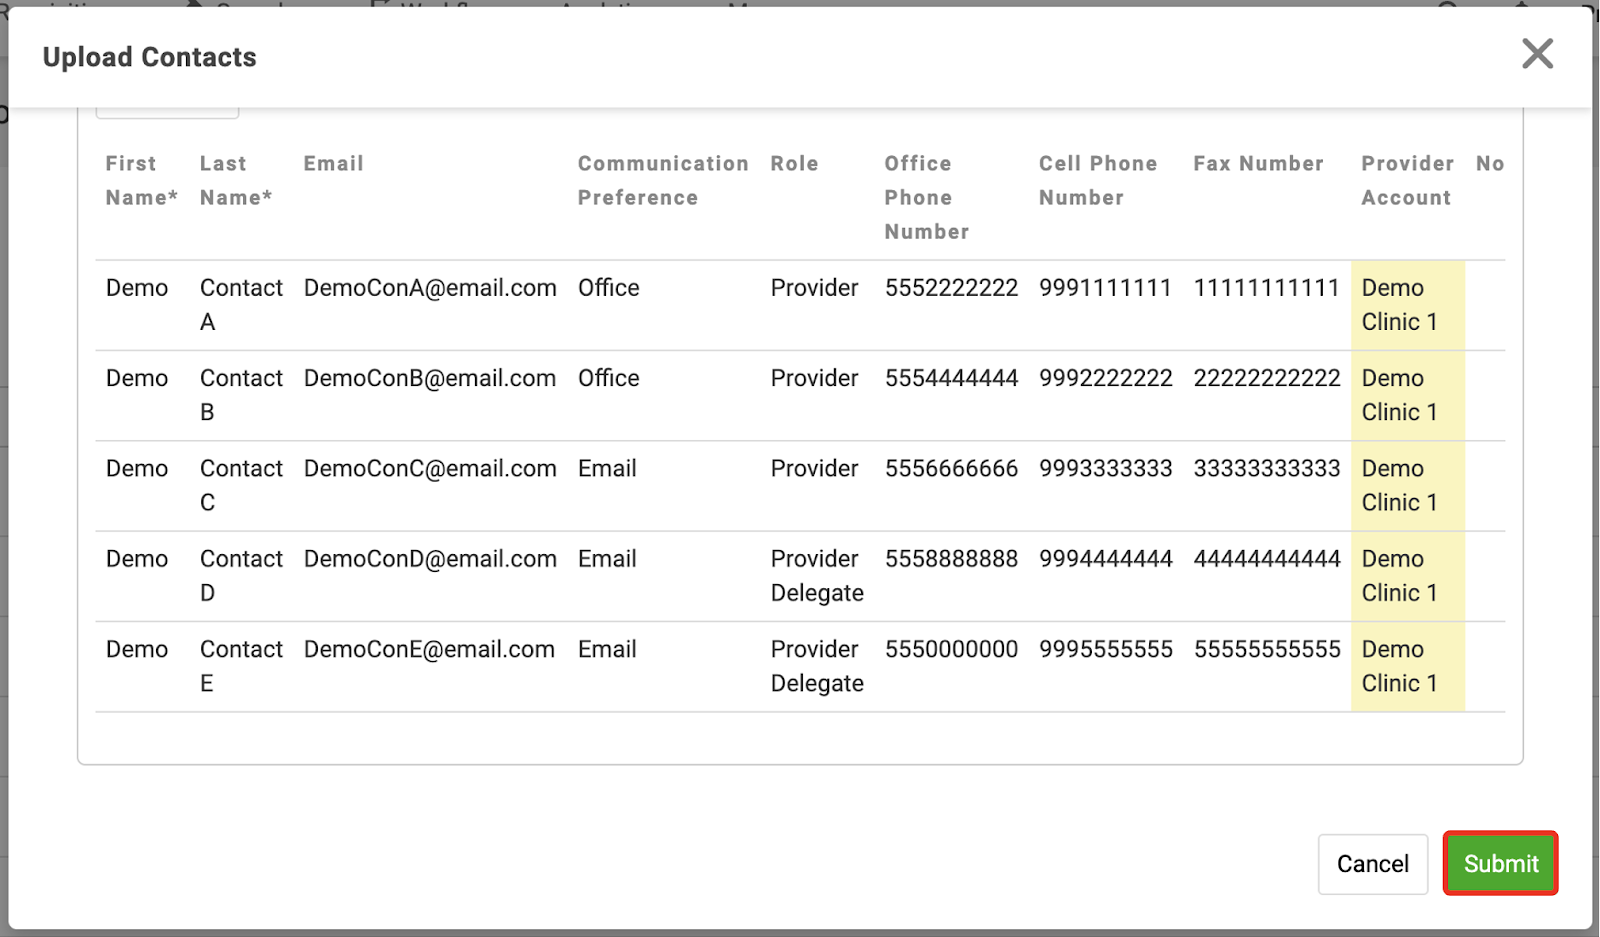
Tip: Contact fields can be edited/updated after the new Contact is created. An edited email causes a notification to be sent to that new email. The notification prompts the Contact to set up a new password for the Ovation Portal. Portal password emails can be resent by clicking the ellipses of the Contact on the Contacts Page.
Import Formatting
The table below lists the formatting for Contact headers, descriptions, and example data to use in each column.
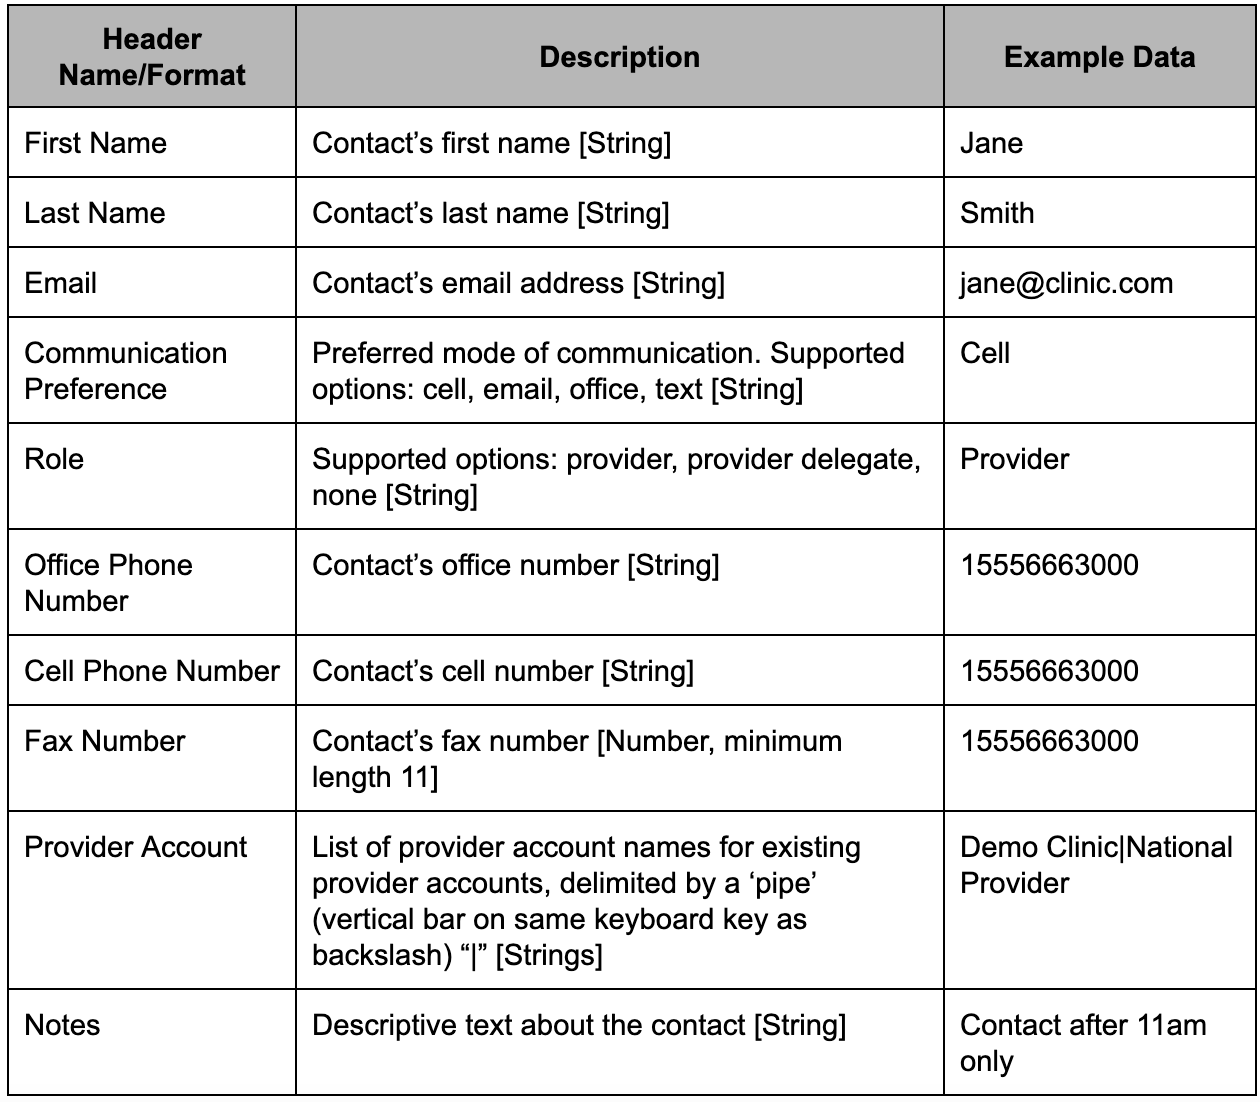
Tip: If adding a fax number, enter only numbers (no dashes) and include the country code. For example, add a “1” at the beginning of US fax numbers.
Import Troubleshooting
The following reasons may cause a warning to display
- If your CSV includes a Provider Account name which does not already exist in the LIMS, a warning will appear and the Provider Account will not be associated
The following reasons may cause an error and cause import to fail
- If the File Type is not Comma Separated Value (CSV)
- If an Email…
- already exists in your organization for another Contact
- is missing for a Contact and their Communication Preference is Email
- If a Contact’s Communication Preference is not a supported option
- If a Contact’s Role is not a supported option
- If an Office Phone Number is missing for a Contact and their Communication Preference is Office Phone
- If a Cell Phone Number is missing for a Contact and their Communication Preference is Cell or Text
- If a Fax Number is less than 11 numbers or if non-numeric characters are present
- If Notes are greater than 500 characters
Note: Any error in the CSV is also an error in the API. Calls with offending data get a 422 response code with the response body enumerating the text of the errors.
Remove/Delete/Undelete Contacts
Contacts can be removed from Individual Provider Accounts as needed. Contacts can also be deleted from the Contacts Page. Contacts can be undeleted if they are deleted in error.
Remove a Contact from an Individual Provider Account
1. Navigate to the Provider Accounts Page
A. Click the “More” button in the Dashboard bar
B. Hover over “Business”
C. Select “Provider Accounts”
3. Click the “Contacts” tab of the Provider Account
4. Click on the ellipses next to the Provider you want to remove
5. Click Remove in the dropdown menu

Delete a Contact
1. Navigate to the Contacts Page
A. Click the “More” button in the Dashboard bar
B. Hover over “Business”
C. Select “Contacts”
3. Click Delete in the dropdown menu

Undelete a Contact
1. Navigate to the Contacts Page
A. Click the “More” button in the Dashboard bar
B. Hover over “Business”
C. Select “Contacts”
3. Click on the ellipses next to the Provider Account you want to undelete
4. Click Undelete in the dropdown menu

Manage Contacts
Provider Contacts added individually or imported on the Contacts Page will then need Provider Accounts and Providers Associated. After Associating, Contact Settings for Report Delivery Preferences, Role, and Primary Contact can be set. These associations and settings give Contacts access to the Ovation Portal. The Ovation Portal allows Contacts to place Orders and view/download Patient Reports.
Associate/Disassociate Contact(s) with Provider Accounts
The following section describes how to associate and disassociate Contacts with Provider Accounts. There are two ways to associate or disassociate Provider Accounts and Contacts.
Use the method that best suits your goal
Option 1: Associate/Disassociate one Contact and available Provider Accounts
1. Navigate to the Contacts Page
A. Click the “More” button in the Dashboard bar
B. Hover over “Business”
C. Select “Contacts”

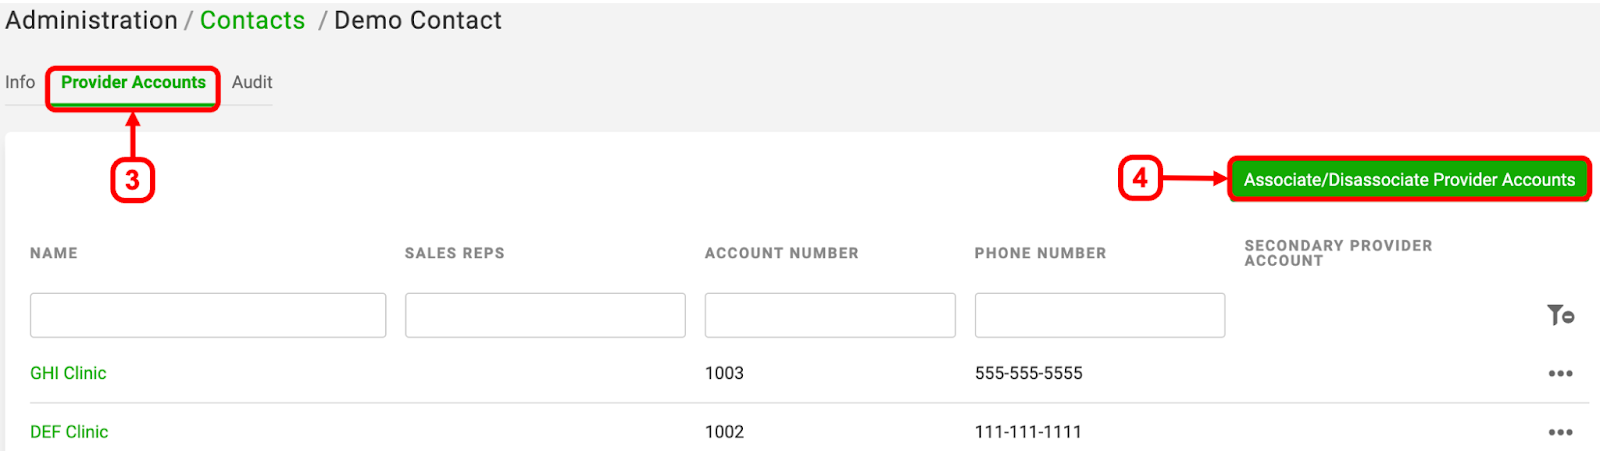
3. Click the Provider Accounts tab
4. Click “Associate/Disassociate Provider Accounts” button
5. Choose to associate or disassociate Provider Accounts:
Associate: Available Provider Accounts are on the left side of the modal. Select the Checkboxes next to the Provider Account(s) you want to associate
Disassociate: Associated Provider Accounts are on the right side of the Modal. Select the Checkboxes next to the Provider Account(s) you want to disassociate
Tip: Selecting the top checkbox will automatically choose all Provider Accounts on the respective side of the modal for association/disassociation
6. Complete the Association/Disassociation
Associate: Click the green “Associate Provider Accounts” button at the top
Disassociate: Click the red “Disassociate Provider Accounts” button at the top
7. Click the green “Save” button
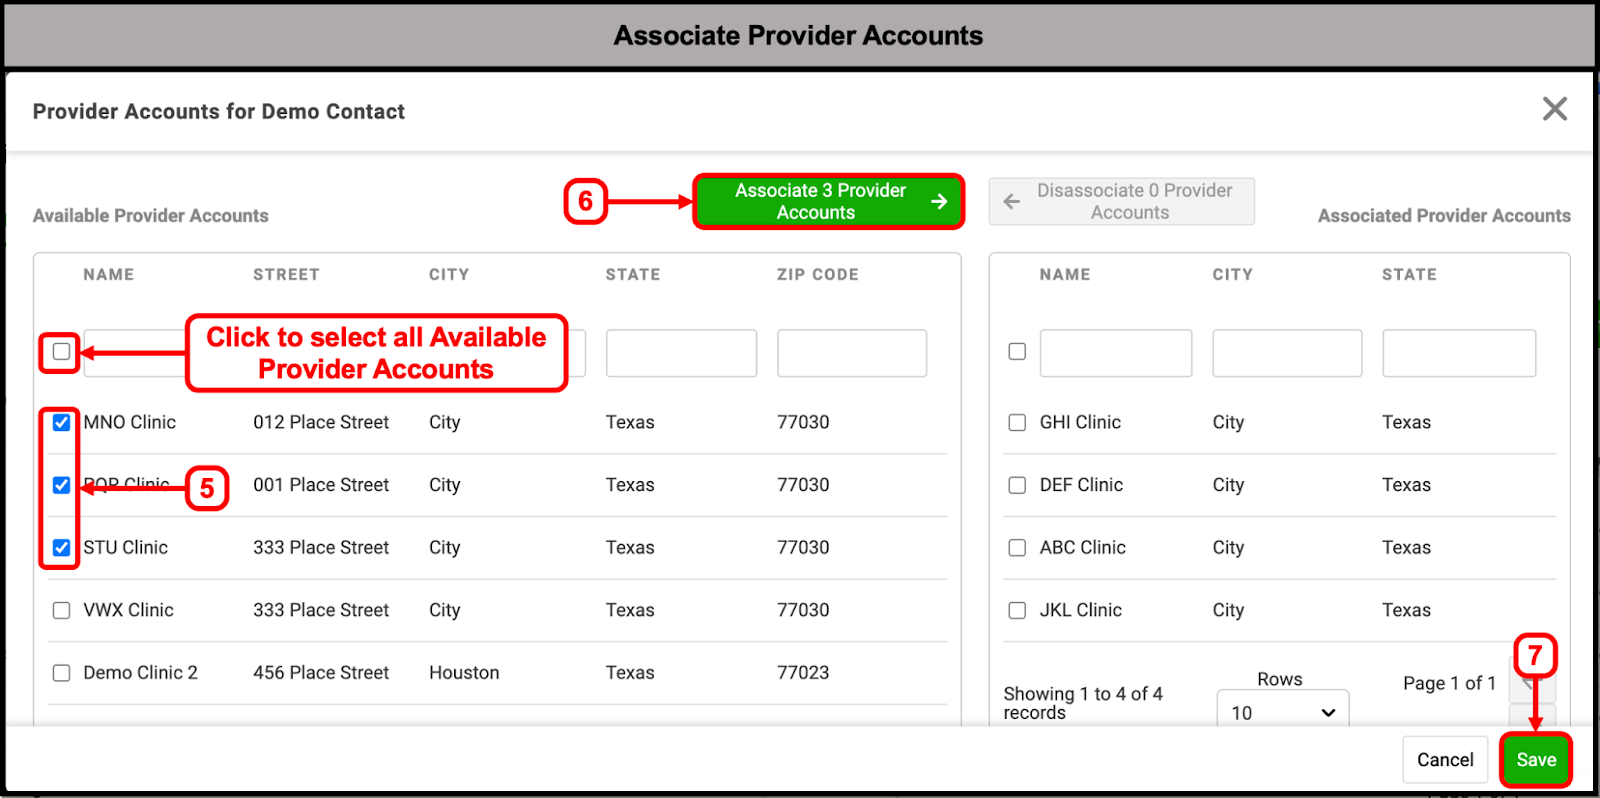
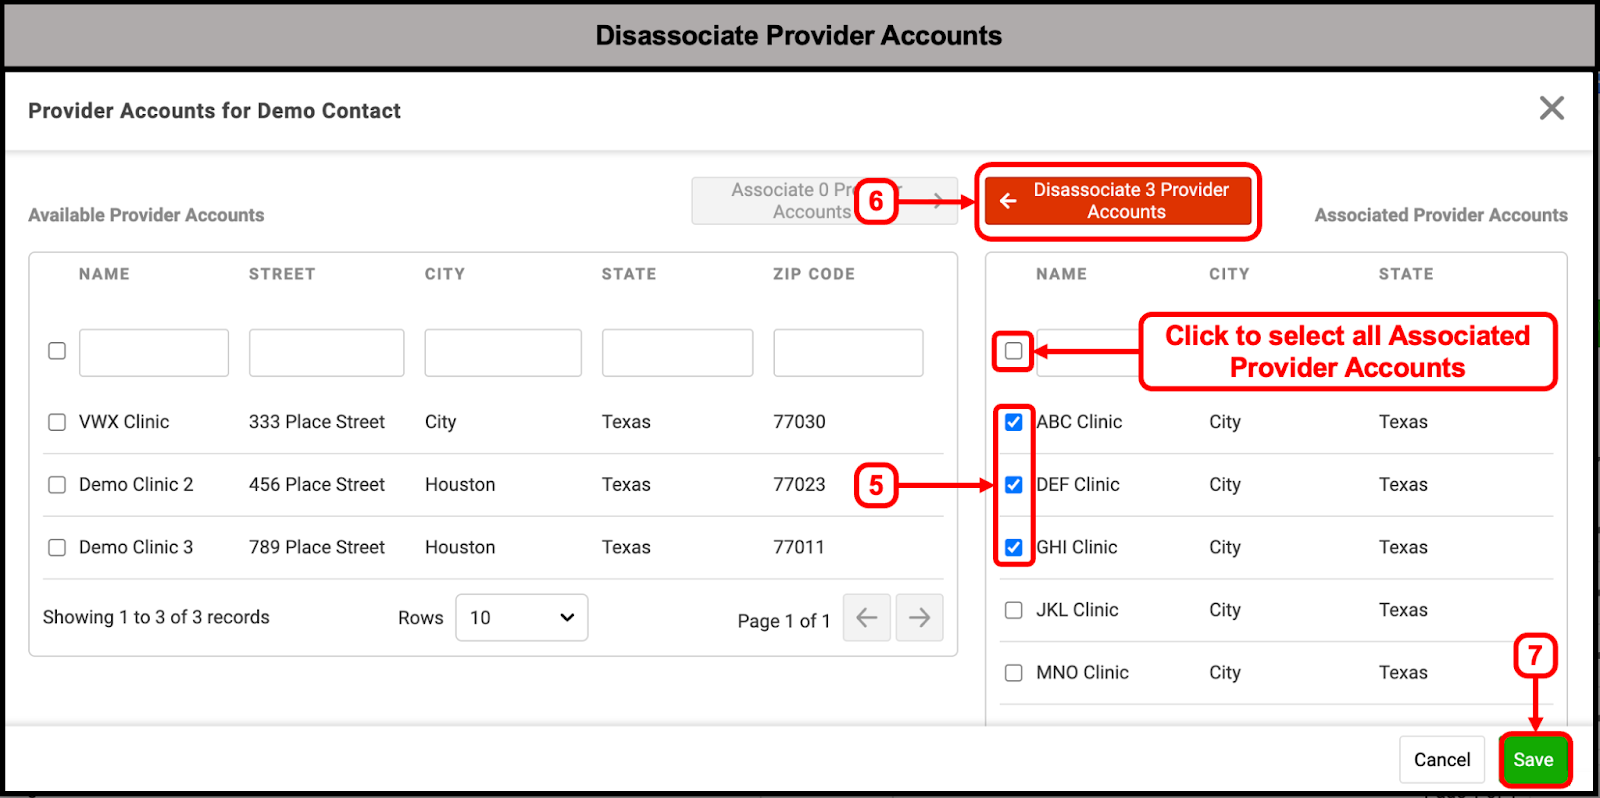
Note: If a Provider Account that you associated to the Contact has “Associate All Contacts with All Providers” toggle ON, then the Contact will automatically be associated to all available Providers within that Provider Account. If any Provider Account you associated to the Contact has the “Associate All Contacts with All Providers” toggle OFF, you will then need to go into the Provider Account and associate Providers to that Contact.

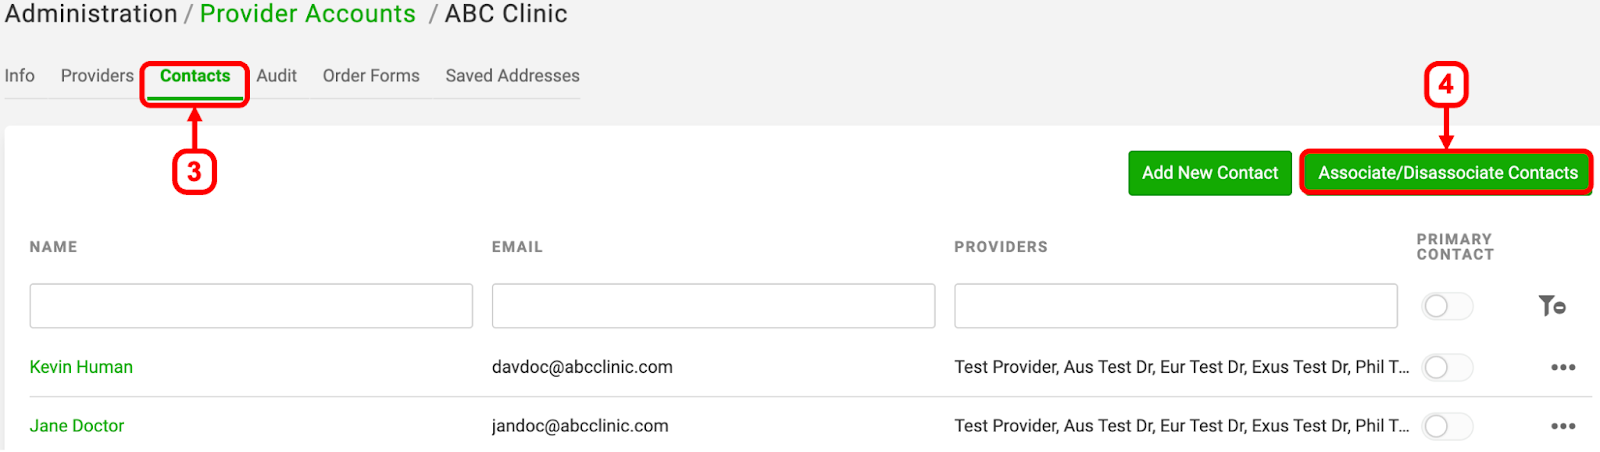
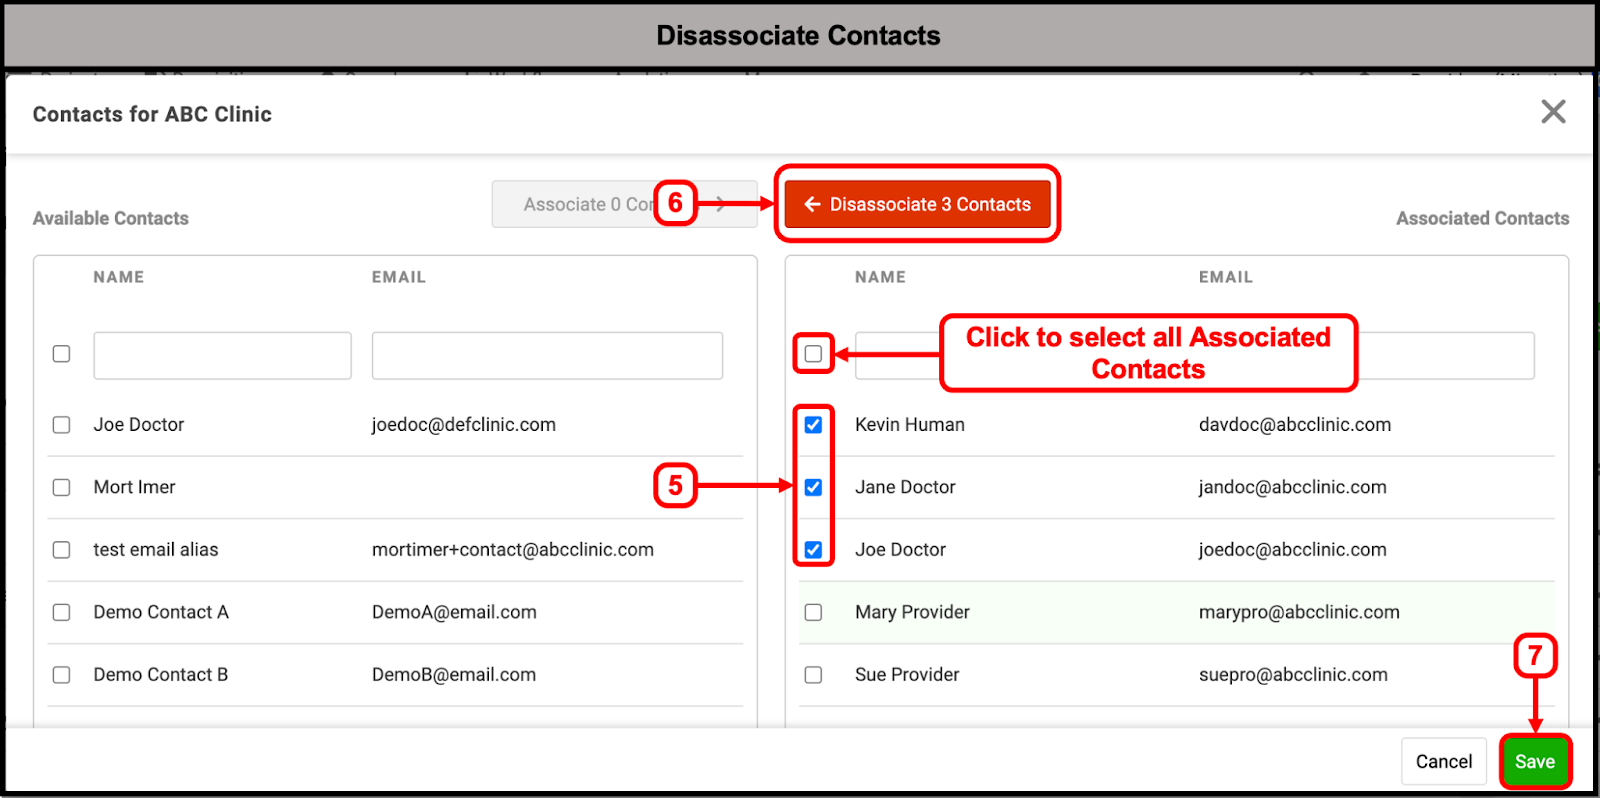
Option 2: Associate/Disassociate one Provider Account and available Contacts
1. Navigate to the Provider Accounts Page
A. Click the “More” button in the Dashboard bar
B. Hover over “Business”
C. Select “Provider Accounts”
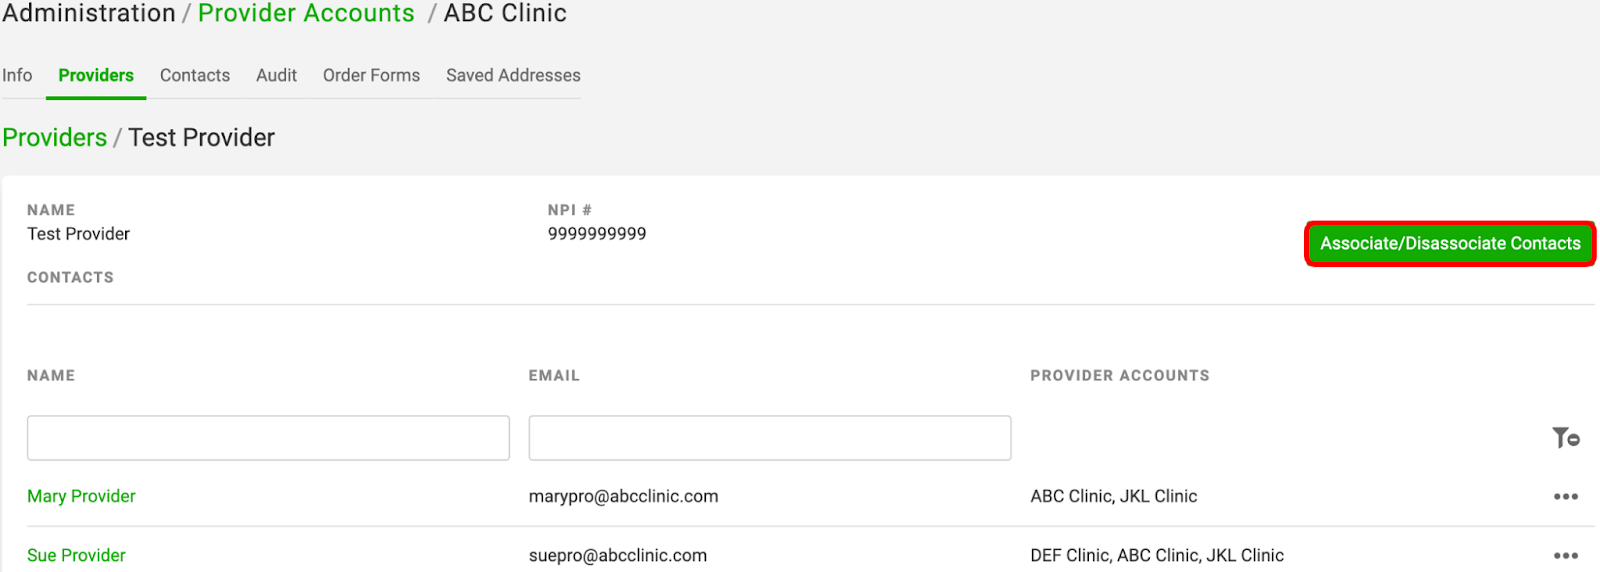
3. Click the “Contacts” tab of the Provider Account
4. Click the “Associate/Disassociate Contacts” button
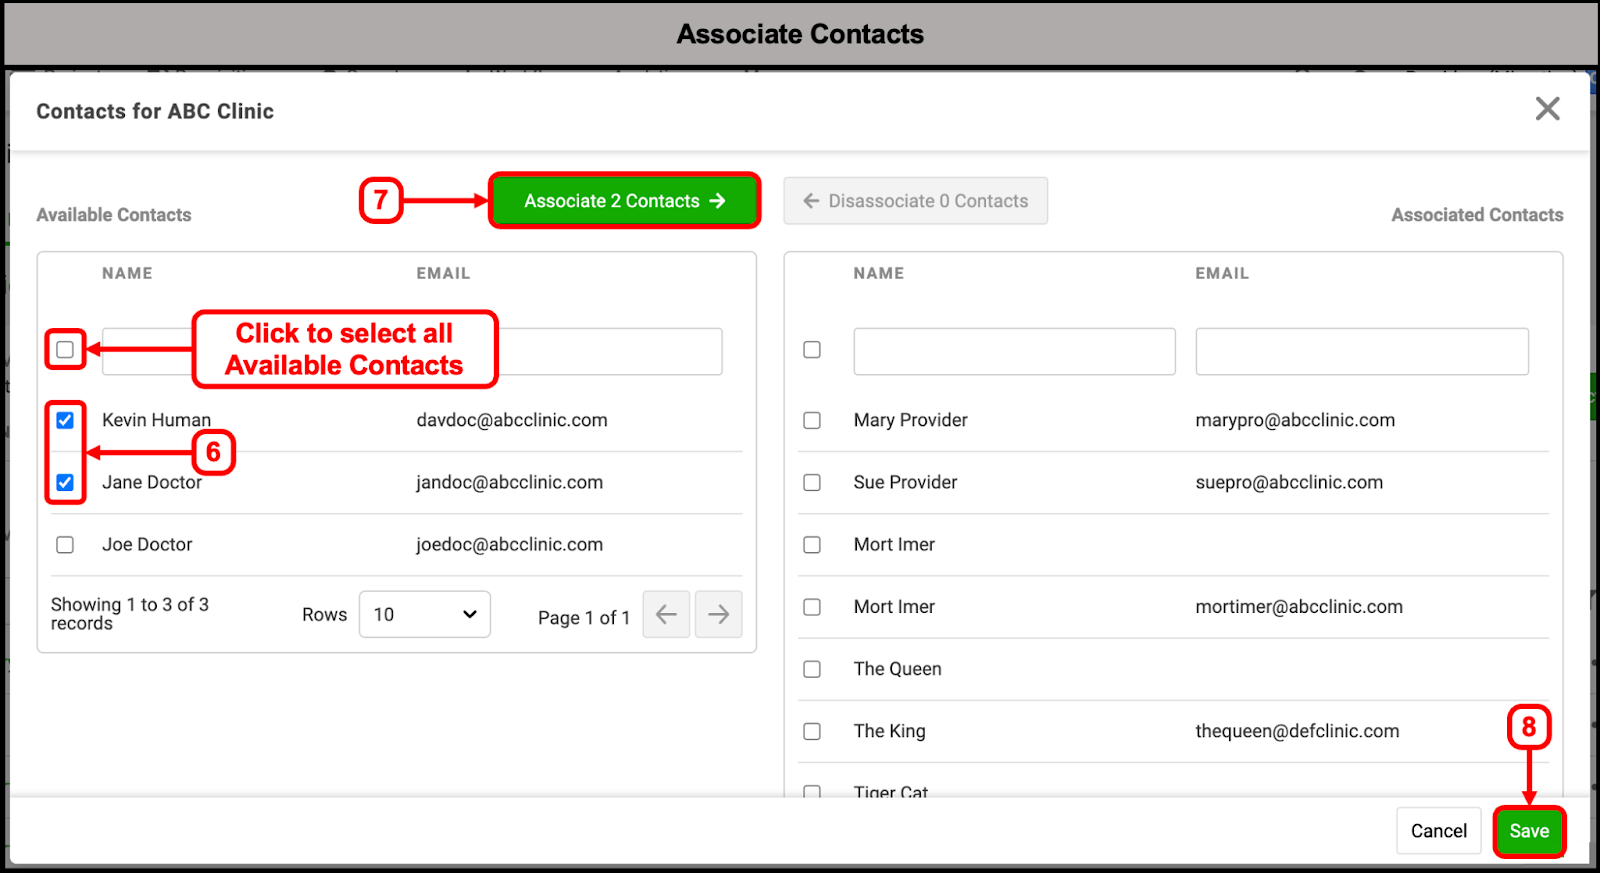
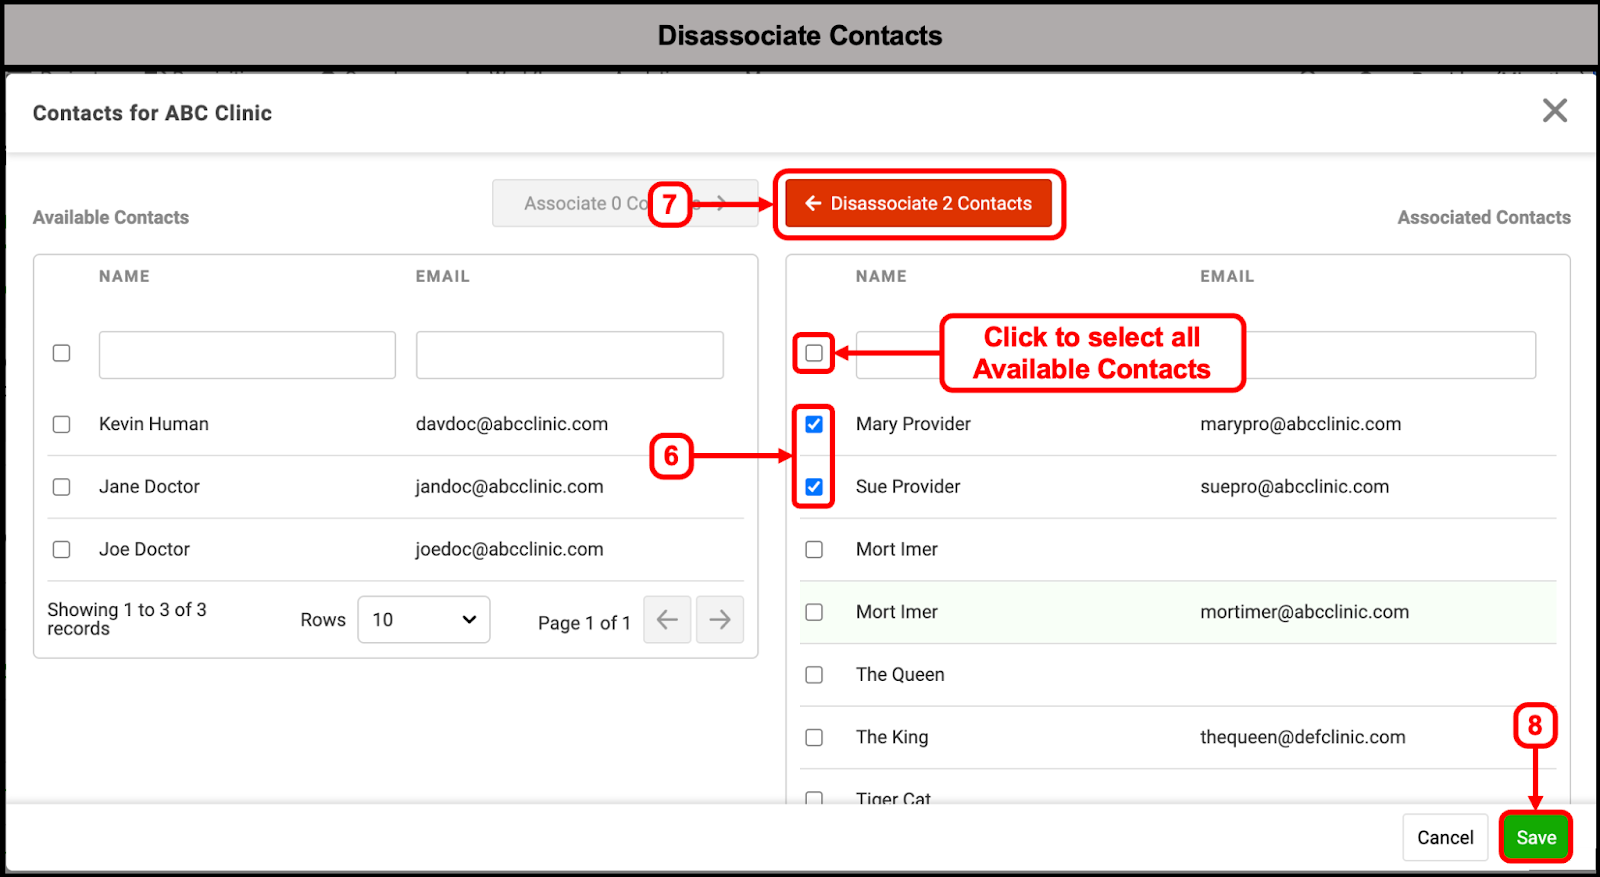
5. Choose to associate or disassociate Contacts:
Associate: Available Contacts are on the left side of the modal. Select the Checkboxes next to the Contact(s) you want to associate
Disassociate: Associated Contacts are on the right side of the Modal. Select the Checkboxes next to the Contact(s) you want to disassociate
Tip: Selecting the top checkbox will automatically choose all Contacts on the respective side of the modal for association/disassociation
6. Complete the Association/Disassociation
Associate: Click the green “Associate Contacts” button at the top
Disassociate: Click the red “Disassociate Contacts” button at the top
7. Click the green “Save” button
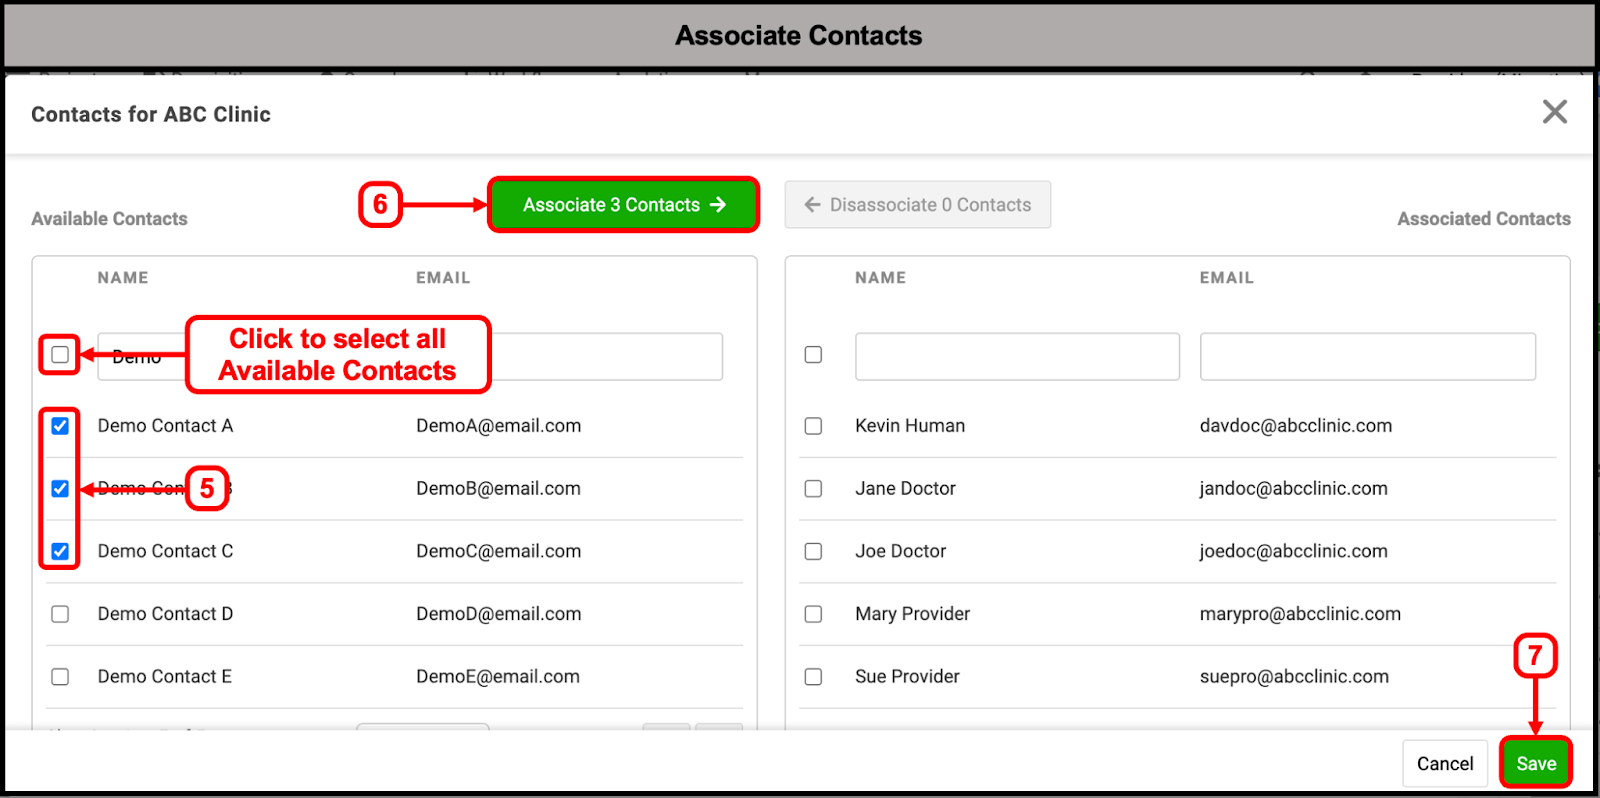
Note: If Contacts are associated to a Provider Account that has the “Associate All Contacts with All Providers” toggle ON, then the Contact(s) will automatically be associated to all available Providers within that Provider Account. If the Contact(s) are associated to a Provider Account that has the “Associate All Contacts with All Providers” toggle OFF, you will then need to go into the individual Contacts’ Pages and associate Providers.
Associate/Disassociate Contacts with Providers
The following section describes how to associate and disassociate Contacts with Providers. Contacts will only have access to the Ovation Portal if they have at least one associated Provider. Contacts can view patient reports in the Portal if they are associated with the Provider on the Order/Requisition Form. There are two ways to associate or disassociate Provider Accounts and Contacts.
Use the method that best suits your goal
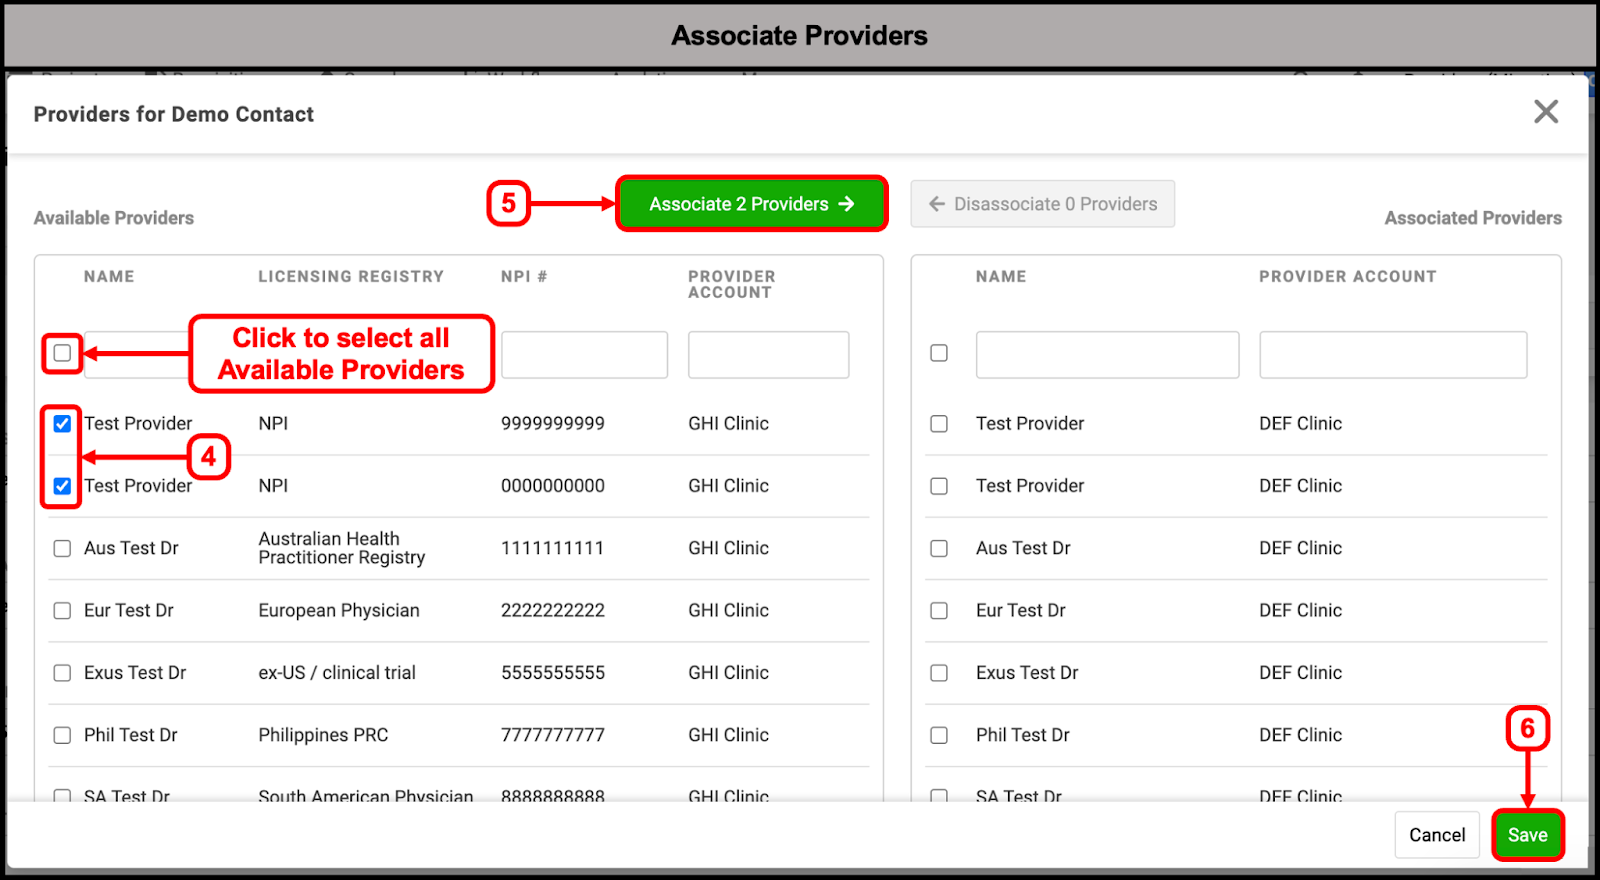
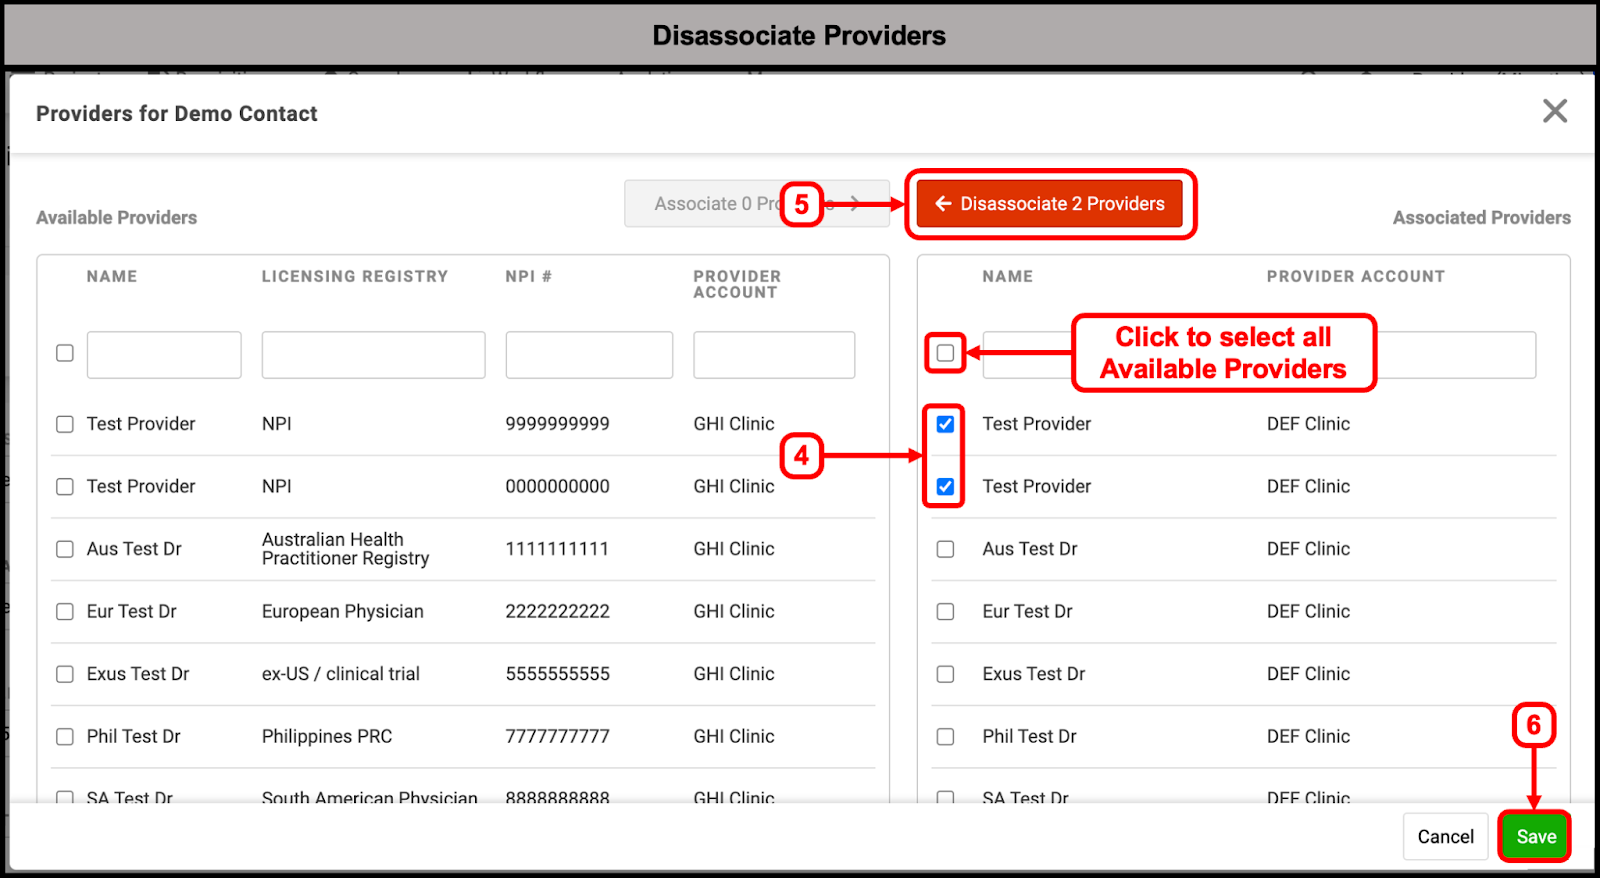
Option 1: Associate/Disassociate one Contact and available Providers
1. Navigate to the Contacts Page
A. Click the “More” button in the Dashboard bar
B. Hover over “Business”
C. Select “Contacts”
Note: Contacts can also be associated with Providers by accessing the Contact Record from within a Provider Account’s Contacts tab. After selecting the Contact for association, follow the steps below.
3. Scroll down to the bottom of the Contact’s Info Page and click the “Associate/Disassociate Providers” button

4. Choose to associate or disassociate Providers:
Associate: Available Providers are on the left side of the modal. Select the Checkboxes next to the Provider(s) you want to associate
Disassociate: Associated Providers are on the right side of the Modal. Select the Checkboxes next to the Provider(s) you want to disassociate
Tip: Selecting the top checkbox will automatically choose all Providers on the respective side of the modal for association/disassociation. Search and filter, or scroll down in the modal to see more Providers.
Note: If no Providers are listed as available, add Providers to the Provider Account

5. Complete the Association/Disassociation
Associate: Click the green “Associate Providers” button at the top
Disassociate: Click the red “Disassociate Providers” button at the top
6. Click the green “Save” button
Option 2: Associate/Disassociate one Provider and available Contacts
1. Navigate to the Provider Accounts Page
A. Click the “More” button in the Dashboard bar
B. Hover over “Business”
C. Select “Provider Accounts”
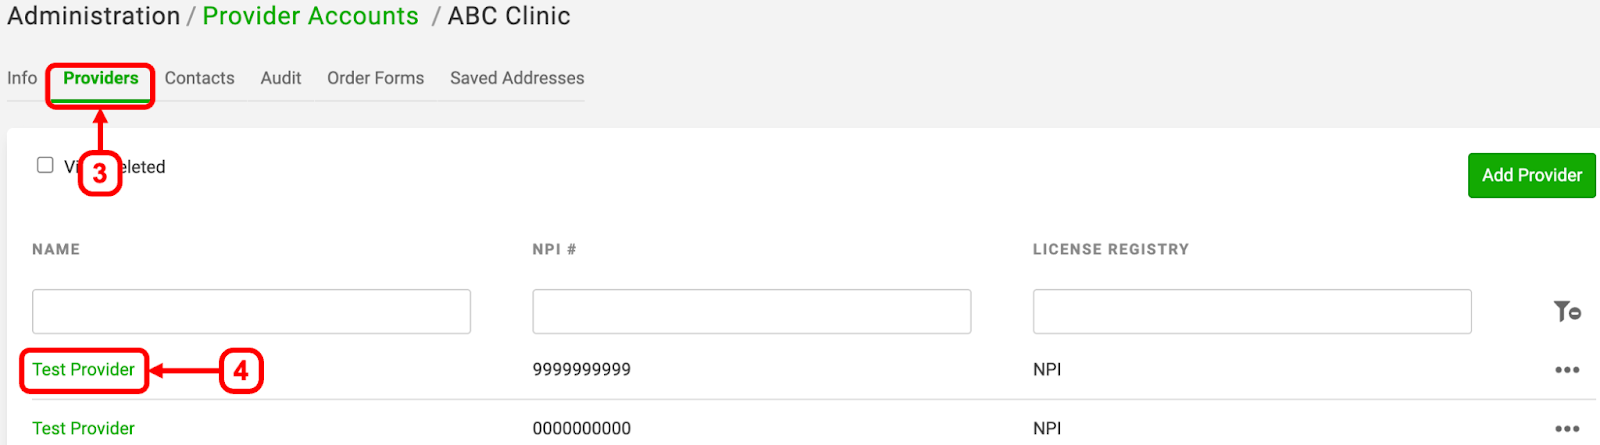
3. Click the “Providers” tab of the Provider Account
4. Search and select a Provider
5. Click the “Associate/Disassociate Contacts” button
6. Choose to associate or disassociate Contacts:
Associate: Available Contacts are on the left side of the modal. Select the Checkboxes next to the Contact(s) you want to associate
Disassociate: Associated Contacts are on the right side of the Modal. Select the Checkboxes next to the Contact(s) you want to disassociate
Tip: Selecting the top checkbox will automatically choose all Providers on the respective side of the modal for association/disassociation. Search and filter, or scroll down in the modal to see more Contacts.
7. Complete the Association/Disassociation
Associate: Click the green “Associate Contacts” button at the top
Disassociate: Click the red “Disassociate Contacts” button at the top
8. Click the green “Save” button
Contacts Settings - Patient Report Delivery Preferences
A Provider Account’s Report Delivery Preferences are the default for all Providers and Contacts associated to the account. However, many Contacts may need Provider specific report delivery settings that differ from a Provider Account’s default settings. Provider Account report delivery preferences can be overridden at the Provider level within each Contact’s Page.
Provider Account Report Deliver Preferences settings are shown below:
- Fax signed reports - Automatically sends signed Patient Reports to the fax number listed on the Provider Account Info tab.
- Fax signed reports to contacts - Automatically sends signed Patient Reports to the fax number listed in a Contact’s record.
- Email report ready notifications to contacts - Automatically sends an email notification to the email address on the Contact’s record. These email notifications say that Patient Reports are ready for viewing or download from the Ovation Portal.
Tip: The report delivery preferences of a Provider Account are found on the Provider Account’s Info Page. The default Provider Account Settings are also shown on Contact Pages.
Modify Report Delivery Preferences on a Provider level for an individual Contact using the steps below.
1. Navigate to the Contacts Page
A. Click the “More” button in the Dashboard bar
B. Hover over “Business”
C. Select “Contacts”
3. Scroll down to the ‘Providers’ section. This will show the default report delivery preferences of the associated Provider Accounts for each associated Provider.
Faxed Signed Reports Column
- Managed by Provider Account (Enabled): The Provider Account’s “Fax signed reports to contacts” toggle is on
- Managed by Provider Account (Disabled): The Provider Account’s “Fax signed reports to contacts” toggle is off
Email Contact when Report is Ready Column
- Managed by Provider Account (Enabled): The Provider Account’s “Email report ready notifications to contacts” toggle is on
- Managed by Provider Account (Disabled): The Provider Account’s “Email report ready notifications to contacts” toggle is off
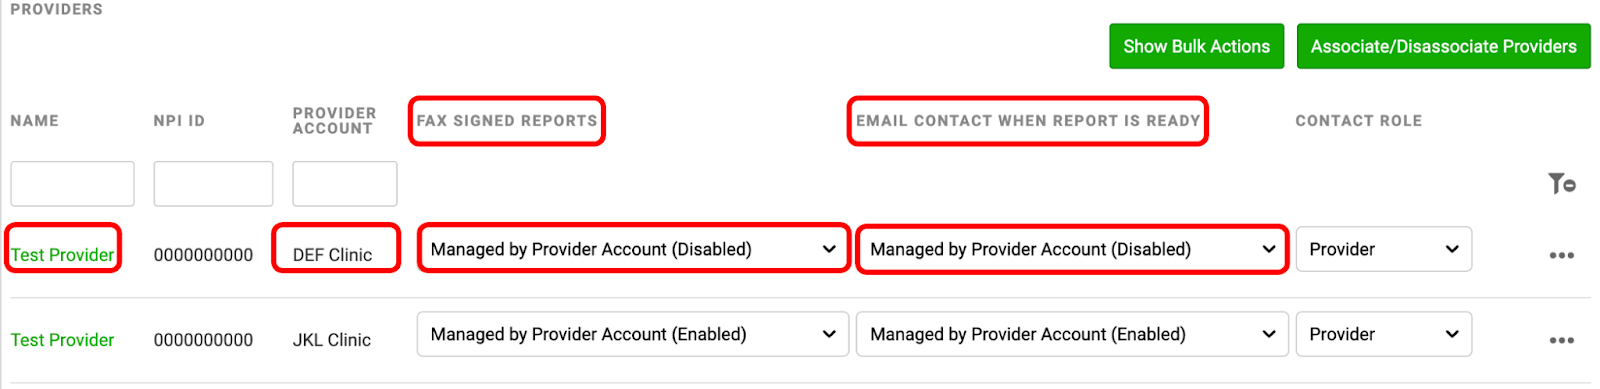
Tip: For Test Provider at Provider Account DEF Clinic, the default fax and email report delivery settings are off. This Contact will not receive reports to the fax or email on their contact record unless these settings are overridden by changing the settings in the dropdown menus using steps 4 and 5 below.
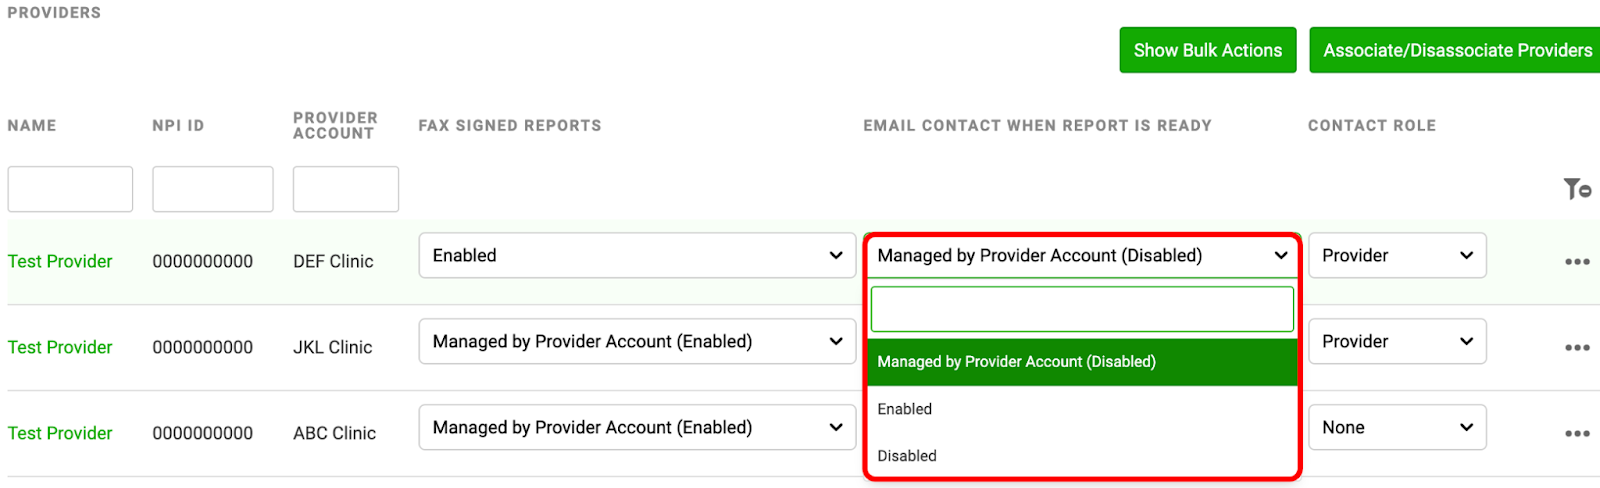
4. Optional: Change the FAX SIGNED REPORTS default setting to override the Provider Account setting. Enabled will trigger signed reports to be sent to the Contact’s fax number. Disabled will prevent signed reports from being sent to the Contact’s fax number

5. Optional: Change the EMAIL CONTACT WHEN REPORT IS READY default setting to override the Provider Account setting. Enabled will send a notification that a signed report is ready to be viewed/downloaded in the Ovation Portal to the Contact’s email. Disabled will prevent report ready notifications from being sent to the Contact’s email.
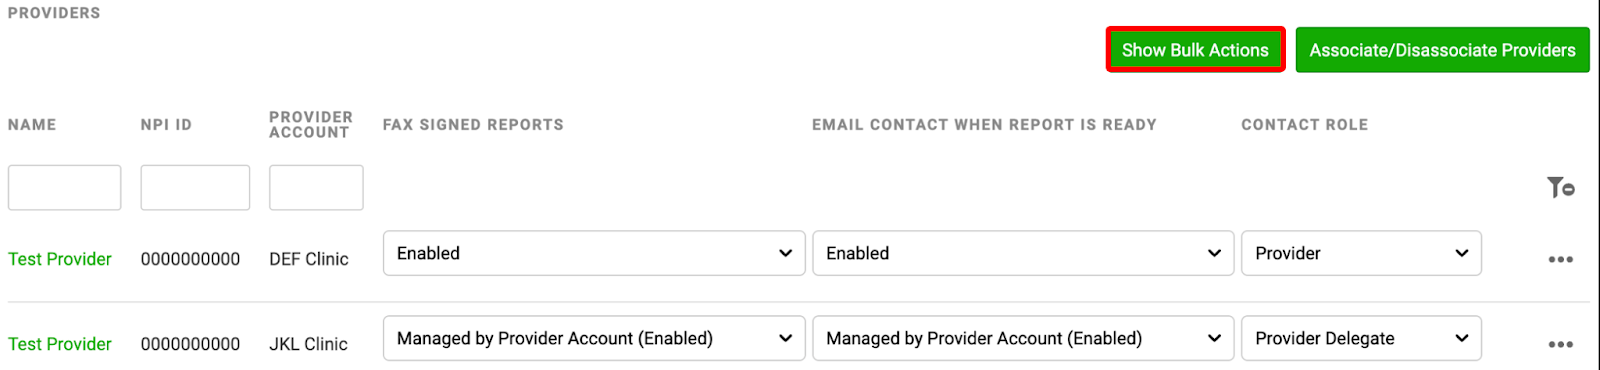
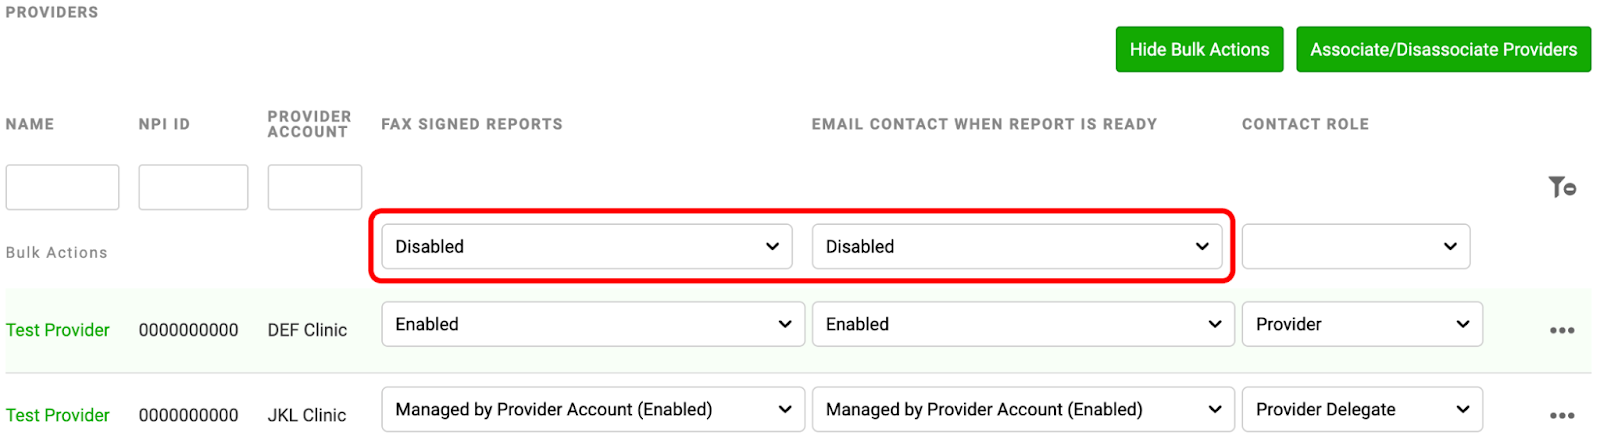
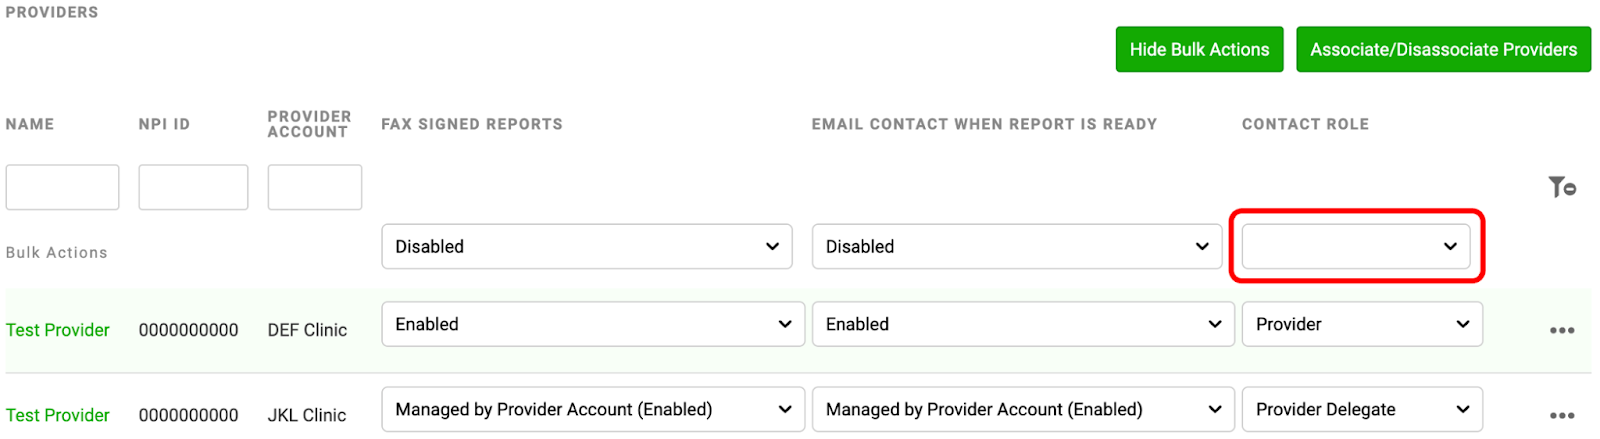
Tip: Report Deliver Preference settings can be overridden for all Provider Accounts and Providers of this Contact using the “Show Bulk Actions” feature. Click the “Show Bulk Actions” button and use the revealed dropdown menus to override all Report Delivery Preferences at once.
Contact Settings - Contact Role
Contact Role is now set at the individual Provider level within a Contact’s Page. Contact Role can be set to None, Provider, or Provider Delegate. Provider and Provider Delegate Roles enable the use of electronic signature for Orders/Requisition Forms. See our Online Ordering - Full Guide article for more details.
1. Navigate to the Contacts Page
A. Click the “More” button in the Dashboard bar
B. Hover over “Business”
C. Select “Contacts”
2. Search and select a Contact
3.Scroll down to the ‘Providers’ section. This will show the default Roles that this Contact has for their associated Provider Accounts and associated Providers.

4. Optional: click the Role dropdown menu and select the appropriate Role for the Contact at this Provider Account using this Provider.
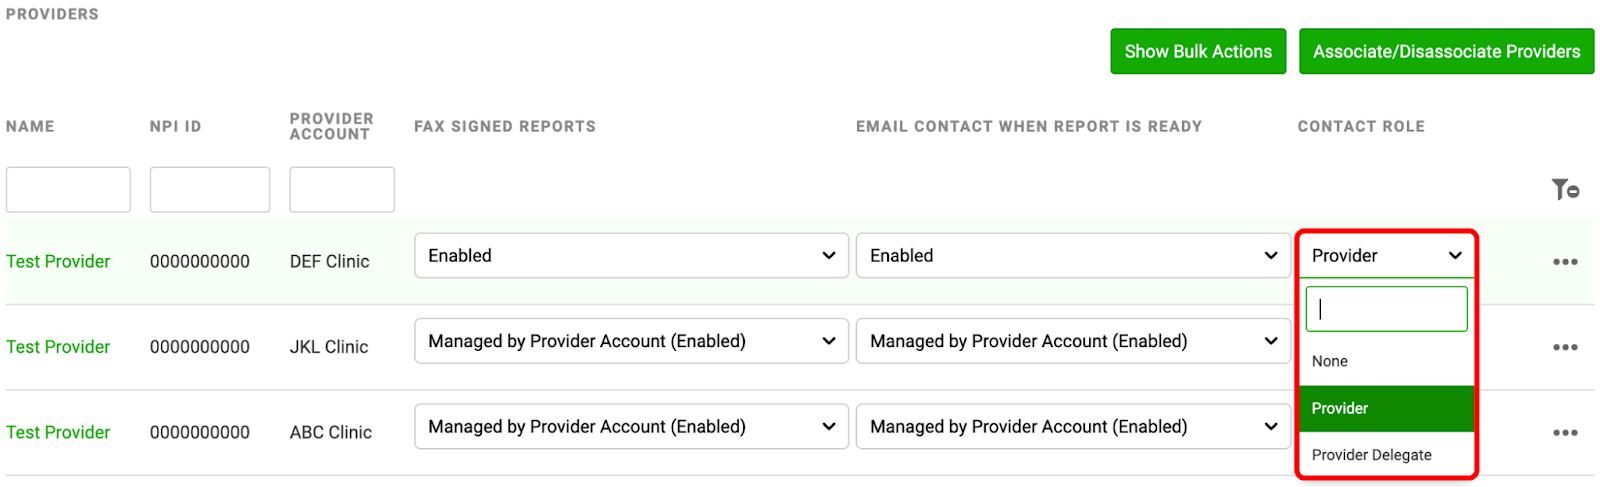
Tip: Contact Roles can be assigned for all Providers across all Provider Accounts using the “Show Bulk Actions” feature. Click the “Show Bulk Actions” button and use the revealed dropdown menus to assign this Contact one Role across all associated Providers and Provider Accounts.
Contact Settings - Primary Contact
Primary Contact allows access to Analytics in the Ovation Portal. Primary Contact is now set within Individual Provider Accounts.
1. Navigate to the Provider Accounts Page
A. Click the “More” button in the Dashboard bar
B. Hover over “Business”
C. Select “Provider Accounts”
3. Click the “Contacts” tab of the Provider Account
4. Optional: Set the Primary Contact toggle to ON for all Contacts that require access to Portal Analytics. Alternatively, set the top Primary Contact toggle to ON to give all Contacts of this Provider Account access to Portal Analytics.

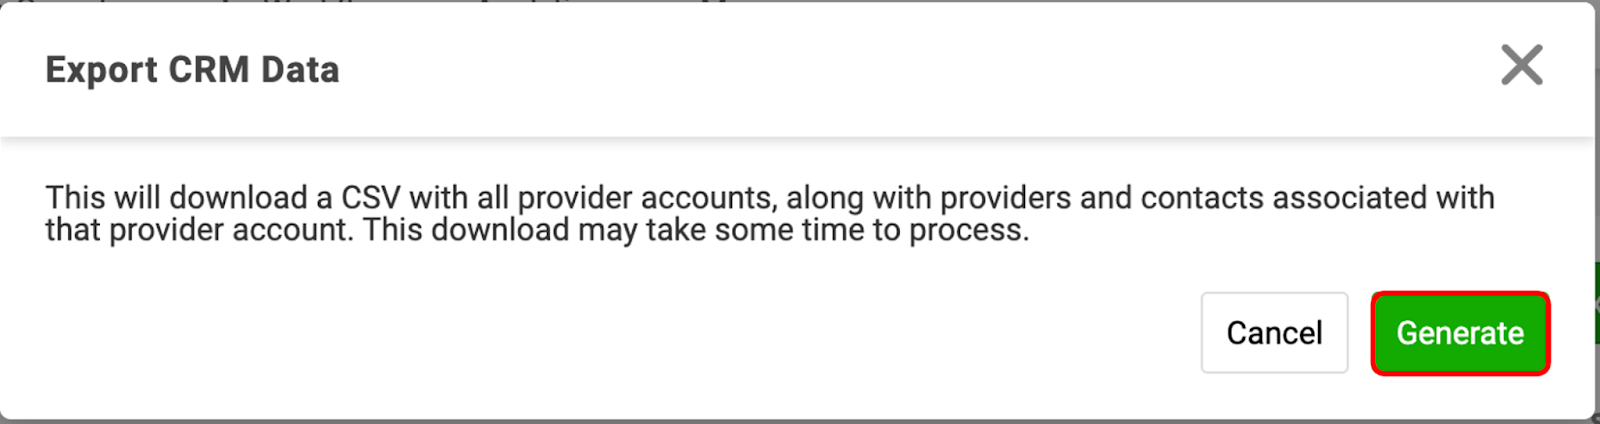
Optional: Export CRM Data
Customer Relationship Management (CRM) Data can now be exported from Ovation LIMS as a CSV file. The CSV file will contain Provider Account, Provider, and Contact details across the organization.
1. Navigate to the Provider Accounts Page
A. Click the “More” button in the Dashboard bar
B. Hover over “Business”
C. Select “Provider Accounts”
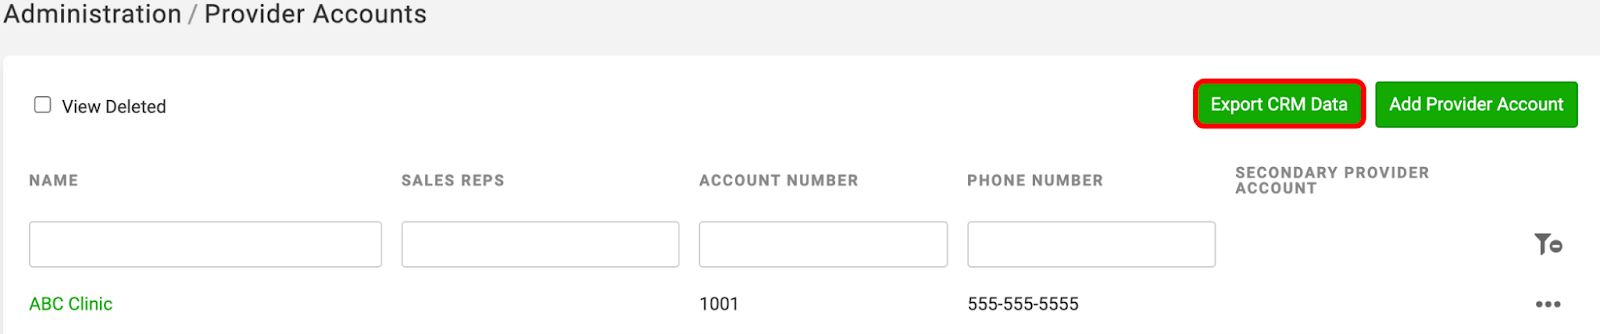
3. Click “Generate”