
Improved Provider Accounts Management - Early Access Feature Overview
The Improved Provider Accounts Management features is now available in Early Access. You can request that this feature be turned on in your Sandbox and Production environments by submitting a Project Request Form.
Note: Once Improved Provider Accounts Management is turned on in your Production environment, it cannot be turned off. See our Improved Provider Accounts Management - Setting Up Accounts Full Guide article for more detailed instructions. If your organization is not using Improved Provider Accounts Management, refer to our existing article Setting Up Accounts - Full Guide.
The new feature enhancements and their benefits are summarized below.
- Feature Overview and Feedback
- Manage Contacts Independently from Provider Accounts
- Automatically Associate Contacts with available Providers in a Provider Account
- Associate/Disassociate Contact(s) with Provider Accounts
- Associate/Disassociate Contact(s) with Providers
- Contact Settings - Patient Report Delivery Preferences
- Contact Settings - Contact Role
- Contact Settings - Primary Contact
- Export CRM Data
- Enhanced Search Tools and Logs
- Import Sales Reps, Provider Accounts, Providers, and Contacts
- Add Provider Account Groups
- Prevent Duplicates
- Add Additional Addresses to a Requisition Form using Saved Addresses
Feature Overview and Feedback
The ability to quickly and efficiently manage clients is crucial for any growing lab business. That’s why we have listened to your feedback and developed improvements that will make it easier for your lab to manage Provider Accounts within the Ovation LIMS.
The fundamentals of how Provider Accounts work in the Ovation LIMS haven’t changed—but they will be more simple to use going forward.
Submitting feedback during a feature’s Early Access period is a great way to influence the development of a feature. Please feel free to submit your feedback about Improved Provider Accounts Management using this form.
Manage Contacts
Contacts are individuals who a client (Provider Account) has designated to place Orders and receive results from your lab.
Contacts added individually or imported on the Contacts Page need Provider Accounts and Providers Associated. After Associating, Contact Settings for Report Delivery Preferences, Role, and Primary Contact can be set. These associations and settings give Contacts access to the Ovation Portal. The Ovation Portal allows Contacts to place Orders and view/download Patient Reports.
Automatically Associate Contacts with available Providers in a Provider Account
Before: Previous versions of the Ovation LIMS required that Contacts be associated to each individual Provider within a Provider Account manually. We understand that this was time-consuming since most customers want to associate a Contact within a Provider Account with all the Providers of that Account.
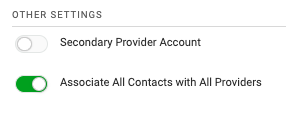
Now: All Contacts within a Provider Account can be automatically associated with all of the account’s Providers using the “Associate All Contacts to All Providers” toggle. Turning on the toggle means you won’t need to manually associate a new Contact to all of the individual Providers within the account. Instead, the Providers and Contacts will automatically be associated upon addition to the Provider Account.
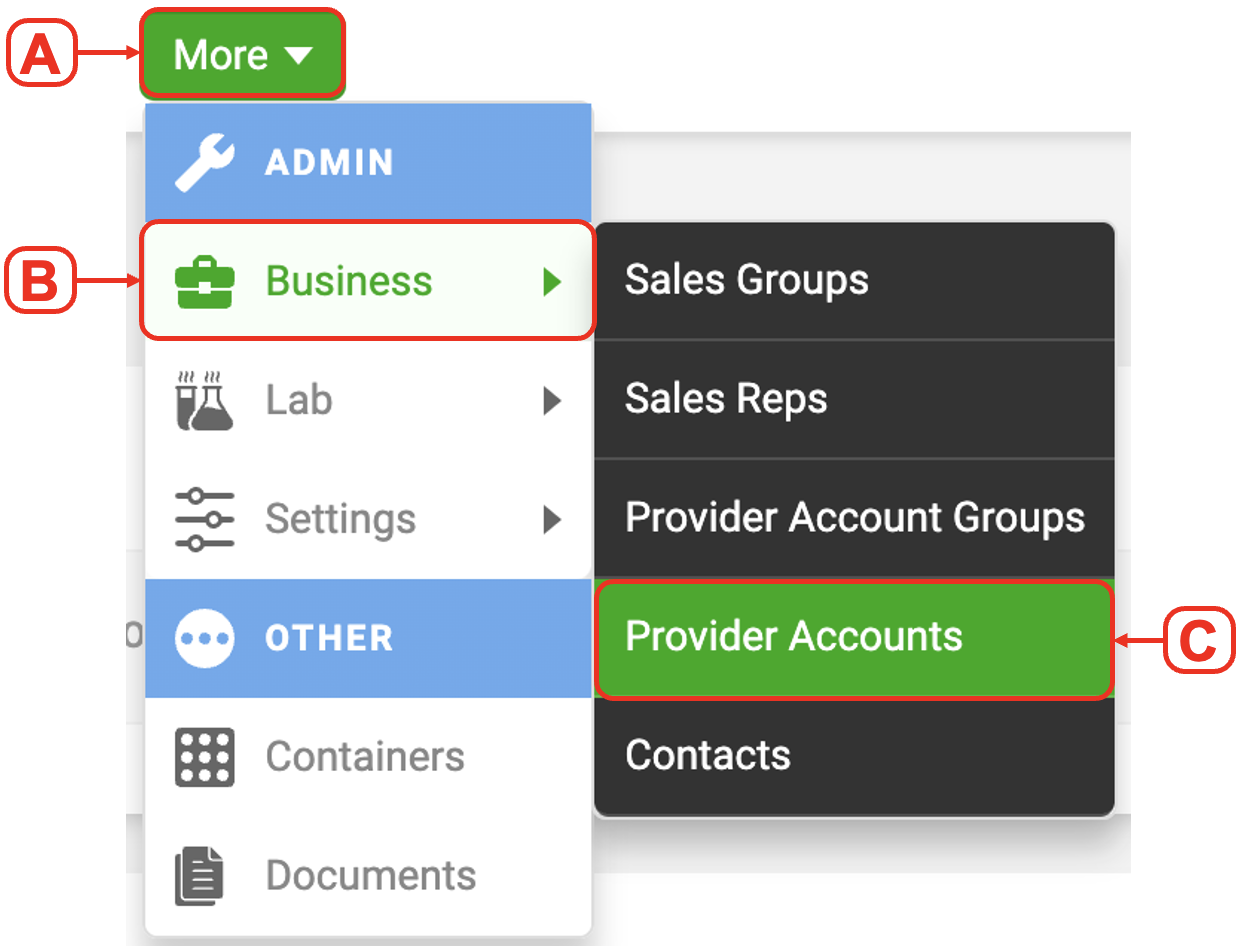
1. Navigate to the Provider Accounts Page
A. Click the “More” button in the Dashboard bar
B. Hover over “Business”
C. Select “Provider Accounts”
3. Scroll down and turn on the “Associate All Contacts with All Providers” Toggle

4. Scroll up and click the green “Save” button

Associate/Disassociate Contact(s) with Provider Accounts
Before: Contacts could not be shared across Provider Accounts, making it difficult to manage Contacts who work for multiple Provider Accounts.
Now: Contacts can be managed independently and across Provider Accounts. Individual Contact details can now be shared instantly across multiple Provider Accounts using the new bulk association tools. For example, if a Contact has their phone number updated, the phone number will now be updated across all Provider Accounts. Previous versions required that updates be repeated if a Contact was associated with multiple Provider Accounts. Similarly, deleting a Contact will now remove the Contact from all associated Provider Accounts.
The following section describes how to associate and disassociate Contacts with Provider Accounts. There are two ways to associate or disassociate Provider Accounts and Contacts.
Option 1: Associate/Disassociate one Contact and available Provider Accounts
Option 2: Associate/Disassociate one Provider Account and available Contacts
Use the method that best suits your goal
Option 1: Associate/Disassociate one Contact and available Provider Accounts
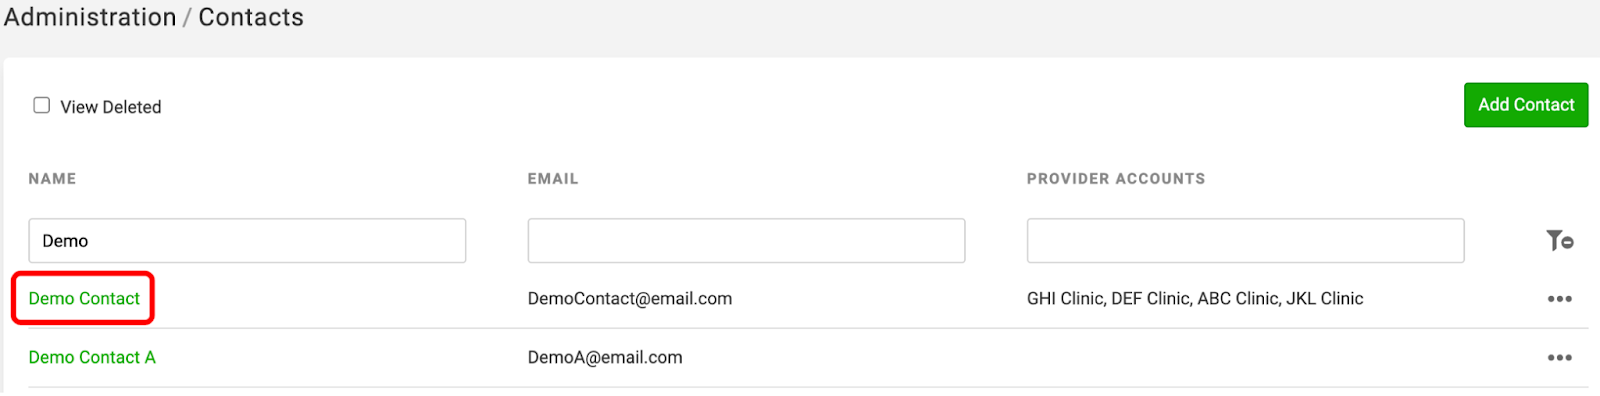
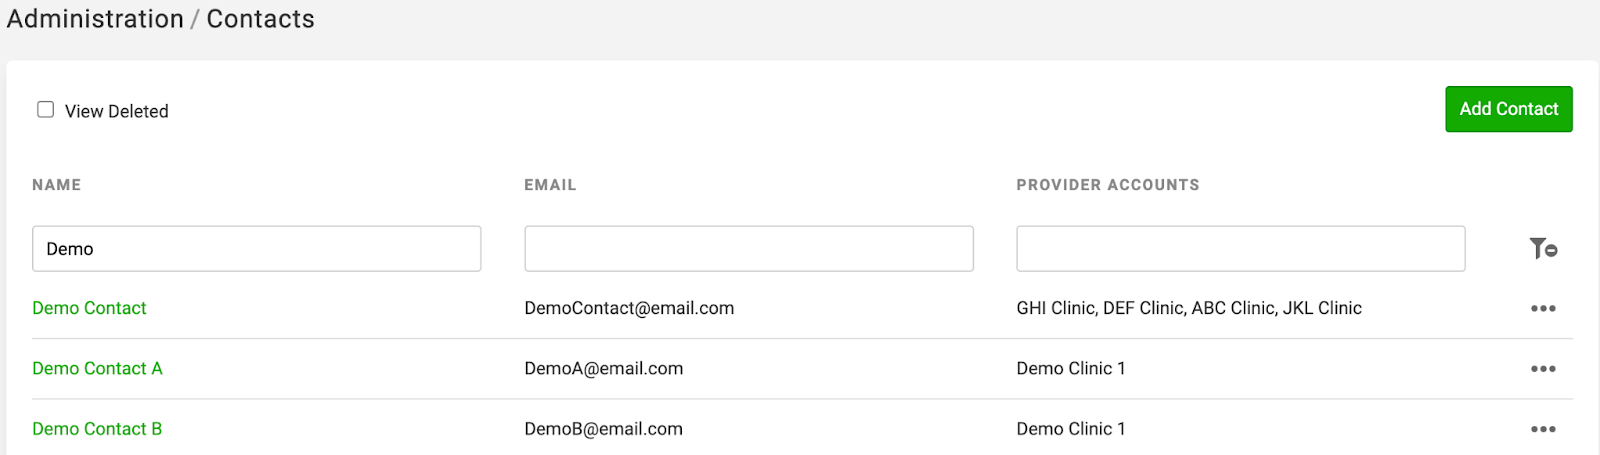
1. Navigate to the Contacts Page
A. Click the “More” button in the Dashboard bar
B. Hover over “Business”
C. Select “Contacts”

3. Click the Provider Accounts tab
4. Click “Associate/Disassociate Provider Accounts” button

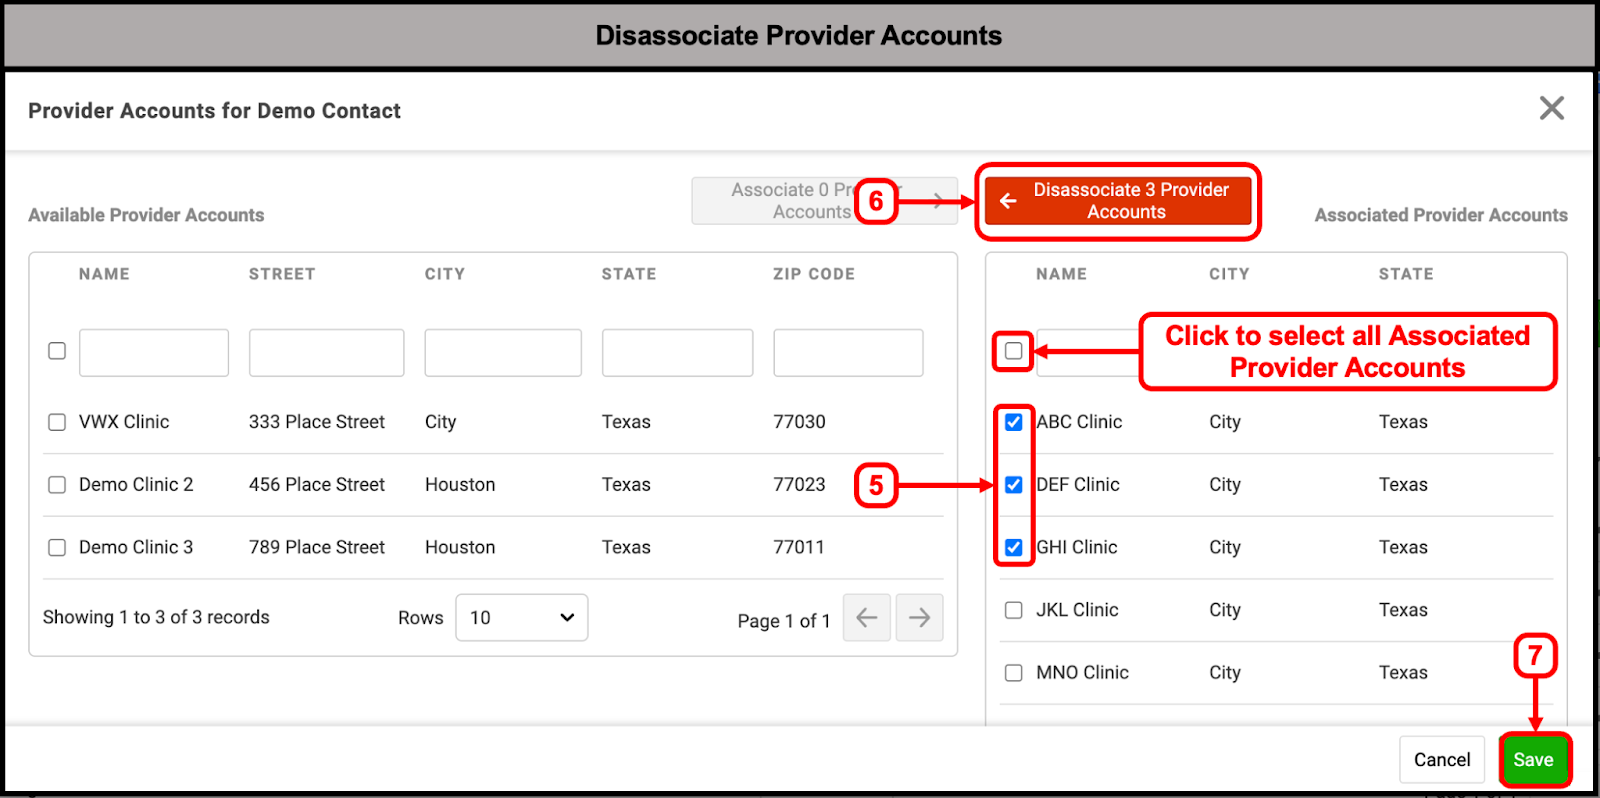
5. Choose to associate or disassociate Provider Accounts:
Associate: Available Provider Accounts are on the left side of the modal. Select the Checkboxes next to the Provider Account(s) you want to associate
Disassociate: Associated Provider Accounts are on the right side of the Modal. Select the Checkboxes next to the Provider Account(s) you want to disassociate
Tip: Selecting the top checkbox will automatically choose all Provider Accounts on the respective side of the modal for association/disassociation
6. Complete the Association/Disassociation
Associate: Click the green “Associate Provider Accounts” button at the top
Disassociate: Click the red “Disassociate Provider Accounts” button at the top
7. Click the green “Save” button

Note: If a Provider Account that you associated to the Contact has “Associate All Contacts with All Providers” toggle ON, then the Contact will automatically be associated to all available Providers within that Provider Account. If any Provider Account you associated to the Contact has the “Associate All Contacts with All Providers” toggle OFF, you will then need to go into the Provider Account and associate Providers to that Contact.
Option 2: Associate/Disassociate one Provider Account and available Contacts
1. Navigate to the Provider Accounts Page
A. Click the “More” button in the Dashboard bar
B. Hover over “Business”
C. Select “Provider Accounts”
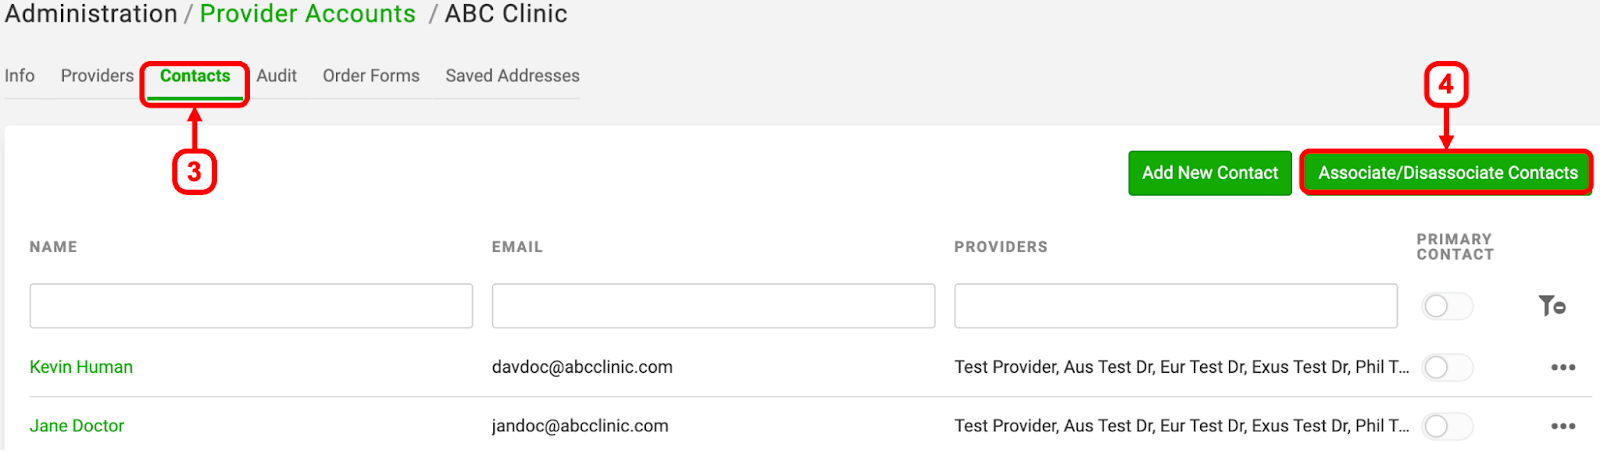
3. Click the “Contacts” tab of the Provider Account
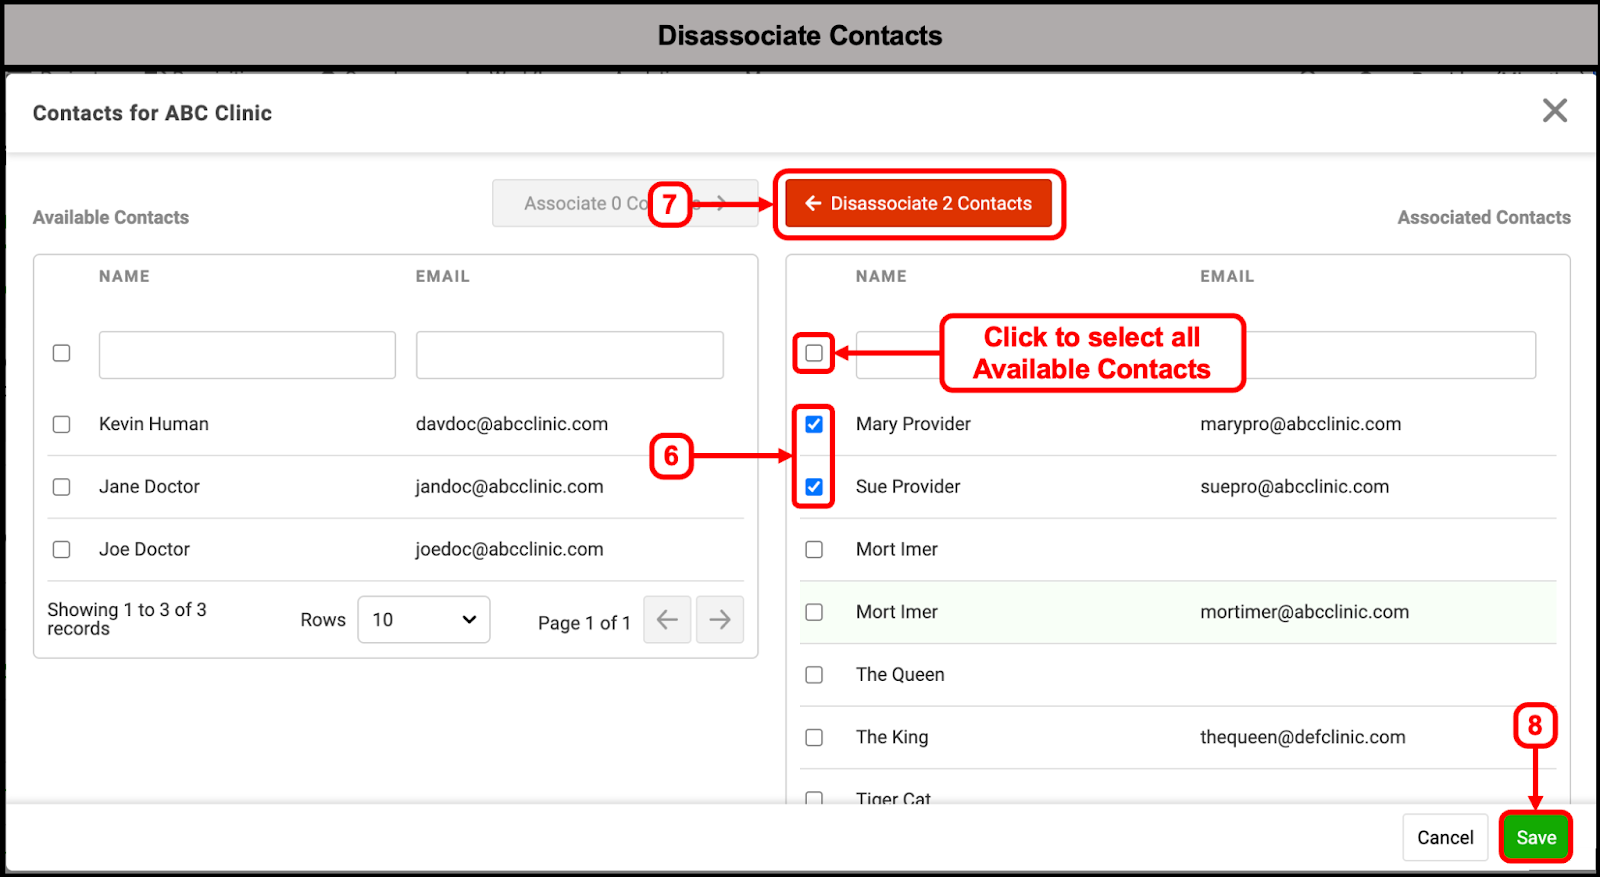
4. Click the “Associate/Disassociate Contacts” button
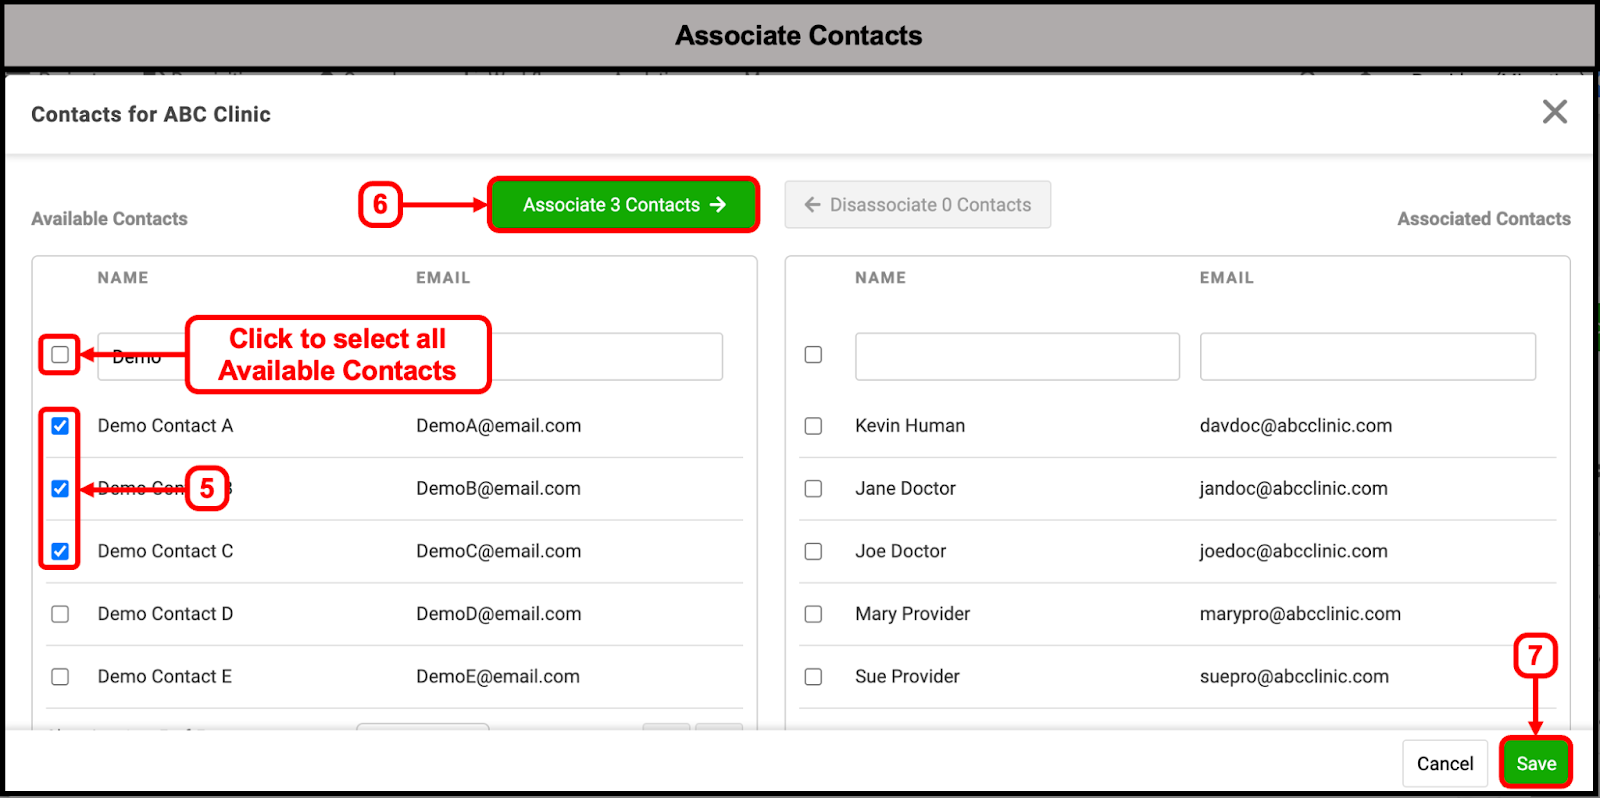
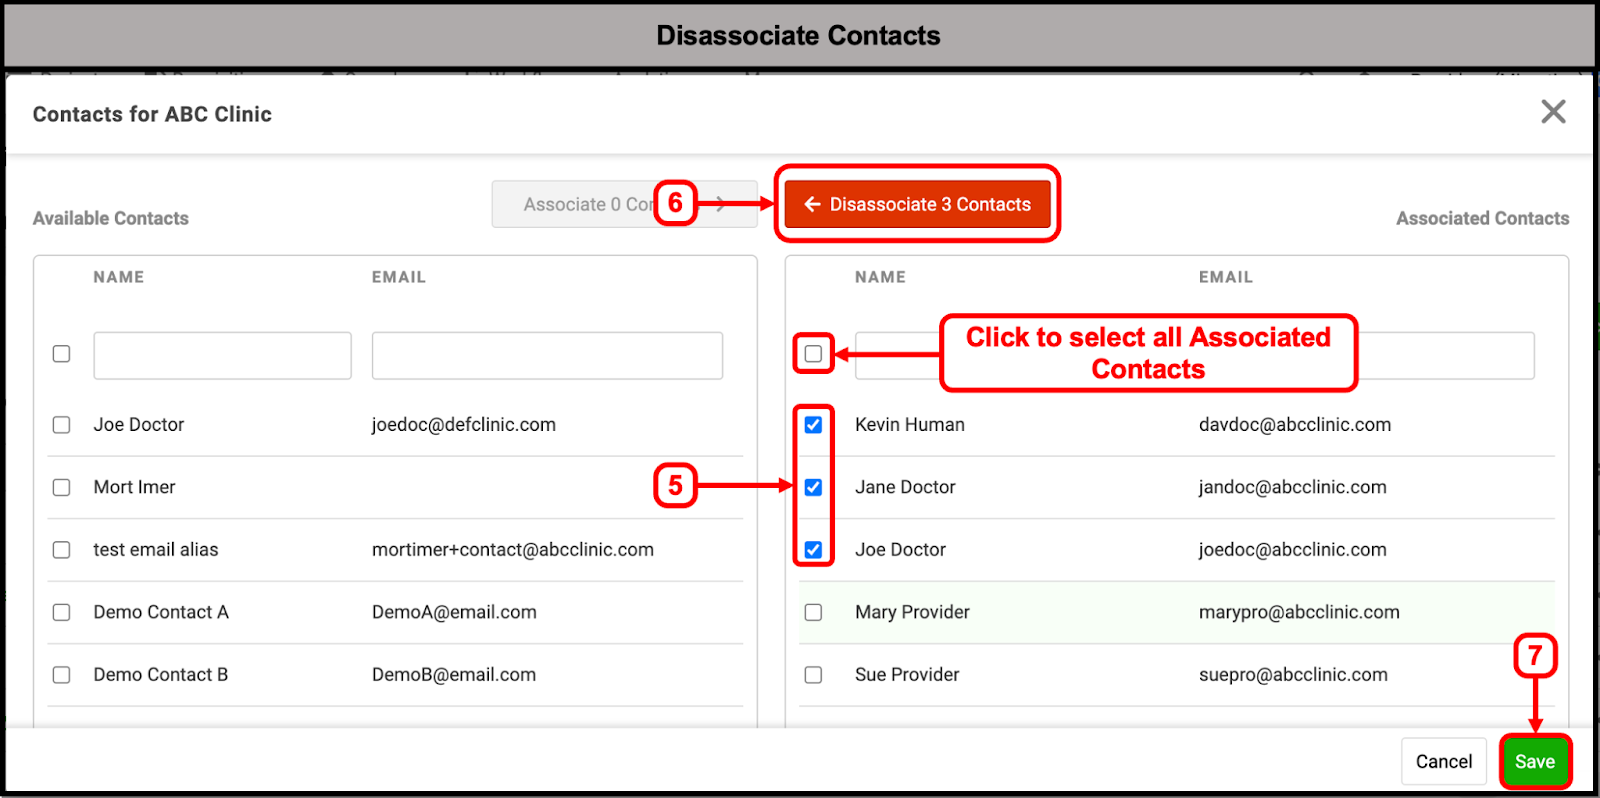
5. Choose to associate or disassociate Contacts:
Associate: Available Contacts are on the left side of the modal. Select the Checkboxes next to the Contact(s) you want to associate
Disassociate: Associated Contacts are on the right side of the Modal. Select the Checkboxes next to the Contact(s) you want to disassociate
Tip: Selecting the top checkbox will automatically choose all Contacts on the respective side of the modal for association/disassociation
6. Complete the Association/Disassociation
Associate: Click the green “Associate Contacts” button at the top
Disassociate: Click the red “Disassociate Contacts” button at the top
7. Click the green “Save” button
Note: If Contacts are associated to a Provider Account that has the “Associate All Contacts with All Providers” toggle ON, then the Contact(s) will automatically be associated to all available Providers within that Provider Account. If the Contact(s) are associated to a Provider Account that has the “Associate All Contacts with All Providers” toggle OFF, you will then need to go into the individual Contacts’ Pages and associate Providers.
Associate/Disassociate Contacts with Providers
Before: Providers needed to be associated with individual Contacts manually.
Now: Providers can be associated with Contacts in bulk. The following section describes how to associate and disassociate Contacts with Providers. Contacts will only have access to the Ovation Portal if they have at least one associated Provider. Contacts can view patient reports in the Portal if they are associated with the Provider on the Order/Requisition Form. There are two ways to associate or disassociate Provider Accounts and Contacts.
Option 1: Associate/Disassociate one Contact and available Providers
Option 2: Associate/Disassociate one Provider and available Contacts
Use the method that best suits your goal
Option 1: Associate/Disassociate one Contact and available Providers
1. Navigate to the Contacts Page
A. Click the “More” button in the Dashboard bar
B. Hover over “Business”
C. Select “Contacts”
Note: Contacts can also be associated with Providers by accessing the Contact Record from within a Provider Account’s Contacts tab. After selecting the Contact for association, follow the steps below.
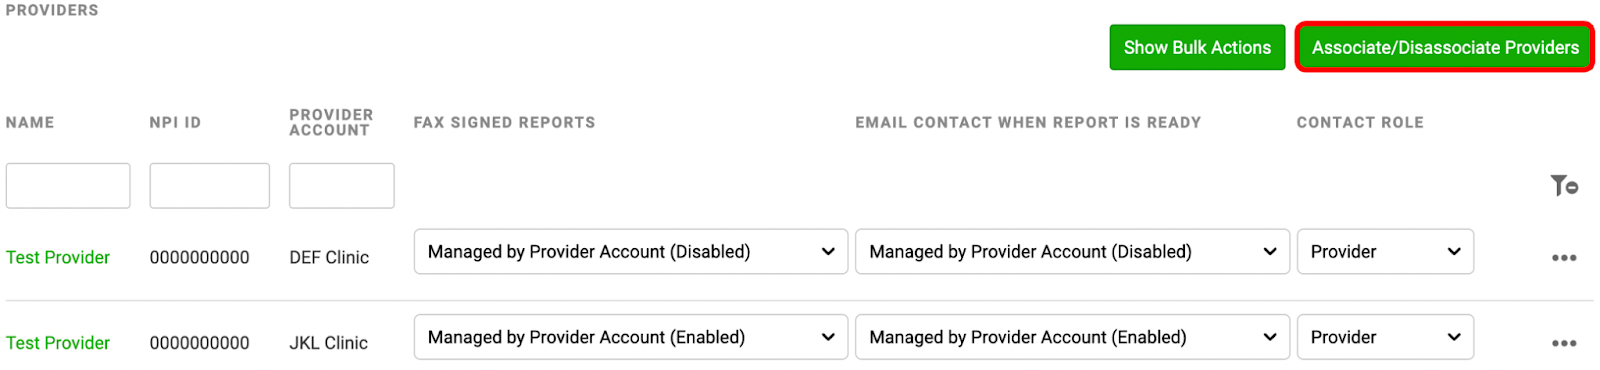
3. Scroll down to the bottom of the Contact’s Info Page and click the “Associate/Disassociate Providers” button
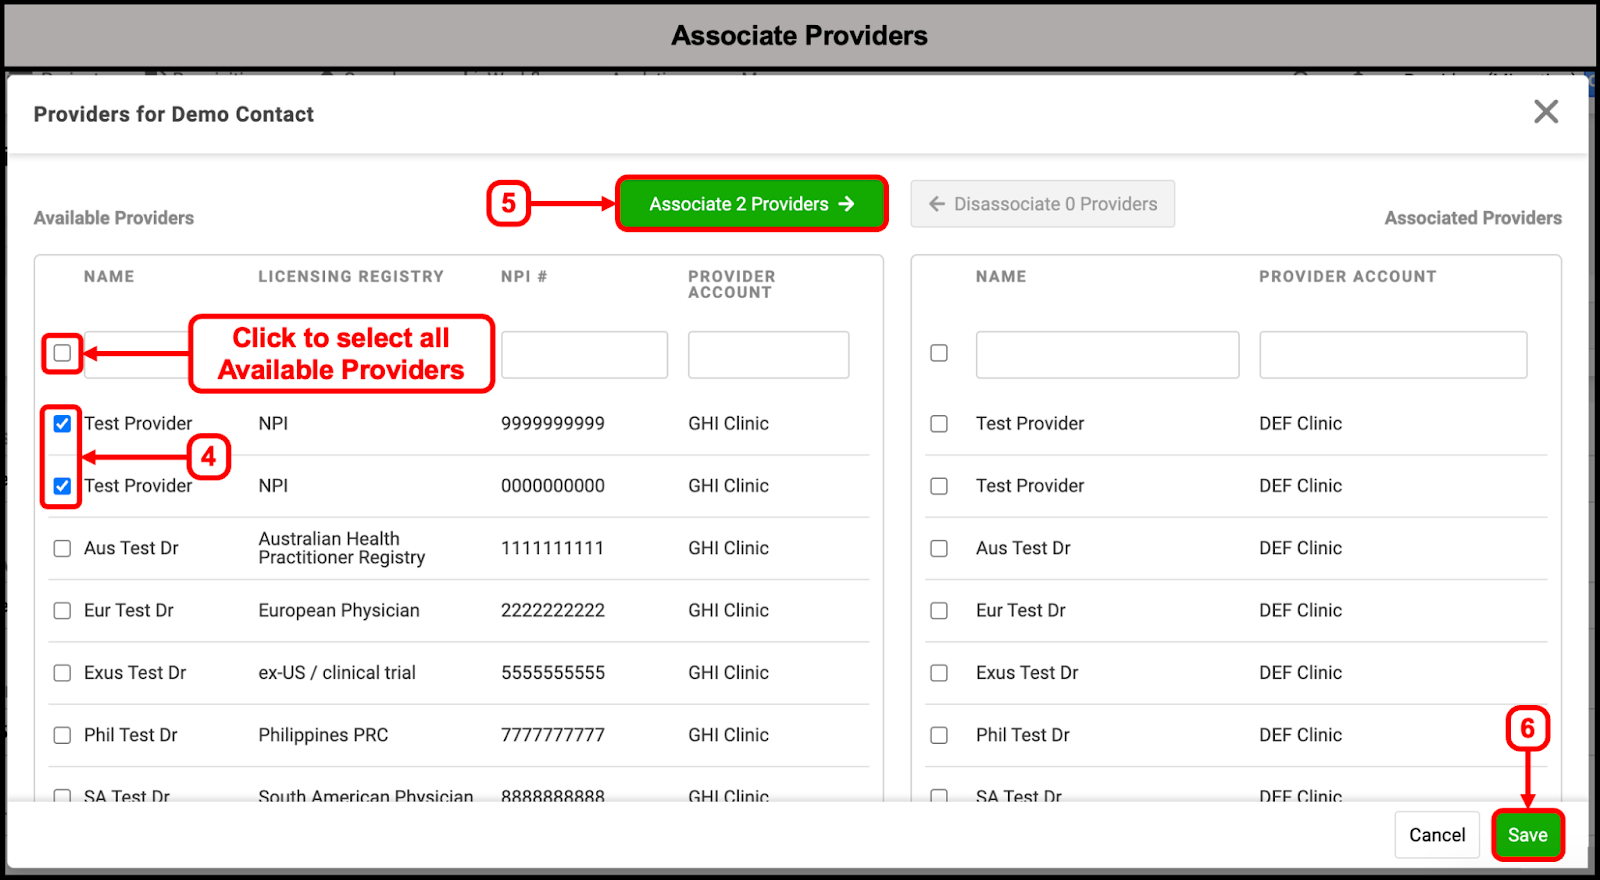
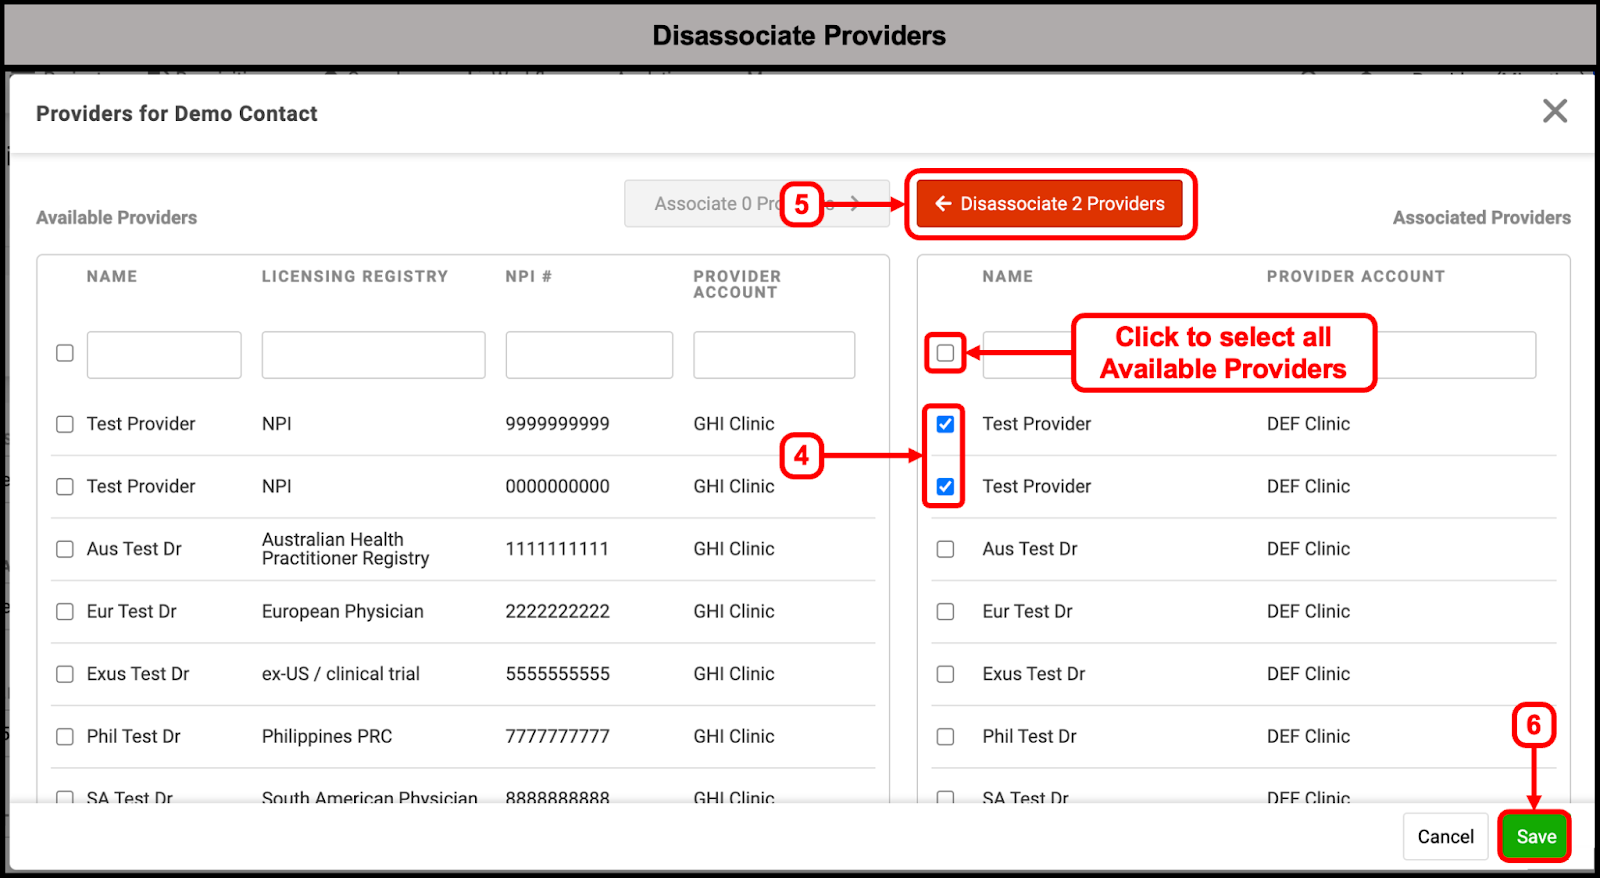
4. Choose to associate or disassociate Providers:
Associate: Available Providers are on the left side of the modal. Select the Checkboxes next to the Provider(s) you want to associate
Disassociate: Associated Providers are on the right side of the Modal. Select the Checkboxes next to the Provider(s) you want to disassociate
Tip: Selecting the top checkbox will automatically choose all Providers on the respective side of the modal for association/disassociation. Search and filter, or scroll down in the modal to see more Providers.
Note: If no Providers are listed as available, add Providers to the Provider Account

5. Complete the Association/Disassociation
Associate: Click the green “Associate Providers” button at the top
Disassociate: Click the red “Disassociate Providers” button at the top
6. Click the green “Save” button
Option 2: Associate/Disassociate one Provider and available Contacts
1. Navigate to the Provider Accounts Page
A. Click the “More” button in the Dashboard bar
B. Hover over “Business”
C. Select “Provider Accounts”
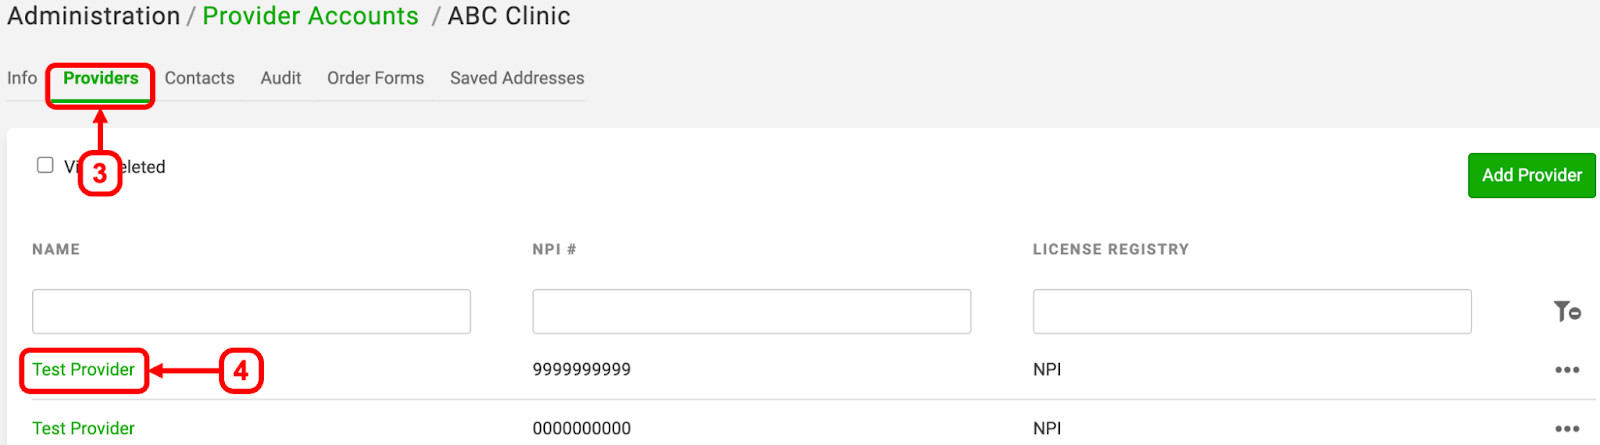
3. Click the “Providers” tab of the Provider Account
4. Search and select a Provider
5. Click the “Associate/Disassociate Contacts” button

6. Choose to associate or disassociate Contacts:
Associate: Available Contacts are on the left side of the modal. Select the Checkboxes next to the Contact(s) you want to associate
Disassociate: Associated Contacts are on the right side of the Modal. Select the Checkboxes next to the Contact(s) you want to disassociate
Tip: Selecting the top checkbox will automatically choose all Providers on the respective side of the modal for association/disassociation. Search and filter, or scroll down in the modal to see more Contacts.
7. Complete the Association/Disassociation
Associate: Click the green “Associate Contacts” button at the top
Disassociate: Click the red “Disassociate Contacts” button at the top
8. Click the green “Save” button

Contacts Settings - Patient Report Delivery Preferences
A Provider Account’s Report Delivery Preferences are the default for all Providers and Contacts associated to the account. However, many Contacts may need Provider specific report delivery settings that differ from a Provider Account’s default settings. Provider Account report delivery preferences can be overridden at the Provider level within each Contact’s Page.
Provider Account Report Deliver Preferences settings are shown below:

- Fax signed reports - Automatically sends signed Patient Reports to the fax number listed on the Provider Account Info tab.
- Fax signed reports to contacts - Automatically sends signed Patient Reports to the fax number listed in a Contact’s record.
- Email report ready notifications to contacts - Automatically sends an email notification to the email address on the Contact’s record. These email notifications say that Patient Reports are ready for viewing or download from the Ovation Portal.
Tip: The report delivery preferences of a Provider Account are found on the Provider Account’s Info Page. The default Provider Account Settings are also shown on Contact Pages.
Modify Report Delivery Preferences on a Provider level for an individual Contact using the steps below.
1. Navigate to the Contacts Page
A. Click the “More” button in the Dashboard bar
B. Hover over “Business”
C. Select “Contacts”
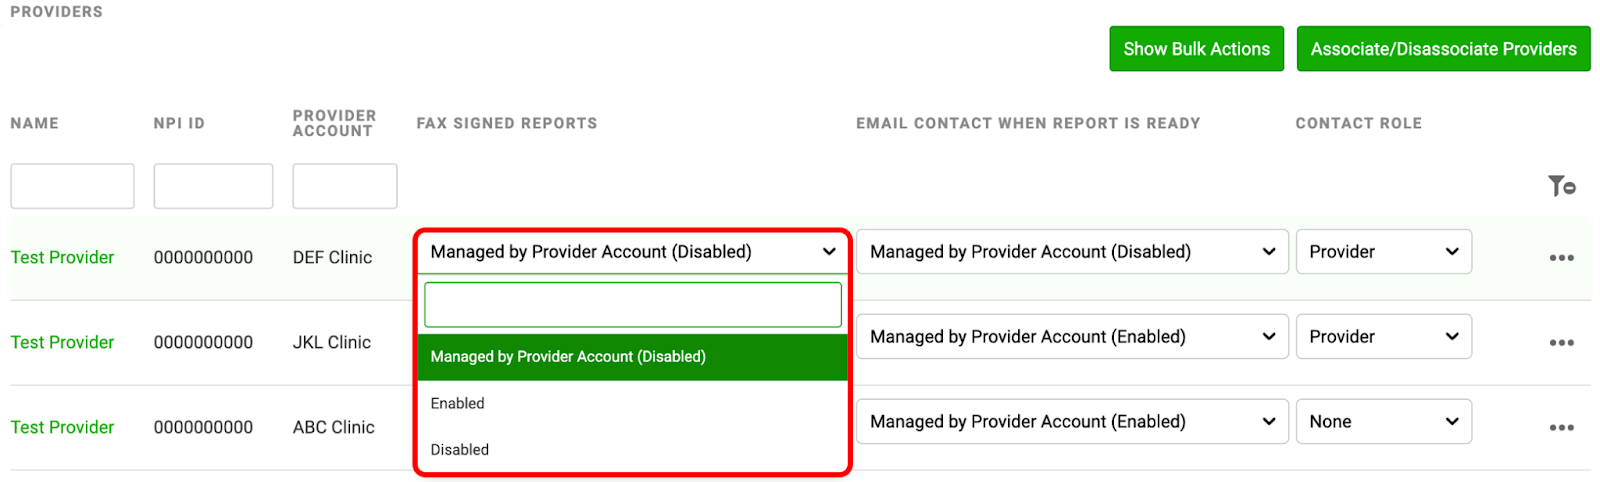
3. Scroll down to the ‘Providers’ section. This will show the default report delivery preferences of the associated Provider Accounts for each associated Provider.
Faxed Signed Reports Column
- Managed by Provider Account (Enabled): The Provider Account’s “Fax signed reports to contacts” toggle is on
- Managed by Provider Account (Disabled): The Provider Account’s “Fax signed reports to contacts” toggle is off
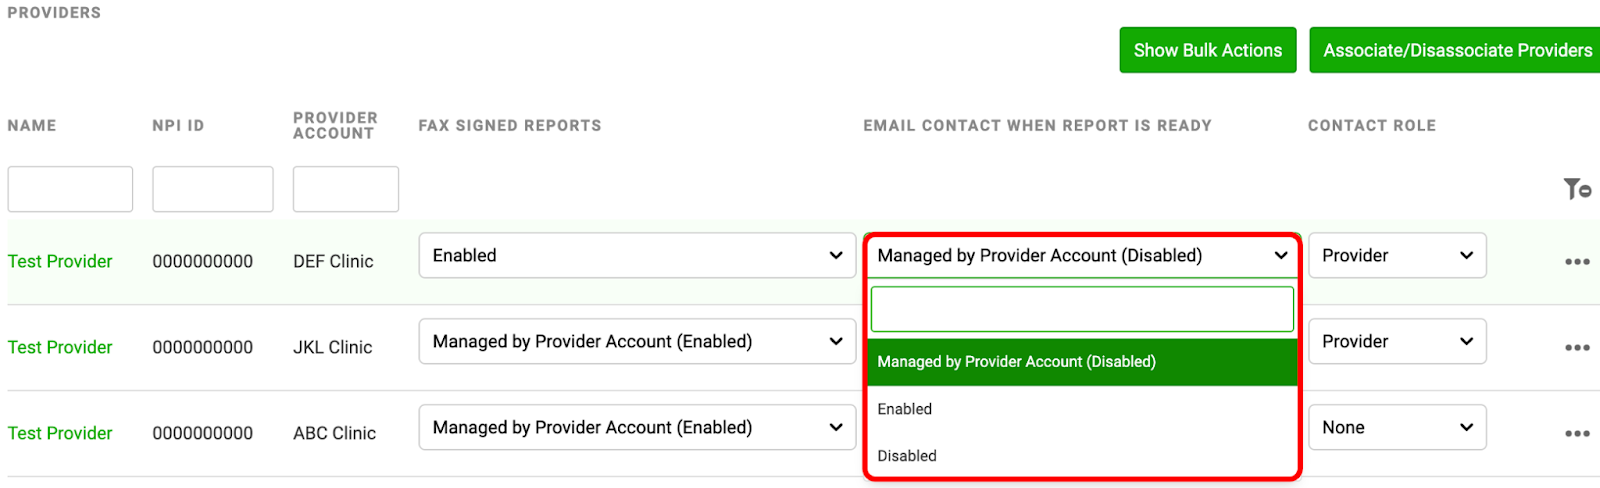
Email Contact when Report is Ready Column
- Managed by Provider Account (Enabled): The Provider Account’s “Email report ready notifications to contacts” toggle is on
- Managed by Provider Account (Disabled): The Provider Account’s “Email report ready notifications to contacts” toggle is off

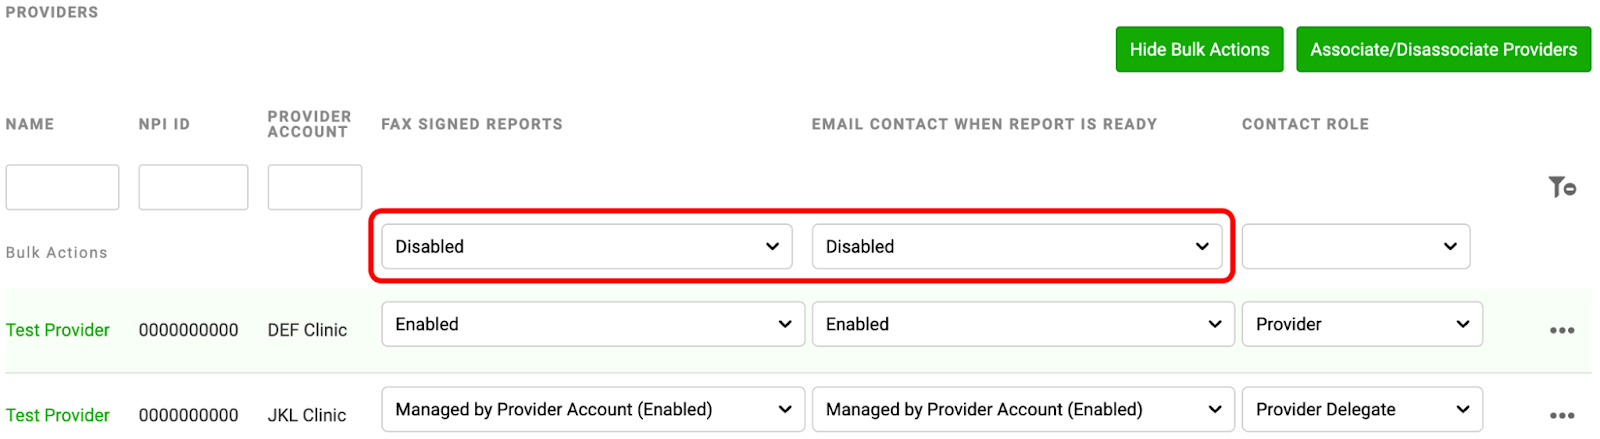
Tip: For Test Provider at Provider Account DEF Clinic, the default fax and email report delivery settings are off. This Contact will not receive reports to the fax or email on their contact record unless these settings are overridden by changing the settings in the dropdown menus using steps 4 and 5 below.
4. Optional: Change the FAX SIGNED REPORTS default setting to override the Provider Account setting. Enabled will trigger signed reports to be sent to the Contact’s fax number. Disabled will prevent signed reports from being sent to the Contact’s fax number
5. Optional: Change the EMAIL CONTACT WHEN REPORT IS READY default setting to override the Provider Account setting. Enabled will send a notification that a signed report is ready to be viewed/downloaded in the Ovation Portal to the Contact’s email. Disabled will prevent report ready notifications from being sent to the Contact’s email.
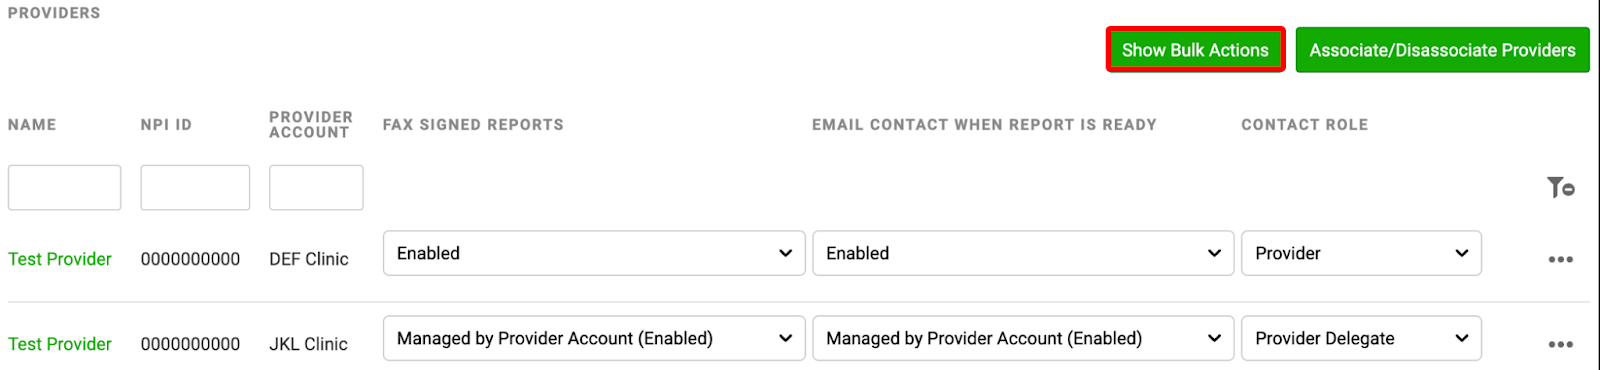
Tip: Report Deliver Preference settings can be overridden for all Provider Accounts and Providers of this Contact using the “Show Bulk Actions” feature. Click the “Show Bulk Actions” button and use the revealed dropdown menus to override all Report Delivery Preferences at once.
Contact Settings - Contact Role
Contact Role is now set at the individual Provider level within a Contact’s Page. Contact Role can be set to None, Provider, or Provider Delegate. Provider and Provider Delegate Roles enable the use of electronic signature for Orders/Requisition Forms. See our Online Ordering - Full Guide article for more details.
1. Navigate to the Contacts Page
A. Click the “More” button in the Dashboard bar
B. Hover over “Business”
C. Select “Contacts”
3.Scroll down to the ‘Providers’ section. This will show the default Roles that this Contact has for their associated Provider Accounts and associated Providers.

4. Optional: click the Role dropdown menu and select the appropriate Role for the Contact at this Provider Account using this Provider.
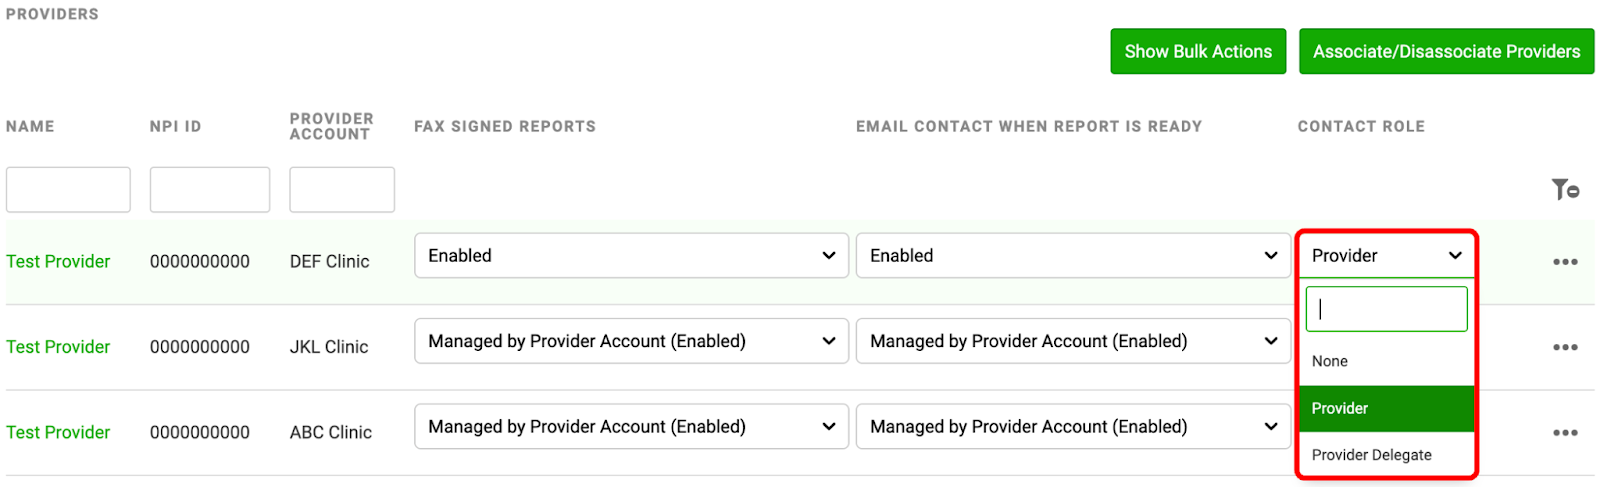
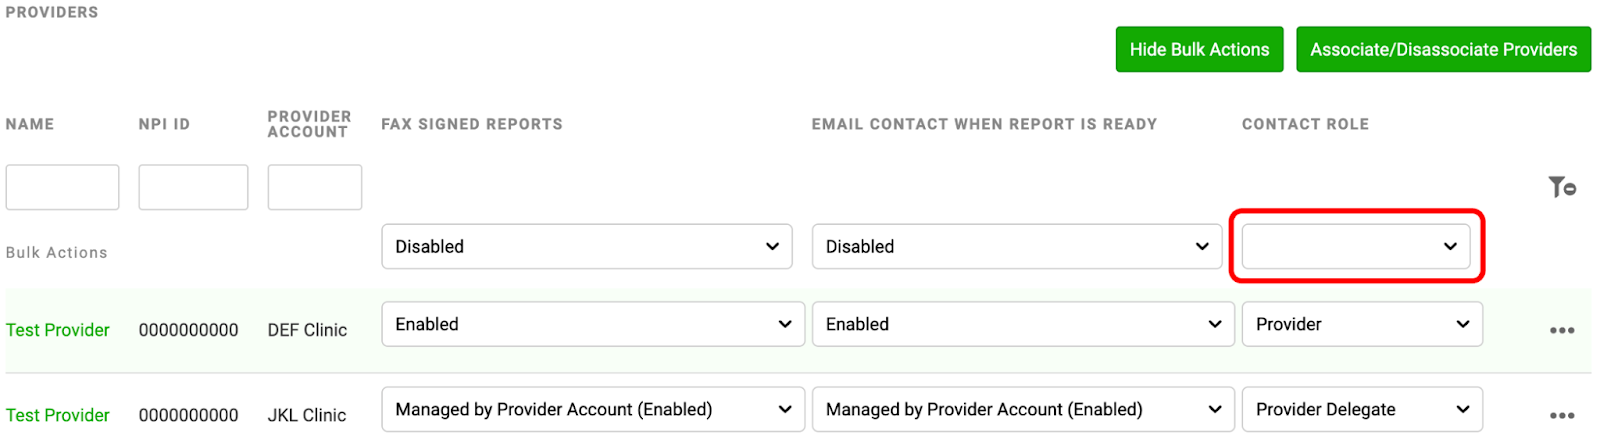
Tip: Contact Roles can be assigned for all Providers across all Provider Accounts using the “Show Bulk Actions” feature. Click the “Show Bulk Actions” button and use the revealed dropdown menus to assign this Contact one Role across all associated Providers and Provider Accounts.
Contact Settings - Primary Contact
Primary Contact allows access to Analytics in the Ovation Portal. Primary Contact is now set within Individual Provider Accounts.
1. Navigate to the Provider Accounts Page
A. Click the “More” button in the Dashboard bar
B. Hover over “Business”
C. Select “Provider Accounts”
3. Click the “Contacts” tab of the Provider Account

4. Optional: Set the Primary Contact toggle to ON for all Contacts that require access to Portal Analytics. Alternatively, set the top Primary Contact toggle to ON to give all Contacts of this Provider Account access to Portal Analytics.

Export CRM Data
Before: Customer details had to be recorded and manually managed in external systems.
Now: Customer Relationship Management (CRM) Data can now be exported from Ovation LIMS as a CSV file. The CSV file will contain Provider Account, Provider, and Contact details across the organization.
1. Navigate to the Provider Accounts Page
A. Click the “More” button in the Dashboard bar
B. Hover over “Business”
C. Select “Provider Accounts”

3. Click “Generate”

Tip: Clicking “Download CSV” at the bottom of a Provider Account Page will generate a summary CSV file that only contains Provider Accounts details.

Import Sales Reps, Provider Accounts, Providers, and Contacts
Before: Sales Reps, Provider Accounts, Providers, and Contacts had to be added and associated individually.
Now: Sales Reps, Provider Accounts, Providers, and Contacts can now be imported in bulk into your Ovation LIMS. Additionally, the “Associate all Contacts to all Providers” toggle enabled one your Provider Accounts, all newly added contacts will automatically be associated to all Providers within individual Provider Accounts
See our “Improved Provider Accounts Management - Setting Up Accounts Full Guide” for detailed import Instructions.
Import Provider Accounts
1. Navigate to the Provider Accounts Page
A. Click the “More” button in the Dashboard bar
B. Hover over “Business”
C. Select “Provider Accounts”

Import Providers
1. Navigate to the Provider Accounts Page
A. Click the “More” button in the Dashboard bar
B. Hover over “Business”
C. Select “Provider Accounts”
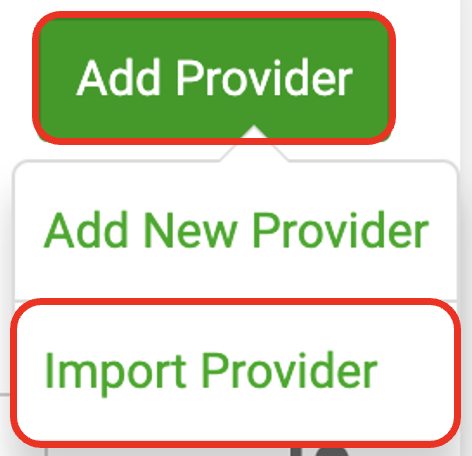
3. Click the “Providers” tab of the Provider Account

4. Click “Add Provider” > “Import Provider”
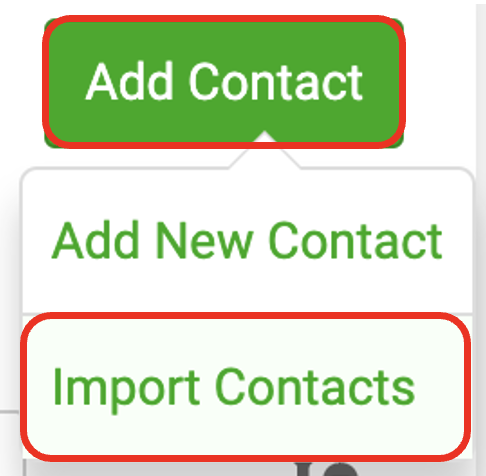
Import Contacts
1. Navigate to the Contacts Page
A. Click the “More” button in the Dashboard bar
B. Hover over “Business”
C. Select “Contacts”
Enhanced Search Tools and Logs
- Use enhanced search capabilities within Provider Accounts, Providers, and Contacts lists to find the client information you need.
- Use the more comprehensive Audit Logs under the Provider Accounts and Contacts “Audit” tabs to better track user actions. Actions, such as who associated a Provider with a Provider Account in your organization (through the Provider Account’s “Audit” tab ) and when a Contact was edited (through the new Contact “Audit” tab), can be tracked in the Audit Logs.

Provider Account Groups
Before: Multiple Provider Accounts could not be recognized as members of a group.
Now: Provider Accounts can be added to distinct Provider Account Groups. For example, multiple Provider Accounts can be recognized as part of the same organization despite having different locations. Provider Account Groups also can be used throughout the Ovation LIMS to look up all shared Provider Accounts within a group.
1. Navigate to the Provider Account Groups Page
A. Click the “More” button in the Dashboard bar
B. Hover over “Business”
C. Select “Provider Account Groups”

3. Name the Provider Account Group and click the green “Create” button

Provider Account Groups can now be selected within individual Provider Account Info pages

Provider Account Groups can now also be searched on the Provider Accounts page

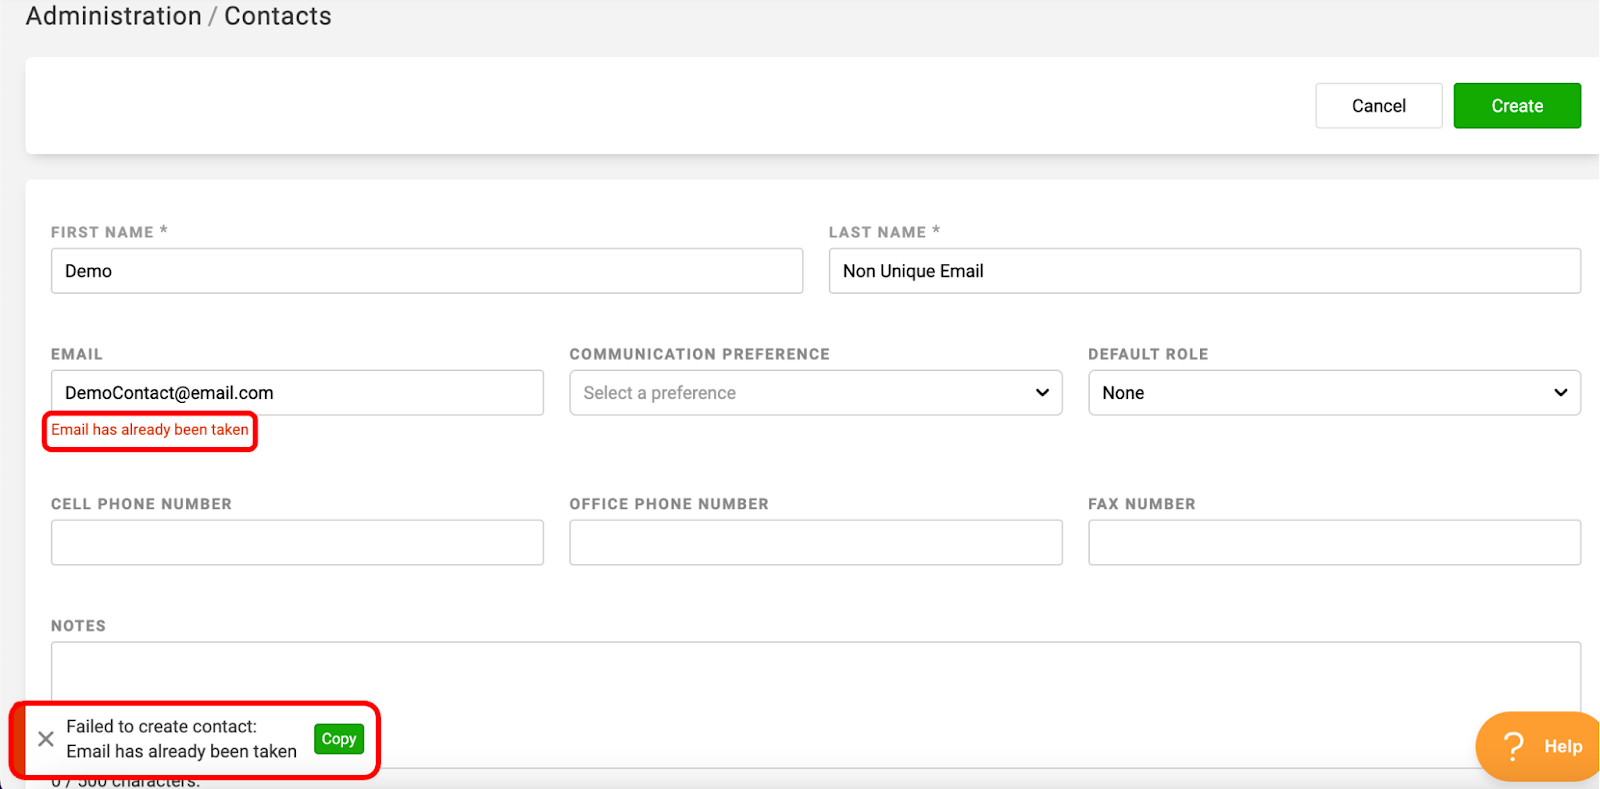
Prevent Duplicates
Before: Ovation LIMS allowed multiple Contacts to have the same email address. Additionally, multiple Provider Accounts could have the same account number or phone number
Now: The system now prevents duplicate Contacts from being added to an organization by checking for a unique email address. Additionally, the system will display a warning if you try to create a new Provider Account with a name, account number, or phone number that matches an existing Provider Account under your organization
After turning on Improved Provider Accounts, you may find that you have many ‘duplicate contacts.’ Duplicate contacts are one or more contacts that share an email address. Upon request, Ovation can provide you with a one-time ‘merge’ of your duplicate contacts to reduce the number of duplicate contacts in your system. See our Improved Provider Accounts Management - Contacts Merge article for more information.
Add Additional Addresses to a Requisition Form using Saved Addresses
Before: Additional addresses needed to be managed as “Secondary Provider Accounts”
Now: You can change the settings of your Requisition Template so that an Accessioner can add an address to the Requisition Form. Accessioners can add an address manually or select from a new list of “Saved Addresses” within a Provider Account. Saved Addresses can be added by your lab directly within the LIMS, or by provider staff within the Ovation Provider Portal. These Saved Addresses are stored within the Provider Account in the Ovation LIMS.
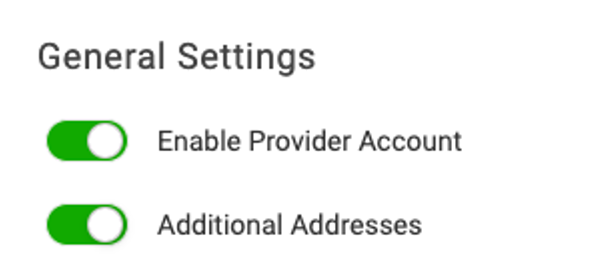
Tip: Requisition Template Forms must have the General Settings of “Enable Provider Accounts” and “Additional Addresses” toggles turned ON to enable Saved Addresses.
1. Navigate to the Provider Accounts Page
A. Click the “More” button in the Dashboard bar
B. Hover over “Business”
C. Select “Provider Accounts”
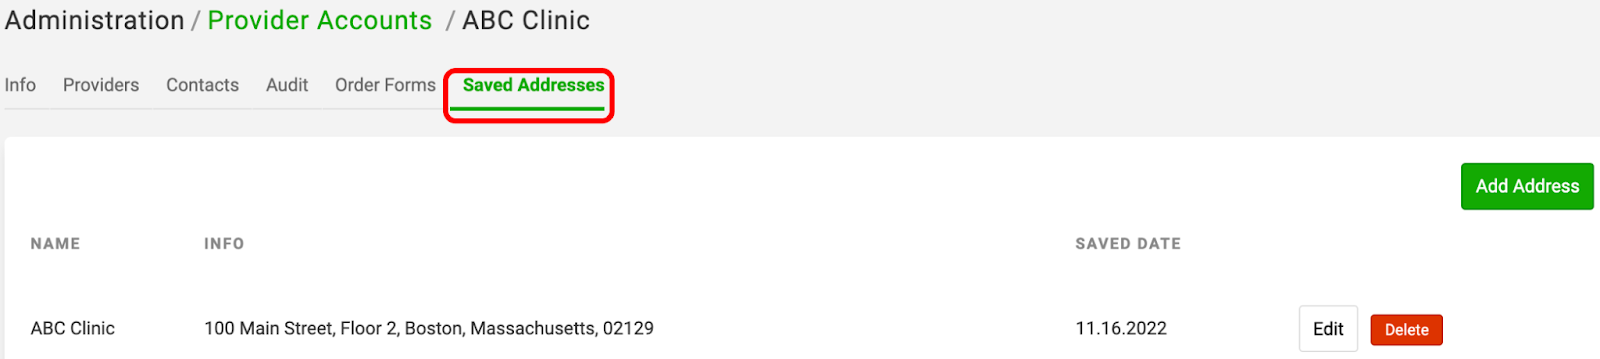
3. Click the “Saved Addresses” tab of the Provider Account
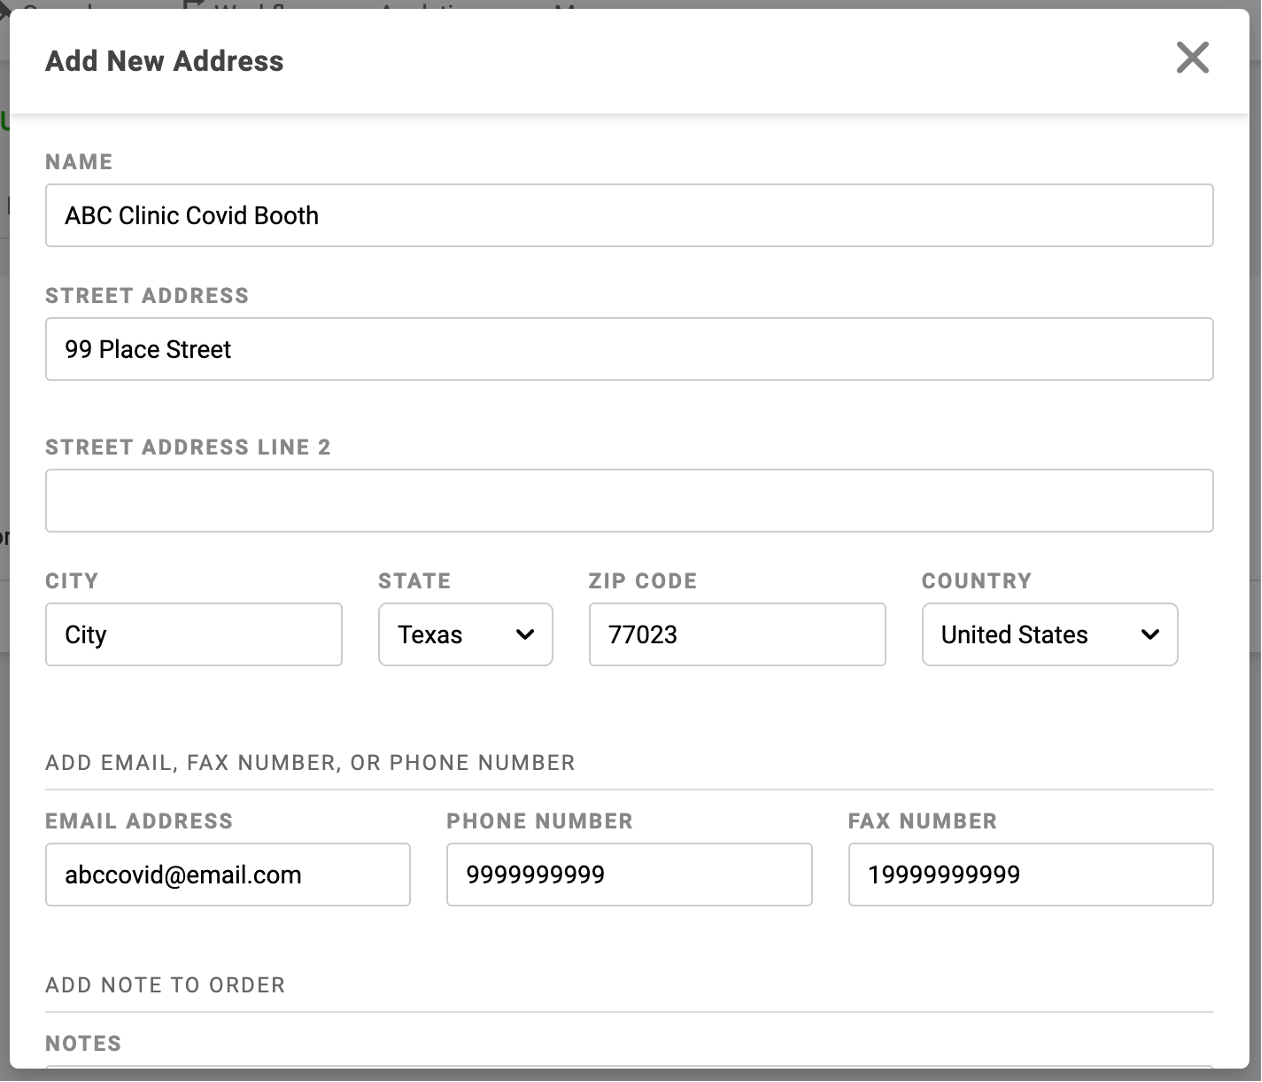
4. Click the “Add Address” button

5. Add the address details: name, street address, city, state, zip code, country, email, phone number, fax number, and notes
6. Scroll down and click the green “Submit” button
