
Roles & Permissions
This article describes the following activities for the Roles and Permissions Table within Ovation LIMS:
- Overview
- Adding a new role
- Renaming or deleting a role
- Setting or changing permissions
- Adding a new document
Read all sections or skip to your section of interest
Overview
Ovation LIMS is a role-based system, where permissions are granted to assigned User Roles, not to individual users. Users may be assigned one or more roles, and Permissions indicate the level of activity that role has access to. Permission levels may be assigned as none, view, read, write or admin. The Roles & Permissions matrix is in the More > Settings > Users & Permissions > Roles and Permissions section of Ovation LIMS. Here, lab administrators can set the permission levels that a role has, create new document folders, and add new roles as needed.

Tip: We strongly encourage you to contact support@ovation.io prior to making any changes to Roles & Permissions. Changing Roles and Permissions will affect what your users can see, read, change, or delete. Your Customer Success team has tailored these permissions specifically to meet your lab's needs. Only the lab’s System Administrator should make changes to the Roles & Permissions matrix.

Individual Permissions are listed in the first column on the left in the image above. The top row contains all of the User Roles that have been set up for your lab. Most users will have a single role, however an individual user can have multiple roles if needed. Permission Levels are set for each Permission under individual User Roles. Users with the same Role will have the same permission levels, and, therefore, the same access to Ovation LIMS. If you need to change what an individual person can see or do in the system, first check their User Role, find your Permission of interest, then check the Permission Level for that role. The implication of using each of these permissions is defined in here.
Tip: Use the filters to quickly find specific Roles or Permissions

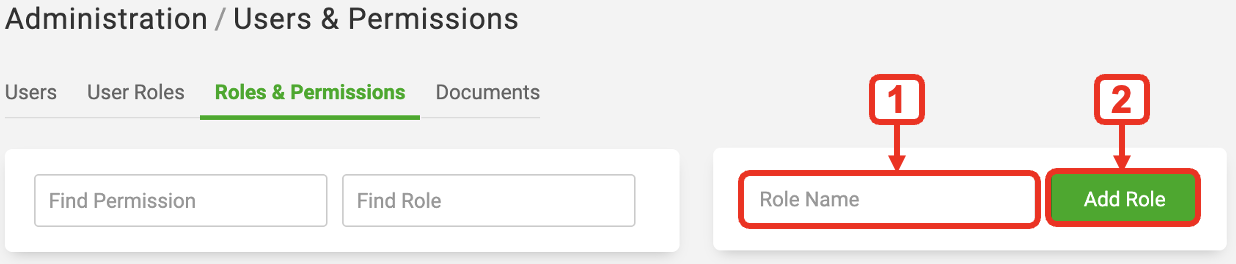
Adding a New Role
1. Enter the name of the new role in the box at the top of the table
2. Click the Add Role button
Renaming or Deleting a Role
1. Click the arrow next to the role
2. Select Rename or Delete

Setting or Changing Permission Levels of a Role

1. Scroll or use filters to find your User Role column of interest. Then scroll or use filters to find the corresponding Permission row and the current permission level settings under your user role. The current Permission Level for the Permission of interest is where the User Role column and Permission Row meet in the matrix.
2. Click on the green, current Permission Level in the box. The Set permission window will open.

3. Choose the desired Permission Level from the dropdown menu. The permission options are:
| Permission Level | Access Allowed |
| None | User won’t see the activity / label |
| View (only applies to Document Folders) | User can see that a document exists, but is unable to read / access it |
| Read | User can read / access the activity / label |
| Write | User can create / write / update an activity / label |
| Admin | User can create / write / update / delete / archive an activity / label |

4. Once the level of permissions is set, click the X to close the Set Permission window

Adding a New Document Folder
Folders allow users to organize their documents. New folders can be added under the Documents section of Ovation LIMS. Lab Administrators can set permission access levels for the folders under the Documents tab. For more information, please see the Using Documents article.
1. Click on the Documents tab

2. Enter the the new Folder Name in the box at the top of the table
3. Click the Add Folder button

Tip: Document Folders also have Permissions and Permission Levels assigned by User Role. There is one additional Permission Level that is exclusive to the Documents Permission Matrix, called View. See the sections above (Setting or changing permissions, Renaming or Deleting a Role, or Adding a new Role) to modify the permission levels for Document Folder access.