
Setting Up Test Configurations
This article describes how to set up Test Configurations for individual Tests in a Test Panel.
Test Configurations:
- determine how the uploaded results of a Test (in a workflow) are interpreted.
- are used when interpretation is being performed by Ovation LIMS and those results are then being displayed on Ovation-generated patient reports.
- are most commonly used for COVID-19 and other Infectious Disease panels.
How to Add a Test Configuration to a Test
- Navigate to More > Lab > Tests > select applicable Test
- Note: Test must be Infectious Disease Type in order to add Test Configurations
- Tests can be changed to Infectious Disease Type, if needed, by using the Type dropdown menu after selecting the applicable Test
- In the Test Configuration section, click the green + button
- Fill in the applicable fields
- Click the green Save button at the top right corner of the Test Configuration section
Notes:
- Existing Test Configurations can be edited by replacing any of the values in the fields and then clicking the green Save button in the top right corner of that Test Configuration section.
- If the same Test is used in different workflows, and the Test has different cutoff values depending on the workflow, more Test Configurations can be set up by clicking the green + button in the top right corner of the Test Configuration section. Be sure that each Test Configuration has a unique Instrument Group Code in this case.
Description of Test Configuration Fields
After clicking the green + button in the Test Configuration section of a Test, the interpretation fields will be displayed.
- All required fields have an asterisk
- There are helpful tool tips for several fields that can be seen by clicking or typing into the field and/or hovering over the tool tip icon (!)
General Test Configuration Fields
- Instrument Group Code: This is a code that connects the Test Configuration to a specific data import field of a workflow. The mapping of this field is set outside of the LIMS UI, so you may need to contact support@ovation.io to obtain the appropriate code for the applicable workflow.
- Result Strategy: The appropriate result strategy is based on the type of data that is being used to determine the result of the Test (see further details in next section)
- Ct only: only 1 numerical data point will be used to determine the result of the Test
- Ct and Amp Status: 2 data points will be used to determine the result of the Test
- Ct, Amp Score and Cq Confidence: 3 data points will be used to determine the result of the Test
- IVD only: a static list of specific values in the results file will determine the final result of the Test (e.g., positive/negative)
- Test Code: Value in Code field near the top of the page for that Test
Patient Samples Interpretation by Result Strategy
Ct only Result Strategy
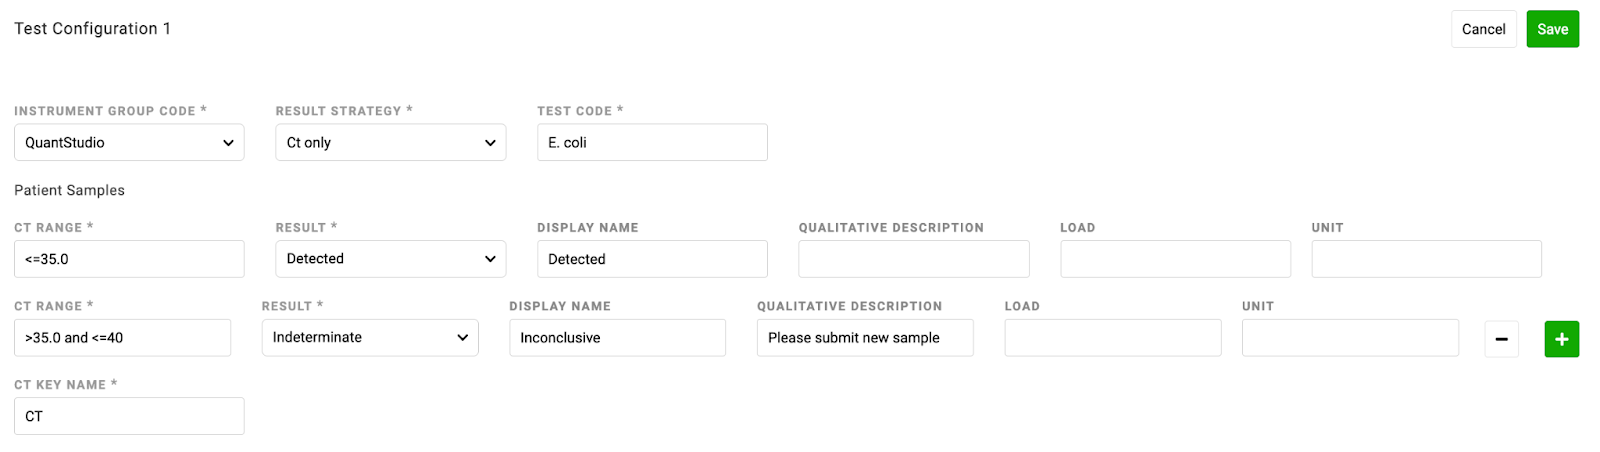
Example of Ct only without Estimated Microbial Loads:
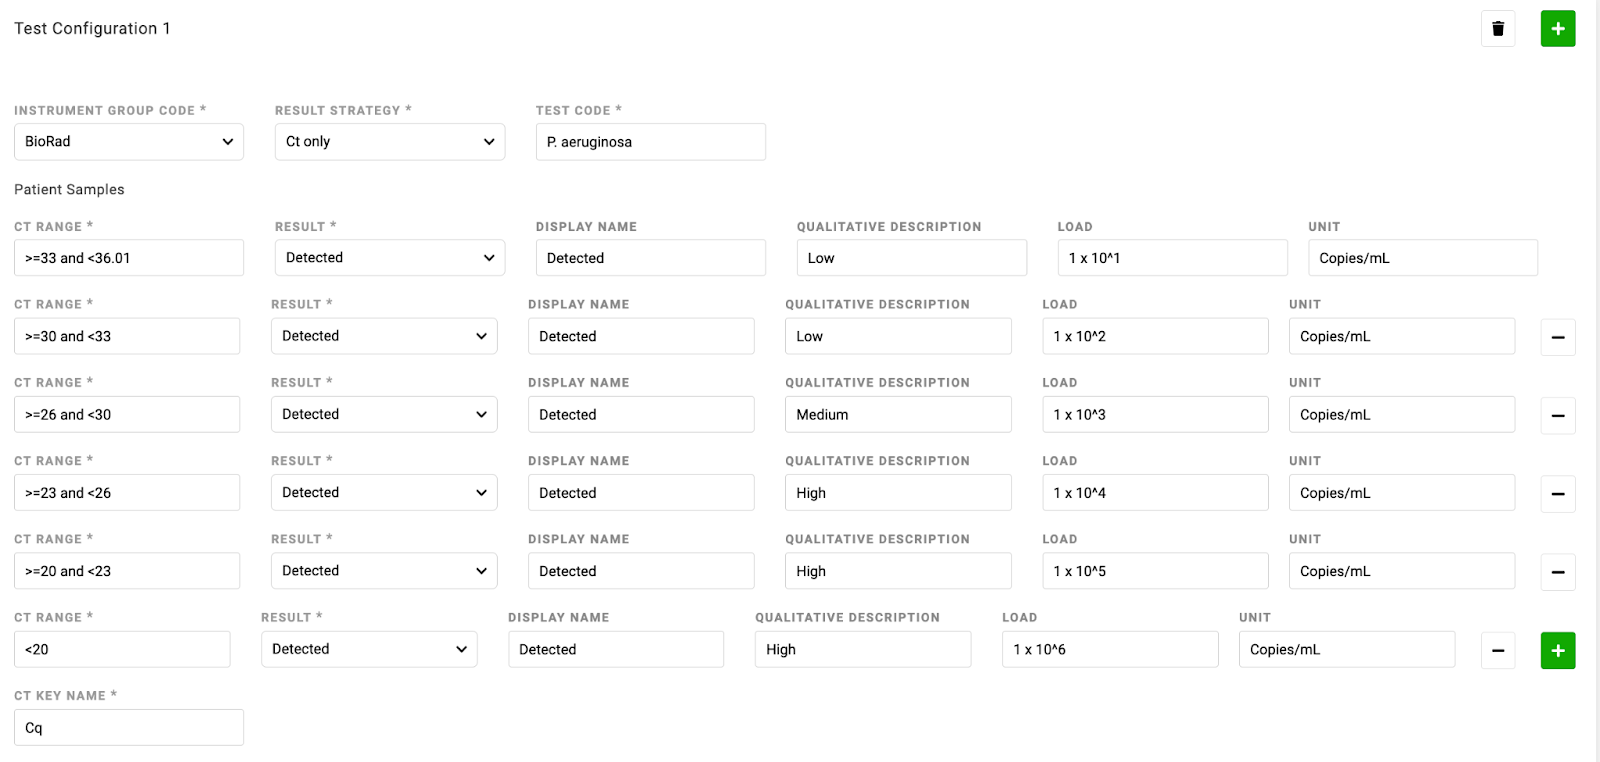
Example of Ct only with Estimated Microbial Loads:
- CT Range: Numerical value or range
- Examples:
- 35.0
- <=35.0
- >10 and <=35.0
- Note: “undetermined” is also an acceptable value for this field, however, any value not accounted for in the CT Range will be considered Not Detected, so it is not usually necessary to set up an interpretation for Not Detected results.
- Note: Although only lowercase undetermined is an accepted value in this field, the results file may contain uppercase letters and will still be compatible with this interpretation
- Examples:
- Result: Appropriate result for the CT Range that was entered (Detected, Not Detected, Indeterminate or Invalid)
- Display Name: Value that should be displayed on the patient report for the CT Range that was entered
- Examples:
- Detected
- Positive
- Target Detected
- Note: If no ranges are configured for negative/not detected results, the default value that will be displayed on the patient report is ‘Not Detected’
- Examples:
- Qualitative Description: Optional field for additional text that will be added to the Test result on patient reports in the case of this CT value or range
- Examples:
- Critical Value
- Indicates contamination
- Reference Range: Negative
- If displaying Estimated Microbial Loads on patient reports, this field is used for the High/Medium/Low values
- Examples:
- Load: Used for the Estimated Microbial Load value not including the units
- Example: 1x10^2
- Unit: Used for the unit value of the Estimated Microbial Load
- Example: copies/mL
Note: Additional ranges can be added by clicking the green + button to the right of the Unit field to add a new line of fields
- CT Key Name: Header of the column containing the data to be interpreted in the results file that will be uploaded in the workflow
- Example: CT
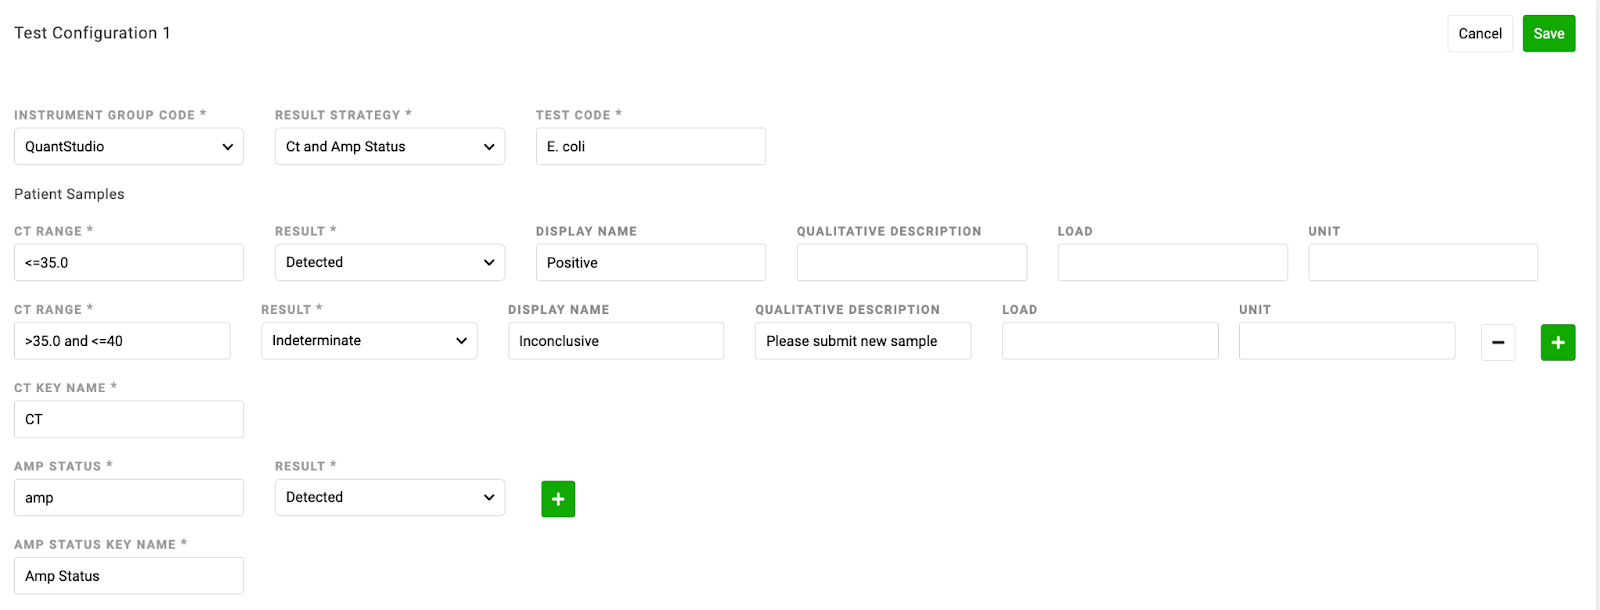
Ct and Amp Status Result Strategy
Example of Ct and Amp Status:
- CT Range: Numerical value or range
- Examples:
- 35.0
- <=35.0
- >10 and <=35.0
- Note: “undetermined” is also an acceptable value for this field, however, any value not accounted for in the CT Range will be considered Not Detected, so it is not usually necessary to set up an interpretation for Not Detected results.
- Note: Although only lowercase undetermined is an accepted value in this field, the results file may contain uppercase letters and will still be compatible with this interpretation
- Examples:
- Result: Appropriate result for the CT Range that was entered (Detected, Not Detected, Indeterminate or Invalid)
- Display Name: Value that should be displayed on the patient report for the CT Range that was entered
- Examples:
- Detected
- Positive
- Target Detected
- Note: If no ranges are configured for negative/not detected results, the default value that will be displayed on the patient report is ‘Not Detected’
- Examples:
- Qualitative Description: Optional field for additional text that will be added to the Test result on patient reports in the case of this CT value or range
- Examples:
- Critical Value
- Indicates contamination
- Reference Range: Negative
- If displaying Estimated Microbial Loads on patient reports, this field is used for the High/Medium/Low values
- Examples:
- Load: Used for the Estimated Microbial Load value not including the units
- Example: 1x10^2
- Unit: Used for the unit value of the Estimated Microbial Load
- Example: copies/mL
Note: Additional ranges can be added by clicking the green + button to the right of the Unit field to add a new line of fields
- CT Key Name: Header of the column containing the data to be interpreted in the results file that will be uploaded in the workflow
- Example: CT
- Amp Status: Numerical value or range OR amp/no amp
- Examples:
- 1.2
- >=1.2
- amp
- Note: Although only lowercase amp and no amp are accepted values in this field, the results file may contain uppercase letters and will still be compatible with this interpretation
- Examples:
- (Amp Status) Result: Appropriate result for the Amp Status that was entered (Detected, Not Detected, Indeterminate or Invalid)
Note: Additional ranges can be added by clicking the green + button to the right of the Result field to add a new line of fields
- Amp Status Key Name: Header of the column containing the data to be interpreted in the results file that will be uploaded in the workflow
- Example: Amp Status
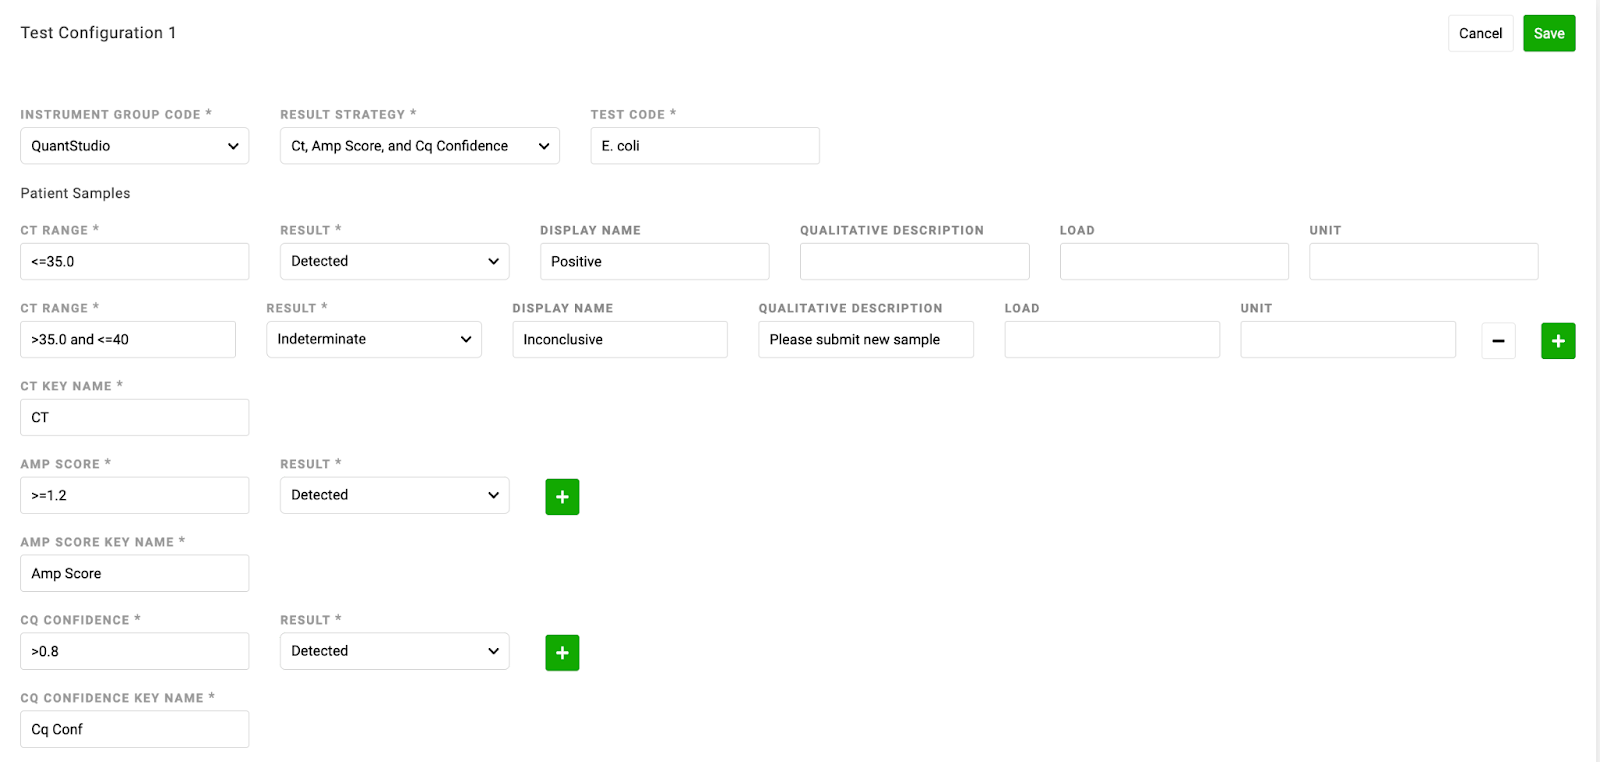
Ct, Amp Score, and Cq Confidence Result Strategy
Example of Ct, Amp Score and Cq Confidence:
- CT Range: Numerical value or range
- Examples:
- 35.0
- <=35.0
- >10 and <=35.0
- Note: “undetermined” is also an acceptable value for this field, however, any value not accounted for in the CT Range will be considered Not Detected, so it is not usually necessary to set up an interpretation for Not Detected results.
- Note: Although only lowercase undetermined is an accepted value in this field, the results file may contain uppercase letters and will still be compatible with this interpretation
- Examples:
- Result: Appropriate result for the CT Range that was entered (Detected, Not Detected, Indeterminate or Invalid)
- Display Name: Value that should be displayed on the patient report for this CT Range
- Examples:
- Detected
- Positive
- Target Detected
- Note: If no ranges are configured for negative/not detected results, the default value that will be displayed on the patient report is ‘Not Detected’
- Examples:
- Qualitative Description: Optional field for additional text that will be added to the Test result on patient reports in the case of this CT value or range
- Examples:
- Critical Value
- Indicates contamination
- Reference Range: Negative
- If displaying Estimated Microbial Loads on patient reports, this field is used for the High/Medium/Low values
- Examples:
- Load: Used for the Estimated Microbial Load value not including the units
- Example: 1x10^2
- Unit: Used for the unit value of the Estimated Microbial Load
- Example: copies/mL
Note: Additional ranges can be added by clicking the green + button to the right of the Unit field to add a new line of fields
- CT Key Name: Header of the column containing the data to be interpreted in the results file that will be uploaded in the workflow
- Example: CT
- Amp Score: Numerical value or range
- Examples:
- 1.2
- >=1.2
- >1.2 and <=1.9
- Examples:
- (Amp Score) Result: Appropriate result for the Amp Score that was entered (Detected, Not Detected, Indeterminate or Invalid)
Note: Additional ranges can be added by clicking the green + button to the right of the Result field to add a new line of fields
- Amp Score Key Name: Header of the column containing the data to be interpreted in the results file that will be uploaded in the workflow
- Example: Amp Score
- Cq Confidence: Numerical value or range
- Examples:
- 0.8
- >=0.8
- >0.8 and <=1.0
- Examples:
- (Cq Confidence) Result: Appropriate result for the Cq Confidence that was entered (Detected, Not Detected, Indeterminate or Invalid)
Note: Additional ranges can be added by clicking the green + button to the right of the Result field to add a new line of fields
- Cq Confidence Key Name: Header of the column containing the data to be interpreted in the results file that will be uploaded in the workflow
- Example: Cq Conf
IVD only Result Strategy
Example of IVD only:
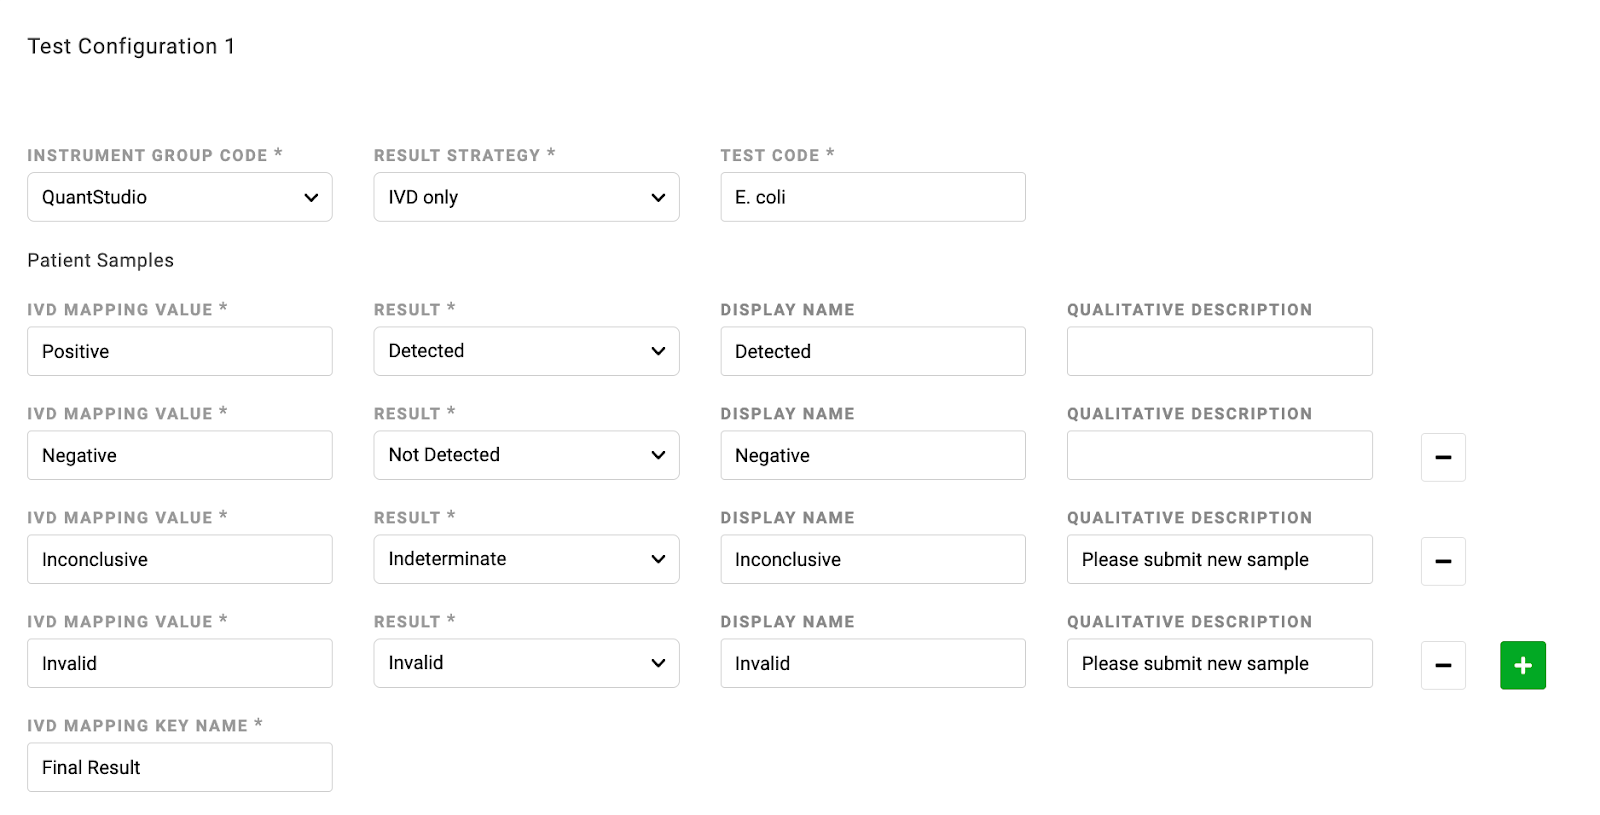
- IVD Mapping Value: One of any possible result values that will be in the uploaded results file
- Examples:
- Positive
- Not Detected
- Inconclusive
- Examples:
- Result: Appropriate result for the IVD Mapping Value that was entered (Detected, Not Detected, Indeterminate or Invalid)
- Display Name: Value that should be displayed on the patient report for this IVD Mapping Value
- Examples:
- Detected
- Negative
- Target Inconclusive
- Examples:
- Qualitative Description: Optional field for additional text that will be added to the Test result on patient reports in the case of this IVD Mapping Value
- Examples:
- Critical Value
- Indicates contamination
- Reference Range: Negative
- Examples:
Note: A new line of IVD Mapping values should be configured for each possible result value in the uploaded results file. Additional IVD Mapping Values can be added by clicking the green + button to the right of the Qualitative Description field.
- IVD Mapping Key Name: Header of the column containing the result (IVD Mapping Value) in the results file
- Example: Final Result
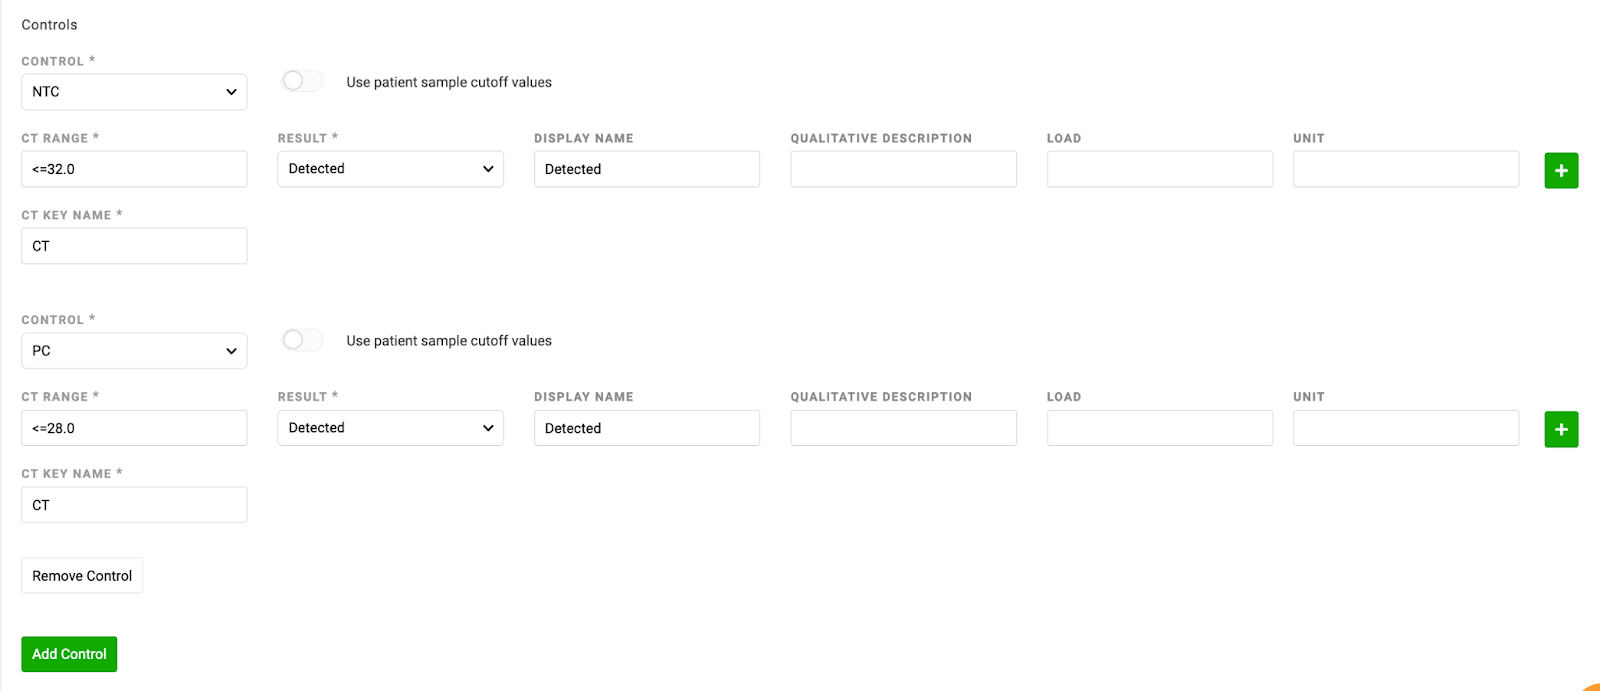
External Controls Interpretation Setup
If the external controls (NTC, Positive Control, etc.) for this Test have the same cutoff values as patient samples, leave the default value of All in the Control dropdown menu and the ‘Use patient sample cutoff values’ toggle should remain switched on.

If the external controls for this test panel (NTC, Positive Control, etc) have different cutoff values than patient samples, those cutoffs can be defined in the Controls section of the applicable Test Configuration, as described below.
- Choose an applicable external control (that has different cutoff values than patient samples) from the Control dropdown menu
- Turn off the toggle “Use patient sample cutoff values” to display the interpretation fields
- Fill in the interpretation fields, as appropriate for that external control
- Repeat for all applicable external controls for this Test by clicking the green Add Control button
- If some external controls have the same cutoff values as patient samples, turn on the “Use patient sample cutoff values” toggle for those controls
- Click the green Save button at the top right corner of that Test Configuration section
Note: If any external controls for this Test have different cutoff values than patient samples, then interpretations must be configured here for all external controls that are used for this Test (even if some external controls have the same cutoffs as patient samples)
Example of All External Controls Having Different Cutoff Values than Patients:
Example of Some External Controls Having Different Cutoff Values than Patients:
