
COVID-19 Best Practices Workflow Guide
Sections contained in this guide are shown below. Read the whole workflow guide or skip to the section you need.
Workflow Structures Overview
Covid-19 Best Practices contains 3 workflows:
1. Covid-19-Extraction workflow (optional)
2. Covid-19-PCR workflow
3. Covid-19-PCR Repeat workflow
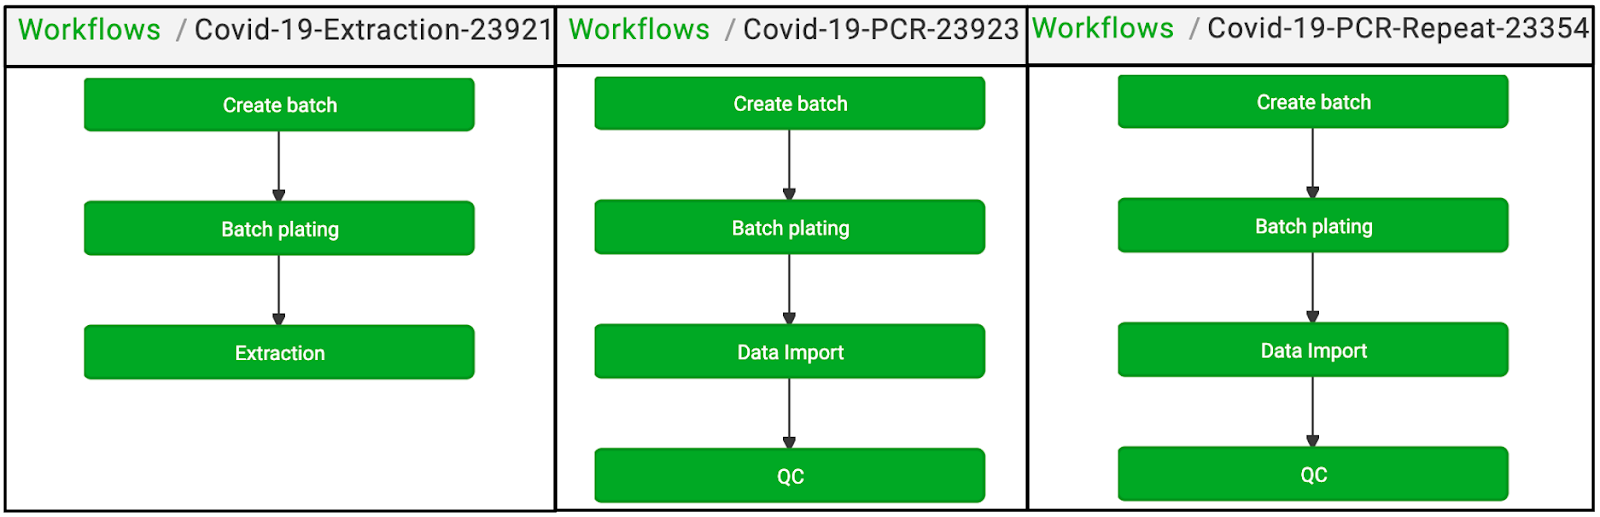
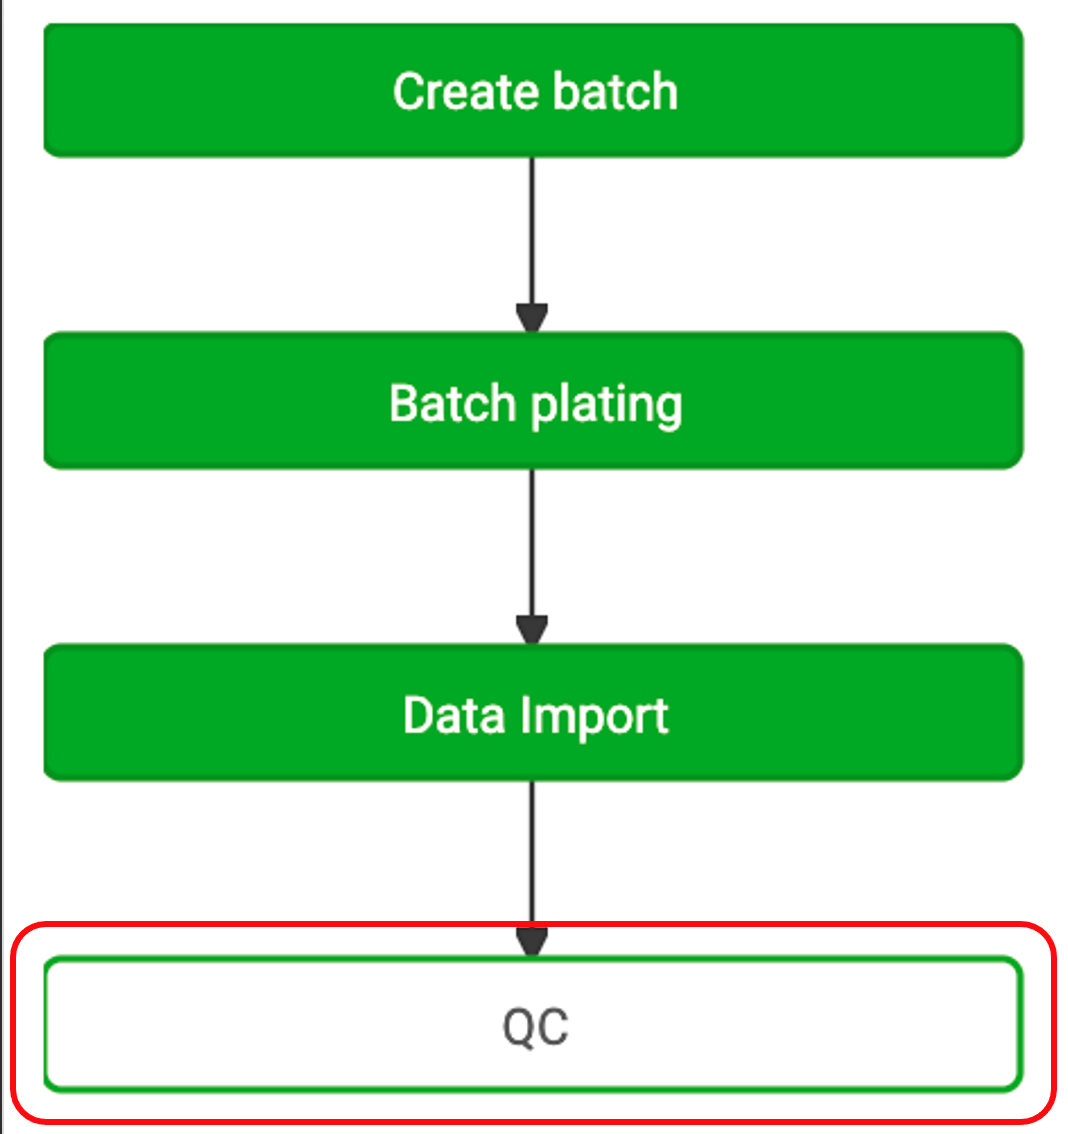
Each workflow in your OvDx LIMs has multiple Activity Steps. Activity Steps are the sequential processes required to complete a workflow.
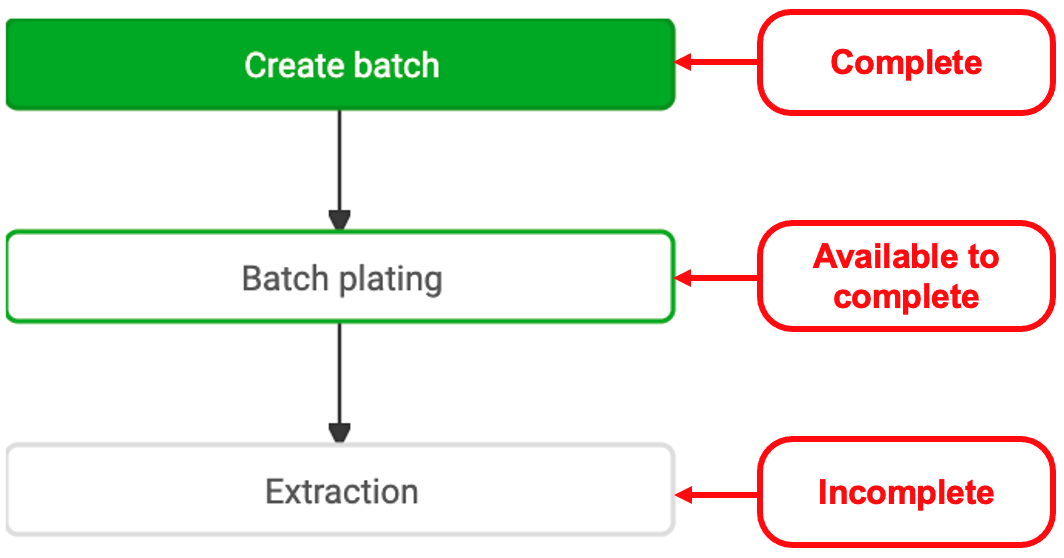
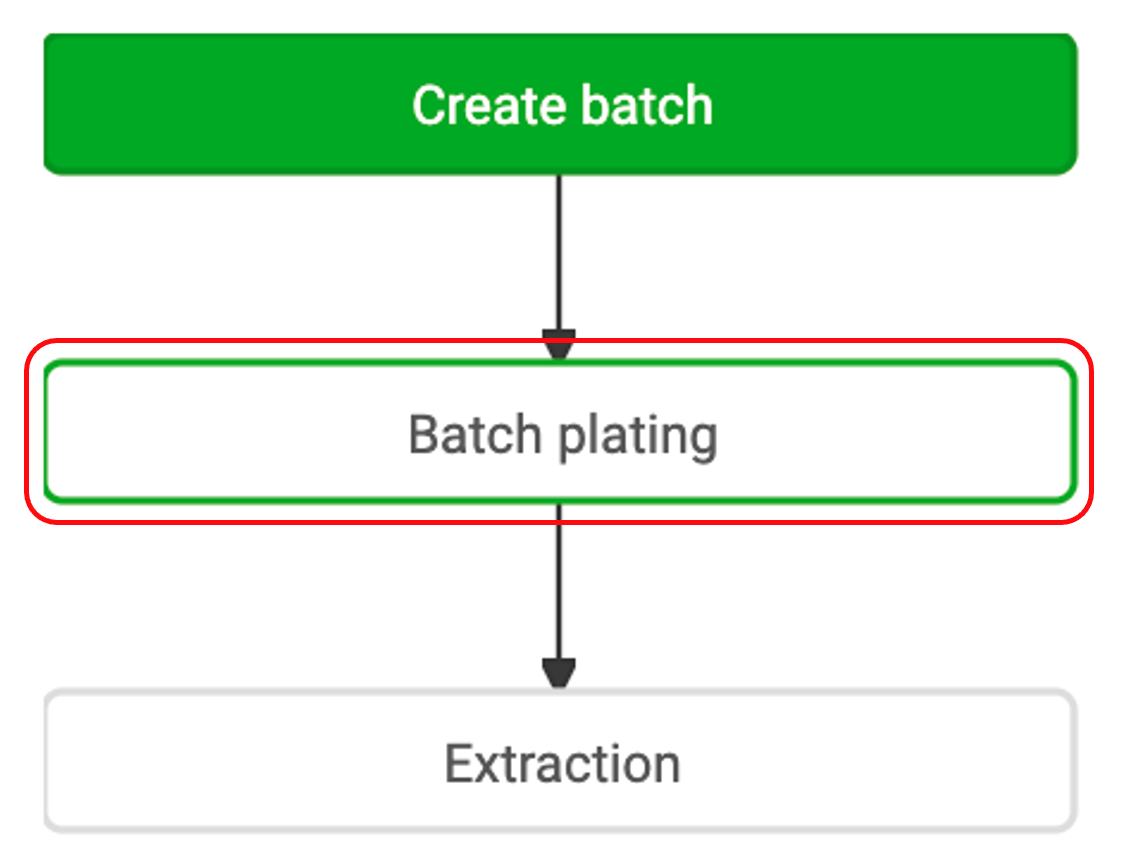
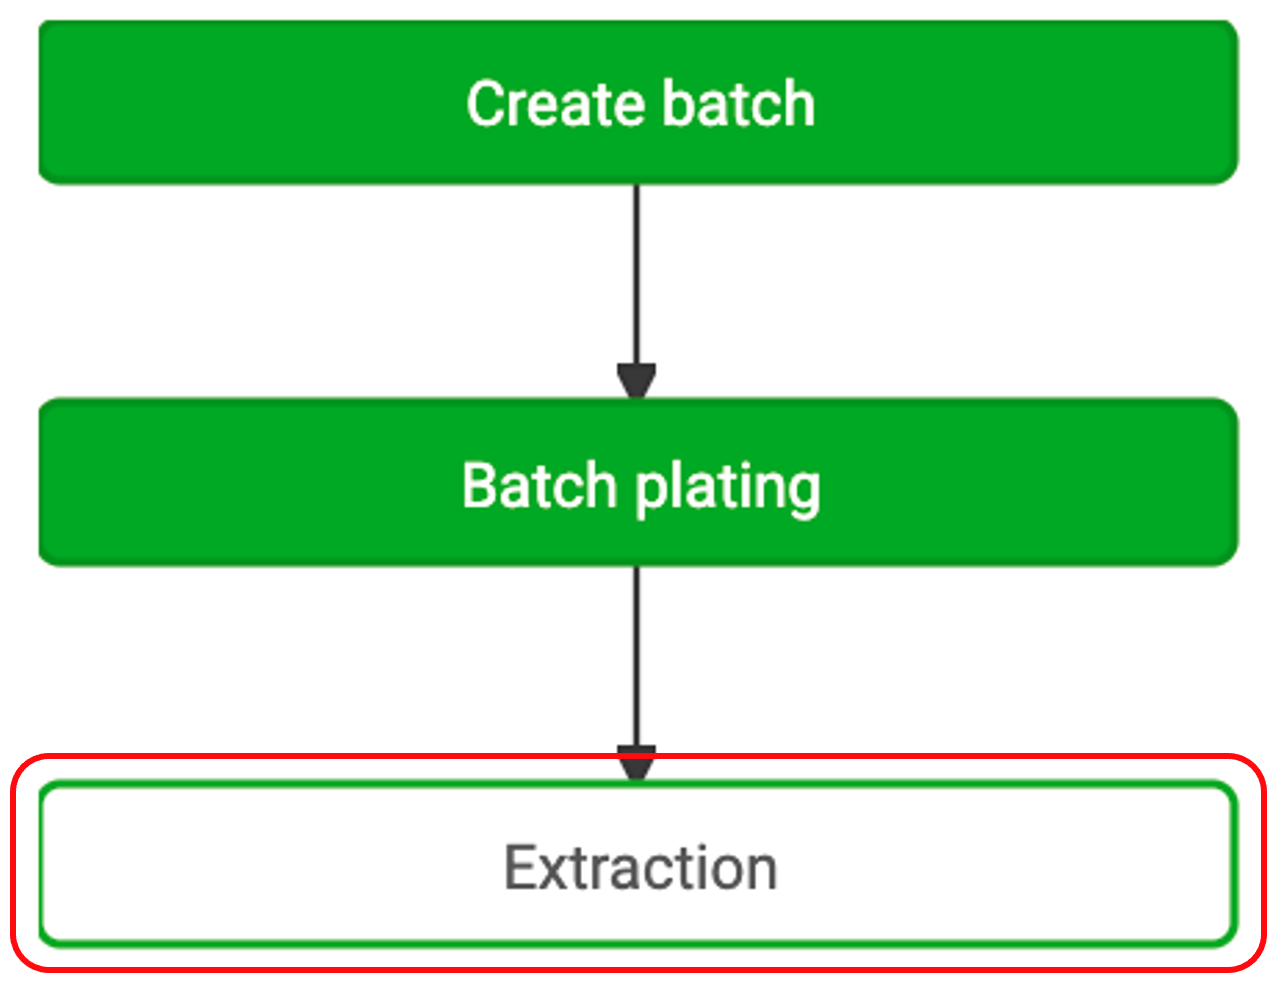
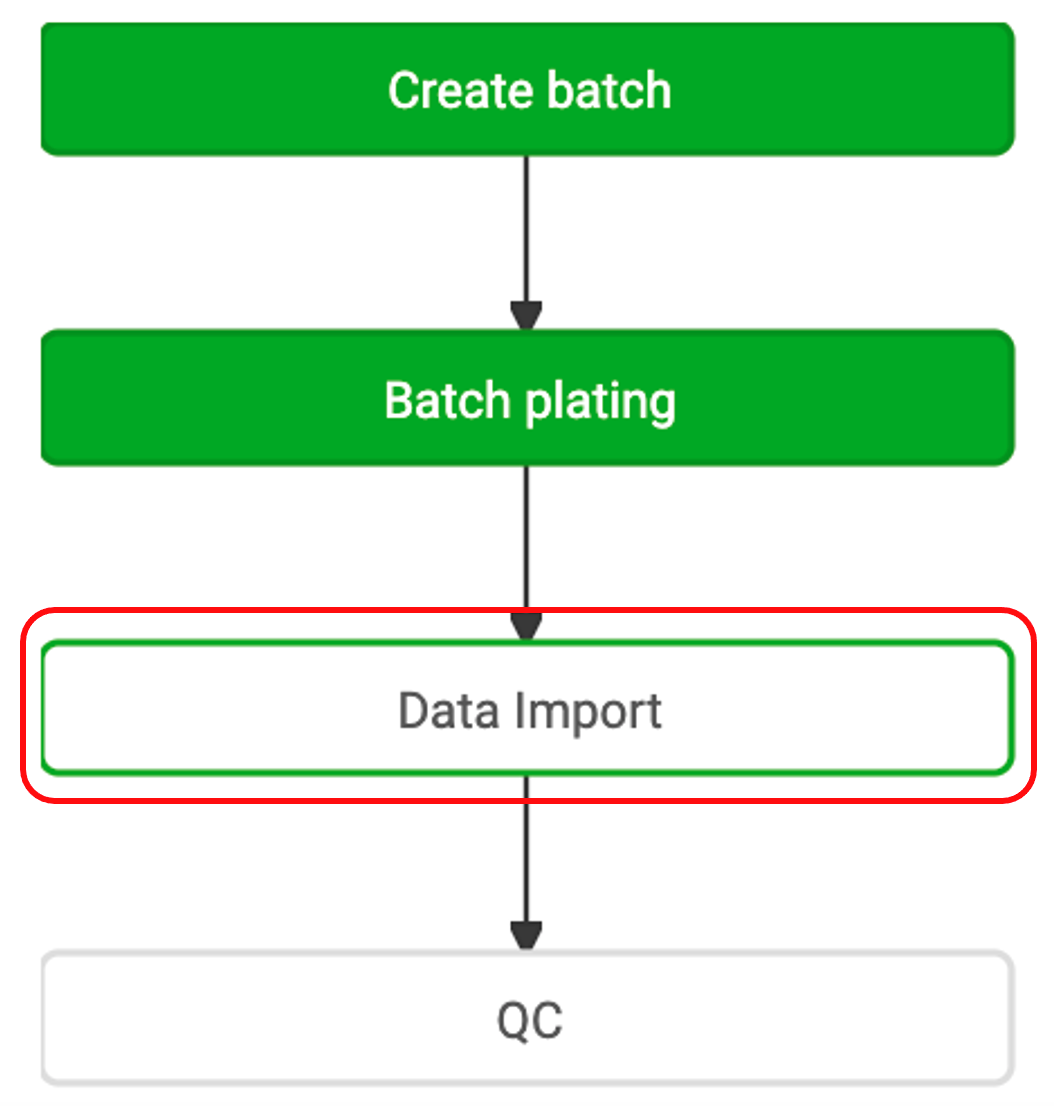
Solid green rectangles indicate a workflow Activity Step is complete, green-bordered rectangles show the next available Activity Step to complete, and gray-bordered rectangles indicate incomplete Activity Steps. You can click on solid green rectangles to return to completed activities.
Note: Samples that complete a Covid-19-Extraction workflow automatically queue to a Covid-19-PCR workflow. OvDx Covid Best Practices provides your lab with a separate Repeat workflow. Samples can be sent to a Covid-19-PCR-Repeat workflow if they fail quality control in a Covid-19-PCR workflow. This allows users to keep a record in OvDx of samples that have already failed quality control once and prevents users from repeating samples multiple times.
Creating a Workflow
There are two ways to create a new workflow: using the Workflows Bar Chart or using the Add Workflow button
Creating a workflow using the Workflows Bar Chart
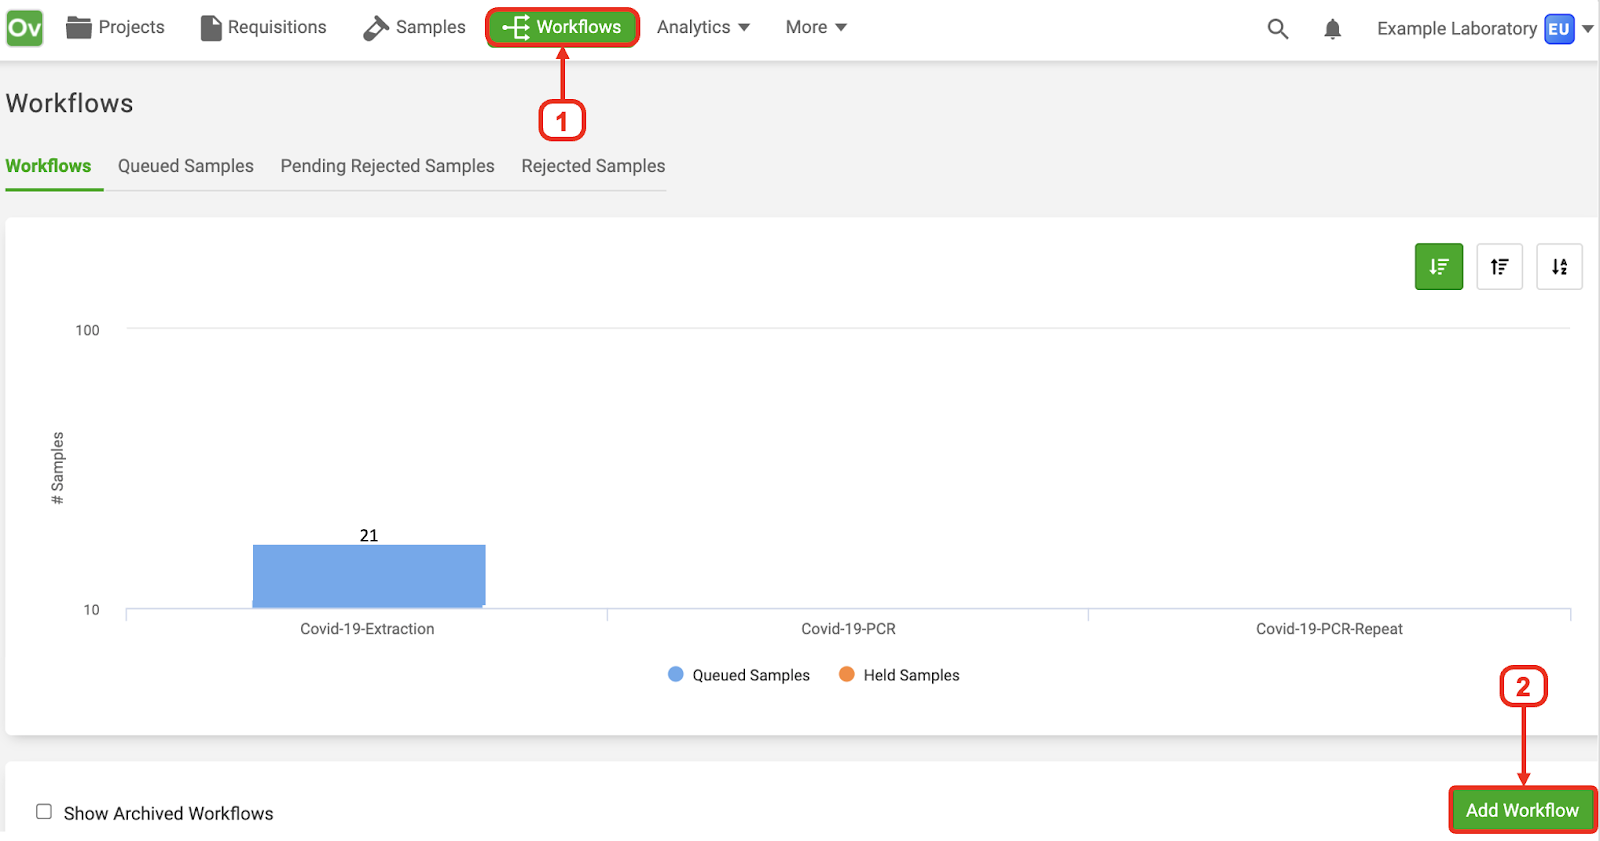
1. From any screen, click “Workflows” on the top bar
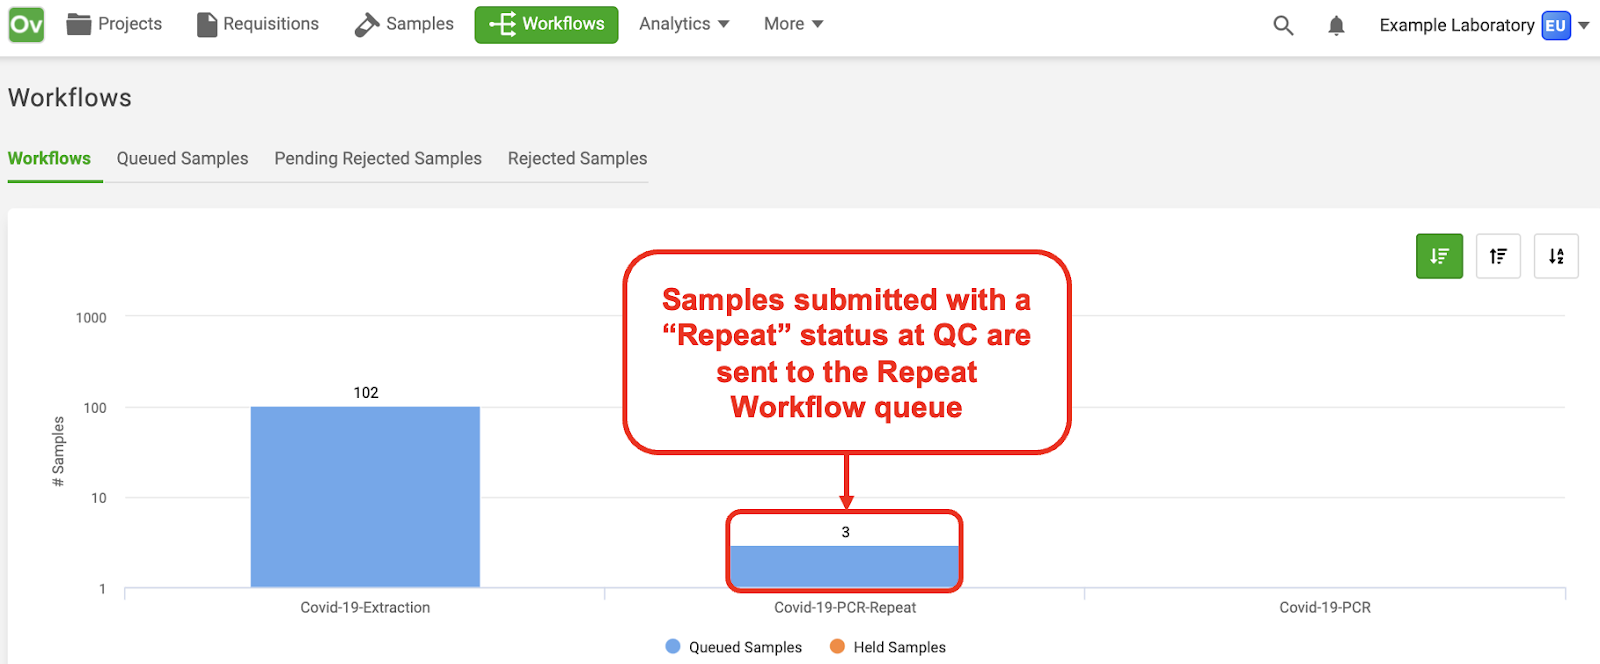
2. Click on the blue bar above the workflow type you want to create

Note: The number above the blue bars in the Workflows Bar Chart indicates the number of samples in the queue for that workflow.
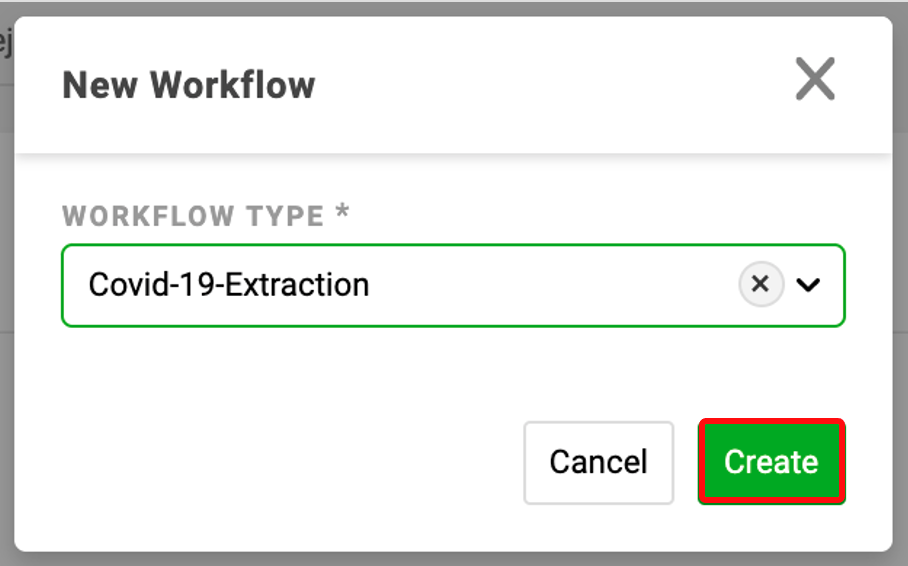
3. Click the green Create button in the New Workflow modal
Creating a workflow using the Add Workflow Button
1. From any screen, click “Workflows” on the top bar
2. Scroll below the bar graph and click the green “Add Workflow” button
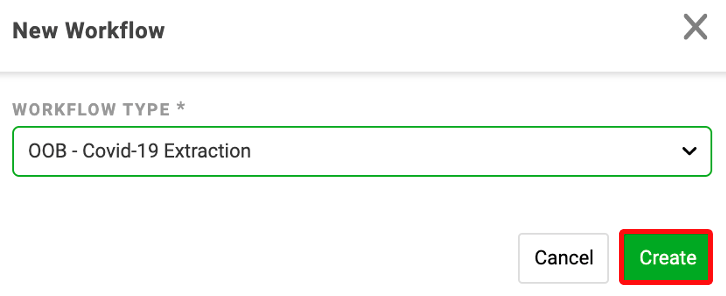
3. In the New Workflow modal select your workflow type from the dropdown menu

4. Click the green Create button
Workflow Activity Steps
The Workflow Activity Steps contained in the three Covid-19 Best Practices are Create Batch, Batch Plating, Extraction, Data Import, and QC. Some activity steps, such as Create Batch, are in multiple workflows. The Extraction activity step is optional or only present in one workflow. Read all sections or skip to your Activity Step of interest.
Create Batch
All workflows in your OvDx LIMs begin with a Create Batch Activity Step. This activity allows you to define which samples and controls will be processed together as a workflow batch under the same workflow ID.
1. Click the “Create batch” activity step

2. If applicable, confirm that positive and negative external controls are selected
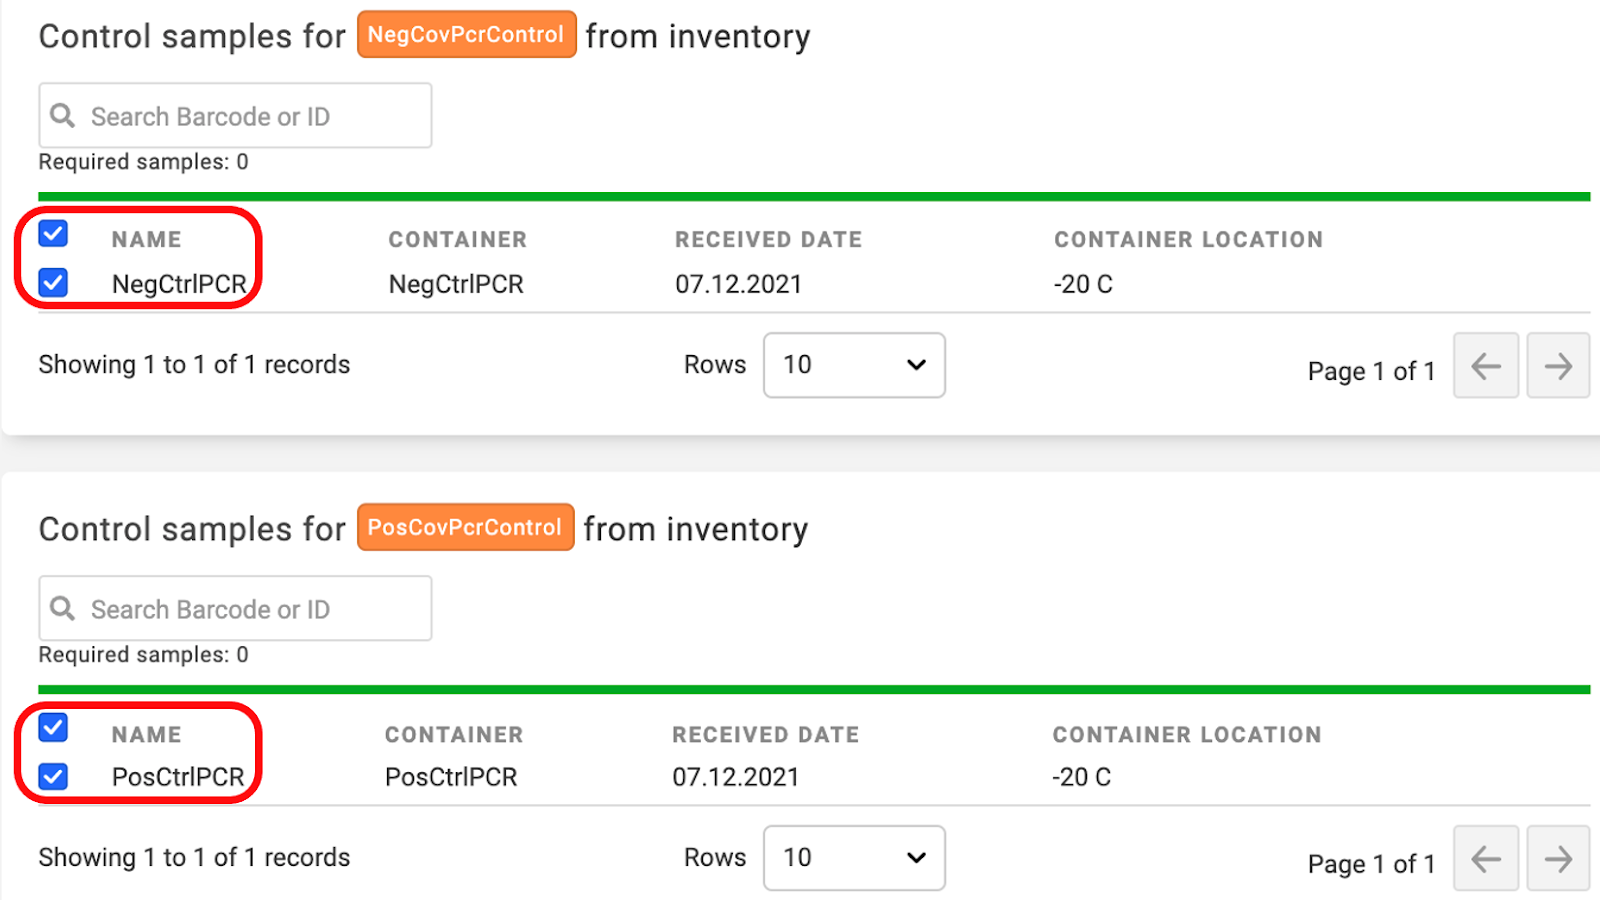
Note: Not all ‘Create Batch’ Activity Steps require external controls. If required, External controls are selected by default. You can deselect the external controls to exclude them from the assay. External controls can also differ by workflow. For example, Extraction workflows may include a no template control (NTC) while PCR workflows may include both a positive and negative external control.
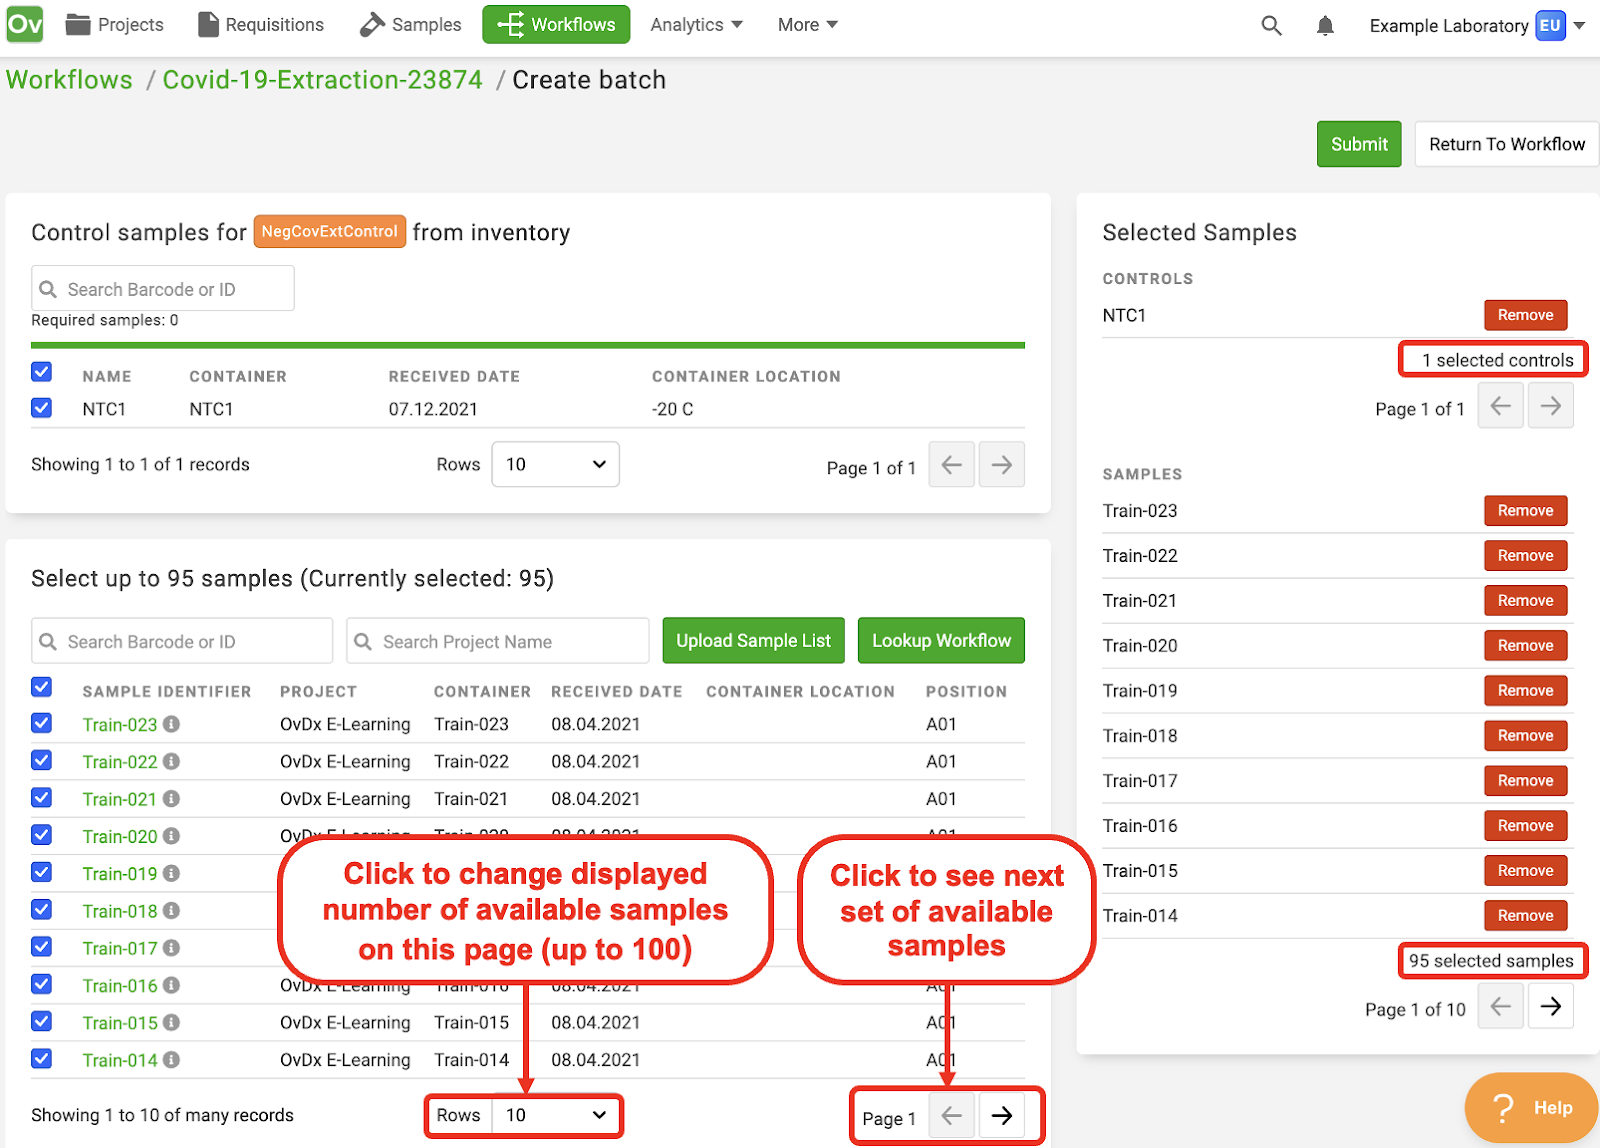
3. Choose one of the following methods to add your samples to the batch: Manual selection, Upload sample List, or Lookup Workflow
Note: The maximum number of samples and controls that can fit in the selected container type will be auto-selected by OvDx. In the 96-well plate example below, there is one default external control that is auto-selected. The remaining 95 container positions for the batch are then auto-selected from the list of available queued samples. The Create Batch screen can show a maximum of 100 queued samples if you set the “Rows” window to 100. If your container type holds more than 100 samples (i.e., 384-well plate), all 382 samples will still be auto-selected, and you will need to use the page arrows to see the rest of the batch.
Manual Selection
A. Select individual samples by checking the box next to the sample identifier. You can select/deselect all samples by clicking the box to the left of “Sample Identifier”

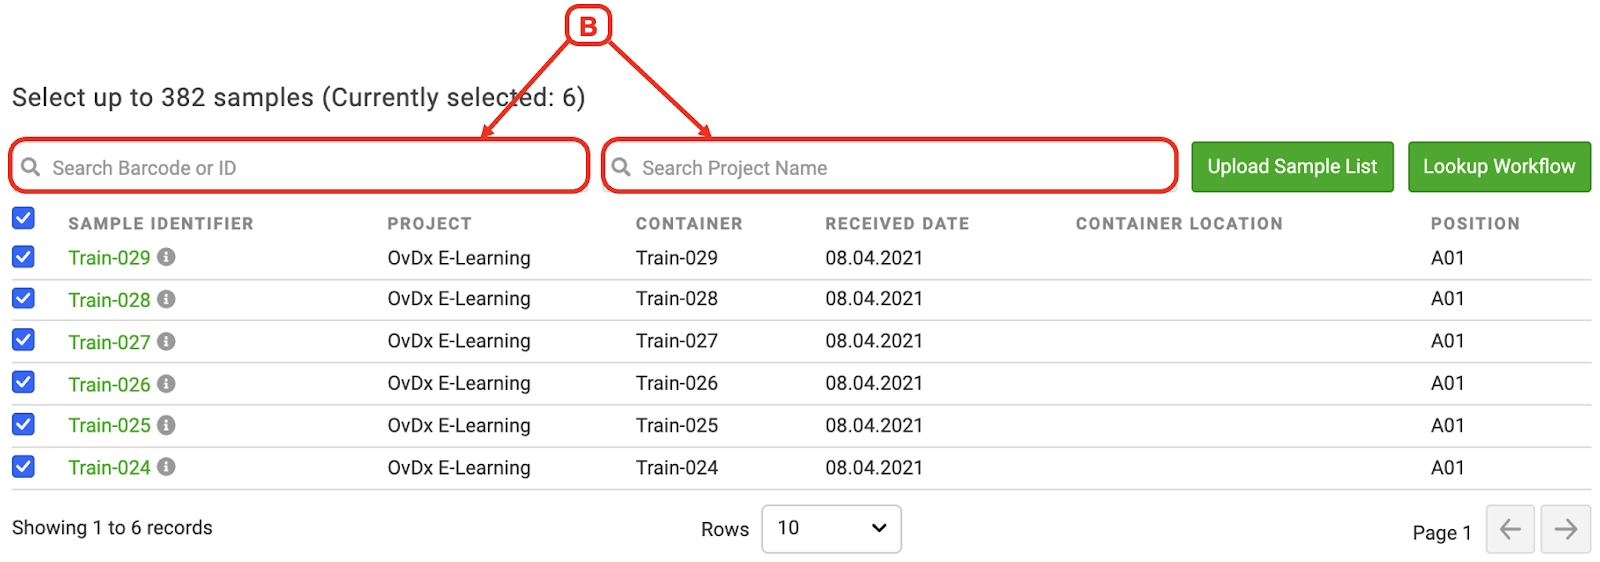
B. Scan the barcode or enter the Sample ID or Container ID to search for individual samples in the search box. Available samples can also be filtered by entering the Project Name into the project box
C. Skip to Step 4 of this section under Create Batch
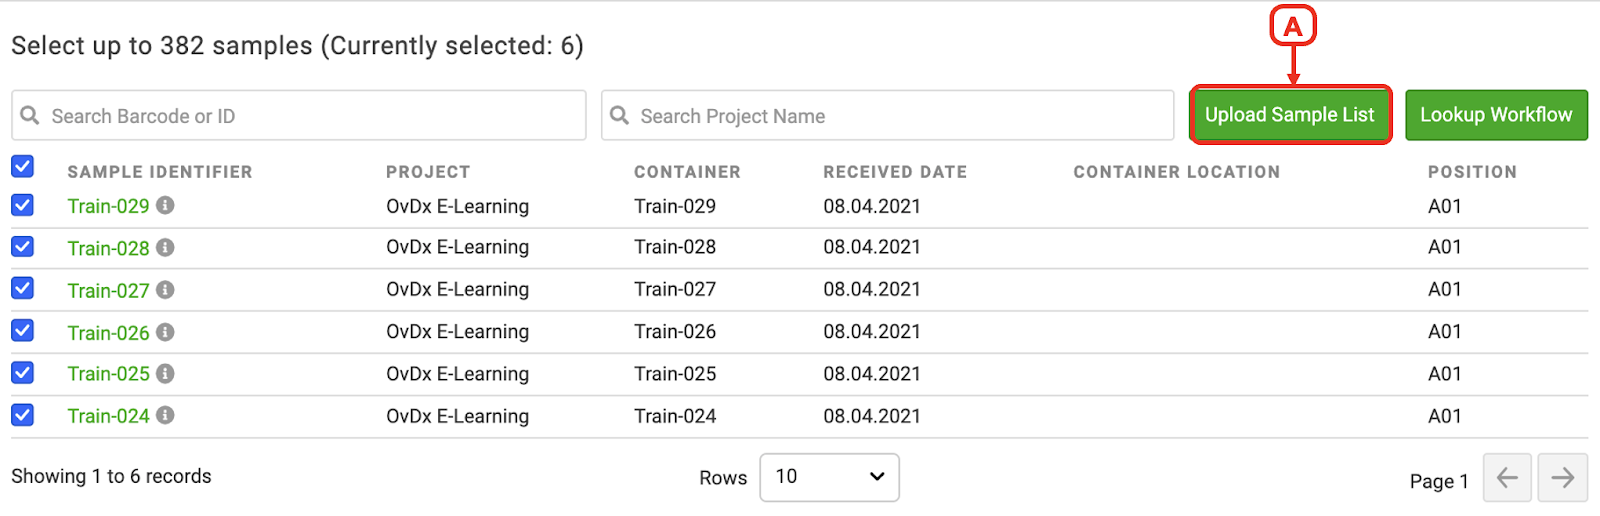
Upload Sample List
A. Click the “Upload Sample List” button
B. Drag and drop your CSV file with your sample batch list
C. Click the green “Submit” once the file loads

Tip: Click the green “Download example file” shown in the previous image if you are unsure or get an error in your upload. CSV’s must include the column header “Identifier”. Sample IDs or Container IDs of the samples you want to include in your batch should be listed beneath “Identifier” in one column. You can use a barcode scanner to help make your upload file by scanning the Sample or Container IDs into the CSV “Identifier” column.

D. Skip to Step 4 of this section under Create Batch
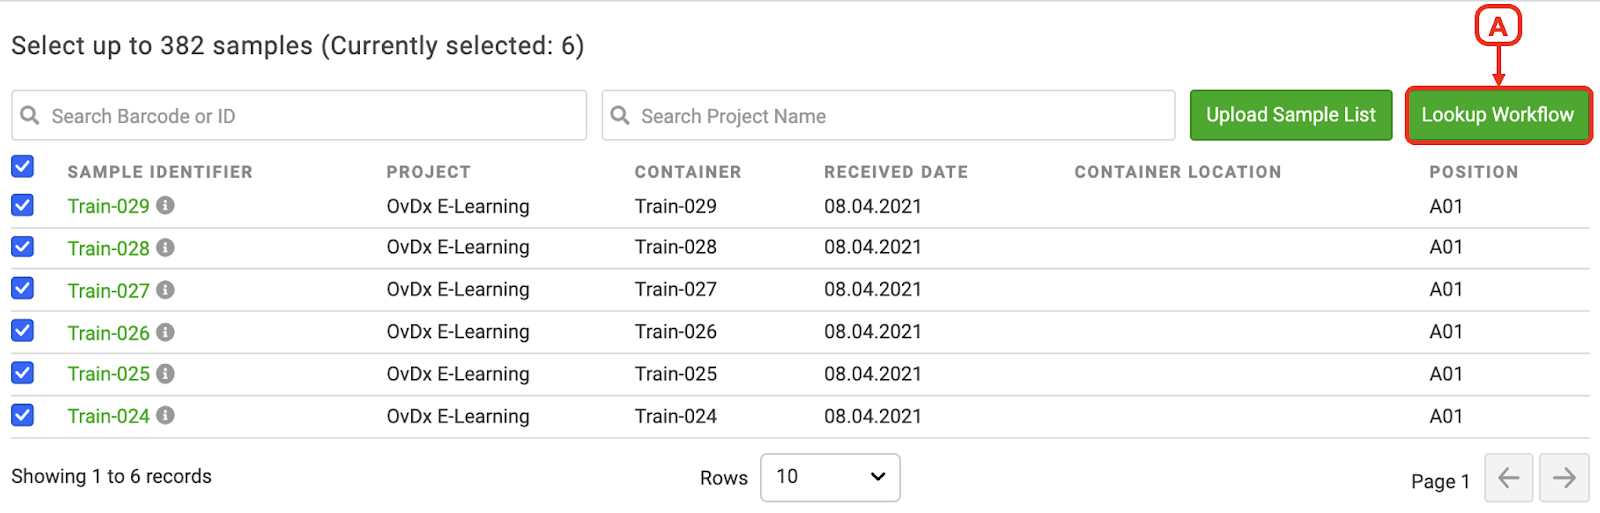
Lookup Workflow
A. Click the “Lookup Workflow” button
B. There are two choices in the Lookup Workflow Modal: Add to Batch or Replace Batch. Choose Add to Batch to add the samples from your selected workflow to the current list of selected samples. Choose Replace Batch to replace the current selected samples with the samples in your workflow of choice
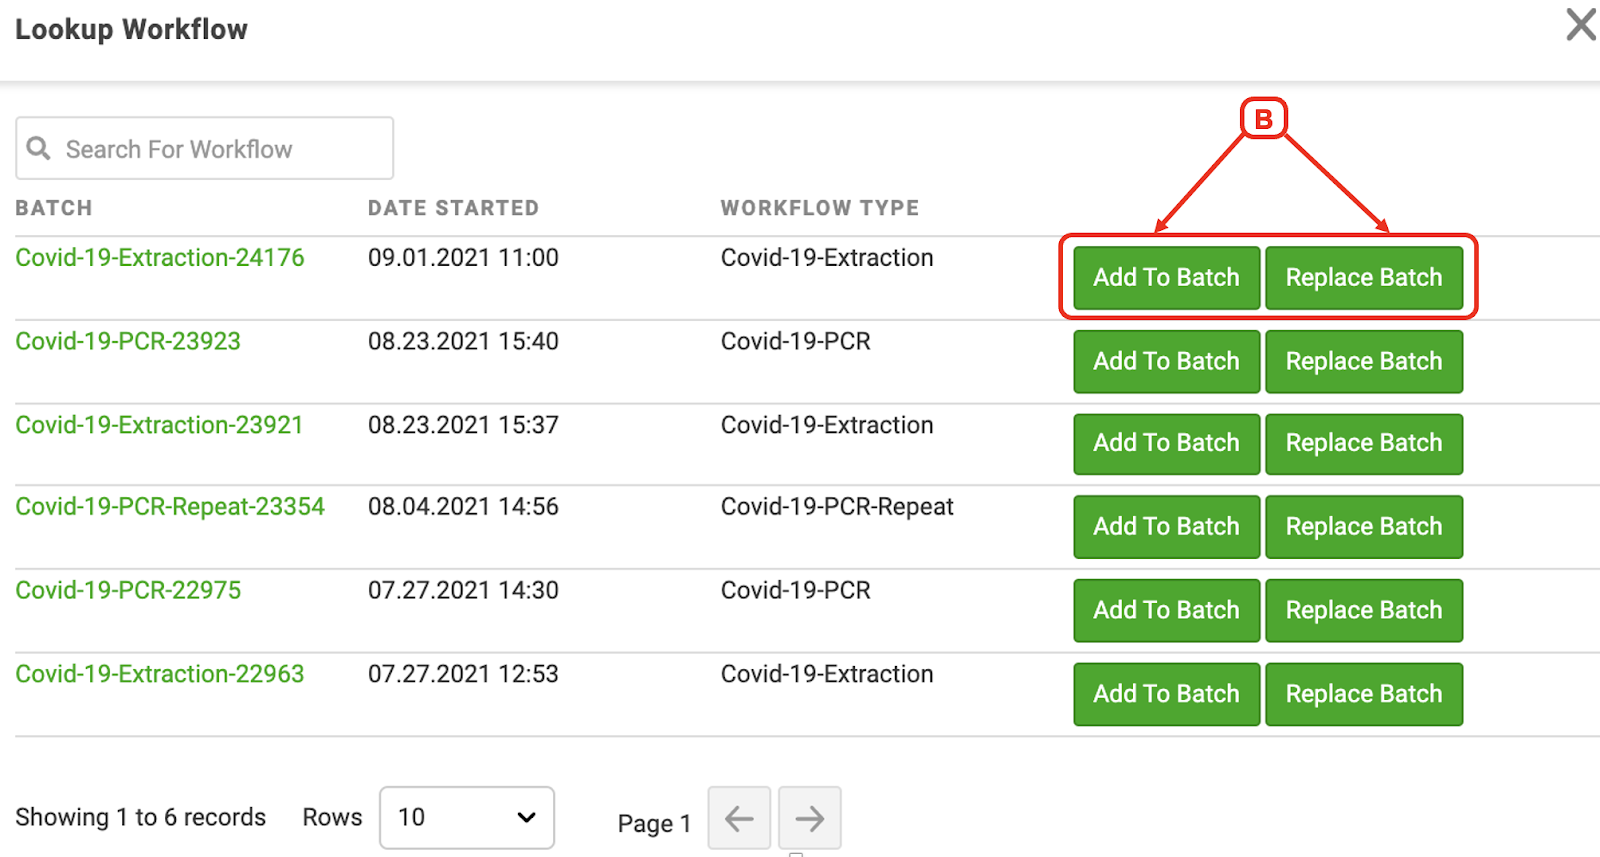
C. Go to step 4 below
4. Verify your selected controls and samples samples are shown on the right side of the screen
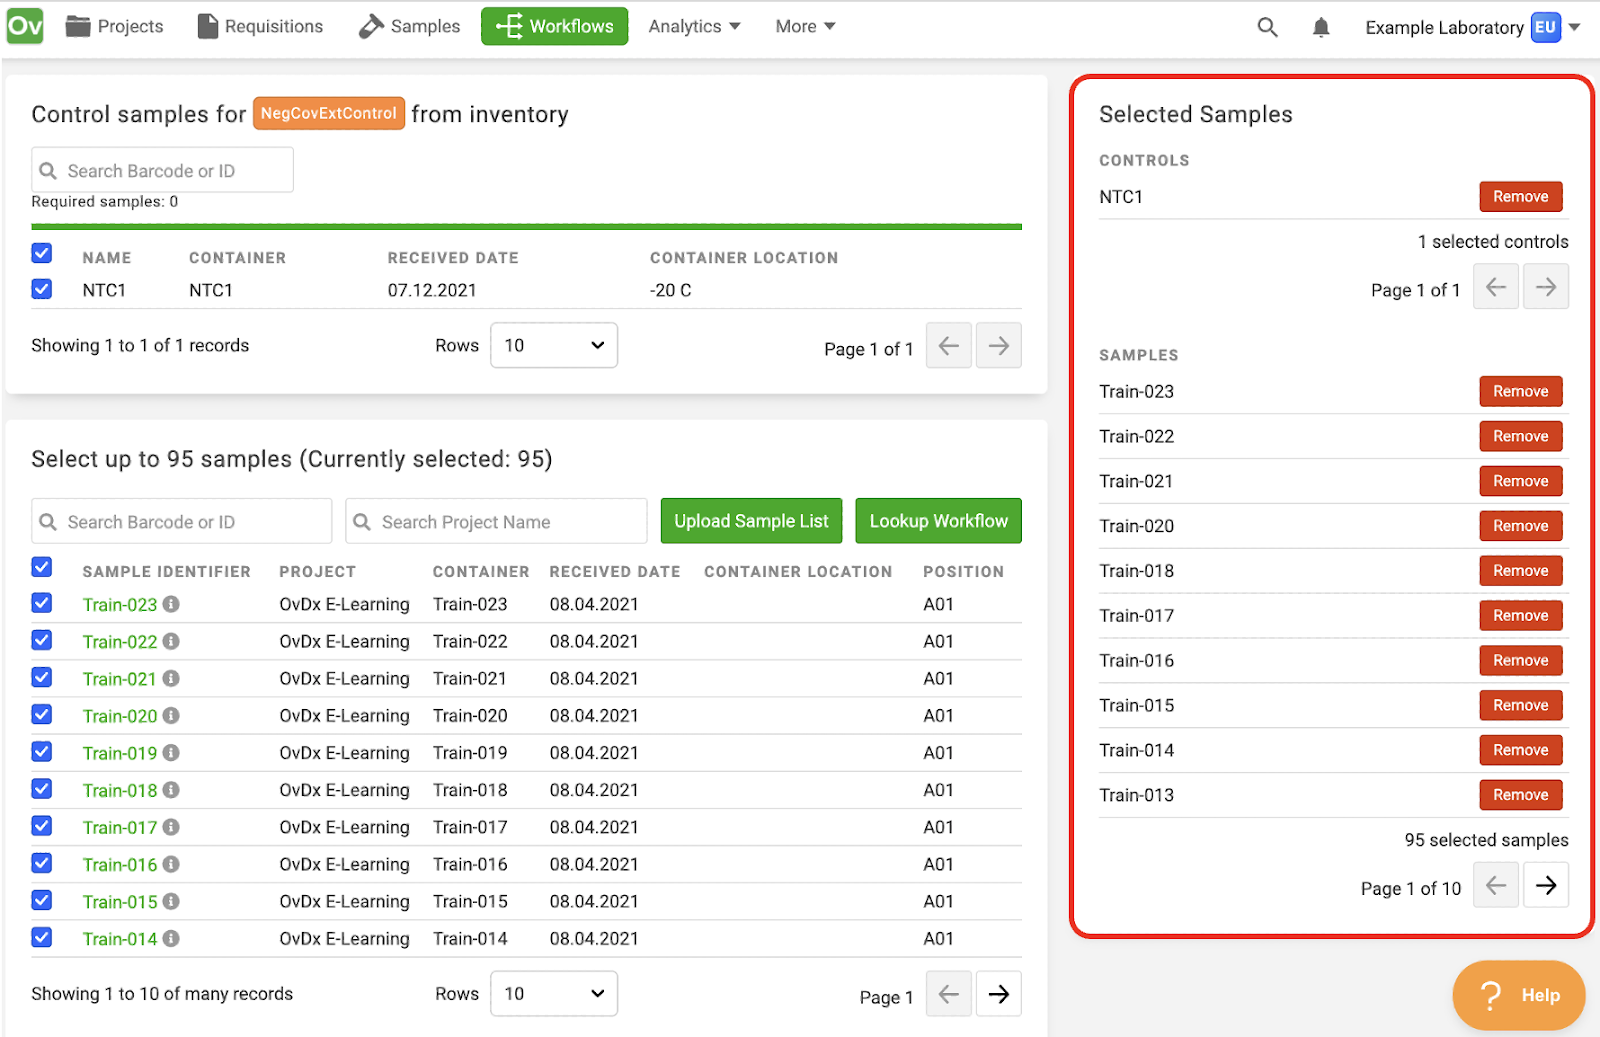
Note: Clicking the red Remove button will remove that control or sample from the batch.
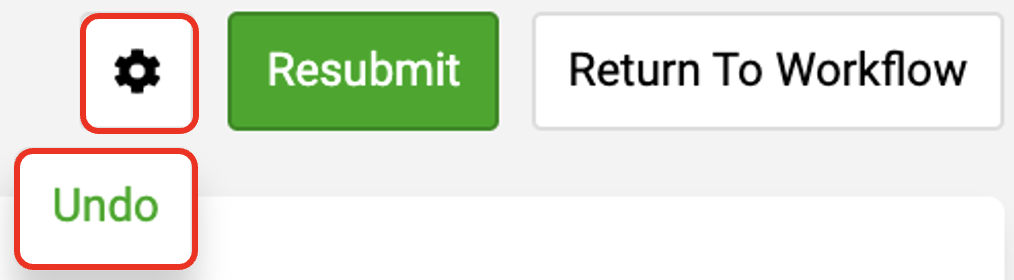
5. Scroll up and click the green “Submit” button, then click “Return to Workflow”


Note: You can click the gear in the top right corner of the most recently submitted activity step to undo that step.
Batch Plating
The Batch Plating Activity Step allows you to track the lab process of moving samples from one container to another and to record the sample position within the container. If your secondary container already has a unique identification number, you can record it. Alternatively, you can have OvDx auto-generate a unique identification number for the container and associate all batched samples to that container ID. Details for sample location, metadata, and files can also be associated with a Batch Plating Activity Step.
1. In the workflow, click “Batch Plating”
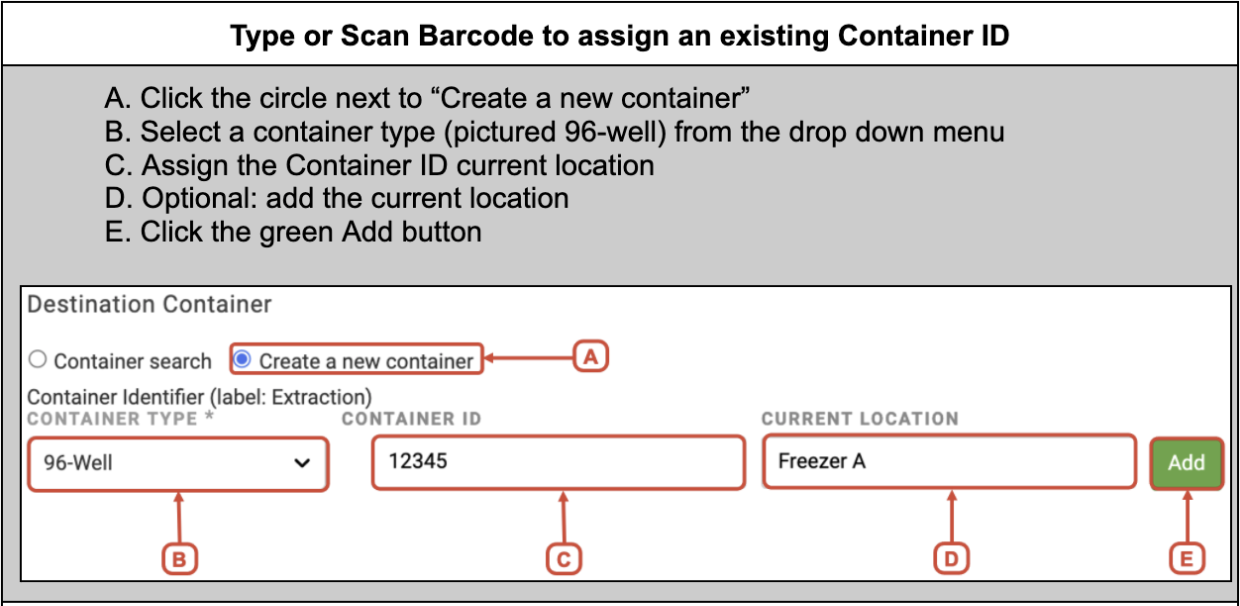
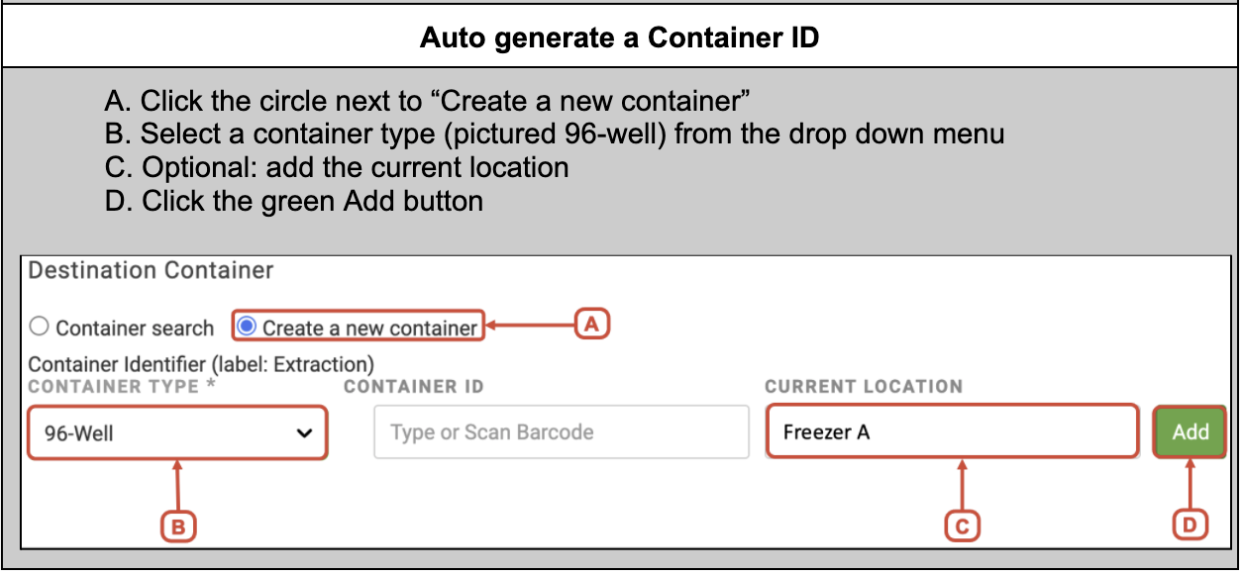
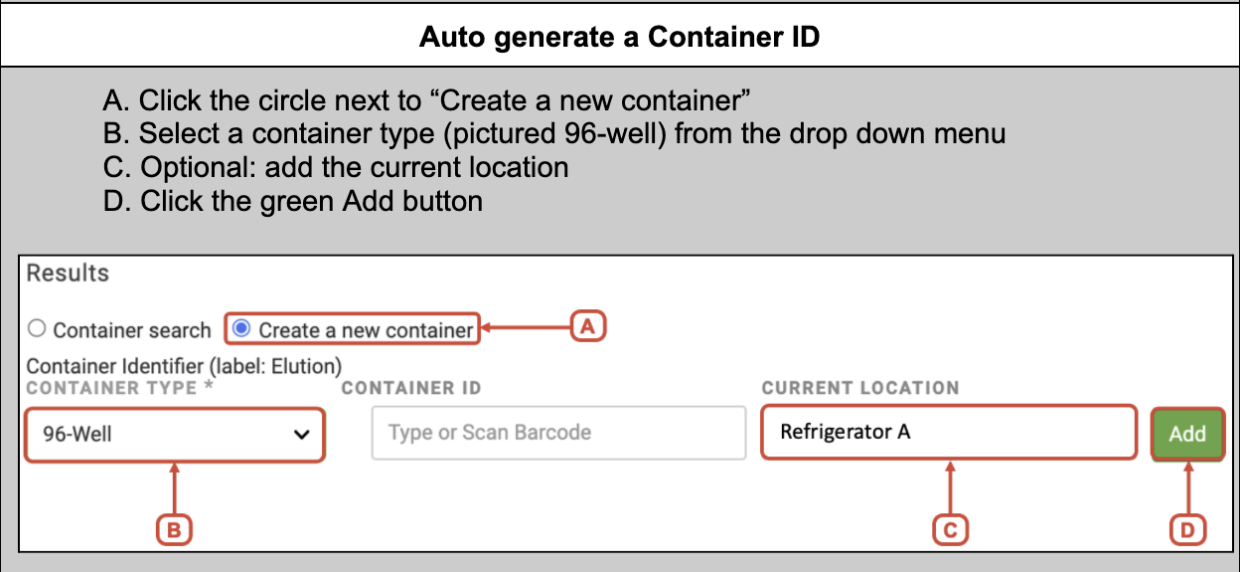
2. Add Destination Container details. Choose to enter an existing Container ID or Auto generate a Container ID
Do you have an existing Container ID? If yes…
If you do not have an existing Container ID…
Note: You cannot have more samples than wells. Choose the appropriate container type.
3. Choose one of the three sample position assignment options for your Destination Container using the table below. Then scroll to the position assignment option of your choice

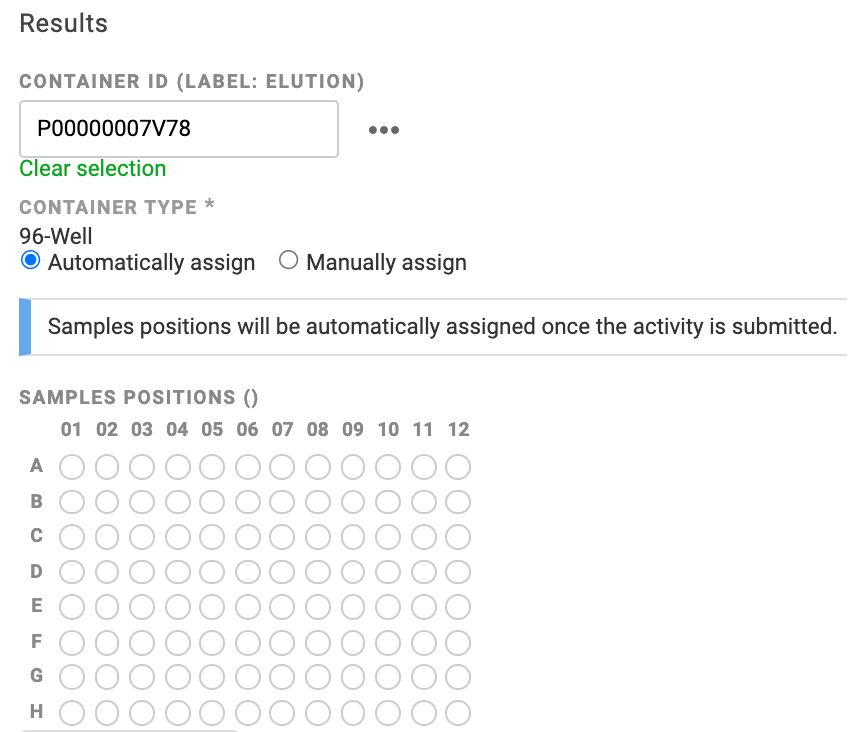
Automatically assign
A. Choose the “Automatically assign” option

B. Skip to Step 4 of this section under Batch Plating. The system will automatically assign your samples a position when this step is submitted
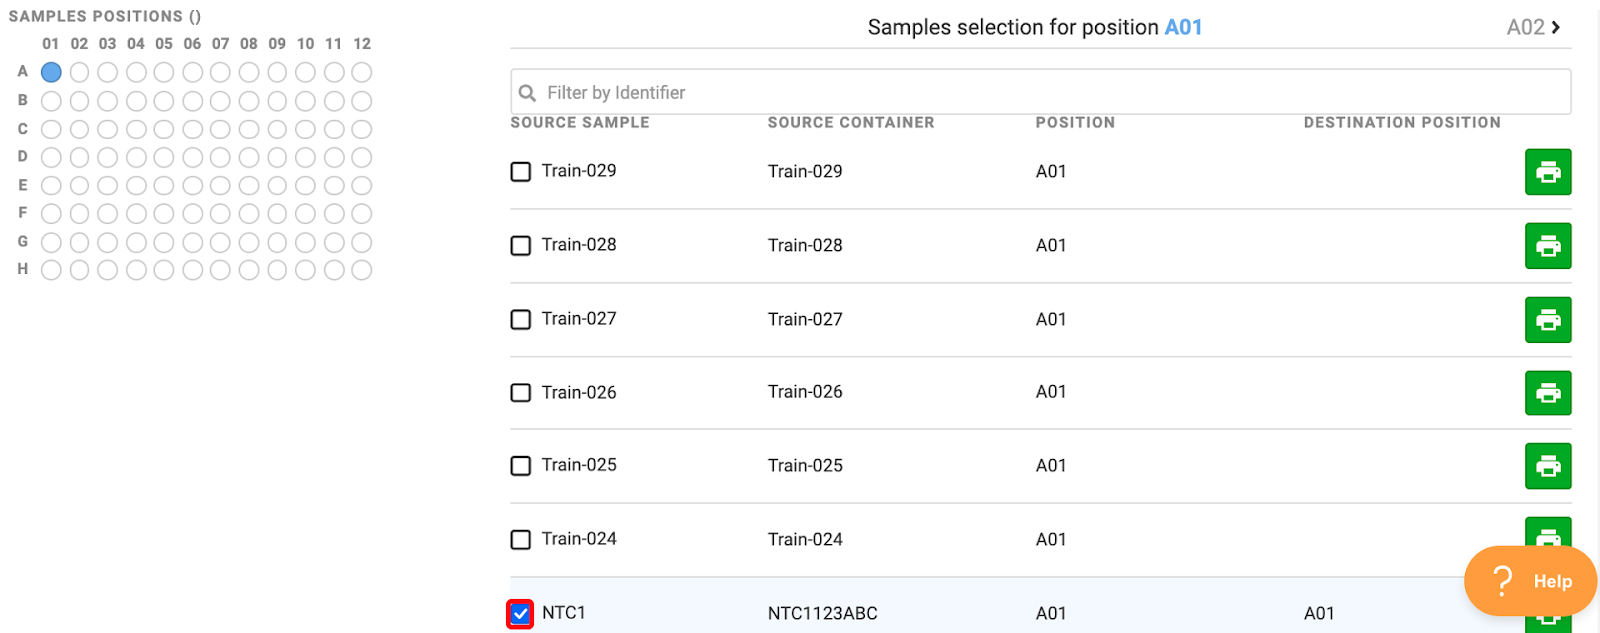
Manually assign
A. Choose the “Manually assign” option

B. The blue well on the plate map indicates the selected well. Click the checkbox next to the sample you wish to assign to the selected blue well
C. Click the next well you wish to assign. Wells that already have an assigned sample are green
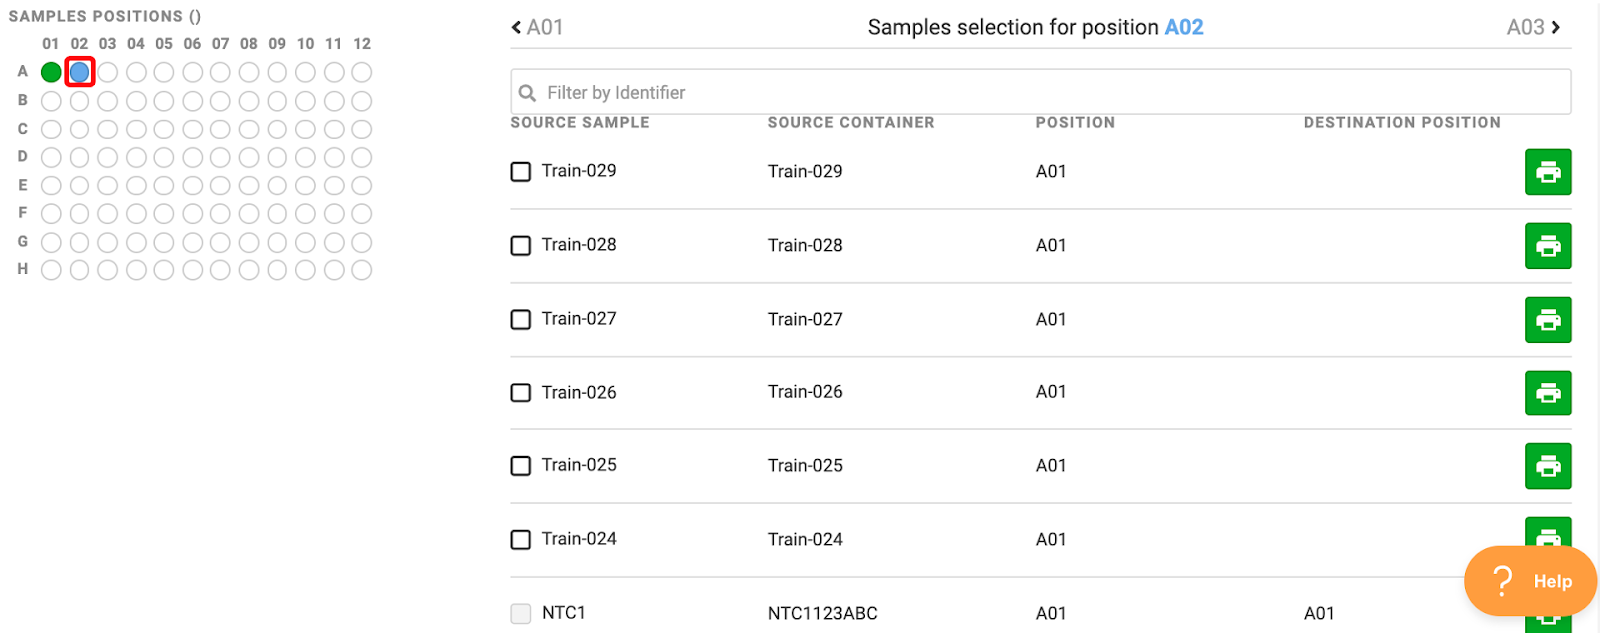
D. Click the checkbox of the next sample you wish to assign. Keep choosing wells and assigning samples until all samples are assigned
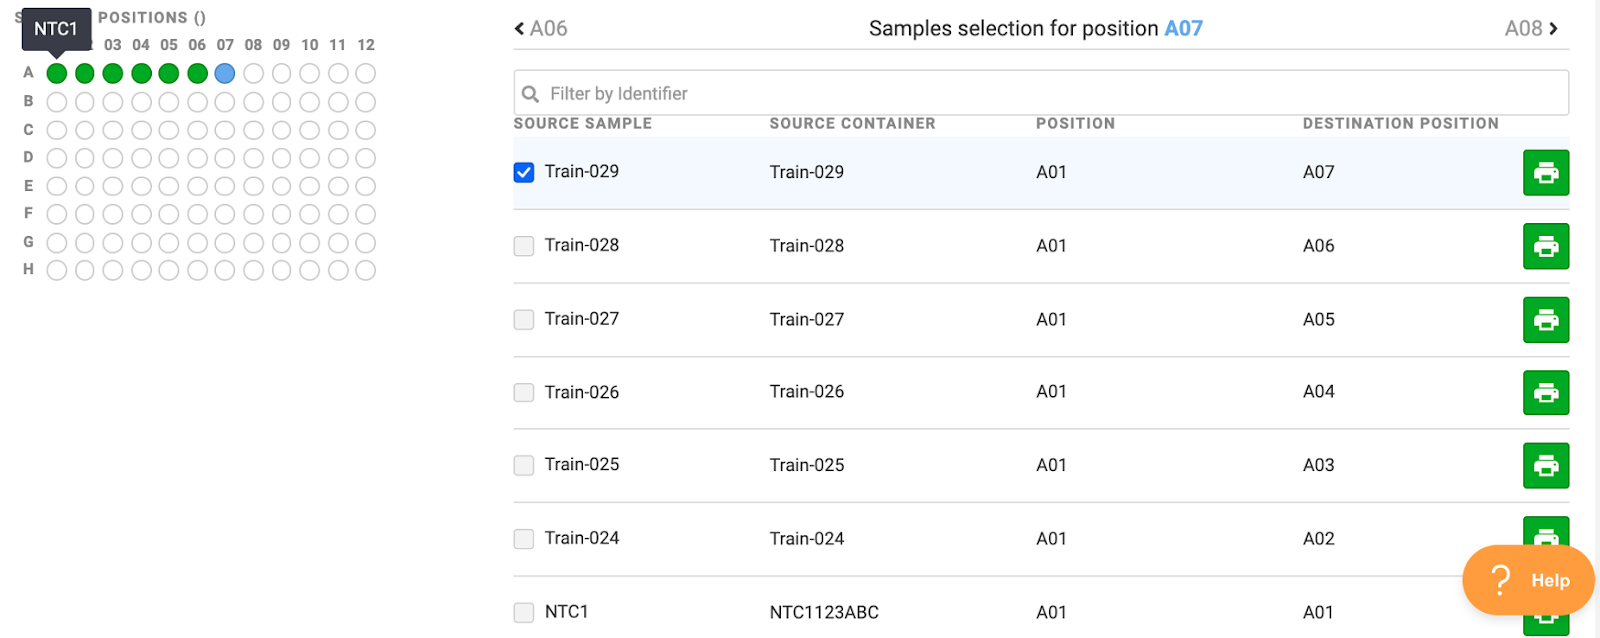
Tip: Hovering over a green well will show the sample currently assigned to that well
E. Skip to Step 4 of this section under Batch Plating. The system will assign your samples to the positions you chose when this step is submitted
Upload plating configuration
A. Choose the “Upload plating configuration” option
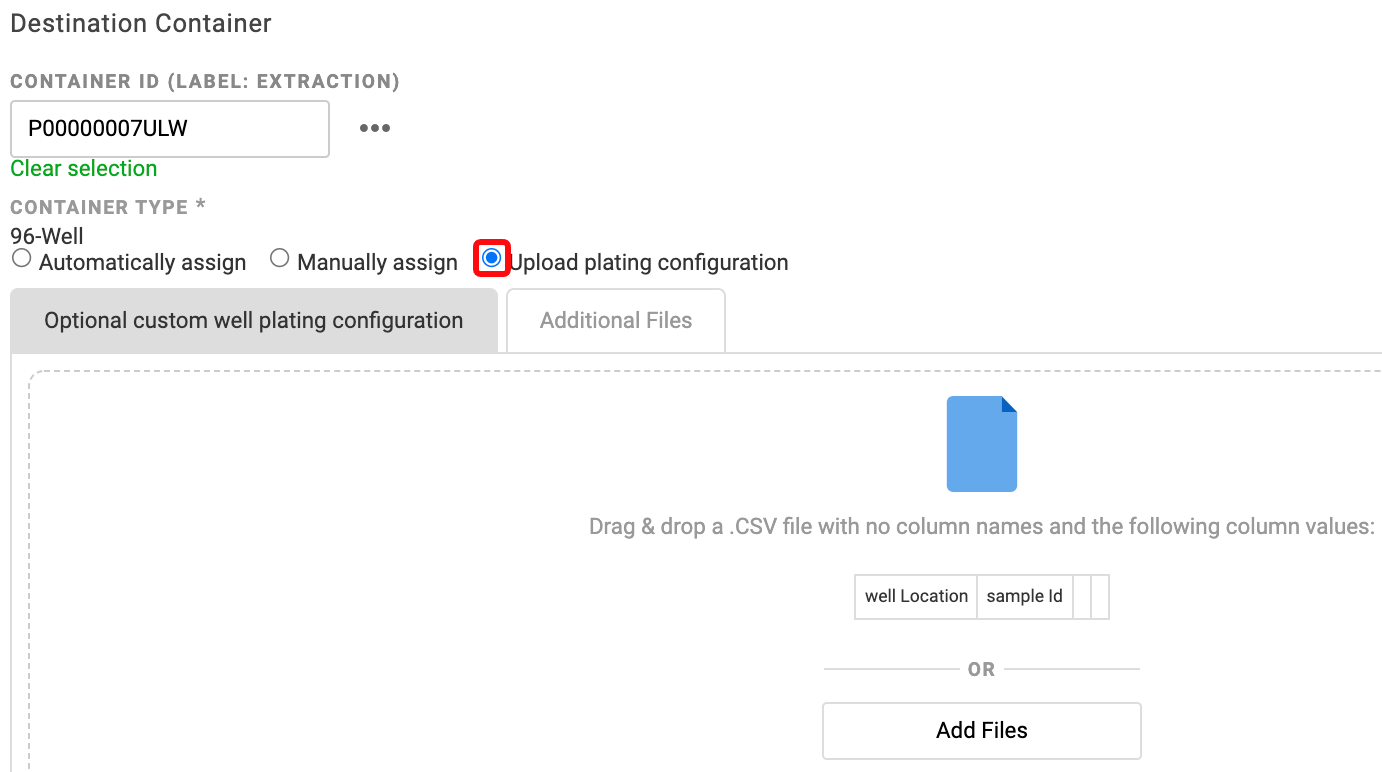
B. Prepare your CSV for upload. Have all wells listed in the first column of your CSV. Have all Sample IDs listed in the second column aligned with their designated well. Save your CSV file
Tip: Columns must have the well format A01, not A1
C. Drag and drop of click Add Files to select your file

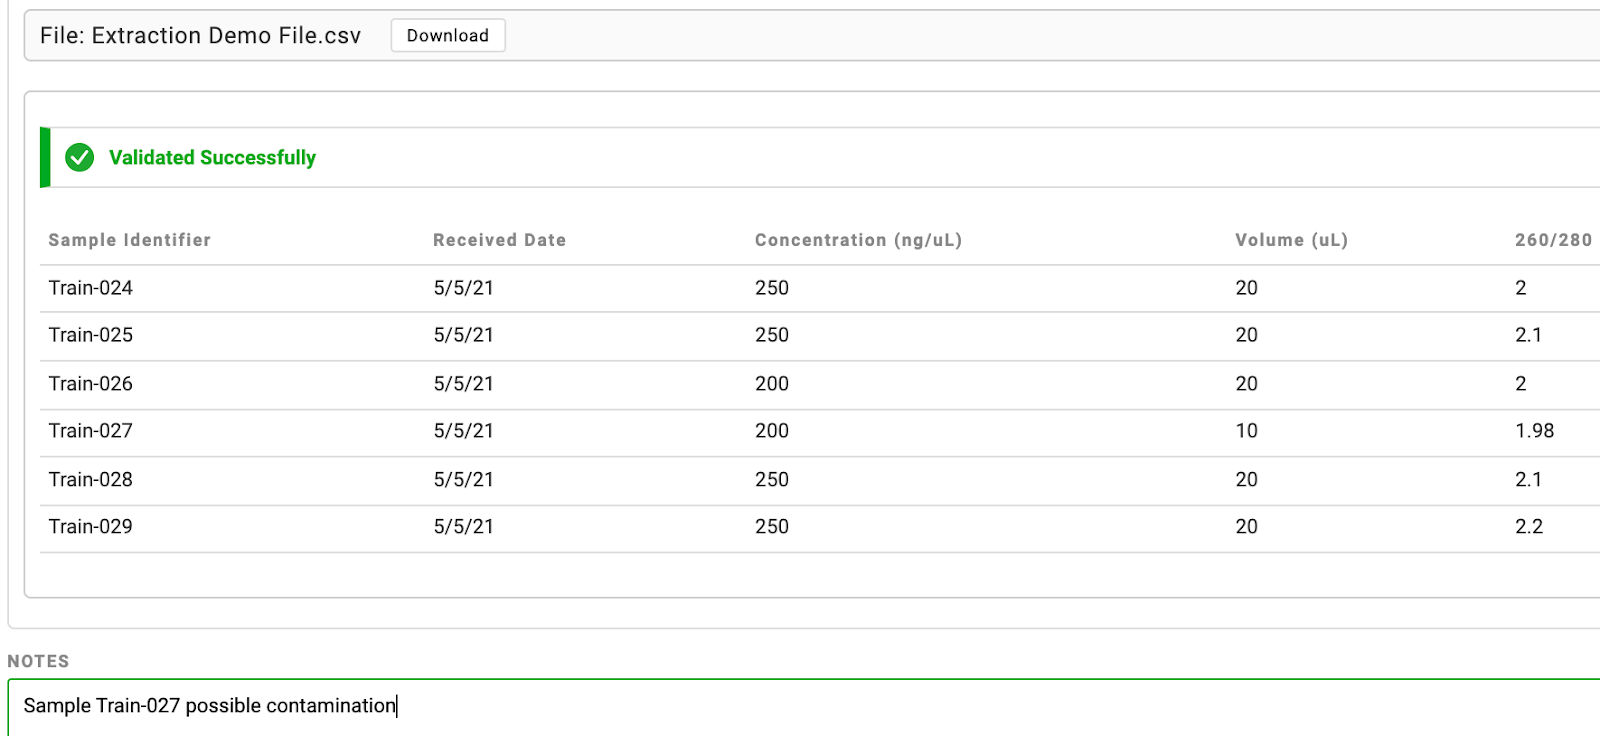
D. Check for the green validated successfully banner
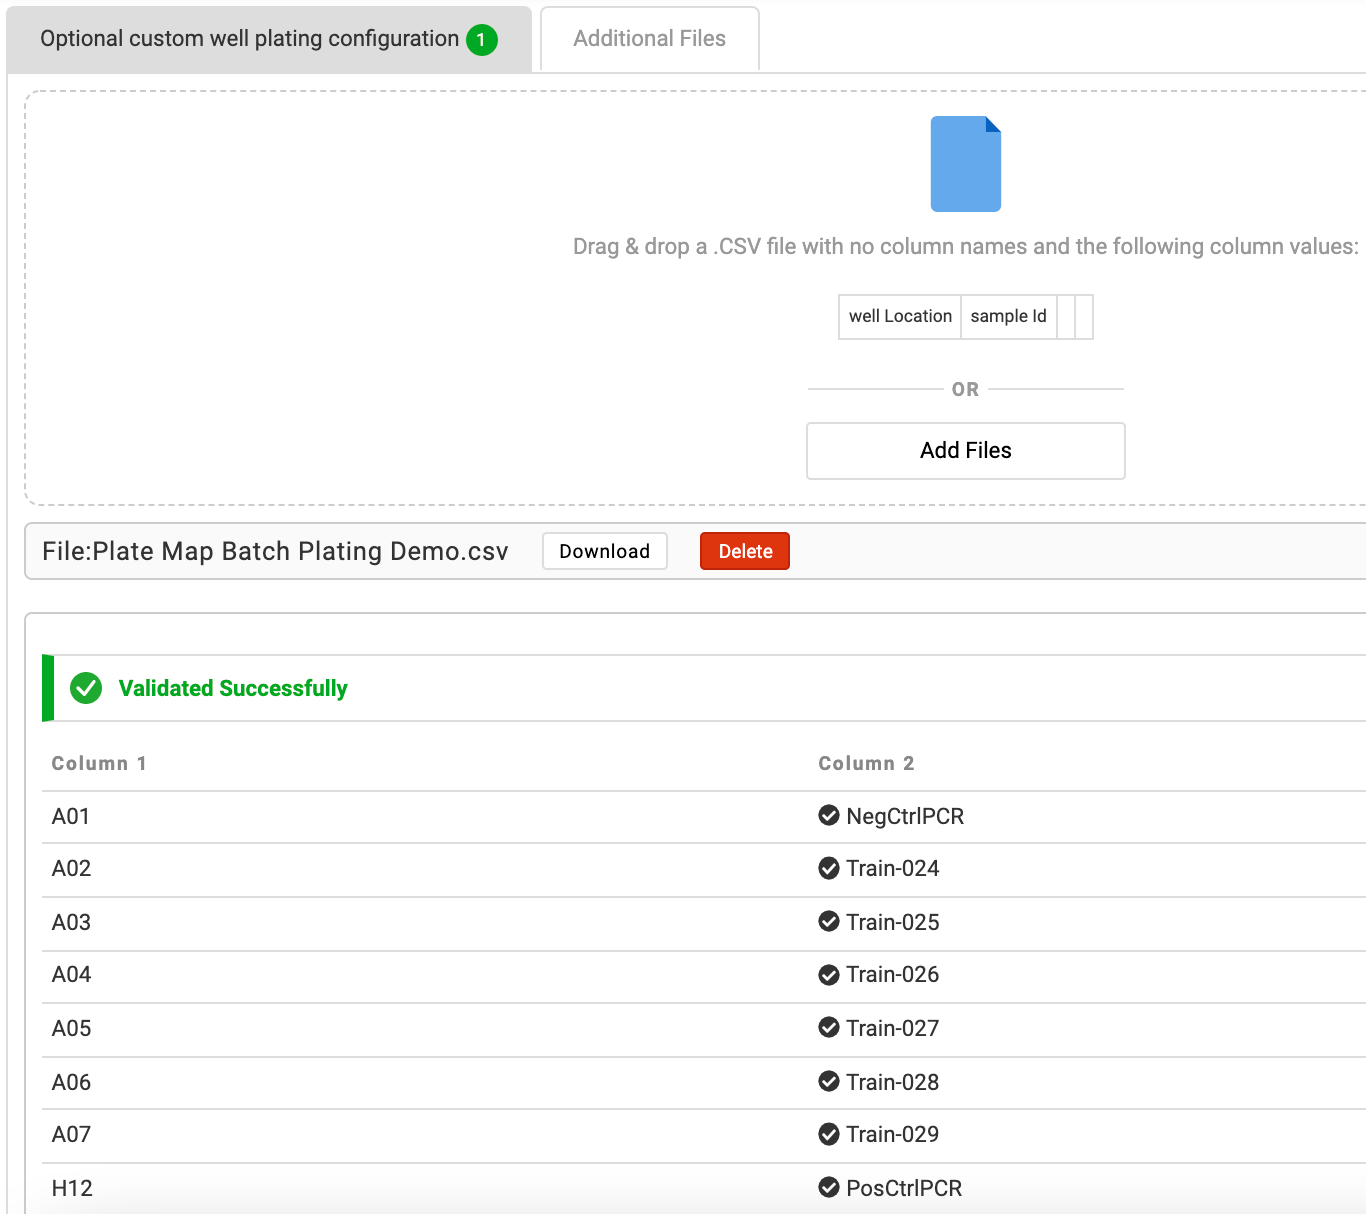
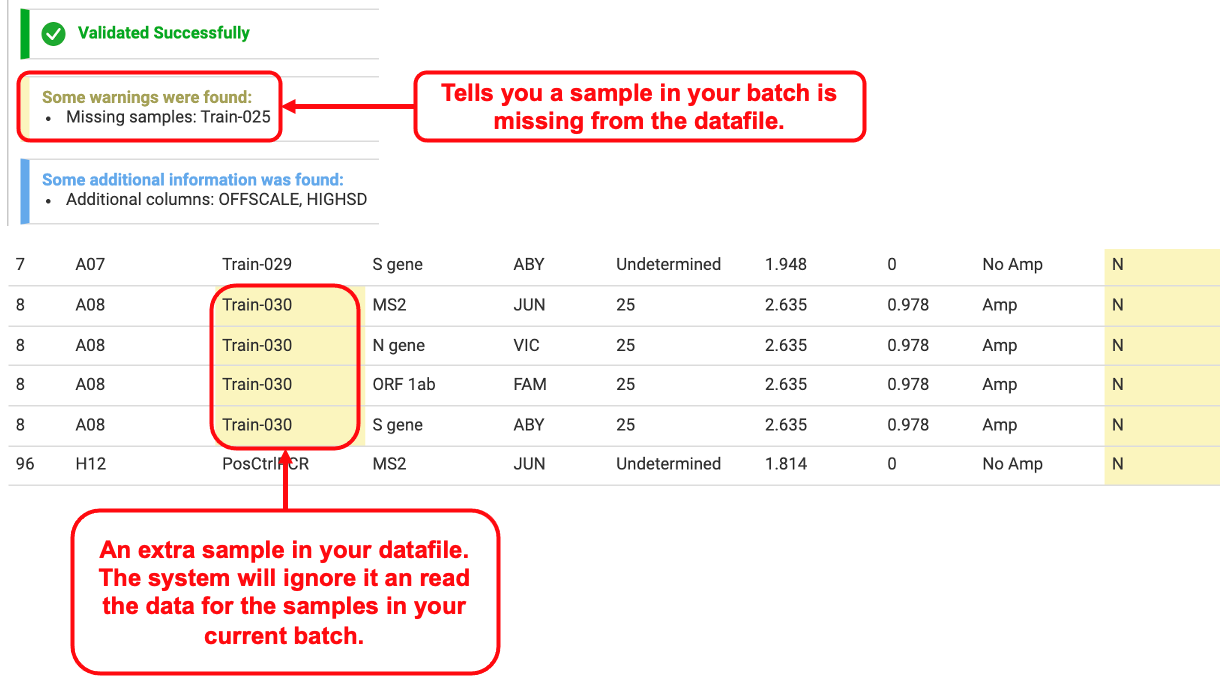
Note: Missing samples from the batch will be indicated in a yellow warning banner after uploading your CSV. Extra samples in the file, but not included at the previous Create Batch step, are also indicated in yellow, but these samples are ignored

E. Skip to Step 4 of this section under Batch Plating. The system will assign your samples to the positions you chose when this step is submitted
4. Optional: Scroll down after entering position assignments for the samples to the results section. Click “Add Files” to add any files you want associated with the samples. Click the box under “Notes” to document any notes


Note: Files and notes display within the workflow and any attached files can be downloaded here.
5. Scroll up and click the green “Submit” button, then click “Return to Workflow”

Extraction
Extraction activity steps allow users to track the extraction of nucleic acids from their primary samples. Details for plating, metadata, and files can be associated with an Extraction Activity Step.
1. In the workflow, click “Extraction”
2. Copy and paste the input candidate container ID into the source container search bar, then click search. The source container will display after search

3. Optional: Scroll down and select an instrument from the dropdown menu if you wish to capture this metadata

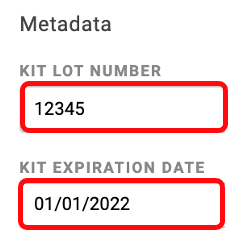
4. Optional: Scroll down and enter information for the metadata fields (here Kit Lot Number and Kit Expiration Date)
5. Scroll down to results and add a Destination Container for the samples (elution)
Do you have an existing Container ID? If yes…
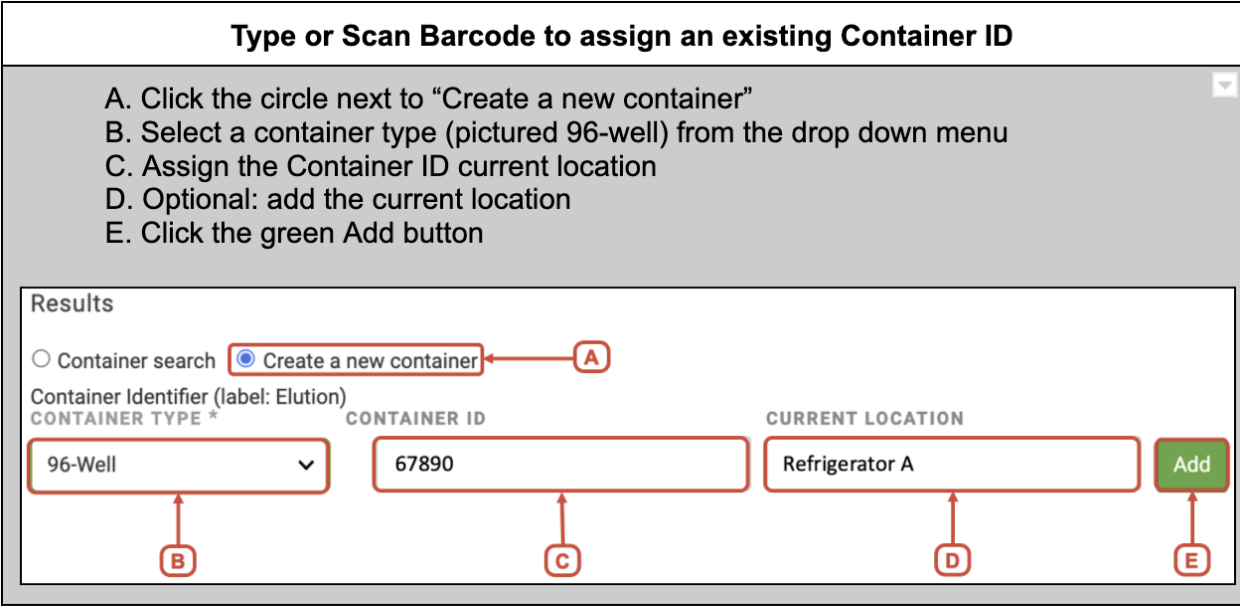
If you do not have an existing Container ID…
6. Scroll down and select a plating option. Leaving “Automatically assign” selected will put the samples in the same position as the source container above (see step 2)
7. Optional: Scroll down after selecting a plating option for the samples. Click “Add Files” to add any files you want associated with the samples. Click the box under “Notes” to document any notes

Note: Files and notes display within the workflow and any attached files can be downloaded here.
Data Import
Data Import activity steps allow users to upload data files from their instruments. Metadata about the instruments used and run details can also be documented at this step. In some workflows, such as Covid and Infectious Disease, Ovation Lambda will parse the data to deliver to the next activity step, Quality Control (QC).
1. In the workflow, click “Data Import”
2. Copy and paste the input candidate container ID into the source container search bar, then click search. The source container will display after search
3. Open your instrument data file. Check that the file has all the matching column headers. Then make sure to save your file in the appropriate file format (TXT or CSV). The required column headers and required file type are displayed in your OvDx window under Results

4. Scroll down to Results. Click “Add Files” or drag and drop your datafile to upload

5. Check for the green “Validated successfully” box
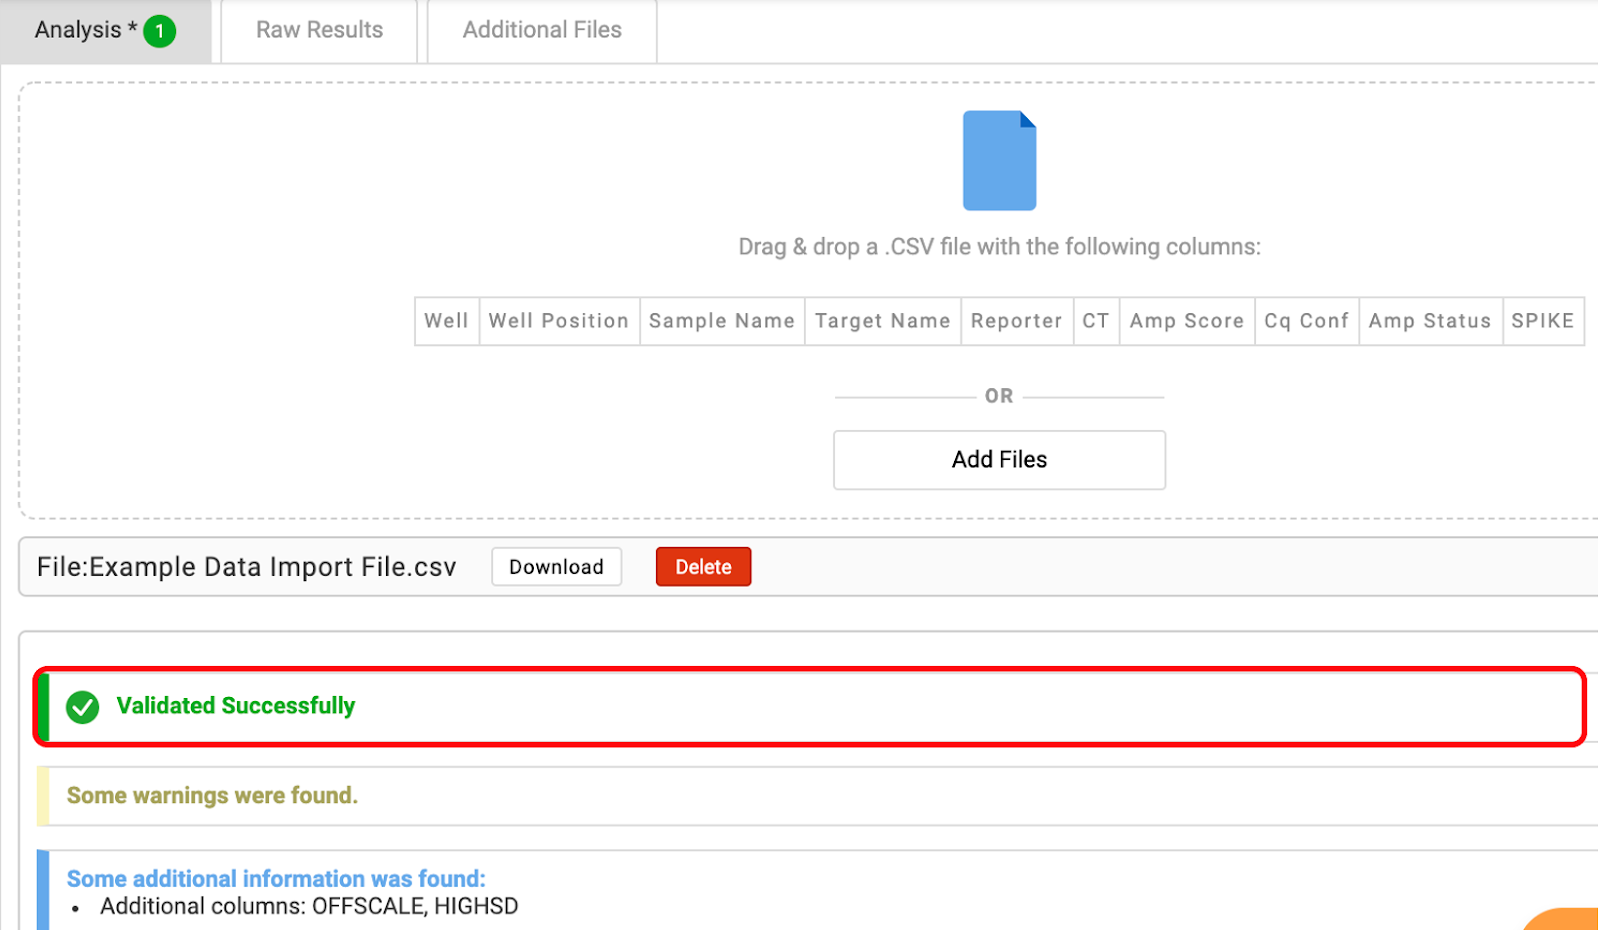
Note: If you try to upload a file without the displayed column headers OR with a different column format, then you may get a red error box. If you get a red error box, click the red delete button to remove the file. Amend the errors in your file, then upload the corrected datafile. Yellow or blue boxes indicate discrepancies, but do not prevent upload.

6. Optional: Raw Results or Additional files can be uploaded by clicking into those respective tabs
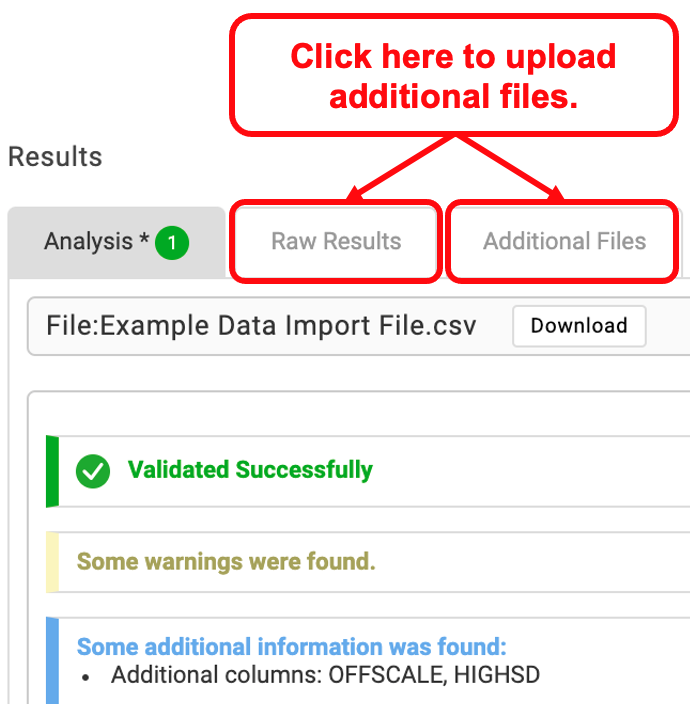
Note: No results will be generated for files uploaded to Raw Results or Additional Files as these tabs are not parsed through Ovation Lambda. Only the Analysis tab will contain data file(s) that will be parsed and generate results.
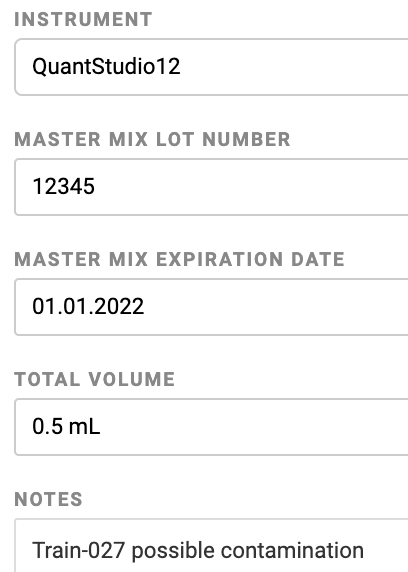
7. Optional: Scroll down beneath the results window and enter any relevant metadata you would like to capture or Notes in the provided boxes
8. Scroll up and click the green “Submit” button, then click “Return to Workflow”
Quality Control (QC)
QC Activity Steps allow you to review sample data results, overall status, and control subsequent routing or reporting. Sample default QC statuses are generated after Ovation lambda parses data files and Data Import completes. Default statuses are determined based on your lab’s custom configuration, but can be manually changed as needed.
1. In the workflow, click “QC”
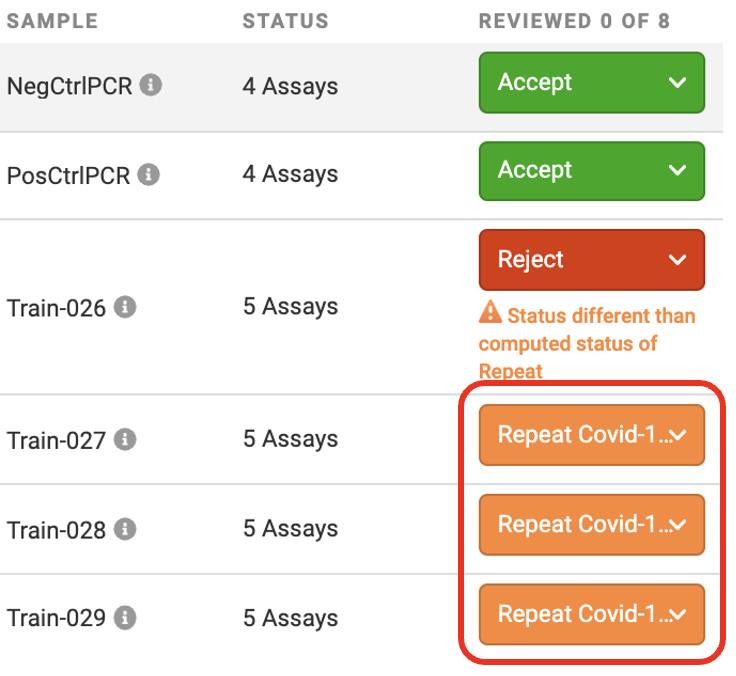
2. Review the default QC status of all samples. Default QC statuses are displayed in green, orange, or red boxes. Controls appear first in the list of samples, followed by any samples with a Repeat status, then all samples with an Accept status

Note: Click on a sample’s name to see expanded details for that sample from the datafile. Positive tests display a “flag” in the expanded details
3. If you are satisfied with the default QC status for all samples, skip to step 7. If you wish to change a sample’s default QC status, proceed to step 4
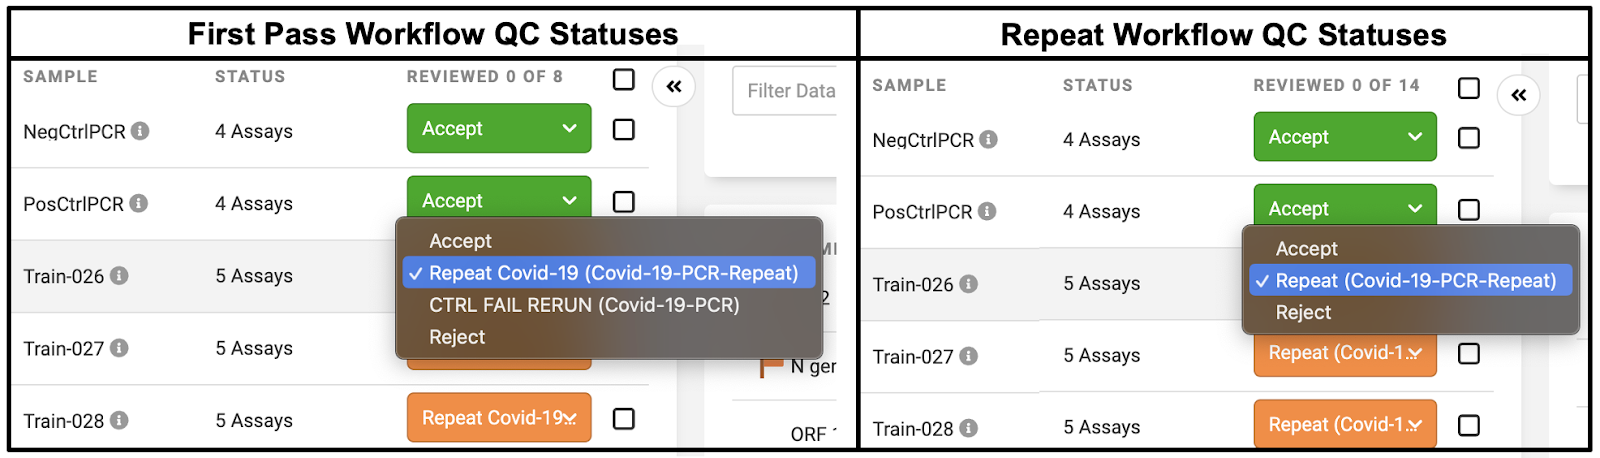
4. Click on a sample’s default status to see all QC status options available for manual override
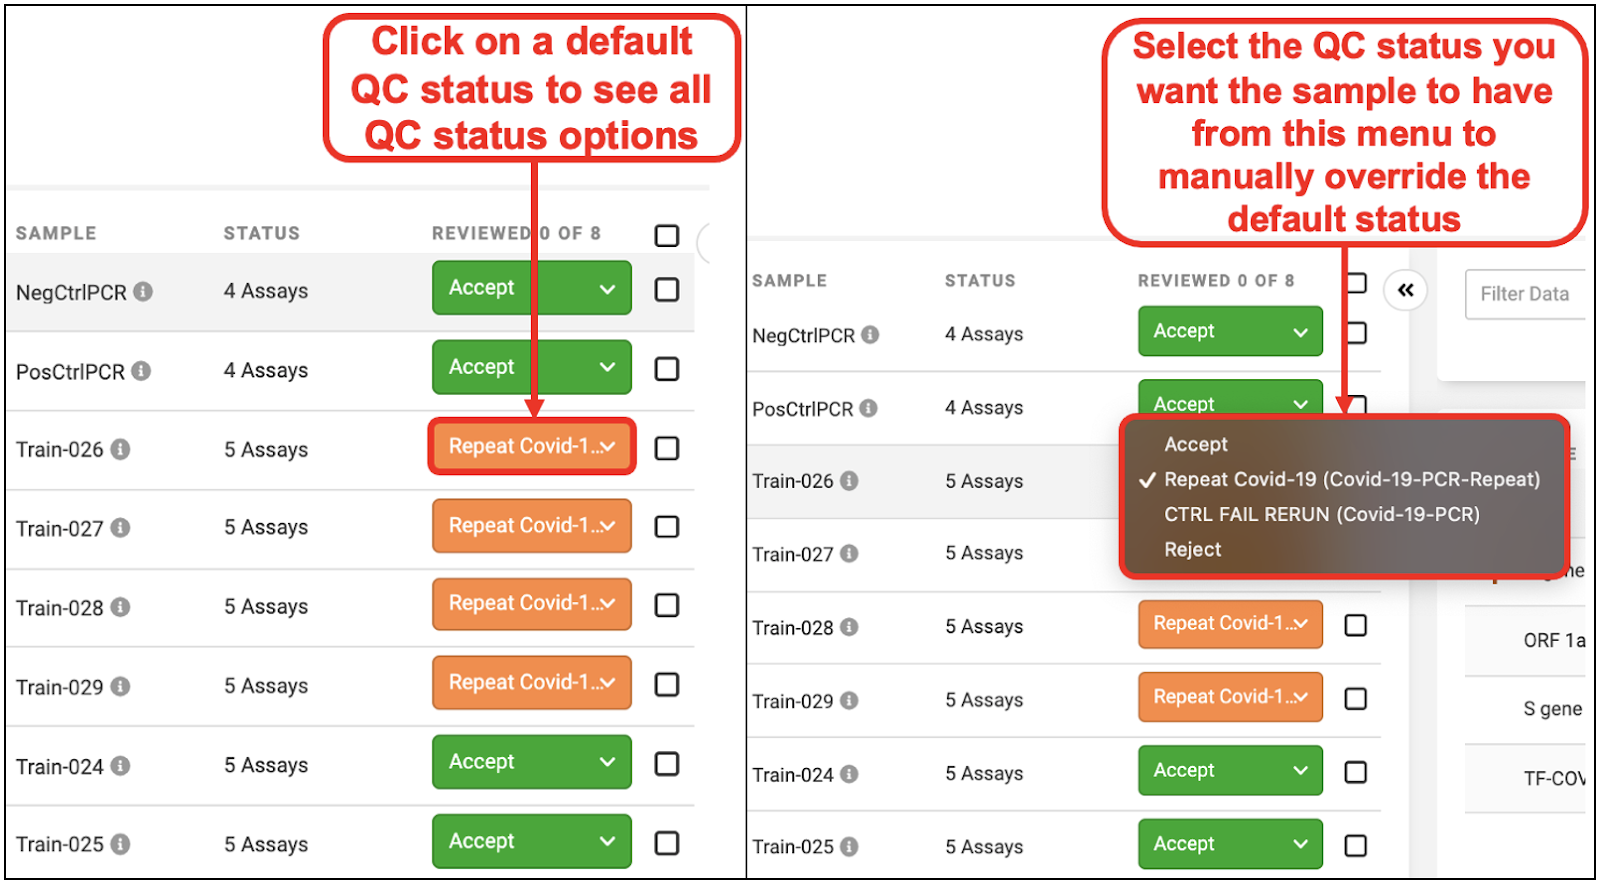
5. Select your desired QC status based on the table below

Note: For Repeat or CTRL FAIL RERUN statuses, the destination workflow is shown in parentheses in the override menu. For example, the Repeat status queues samples to a Repeat COVID-19 workflow while CTRL FAIL RERUN queues samples back to a COVID-19 workflow.

6. If you wish to Reject a sample, select the Reject QC status from the dropdown menu
A. Select a Reject reason from the dropdown
B. Provide any additional notes you want to capture for sample rejection

Note: “Reject” does not mean a sample is negative. “Reject” means that the sample will not be repeated. Samples may be rejected by the user at any QC step. Read our support article Rejecting a Sample for more information.
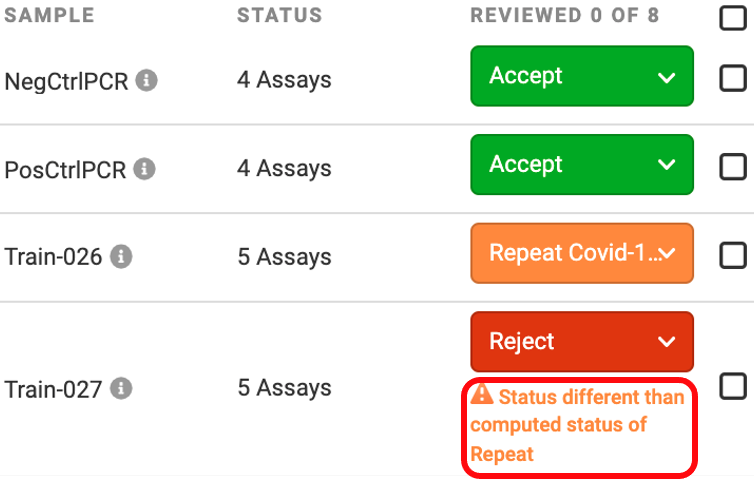
Tip: A warning triangle displays beneath any sample status that has been manually overridden by a user
7. Confirm the sample(s) status
A. Select the checkbox above all samples
B. In the confirmation modal, click the green “Yes” box


8. Scroll up and click the green “Submit” button, then click “Return to Workflow”
Rejecting a Sample
Rejecting a sample is a two-step process in Ovation. First, the sample is marked for rejection and enters the “Pending Rejected Samples” pool. Then, after review, samples are fully rejected from the Pending Rejected Samples pool.There are multiple places in Ovation where you can mark a sample for rejection and send the sample to the Pending Rejected Samples pool:
- QC step of a workflow
- Global Samples’ page,
- Global Requisitions’ page
- a Project Samples’ page
- or a Project Requisitions’ page
There are 2 places where Pending Rejected Samples can be found and reviewed to finalize rejection:
- OvDx Home Page
- Workflows page Rejected Samples Tab
For this review, we will cover completing rejection from the OvDx Home Page. Please read our support article Rejecting a Sample for more information.
1. Click the logo in the top left corner of your OvDx window to navigate to the OvDx Home Page
2. Scroll down to the Pending Rejected Samples window and review the Reject Reasons. If you are satisfied, skip to step 6. If you wish to change or modify any of the Pending Rejected Samples, go to step 3
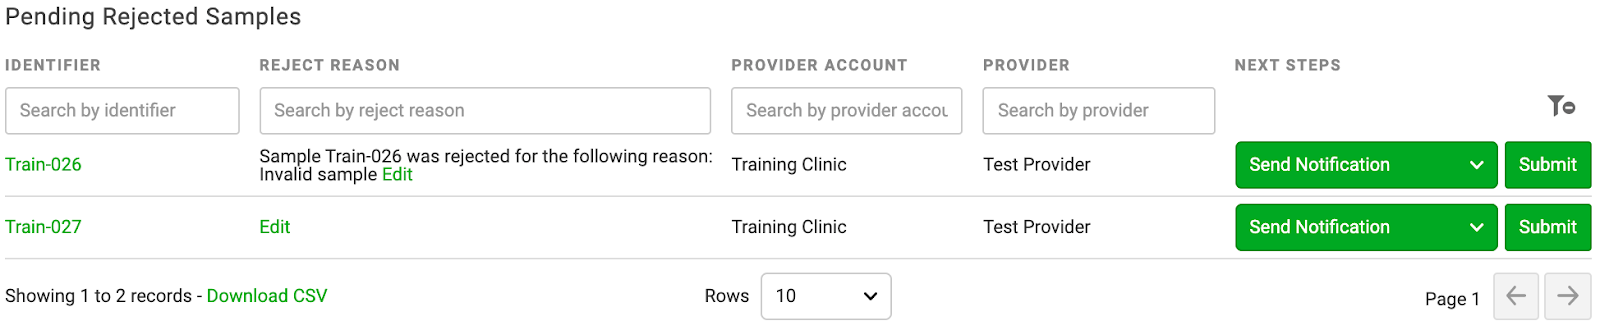
3. Change the Pending Rejected Samples Next Steps
A. Click the dropdown menu under Next Steps
B. Select the appropriate next step from the dropdown menu

4. Click the green Edit to change the Reject Reason

5. In the Rejection Modal...
A. Select a new Reject Reason in the Rejection modal
B. Add any additional notes
C. Hit the green submit button

6. When you are finished reviewing all Rejection Reasons and Next Steps for Pending Rejected Samples, hit the green submit button to finalize rejection

Repeat Workflows
Samples that failed the QC step of a workflow give a default “Repeat” orange status. When the QC step is submitted, the samples that failed QC are routed to a Repeat Workflow. Repeat Workflows have the same processing activity steps as the original Workflow.
Repeat Workflows differ from first-pass Workflows only at the QC Activity Step. At the QC Activity Step, First-Pass Workflows have a “Repeat” status that sends samples to the Repeat Workflow and a “CTRL FAIL RERUN” status that sends samples back to the first pass workflow queue. In Repeat Workflows, leaving or selecting a “Repeat” status for a sample will return the sample back to the Repeat Workflow queue and there is no “CTRL FAIL RERUN” status.
Note: If a sample has a default status of Repeat at the QC step of a Repeat Workflow, the sample is most likely Invalid or Inconclusive for a second time. Change the Repeat status to Accept to generate an Invalid or Inconclusive Report for that sample. This will remove the sample from the workflow queues.