Onboarding - Accessioner Role
Welcome to our instructional guide for OvDx LIMS users with an Accessioner Role. Accessioners are prescribed the following training modules to familiarize themselves with the Ovation platform. Each Module contains videos and an accompanying article. Read the whole guide or skip to your section of interest.
Module 1: Intro to OvDx
Welcome to OvDx! This guide will cover the basics of your dashboard when you log in to Ovation and the Ovation support resources. The following sections are included in this guide:
OvDx Dashboard
Video
Knowledge Base Article
This article describes the OvDx dashboard, which is your landing page upon every first login. All OvDx users will see the dashboard, but your contents may vary based on permission levels. You can always navigate back to the dashboard by clicking your lab’s logo (Home Button) in the top left of the screen from any page.

Tip: The logo at the top left will say “Ov” as a default. To use your lab’s logo as your Home Button on your Ovation page, contact support@ovation.io
Scrolling down on the dashboard, you will see several quick action shortcuts. These shortcuts are useful for admins and lab directors. The shortcuts and their functions are briefly described in the section below.
Dashboard Quick Action Shortcuts
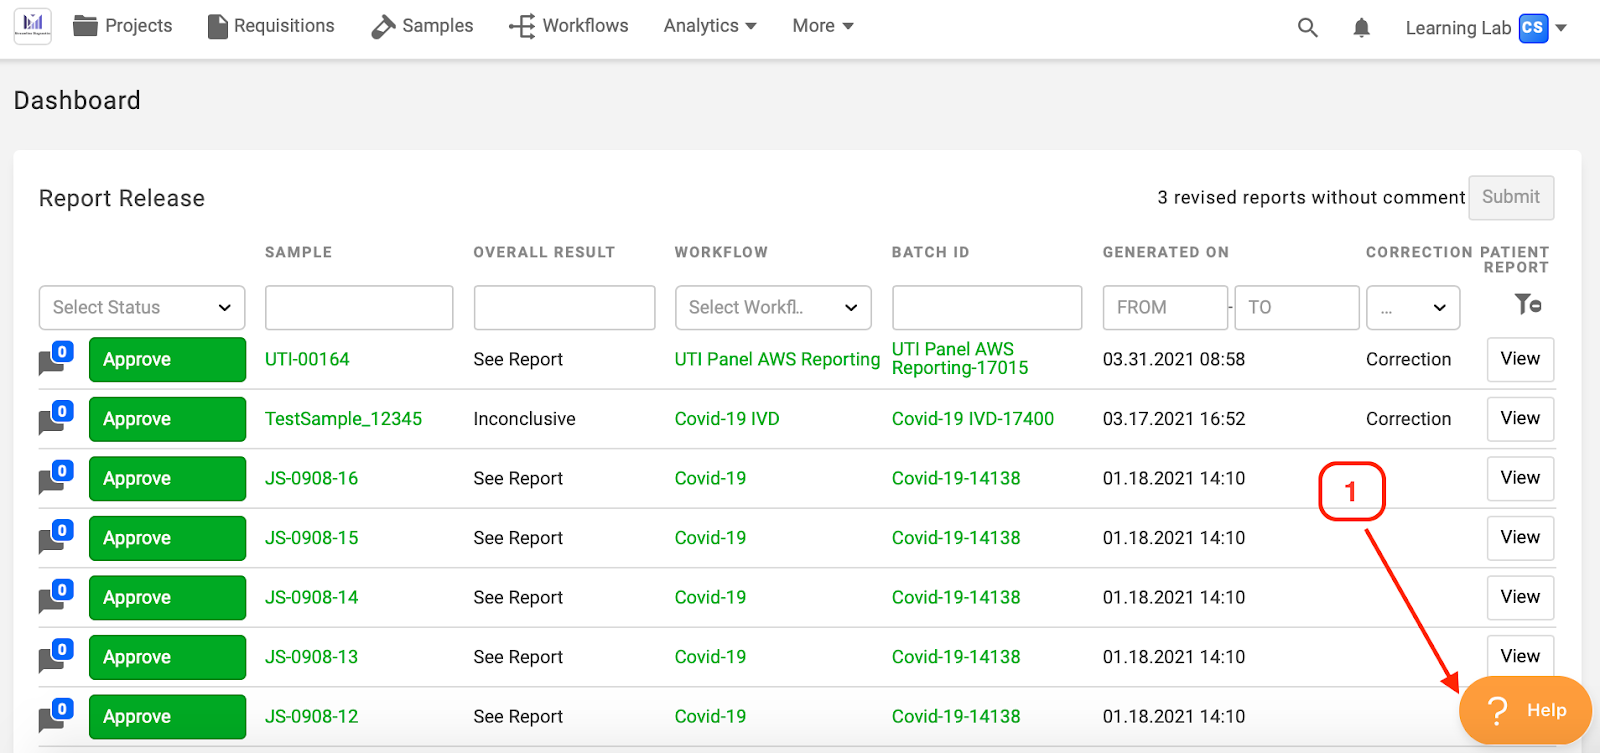
1. Report Release: Allows the user to release reports to the Provider Portal in bulk. For more details on this feature please see the Batch Report Release article in our knowledge base

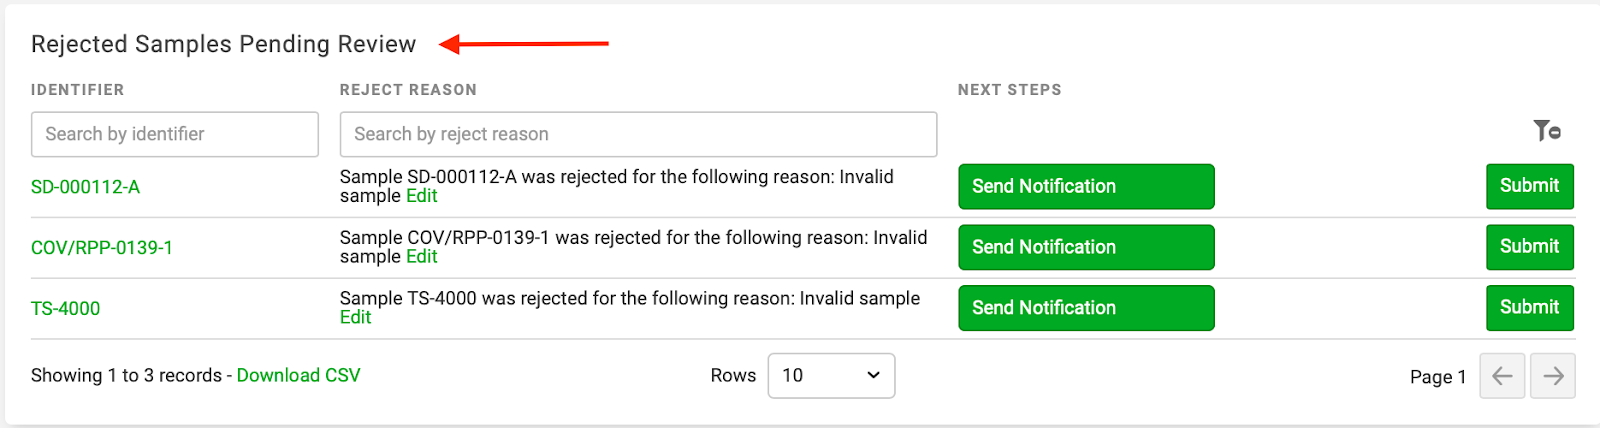
2. Rejected Samples Pending Review: Allows the user to review the rejected samples and confirm the rejection status. Rejecting the sample here removes it from the system. For more details on this feature please see the Rejecting a Sample article in our knowledge base
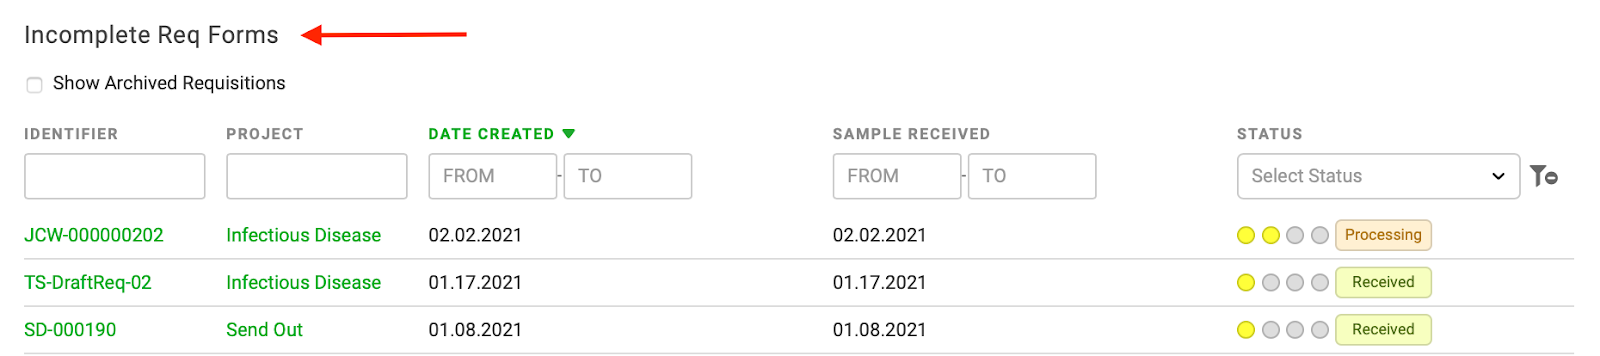
3. Incomplete Req Forms: Allows the user to view all samples that have incomplete requisitions
4. Documents Requiring Signature: Allows the user to sign and review documents that require signatures (e.g., reports that need to be signed before they are released). For more details on this feature please see the Using Documents article in our knowledge base

5. Required Trainings and Trainings Requiring Co-Signature: Users can access their assigned trainings or co-signature requests in Ovation from here. For more details on this feature please see the Training article in our knowledge base.

6. Active Workflows: Allows a user to view and navigate to workflows that are in ‘Processing’ Status. Incomplete workflows do not generate reports.

Help Beacon
Video
Knowledge Base Article
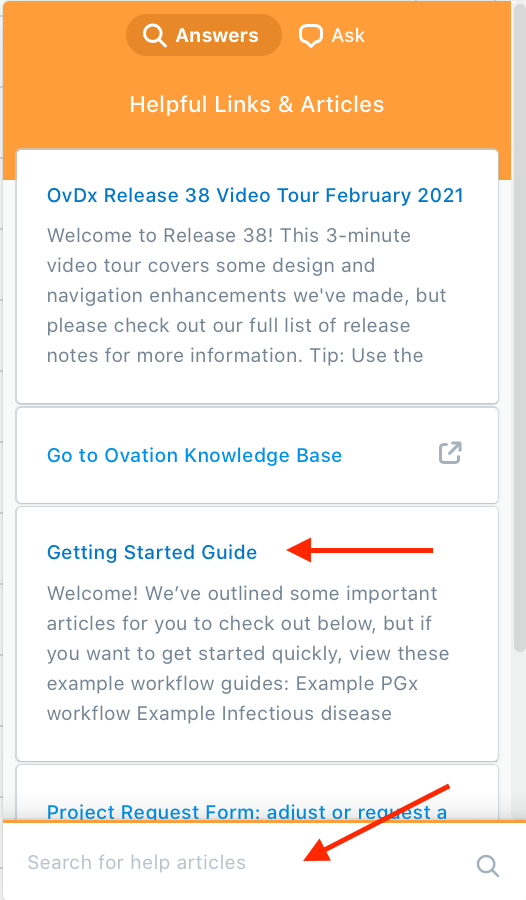
The Help Beacon is located in the bottom right of every Ovation screen. The Help Beacon allows you to search keywords to pull up relevant Knowledge Base Articles. You can also access a Feature/Expansion Request form to modify your existing Ovation environment using the Help Beacon.
1. Click on the orange Help Beacon in the bottom-right corner of any screen
2. Click on the suggested help articles, or search a specific keyword to pull up Knowledge Base articles containing your search term
Knowledge Base Articles
The Knowledge Base contains articles giving detailed instructions on various aspects of the platform. From the Help Beacon or the link above, you can search by keyword to locate articles relevant to your question. The Getting Started Guide is one resource that gathers like articles in a high-level overview of OvDx, and there are also several workflow guides that walk stepwise through a specific workflow.
Project Request Form
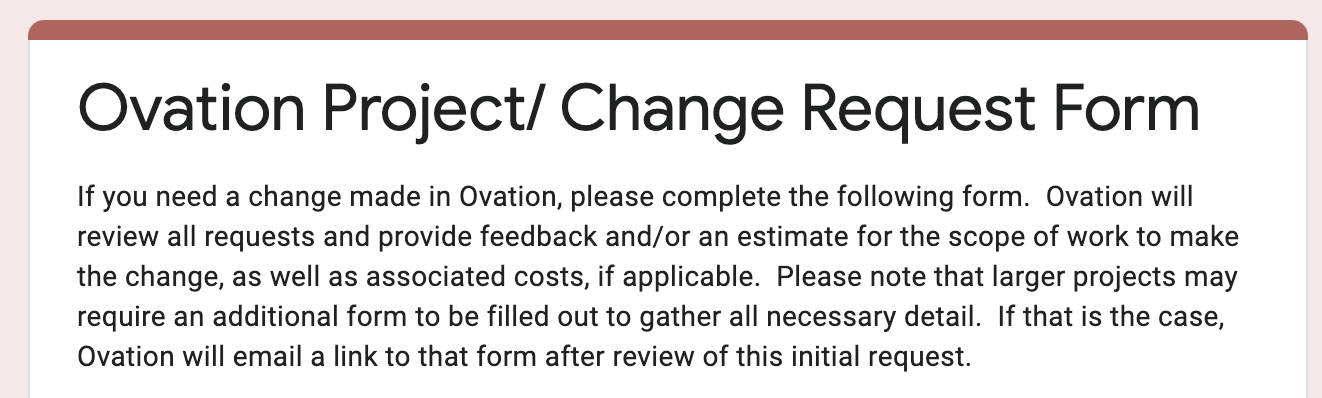
You can request a new feature or expanded functionality using the Help Beacon. Submit a Project Request Form after your project finishes implementation and goes live or if there is a contract amendment during implementation.
1. Click on the Help Beacon and select “ Project Request Form”
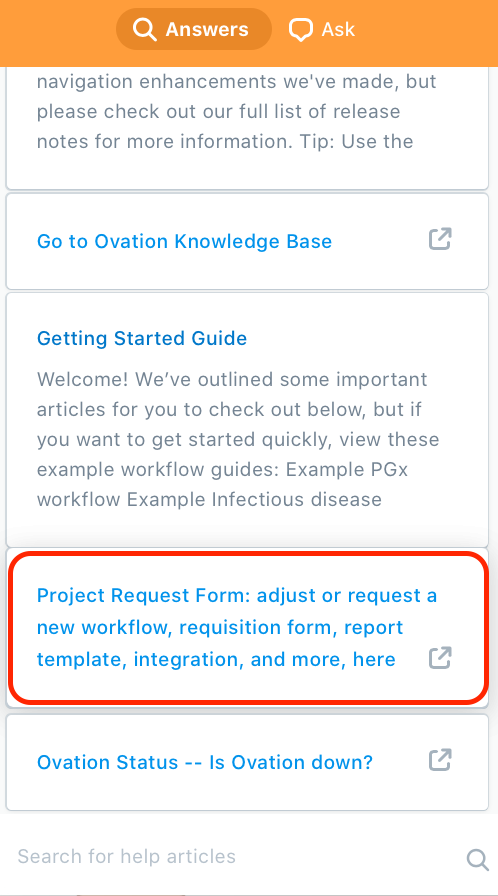
2. Complete the Google form with as much detail as possible and submit
Tip: Your account manager will reach out to you to update you on the status of your project request form
Submit a Support Ticket
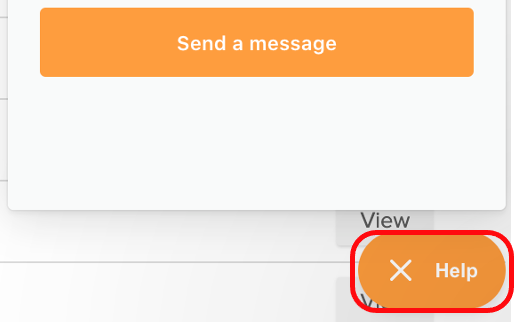
The Help Beacon can also be used to contact a Customer Support Representative at any point once your project has gone live.
1. Click on the “Ask” button at the top of the Help Beacon window

2. Fill in the requested information and hit send

Tip: Be clear and concise in the subject line. Please also provide as much detail as possible in the body of the message. The more information you provide, the faster Ovation can resolve your problem. Also, please avoid including Protected Health Information (PHI) in your message and/or any images
3. Click X to close the Help Beacon after sending your message
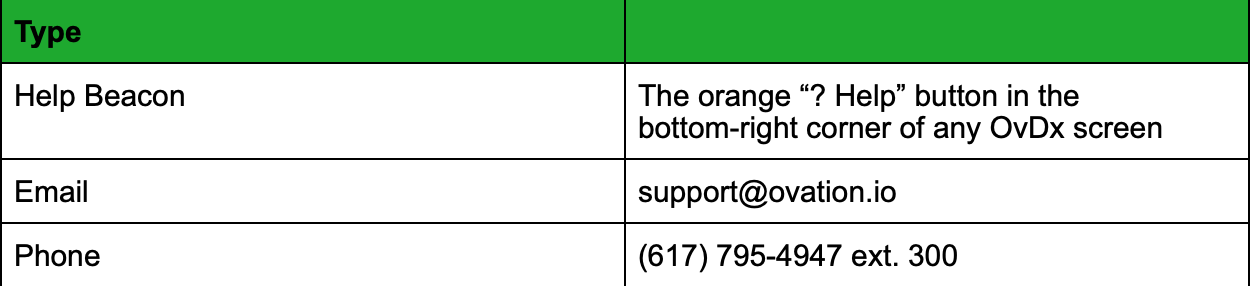
How to Contact:

Individual User Settings
Video
Knowledge Base Article
OvDx users have “roles” and “permissions” that are set up by your System Administrator. Roles and permissions control what information and work you can see and edit in OvDx. For more information, talk to your OvDx Admin or check out the knowledge base article on the Roles and Permissions Matrix
OvDx has a “User Settings” feature that can be set up by each user allowing you to manage your user profile, system email notifications, reset your password, and enable two-step verification
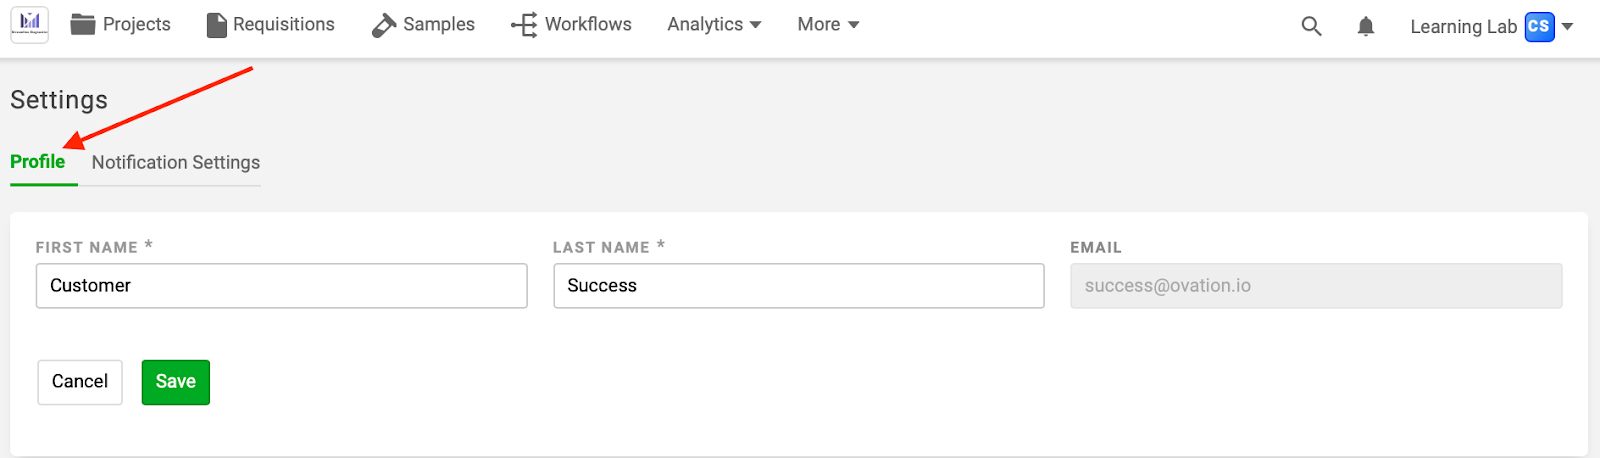
Profile
Under the Profile section, you can change your first and last name. Only an administrator can change your email address after account creation
1. From the dropdown menu next to your user name at the top right of any window, select Settings > Account

2. From the Profile tab, you can edit your first and last name if needed. The email field is grayed out, and can only be altered by an administrator
System Email Notifications
You can tailor your email notifications to fit your preferences
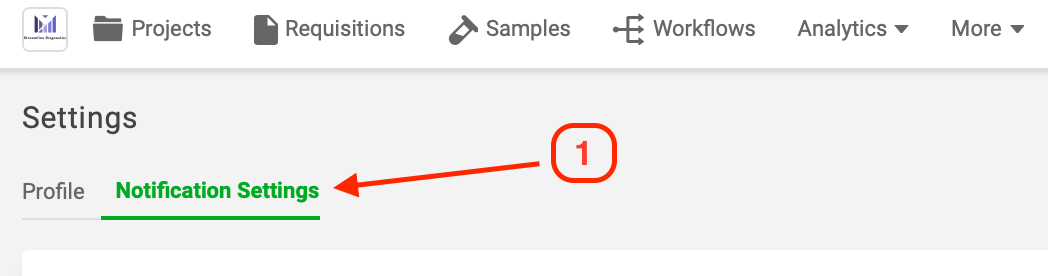
1. From the dropdown menu next to your user name at the top right of any window, select Settings > Account and then click the Notification Settings tab
2. System Email Notifications settings will appear with a default setting to receive report complete email notifications instantly
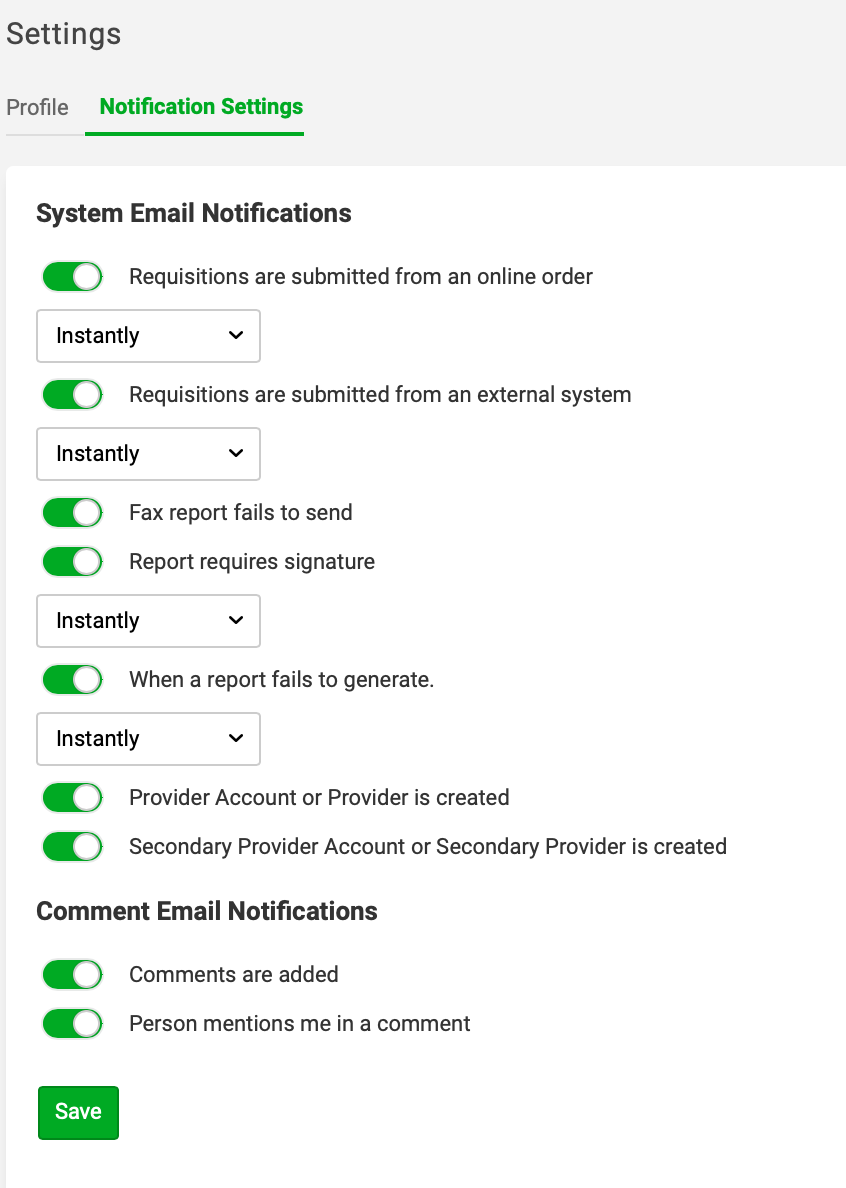
3. To schedule a single daily email with a complete digest of applicable requisitions/reports:
A. Select Daily from the drop down menu
B. Select the time of day you would like to receive the email notification

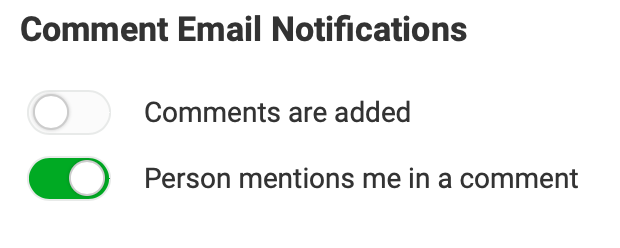
4. If the “Comments” feature is enabled for your portal, you will also see a “Comment Email Notifications” section where you can control email notifications for comments on orders
- To receive an email notification if a comment is added to an order, toggle “Comments are added” to green/On
- To receive an email notification when you are specifically mentioned in a comment, toggle “Person mentions me in a comment” to green/On
Note: If you get a message that says “You don’t have permissions to receive system email notifications. Contact your administrator to be granted permission,” you need to be given the “Notifications” Role. See your system admin to have them enable this role.
Password Reset and Two-Factor Verification
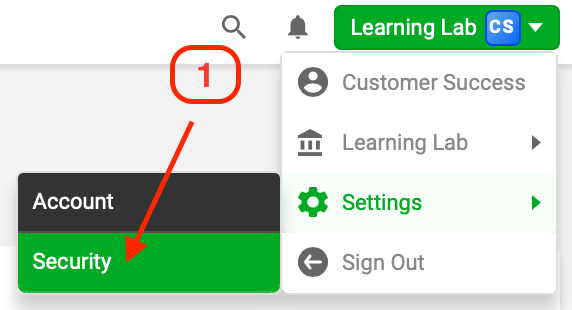
1. From the dropdown menu next to your user name at the top right of any window, select Settings > Security
2. You can reset your password by clicking the Reset Password button and following the prompts. Follow the password requirements format when resetting your password


3. You can enable two-step verification for your account by toggling the Enable button and following the prompts

Global Search
Video
Knowledge Base Article
Global Search allows you to search OvDx for patients, providers, samples, and more. You may search by:
- Requisition/sample identifier
- Patient first and/or last name
- Patient date of birth (Note: the date format must match your date input setting located in Display Preferences)
- Provider name
- Provider account name
- Provider NPI number
- Sample status
- Sales rep name
- Barcode label
- Container type
To use Global Search, click the magnifying glass in the top right corner of your screen, then enter your search term in the box that appears

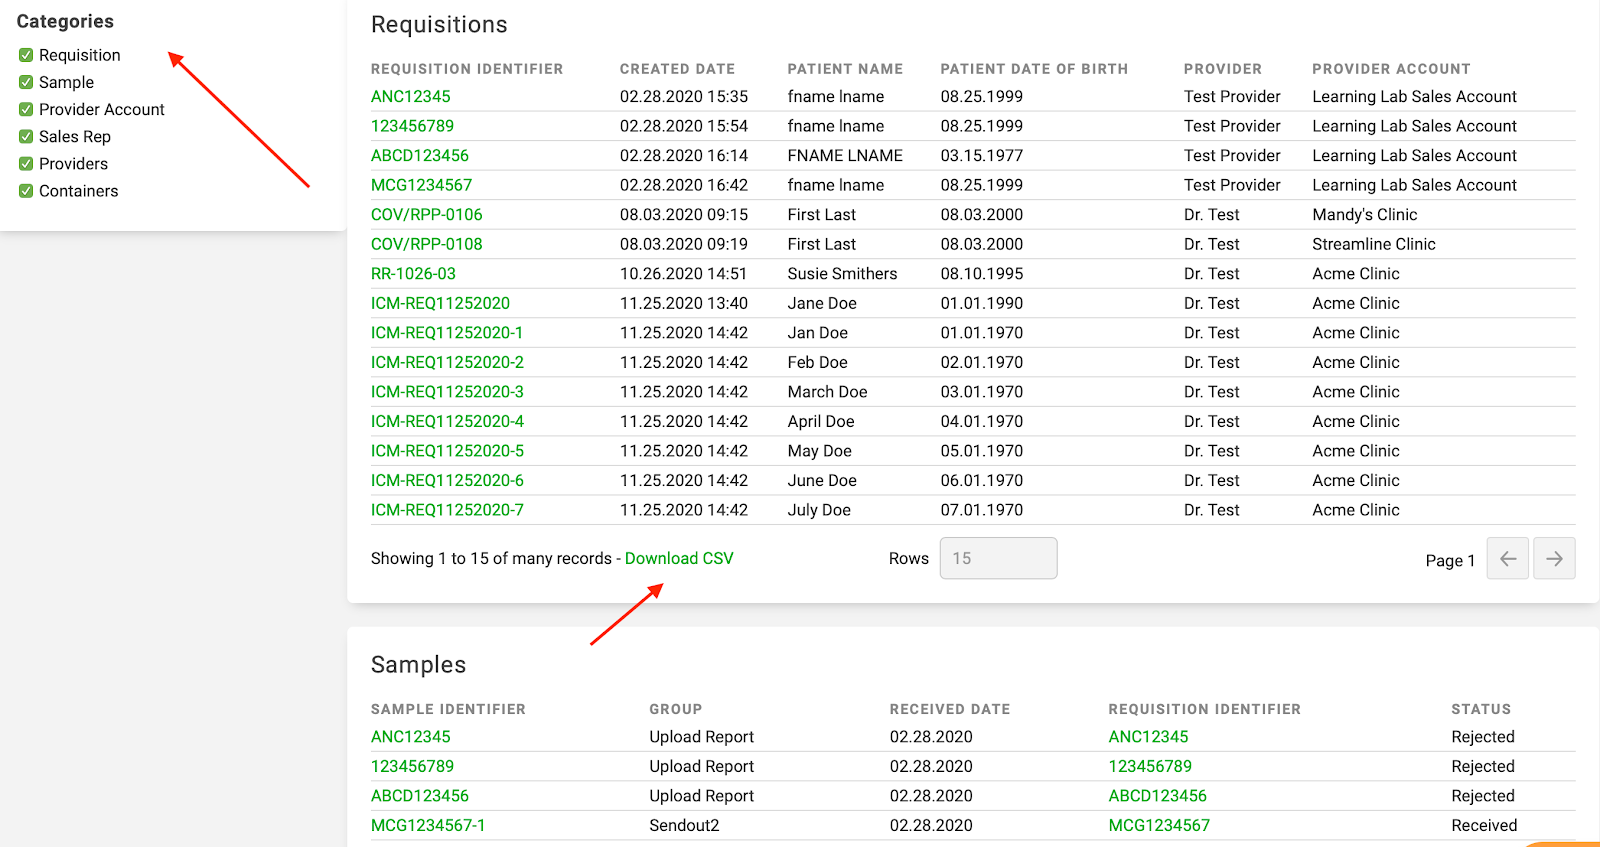
Results will return sorted by category. To narrow the search results, select/deselect boxes in the Categories table on the left of the screen. You can also download a CSV of each category search results table (please note that the maximum number of records that can be downloaded at once as a CSV is limited to the visible records on the page)
See the table below to see how search data is organized and displayed in category tables that can be downloaded

Notifications
Notifications alert users to newly generated reports and platform wide announcements, displaying only the most recent 25 notifications. The Notification icon is the bell in the top right corner
1. Click on the bell icon in the top right of the page
2. Click on the notification to go directly to the linked material

Module 2: Accessioning
This Module covers manual requisition entry, bulk requisition entry by CSV import, receiving individual samples, and bulk sample receipt.
- Adding a New Requisition
- Requisition Manual Entry
- Requisition CSV Import
- Receiving Samples
- Receiving an Individual Sample
- Bulk Sample Receipt
Adding a New Requisition
This article describes how to manually complete a requisition form in the OvDx LIMS.
OvDx orders are made and tracked using a requisition form (Req form). Req forms can also be completed by clients using the Ovation Provider Portal or through API/HL7 integrations. You can refer to the table below to navigate to articles for your specific method.
|
Ways to Enter Orders |
Why? |
Who? |
Where? |
How to Article on Knowledge Base |
| Manual Entry - LIMS | Enter single orders from paper requisitions | Your OvDx LIMS users | Ovation LIMS | Contained in this article |
| CSV file import | Create multiple orders at one time by importing a CSV file | Your OvDx LIMS users | Ovation LIMS | Importing Requisitions |
| Manual Entry - Portal | Portal users submit orders which populate into the LIMS directly. | Your Providers, Provider Contacts, or Provider Delegates submit orders(Lab user completes req form when sample is received) | Ovation Provider Portal |
|
| API/HL7 Integration | Providers place order in 3rd party platform, req fields are imported directly into OvDx LIMS | Customer’s Providers and Provider Delegates | In 3rd party platform | Requisition APIs |
Requisition Manual Entry
Video
Knowledge Base Article
Requisitions are added under Projects > Requisitions
Requisitions are organized under lab Projects. Projects allow users to group their orders based on sample type, test panels, workflows, etc. Each project can have one or more requisition templates.
Requisition templates allow the user to customize what information is captured based on the types of sample, test panels, workflows, billing routing, or reports to be generated. For example, an Infectious Disease project may offer 2 requisition templates: COVID-19 and Fungal Assay. New requisitions are added under the Project button.
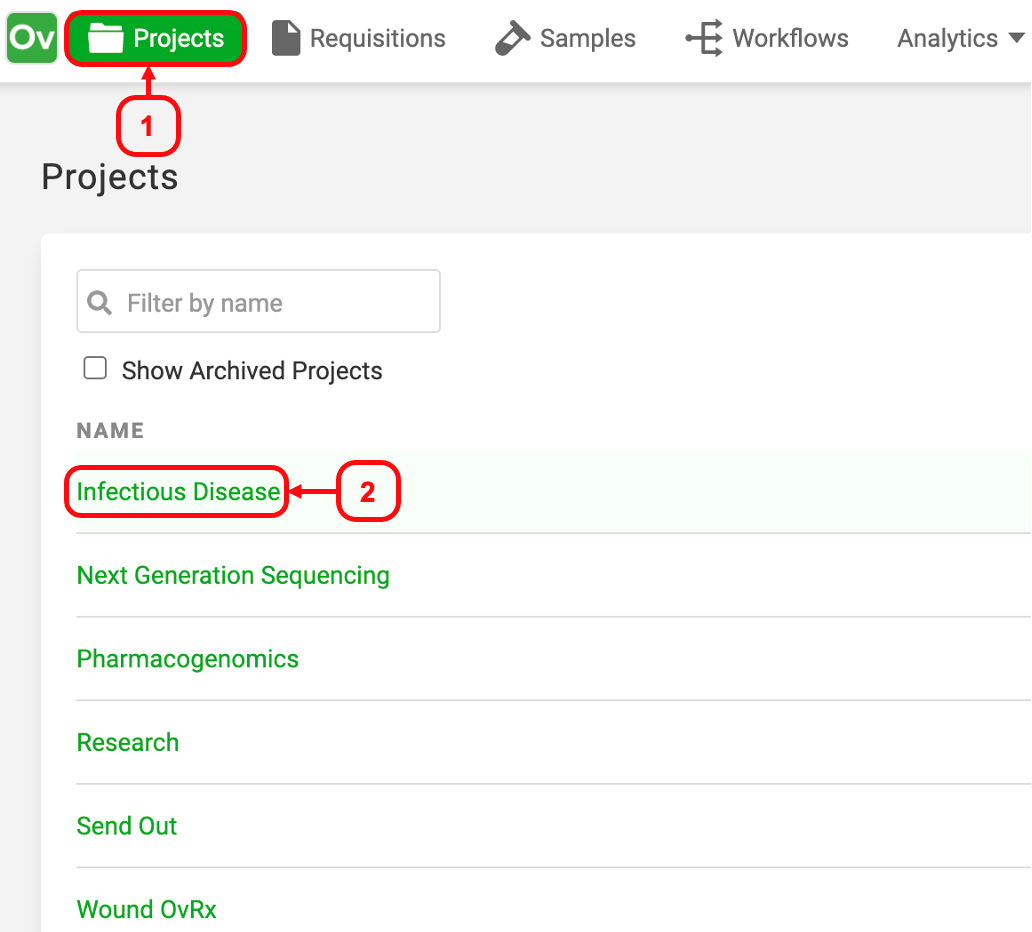
1. Click Projects from the top menu
2. Click the desired Project
Note: Users must be added to the Ovation LIMS and to each project in order to access a project. To add users to your projects, see our “ Adding New Users” article for more information.
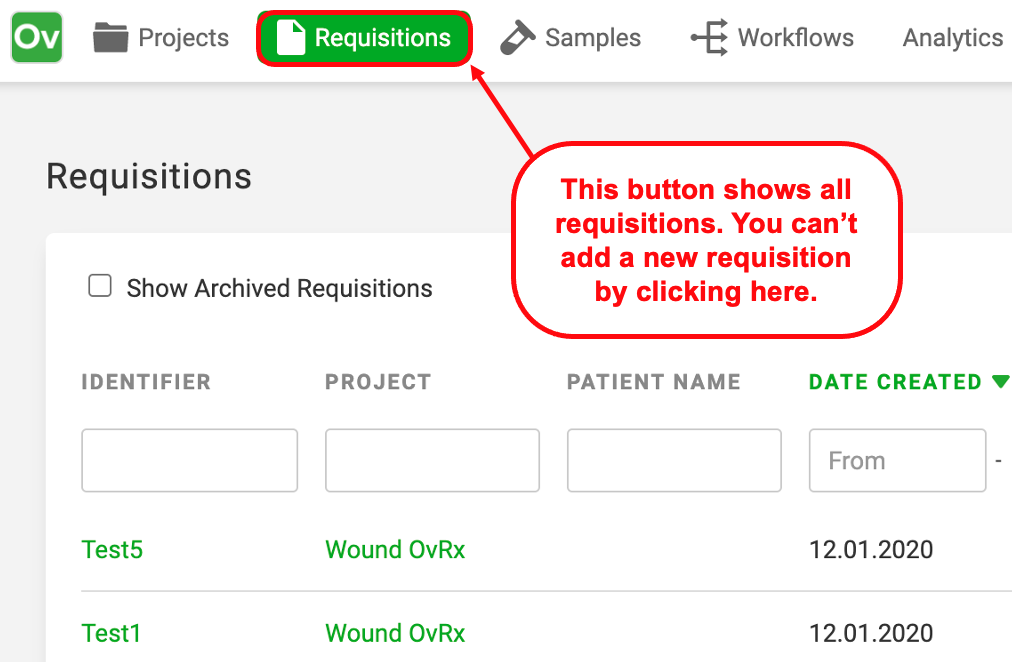
Note: You cannot add a new requisition by clicking the Requisitions button from the top menu. The Requisitions button allows users to view all requisitions across all projects. All new requisitions must be added under their respective project.
3. Select the Requisitions tab inside of your project. This will show all requisitions in that project and allow you to add a new requisition to the project
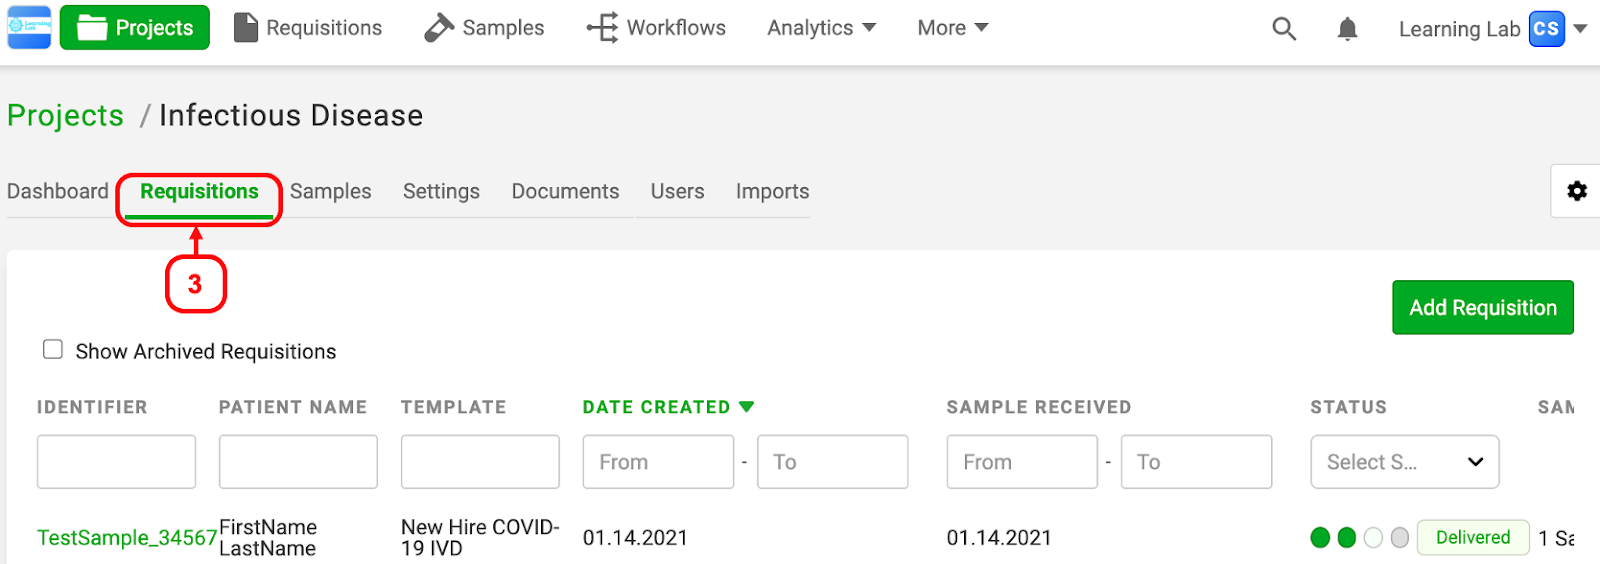
4. Click Add Requisition button
5. Select Add New Requisition from the dropdown menu

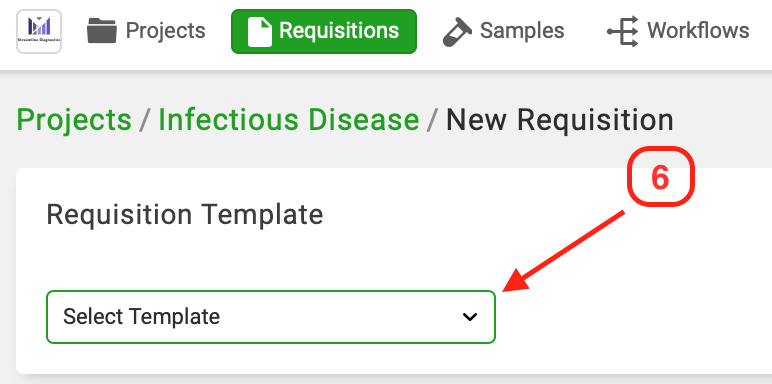
6. Click Select Template in the new window
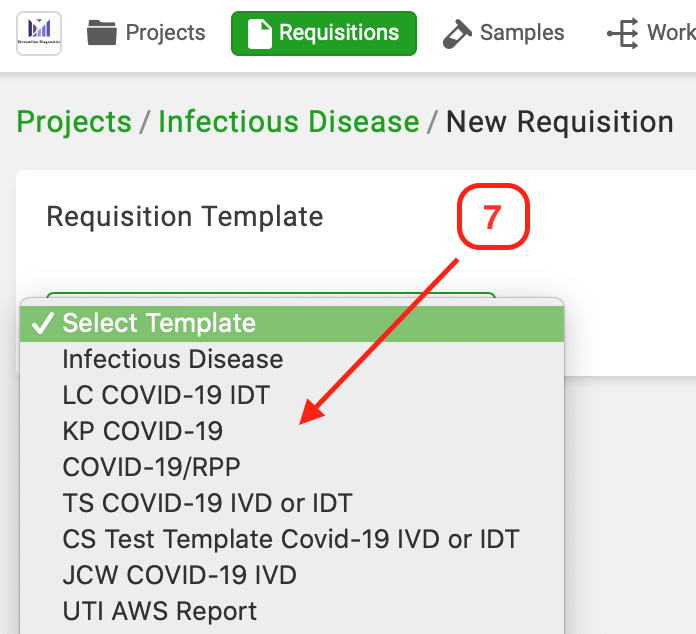
7. Select your requisition template from the dropdown menu
Provider Information
1. Select the Provider Account from the dropdown menu
2. Select the Provider NPI from the Provider dropdown menu

Requisition Information
- Fill in the Identifier and any required fields
Tip: The requisition will default to being “on hold” until the sample is marked as received in the Samples section of the form

Tip: If your requisition is configured to auto-generate identifiers, the Identifier field of the Requisition Information section will be pre-populated upon saving. Auto-generated identifiers can be set up to include a prefix (ex: COV-#) or a numbered series. For help with modifying your auto-generated identifiers, contact support@ovation.io
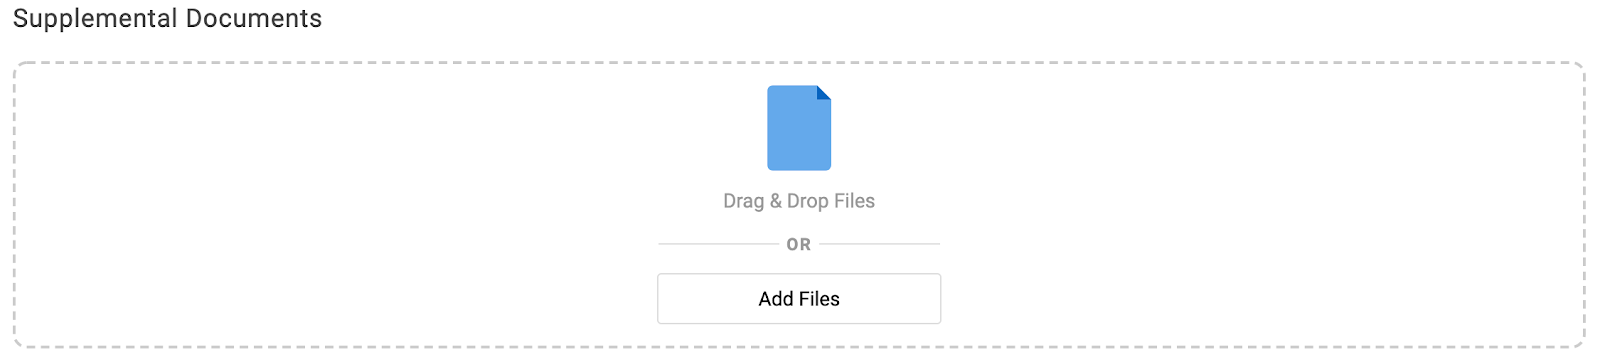
Supplemental Documents
- This window allows any additional documents, such as insurance forms, to be associated with the requisition
- Drag and drop or click Add Files to upload documents to the the supplemental document window
Samples
1. Type or scan in the Sample Identifier (if not auto-generated)
2. Select the sample type from the drop down menu
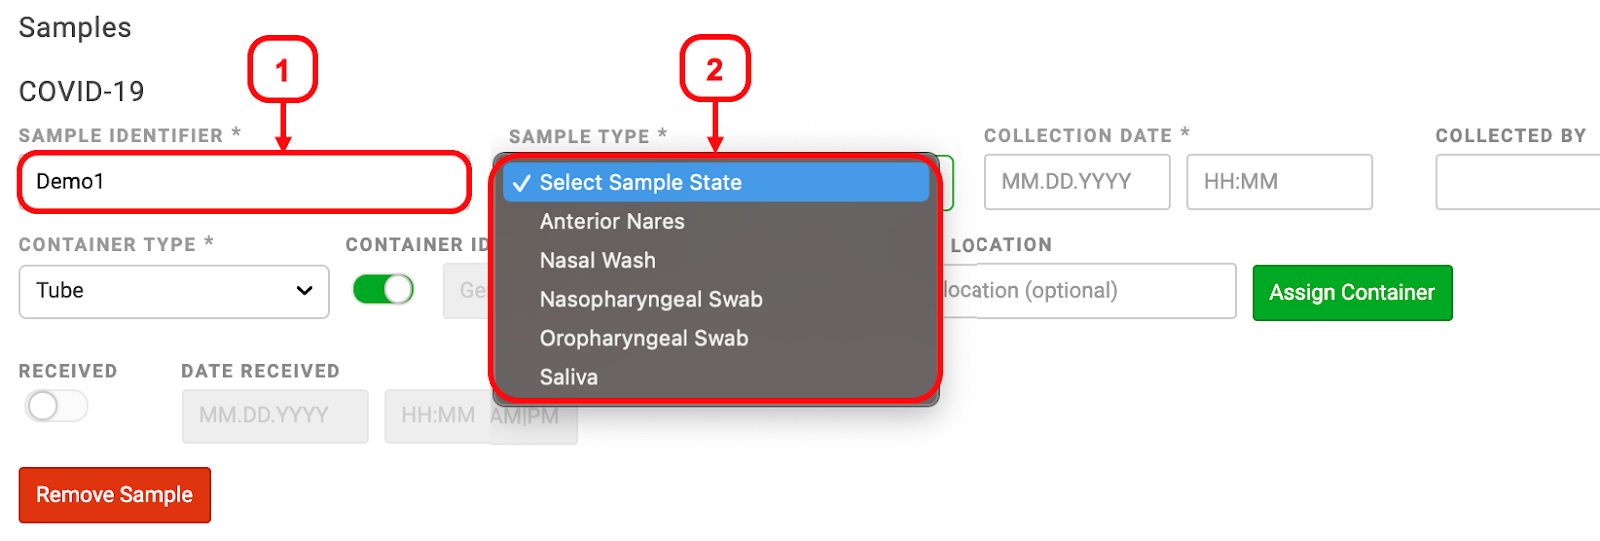
Tip: If there is only one sample and/or container type associated with the requisition, it will be auto-selected
3. Fill in the Collection date and time (required), and Collected By (optional) fields
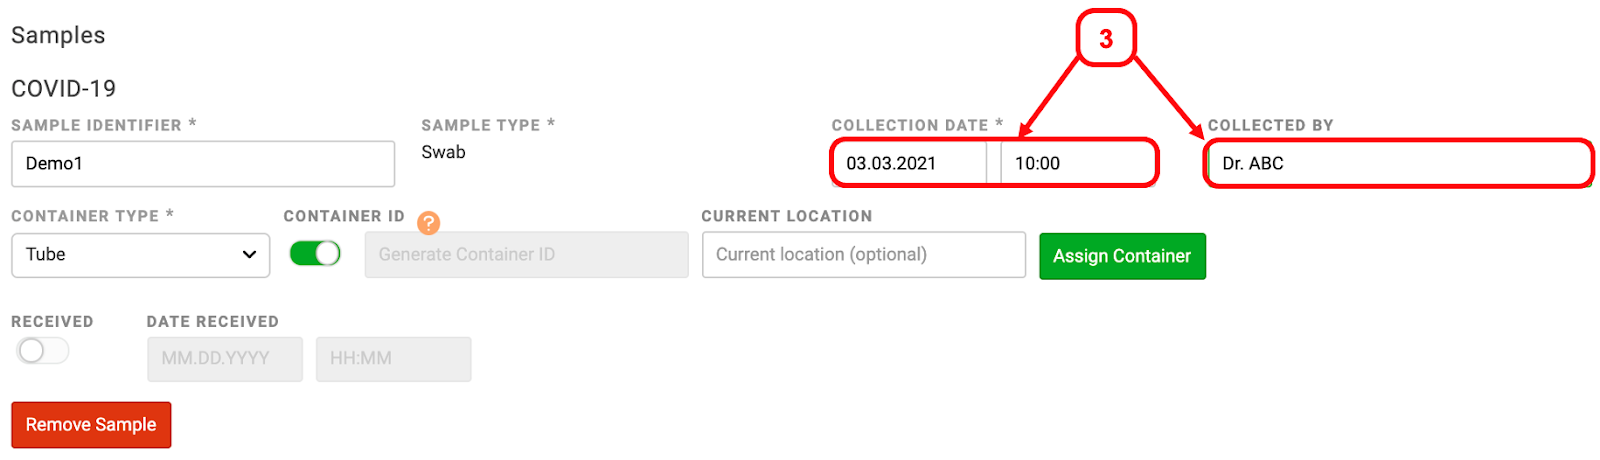
Tip: Depending on your lab’s display preferences, the collected and received times may require that you type “am” or “pm” in order to save
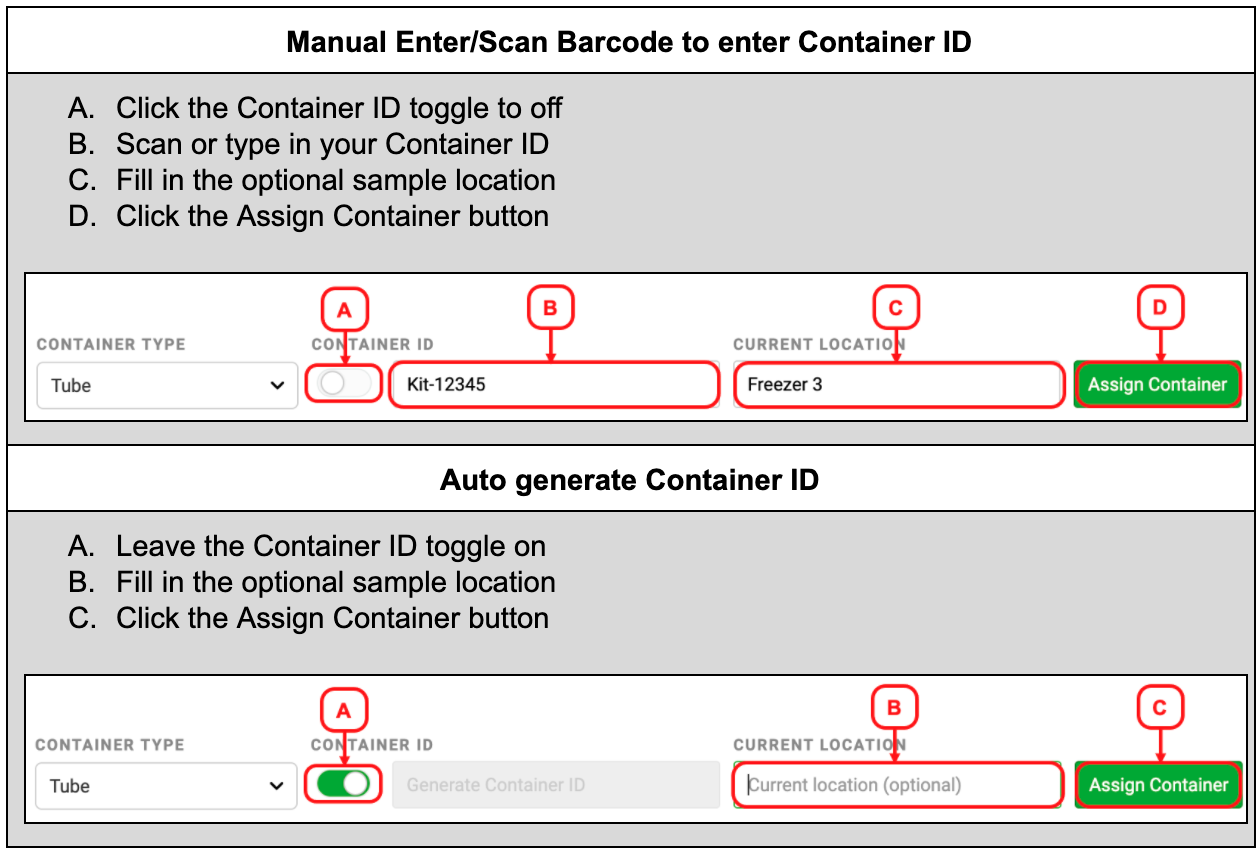
4. Choose the Container Type from the dropdown menu
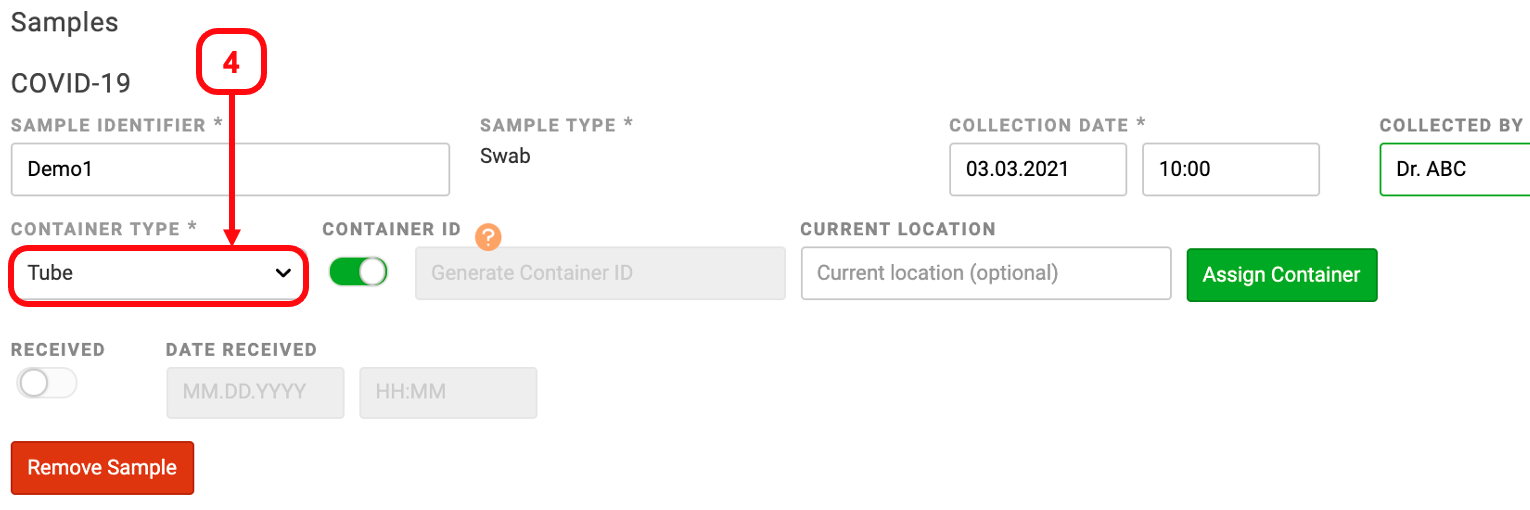
5. Assign the sample container ID: choose to manually enter/scan barcode or auto-generate a container ID
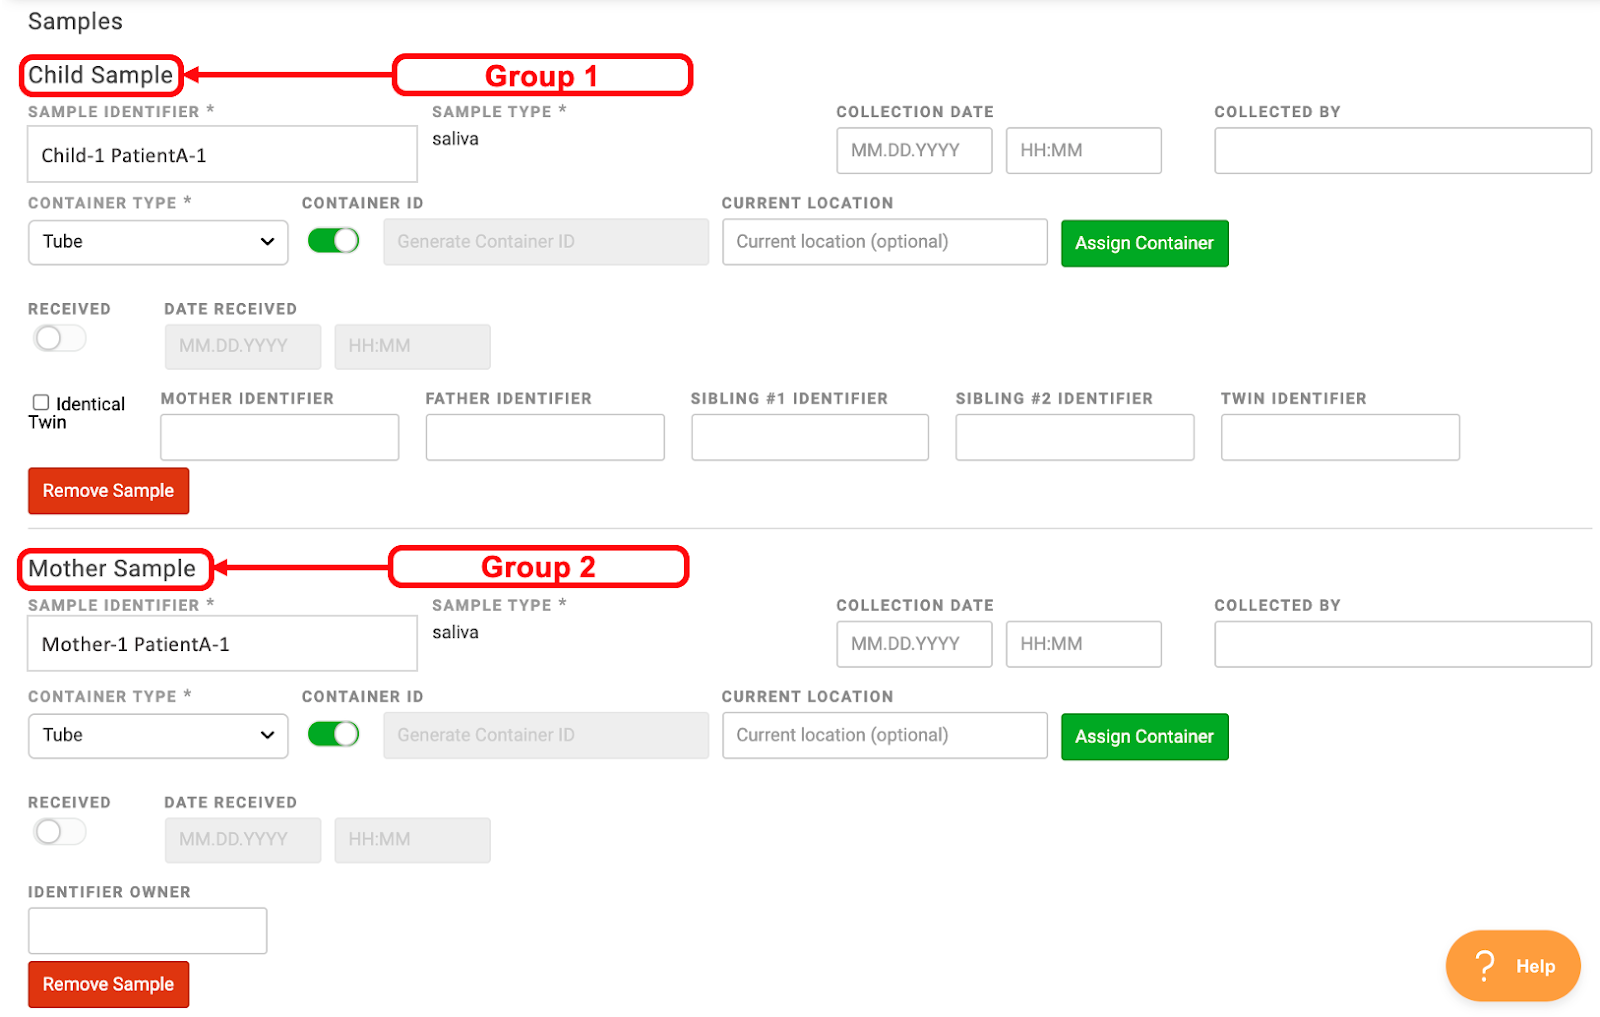
Tip: Some requisitions will use multiple Sample Groups. Samples Groups help discern between multiple samples on one requisition. If multiple sample groups are being used with auto-generated Sample Identifiers, samples will index by group (Group-1 Sample-1 and Group-2 Sample-1). For example, in the picture below there are two sample groups: Child and Mother. If the child’s sample Identifier is PatientA, the auto generated names for the 2 samples will be “Child-1 PatientA-1” and “Mother-1 PatientA-1”
6. Toggle the sample to Received and enter the received date time fields

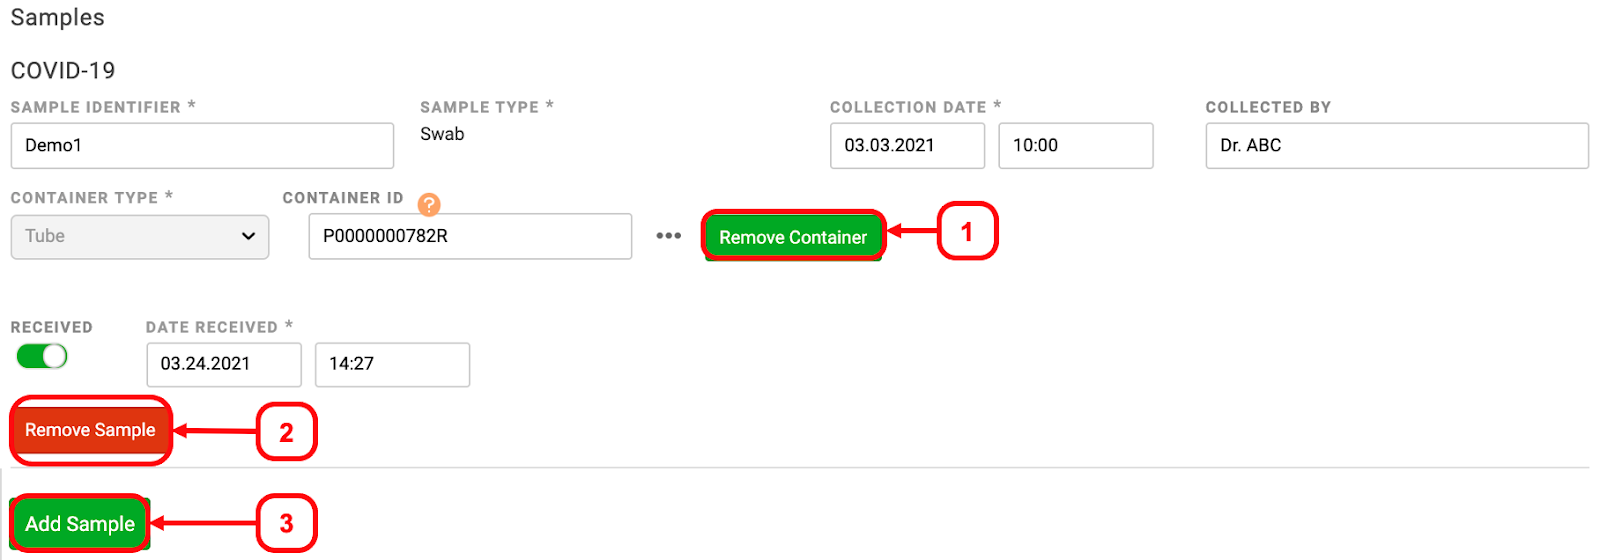
Changing Sample Information
1. Click the green Remove Container button to change the Container Identifier for your sample
2. Click the red Remove Sample button to completely remove the sample and start again
3. Click the green Add Sample button to add a sample to the same requisition
Test Panels
- Select the applicable Test(s) or Test Panel(s) for the sample(s) being submitted

Tip: Some requisitions are configured to show the individual tests, as well as the test panels
Patient Information
Tip: If your browser uses an autofill feature, it could incorrectly populate name and address information to this section. Be sure to check name and address information carefully. See our article on Disabling Chrome Auto-fill
- Fill in the required patient fields to create a new patient
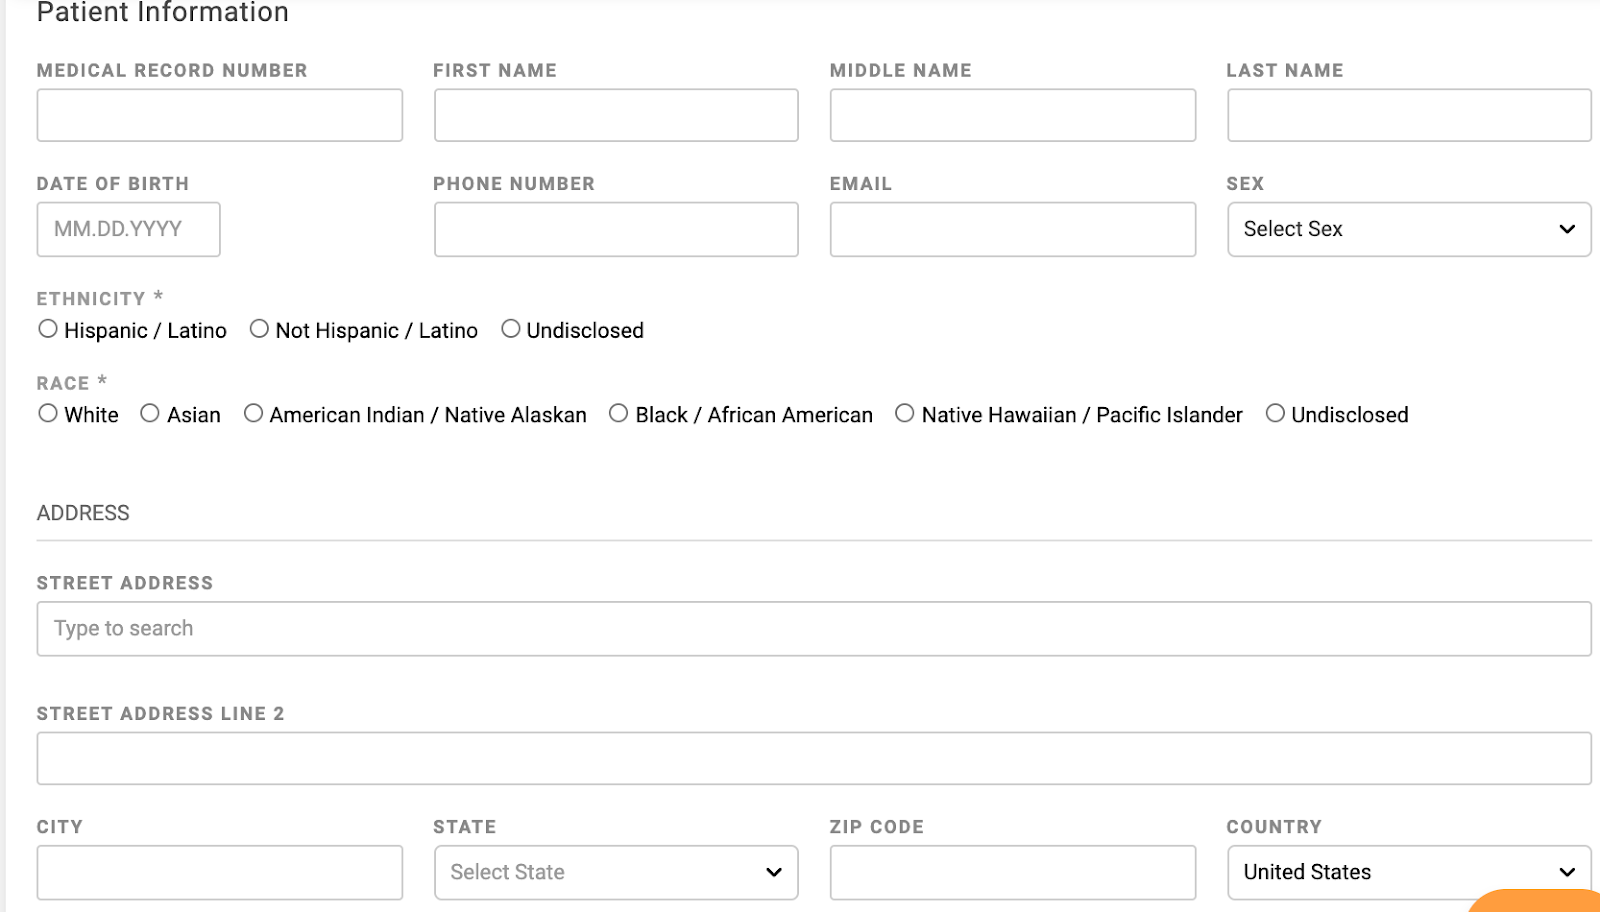
Tip: Required fields are indicated by an asterisk*. In the image above, Ethnicity* and Race* are required
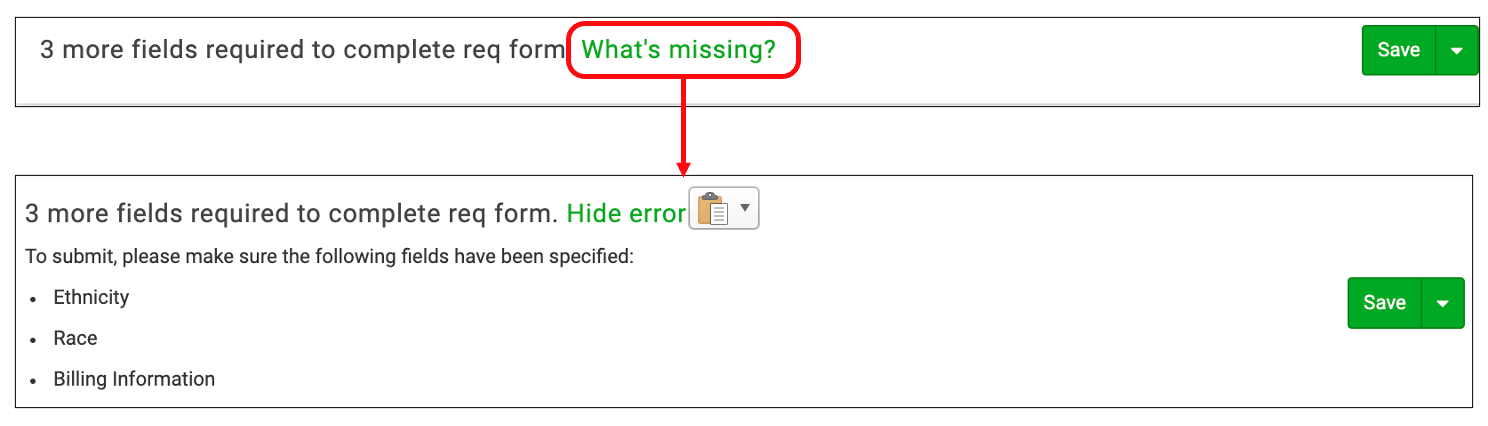
Tip: Missing fields that are required to save can be seen in the banner at the top of the window. Click “What’s missing?” to see missing fields
Existing Patient Information
1. Click the gray Search Patient button located on the top right of the Patient Information section

2. Fill in the any of the patient information fields
3. Click the green Search button

4. Select the patient from the list provided
Tip: Selecting an existing patient fills the Patient Information and Billing Information fields with the information already on file for that patient
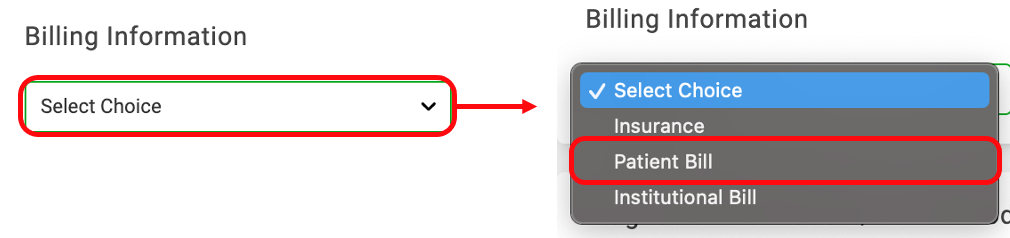
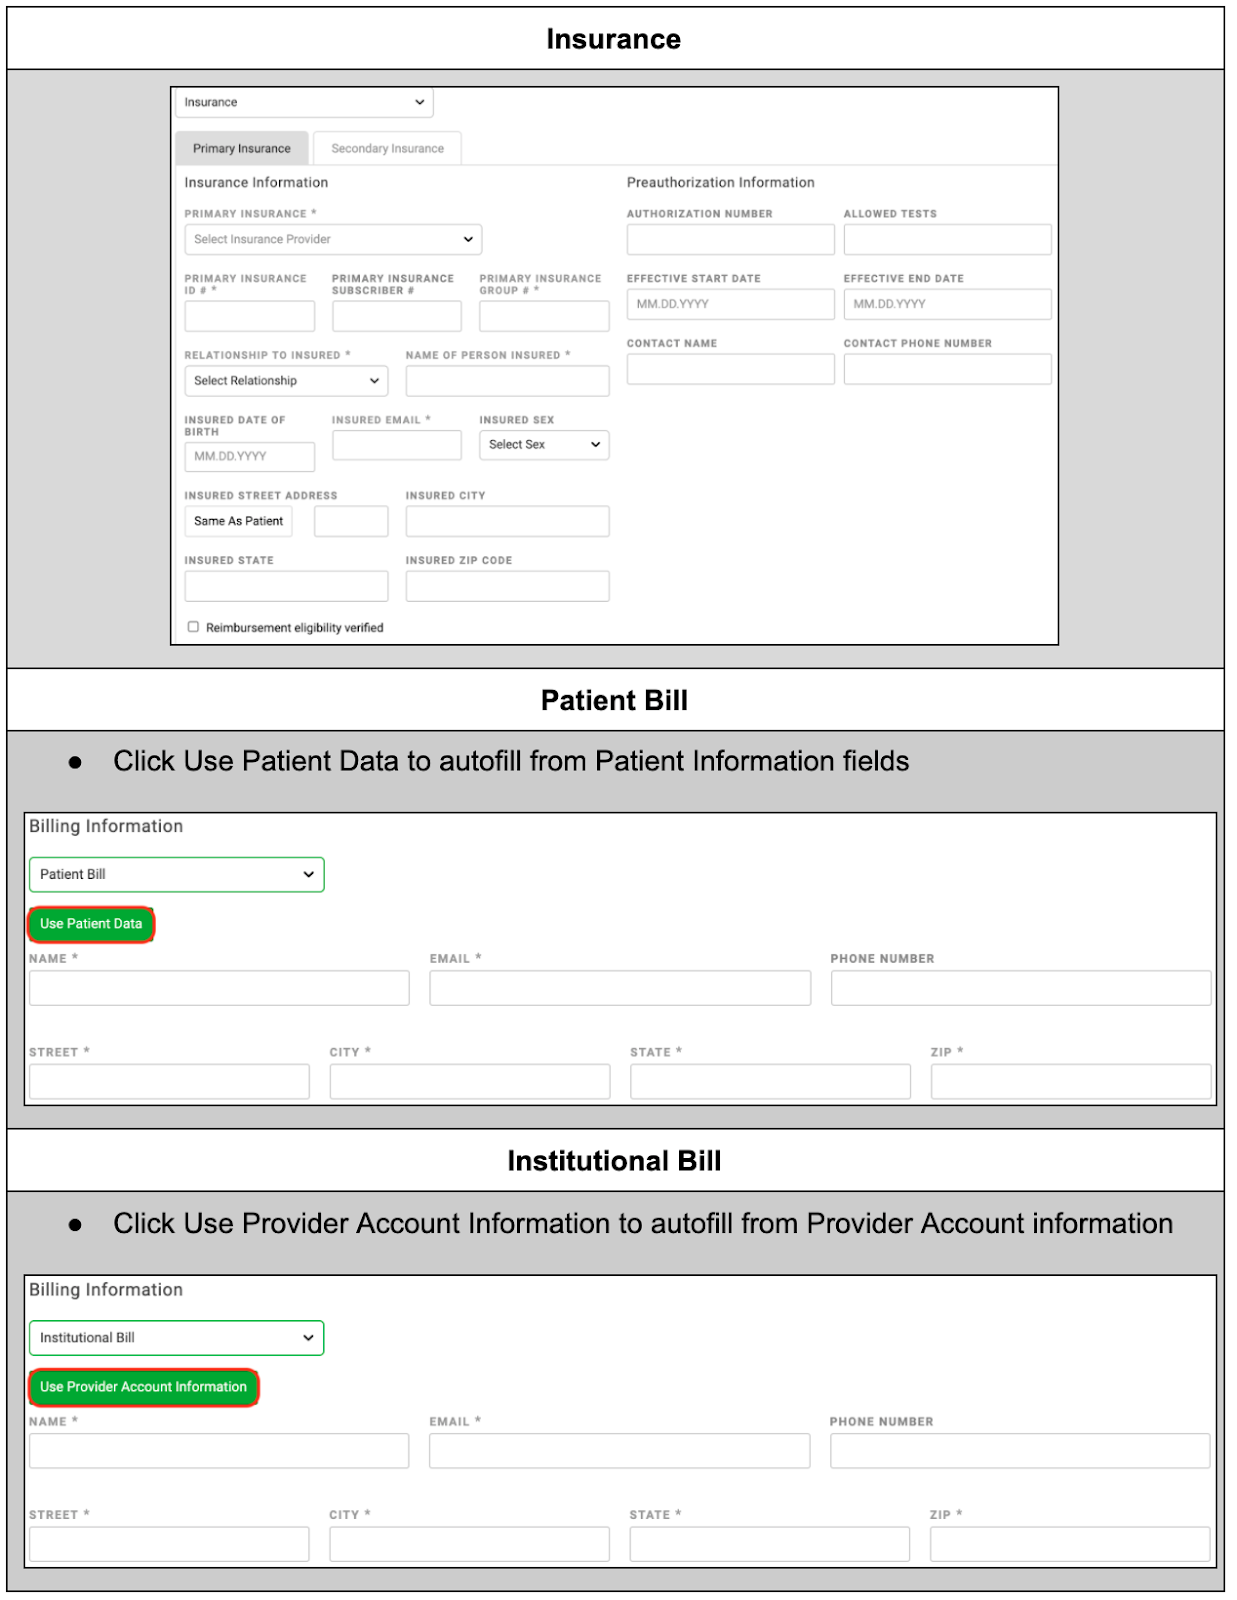
Billing Information
- Select the billing type from the drop down menu
- Fill in the required fields for your billing type; see table below for info to quick-fill some fields
Medication
- Click the Search Medications drop down menu and begin typing the medication name
- Choose the applicable medication from the list provided in the search

Tip: This field may not be required on all requisitions. For help with making this field optional or required on your requisition, contact support@ovation.io
Diagnosis/ICD-10 Codes
- Click the Select Diseases drop down menu and begin typing either the disease name or ICD-10 code
- Choose the applicable diagnosis from the list provided in the search

Tip: This field may not be required on all requisitions. For help with making this field optional or required on your requisition, contact support@ovation.io
Note: billable ICD-10 codes are updated quarterly from the CMS database
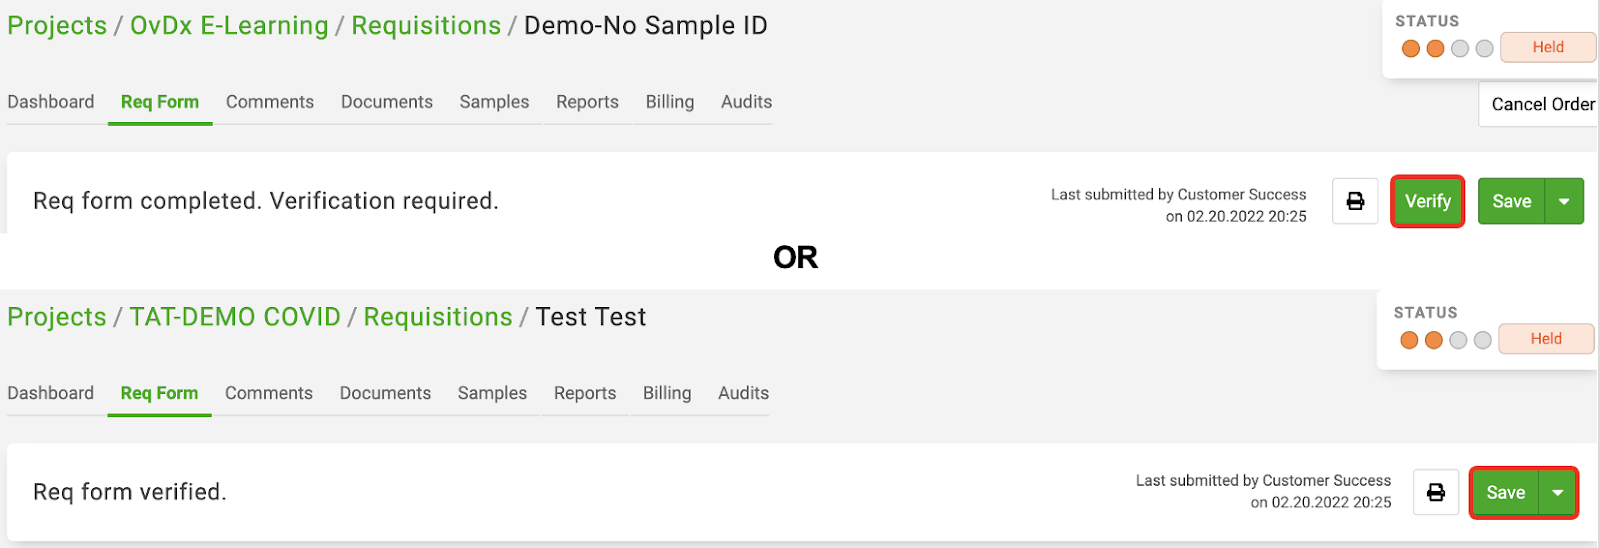
Save and Verify Requisition
- Click the Save button at any time to save the requisition
Tip: If you save when the “What’s missing?” banner is still displayed (see above), the requisition will save all the fields entered thus far and be incomplete. An incomplete saved requisition gives a yellow gumdrop in the requisition status position (see below). Workflows can be run on the saved sample, but reports cannot be generated until the requisition is completed and verified

- Click the Save button when all fields are filled in to complete the requisition
- The requisition gumdrop will turn orange, marking the sample as “held” until verified
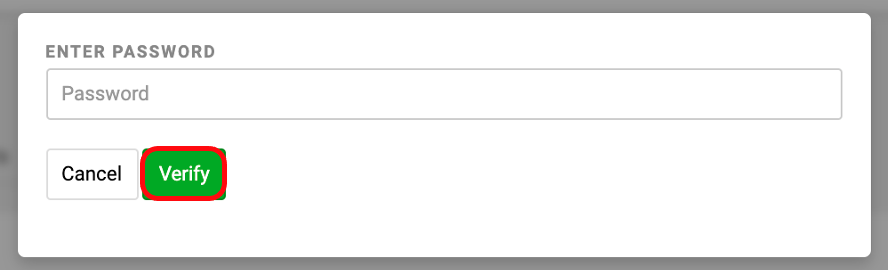
- Click the Verify button to open the verification modal
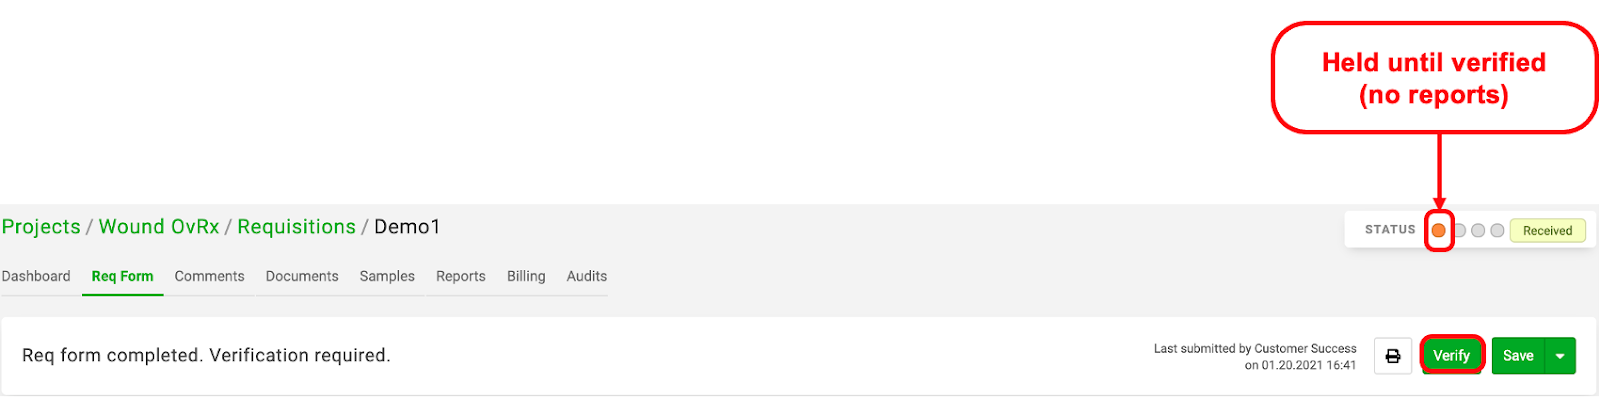
Tip: If you save when all required fields are filled, the requisition gumdrop changes to orange for Held. Held means the sample is awaiting verification. Workflows can still be run on the saved sample, but reports will not generate until the requisition is verified
- Enter your password and click Verify
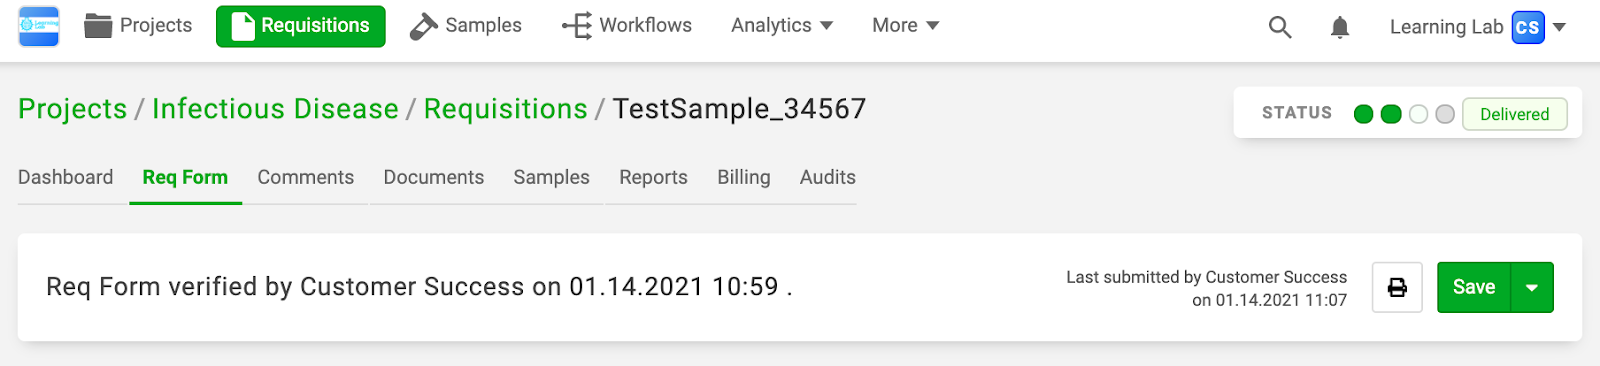
- The requisition status gumdrop will now be green for completed and verified
- A time stamp will appear that displays which user verified the requisition

Edit Requisition
You can edit some requisition fields if needed. To edit or complete a requisition, you will navigate to the requisition of choice, go to the Req Form tab, amend the requisition, then Save and Verify it again.
1. Click Requisitions in the top bar
2. Select your requisition from the list

Tip: Clicking Requisitions from the top bar shows all requisitions across all projects. Hover your pointer over a gumdrop to view a single requisition’s status. Use the search fields above the master list to filter requisitions and view subsets of requisitions
3. Click the Req Form tab next to Dashboard
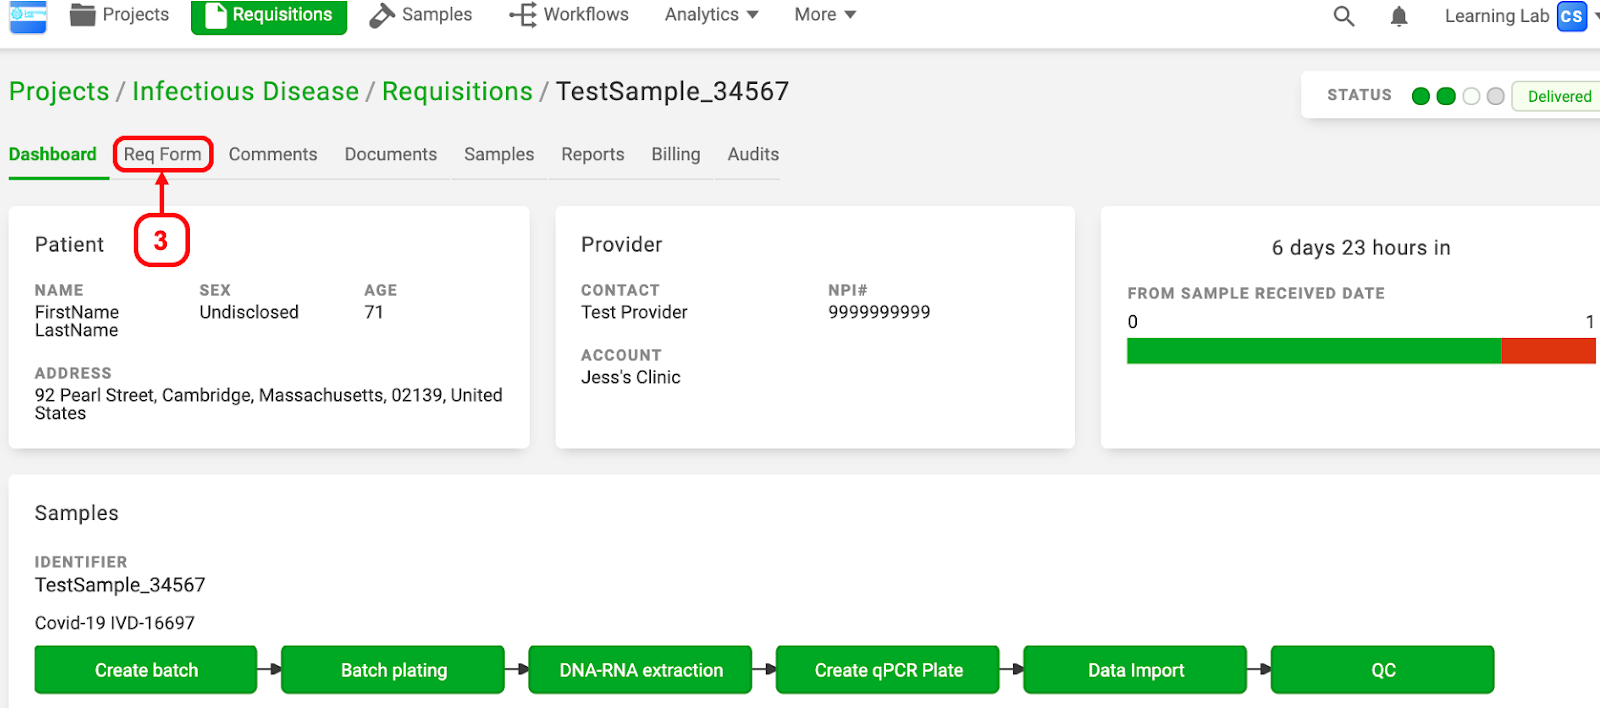
4. Edit the fields you wish to change on the requisition, save, and verify the form (see Save and Verify Requisition section above)
Tip: There will be a time-stamped audit trail of all requisition entries and edits under the Audits tab
Requisition CSV Import
Video
Knowledge Base Article
Requisitions can be imported in batches using the Requisition Import feature. This can be useful if your lab receives orders via a sample manifest or electronic file format.
1. Go to Projects and click on the Project for which you would like to import a batch of requisitions

2. Click the Requisitions tab inside the Project

3. Click the green Add Requisition button and choose Import Requisition

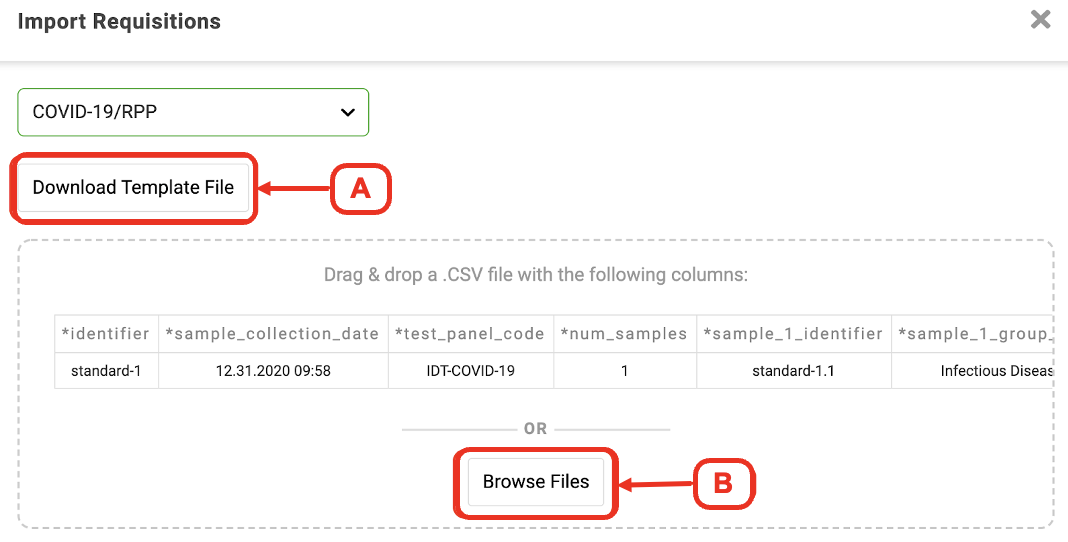
4. Select the Template from the drop-down menu in the Import Requisitions window
5. You can now choose between 2 actions to import:
A. Download the Template File: this will generate a CSV file with the appropriate columns for the Requisition Template chosen in step 4. See notes below on how to fill out the template
B. Drag and drop or click Browse Files to upload a completed Requisition Template CSV file
6. Click the green Create button to complete the import

Tip: Hover over any yellow, blue or red fields to view additional information on why those fields are highlighted

How to fill in a Requisition Template CSV
- Each row in the CSV file will become a new Requisition in the Project
- The first row shows the data field Column Headers and should not be modified in any way
- The second row shows example data and should be removed/deleted before importing the file
- The columns of the batch file represent fields in the requisition, and required fields will be indicated by an asterisk
- Do NOT change the column headers or they will not be recognized upon import
- It is OK to move the columns around before importing
- The number of samples in the template will match what is set as the maximum for that requisition. If the maximum number is different than what is being imported, be sure to change ‘num_sample’ column data to the number of samples being imported.
- Once imported, the Requisitions may appear as Incomplete, Complete, or Verified depending on how much information was included in the import CSV file
The table below lists the formatting requirements for requisition template headers, descriptions and example data to use in each column
Note: If needed, you may contact your support@ovation.io for an import template that is specific to the Requisition Template(s) in your Organization.
| Header Name/Format | Description | Example Data (BOLD highlight = case-sensitive) |
| identifier | Requisition identifier - may be left blank if auto-generation is turned on [String] | REQ-01289 |
| sample_collection_date | Format should match the Datetime Input Format set in Display Preferences under OvDx Administration tab settings. Note: In the csv file, use the format that matches your display preference settings, but Do Not change Display Preferences Format in OvDx since this will affect other areas of your LIMS. |
04/20/2020 22:1004-20-2020 10:1004-20-2020 09:00 AM Note: Legacy (older version) requisitions support date only, but new versions require date and time. |
| test_panel_code | Test Panel Code as defined in the More > Lab > Test Panels page. If more than one Test Panel is to be selected for a single requisition, multiple codes should be delimited by a ‘pipe’ (vertical bar on same keyboard key as backslash) “|” [String] | IDT-COVID-19|77870-00 |
| num_samples |
Number of samples included in that requisition. Note: If ‘2’ is in this column and you are only uploading 1 sample, the import will not validate [Integer] |
1 |
| sample_#_identifier | Sample identifier - may be left blank if auto-generation is turned on. Substitute the # sign in the header with 1 or 2 (dependent on 1st sample data or second sample data) [String] | COV-01289-1 |
| sample_#_group_name | Group name as defined in the Samples section of the requisition form. Should be set to “default” if no sample groups are configured. [String] | COVID-19 |
| sample_#_collected_by | Name of person who collected the sample [String] | Dr. Johnson |
| sample_#_date_received |
Format should match the Datetime Input Format set in Display Preferences under OvDx Administration tab settings. Note: In the csv file, use the format that matches your display preference settings, but Do Not change Display Preferences Format in OvDx since this will affect other areas of your LIMS. |
04/20/2020 22:1004-20-2020 10:1004-20-2020 09:00 AM Note: Legacy (older version) requisitions support date only, but new versions require date and time. |
| sample_#_state_label |
Sample type. Data must match one of the options in the drop-down choices for sample type exactly. [String] Note: Can be left blank if there is only 1 sample type associated with the requisition template. |
SwabNasopharyngeal swabUrine blood |
| sample_#_state_position | Position in container. Use A01 for tubes. [String] | A01 |
| sample_#_container_type | Sample Container type - supported options: Tube, Plate96, Plate384, Plate16 [String] | Tube |
| sample_#_container_barcode | Container barcode. If left blank, the barcode will be auto-generated. Must be unique if provided. [String] | S10098734A |
| patient_mrn | Medical Record Number [String] | 1234567 |
| patient_first_name | Patient’s first name [String] | John |
| patient_middle_name | Patient’s middle name [String] | Joe |
| patient_last_name | Patient’s last name [String] | Doe |
| patient_date_of_birth |
Format should match the Datetime Input Format set in Display Preferences under OvDx Administration tab settings. Note: In the csv file, use the format that matches your display preference settings, but Do Not change Display Preferences Format in OvDx since this will affect other areas of your LIMS. |
04/20/202004-20-2020 |
| patient_street_address | Patient’s street address [String] | 32 Pearl St |
| patient_street_address_line2 | Apartment or Unit number | Apt 5 |
| patient_city | Patient’s city [String] | Cambridge |
| patient_state | Patient’s state: 2 letter abbreviation or spelled out [String] | MAMassachusetts |
| patient_country | Patient’s country [String] | United StatesUSUSA |
| patient_zip_code | Patient’s zip code [String] | 02114 |
| patient_phone_number | Patient’s phone number [String] | 6171234567 |
| patient_sex | Patient’s sex: M, F, U, Male, Female, Undisclosed [String] | M or MaleF or FemaleU or Undisclosed |
| patient_ethnicity | Patient’s ethnicity. Supported options: hispanic, nothispanic and undisclosed [String] | NothispanicHispanicundisclosed |
| patient_race | Patient’s race. Supported options: white, asian, native, black, islander and undisclosed [String] | White |
| patient_email | Patient’s email [String] | john.doe@example.com |
| provider_account | Provider Account name must match existing account name exactly (alternative field sales_account) [String] | Happy Clinic |
| license_registry |
Type of Provider registry. Supported options: NPI, Australian Health Practitioner Registry, European Physician, ex-US / clinical trial, Philippines PRC, South American Physician Note: this field is optional if using NPI Providers; this field is required if using non-NPI Providers. |
European Physician (Ovation will assume ‘NPI’ if this field is left blank or the column is missing) |
| provider_npi | Provider’s NPI number or other registry number if using non-NPI Provider (alternative field physician_npi) [String] | 9999999999 |
| provider_name | Name of Provider (only required if creating a new non-NPI Provider) | Dr. Test, MD |
| medication | List of medications delimited by a ‘pipe’ (vertical bar on same key as backslash) “|” [String] | Maalox|Macrobid |
| icd10_code | List of ICD-10 codes delimited by a ‘pipe’ (vertical bar on same key as backslash) “|” [String] | A00.0|G00.0orA000|G000 |
| bill_type |
Indicates what type of billing should be used. Supported options are: Insurance, Patient Bill, Institutional Bill Note: Several additional billing columns follow the bill_type column. Only fill in the additional billing fields that correspond to the billing type indicated in the bill_type column. |
InsurancePatient BillInstitutional Bill |
| has_secondary_use_notification | Indicates if patient has been notified of secondary use. |
0: patient not notified1: patient notified 2: patient notified but has opted out of one or more entitlements |
| secondary_use_entitlements | In the case where the has_secondary_use_notification field is set to 2, this field shall denote the list of entitlements that are allowed (on the requisition’s samples), each separated by the “|” character. |
can-use-specimencan-use-clinical-datacan-recontact-patient can-use-specimen|can-use-clinical-data|can-recontact-patient |
| has_medical_consent | Indicates if medical consent has been given for the sample(a) on the requisition. | 0: medical consent has been given1: medical consent has not been given |
|
Custom Attributes Examples:requisition_billing_notes is_pregnant |
Additional headers in your requisition template that are specific to your org. String Boolean |
needs approval TRUE=Yes, True, T, or 1FALSE=No, False, F or 2 |
|
|
|
|
System Validation of Import File:
- If your CSV includes a requisition ID that already exists in the LIMS (case-insensitive match), a warning will appear. If the file is then imported, an additional sample will be added to the requisition. Fields on that requisition are only updated if a value is provided in the CSV (non-string fields) or if the value provided is not “null” (string fields)
- All of the following will generate errors and block the file import:
- Collection Date: if it’s a future date, if it’s before 1900, if it’s before the date of birth
- Received Date: if it’s a future date, if it’s before 1900, if it’s before the Collection Date
- Patient Date of Birth: if it’s a future date, if it’s before 1900
- Patient State: if country is US and it’s not a valid state (or abbreviation)
- Patient Zip Code: if country is US and it isn’t in a valid format, if country is US and zip code does not belong to provided state
- Any error in the CSV is also an error in API. Calls with offending data get a 422 response code with the response body enumerating the text of the errors
Receiving Samples
This section describes how to record the receipt of samples on existing Orders/Requisitions in the OvDX LIMS. Use the chart below to determine your lab’s best sample receiving method, then navigate to the appropriate instructions using the link(s) provided below the chart.

Note: If you are manually entering requisitions and receiving samples at the same time, please refer to the Adding a New Requisition article.
Receiving an Individual Sample
Use this method when you have a low volume of samples coming into the lab. The type of ID associated with your sample will help you determine how to receive the sample. Samples with an existing Sample ID can be found and received from the Global Samples Page. Samples with an existing Requisition ID, but no Sample ID, can be found and received from the Global Requisitions Page.
Video
Knowledge Base Article
Receive Using Sample ID
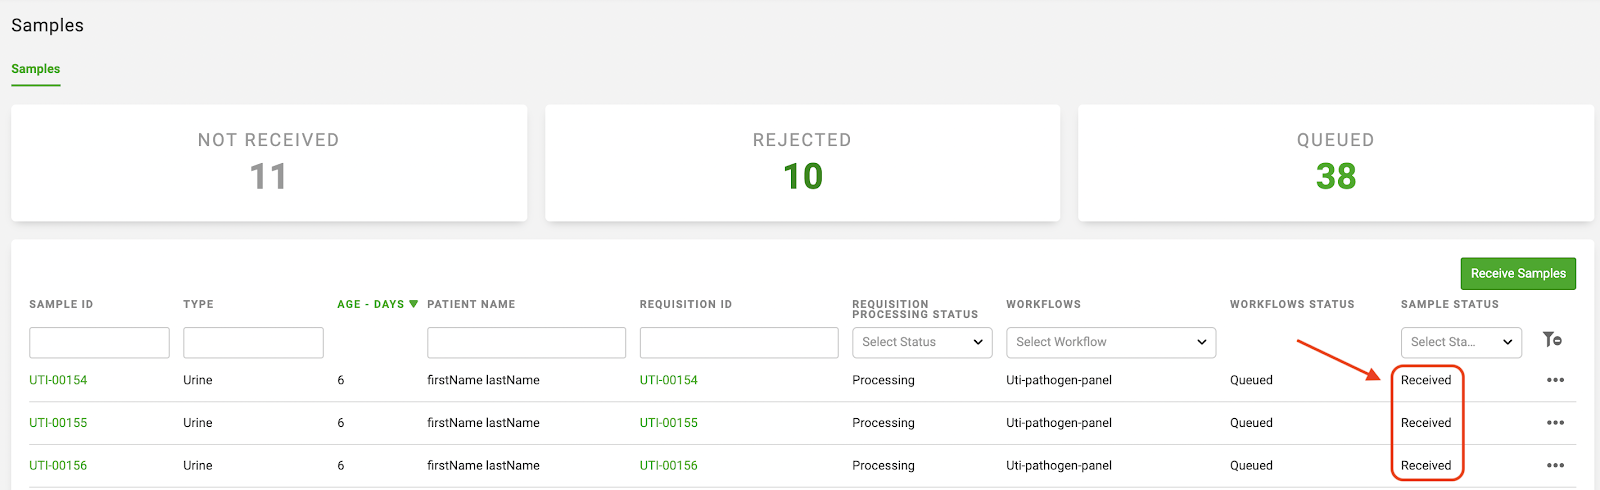
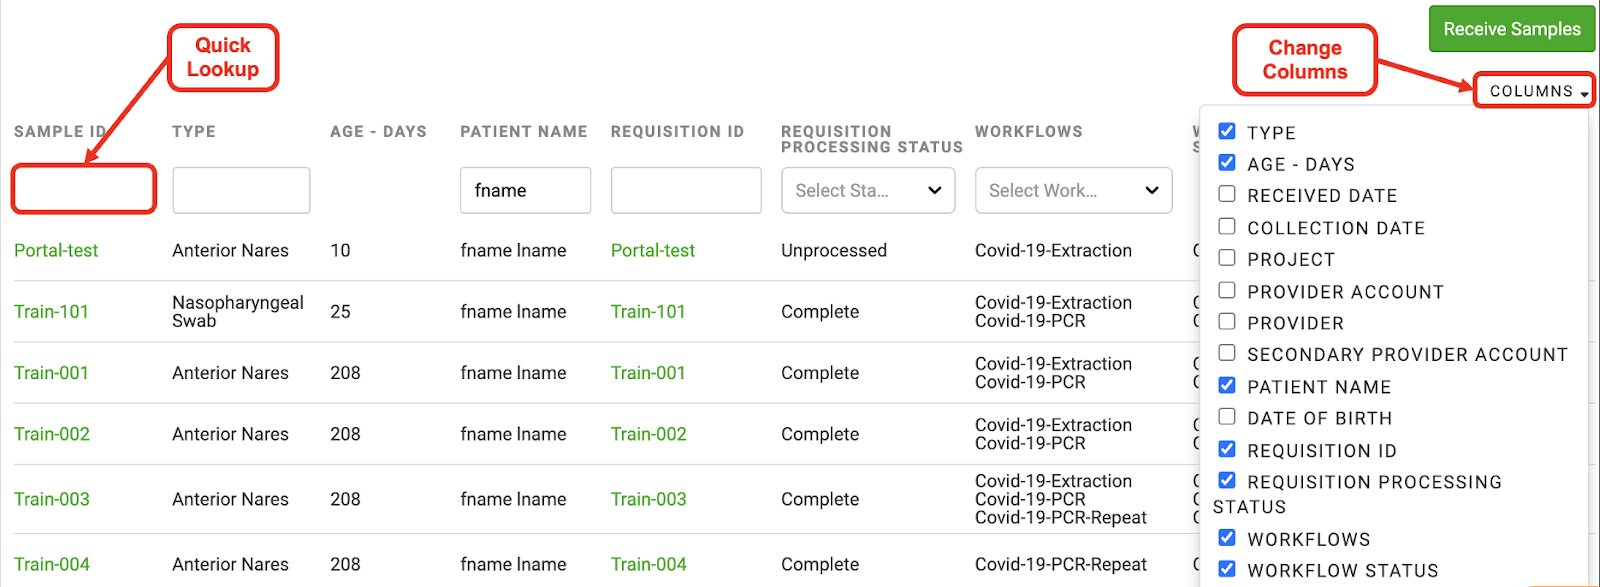
1. Click the Samples tab in the top dashboard to navigate to the Global Samples Page
A table will display with all samples and filterable fields
Tip: You can use the Sample ID field to enter your Sample ID for a quick lookup. You can also click on the columns dropdown menu to select which filterable fields display. Selected fields have a blue checkbox. Once you have your sample pulled up, skip to step 3 below
2. Click the “Sample Status” dropdown and choose “Not Received”

3. Click the green Sample ID of the sample you wish to receive

Tip: If you are receiving multiple samples individually (a small number), you can open a new window by right clicking on the Sample ID and receive the individual sample in a new window. This allows you to return to your original window to receive your remaining samples. Alternatively, if you have a large number of samples to receive, you can use the Bulk Sample Receipt method described later in this article
4. Enter the Received Date/Time
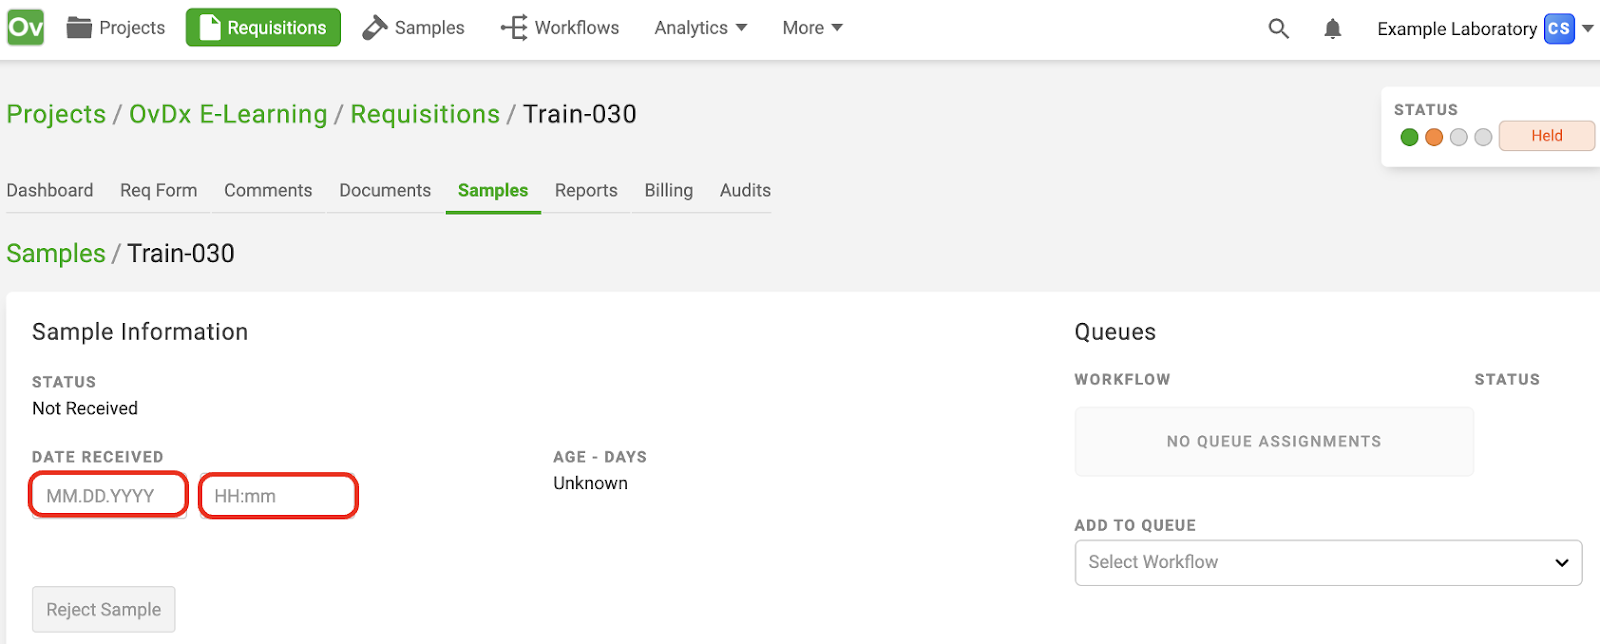
Tip: You can tab through the Date/Time fields to enter the current date/time
5. Hit the green Save button

Receive using Requisition ID (no Sample ID)
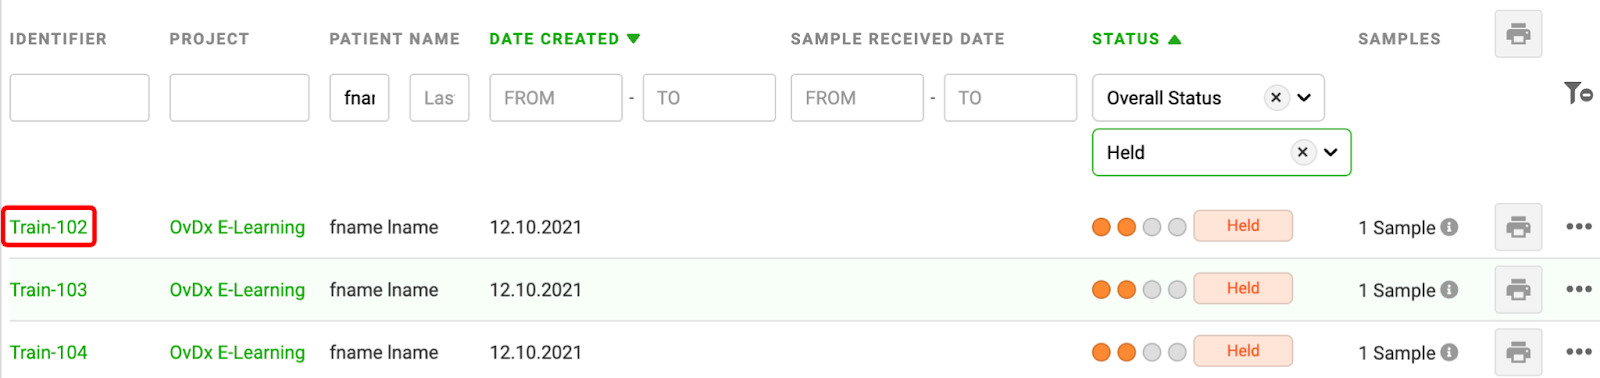
1. Click the Requisitions tab in the top dashboard to navigate to the Global Requisitions Page
Tip: You can use the Identifier field to enter your sample’s Requisition ID for a quick lookup. You can also click on the columns dropdown menu to select which filterable fields display. Selected fields have a blue checkbox. Once you have your sample pulled up, skip to step 4 below

2. Click the “Status” dropdown and choose “Overall Status”
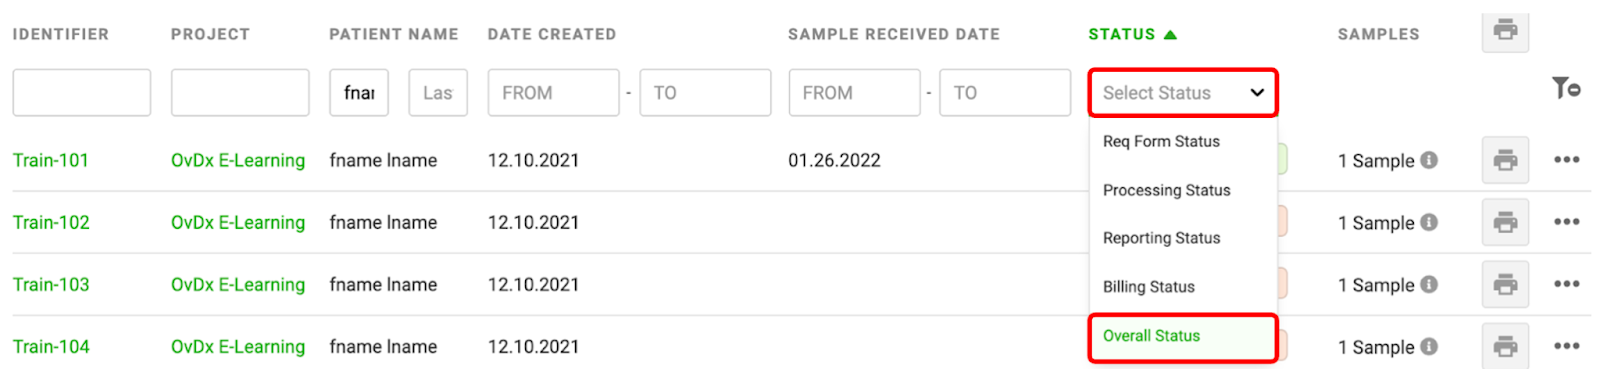
3. Click the sub-status dropdown menu and choose the “Held” status
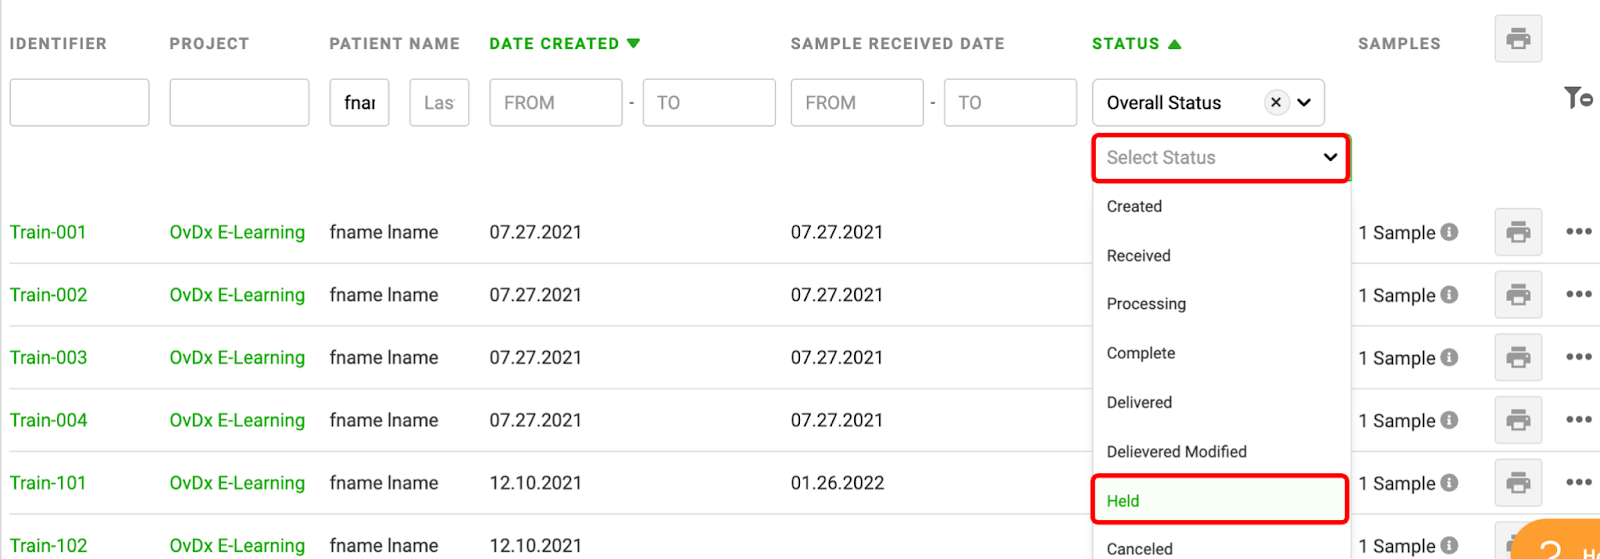
4. Click the green Requisition Identifier of your sample of interest
5. Click the Req Form tab, then scroll down to the Samples section

6. Click the green Add Sample button

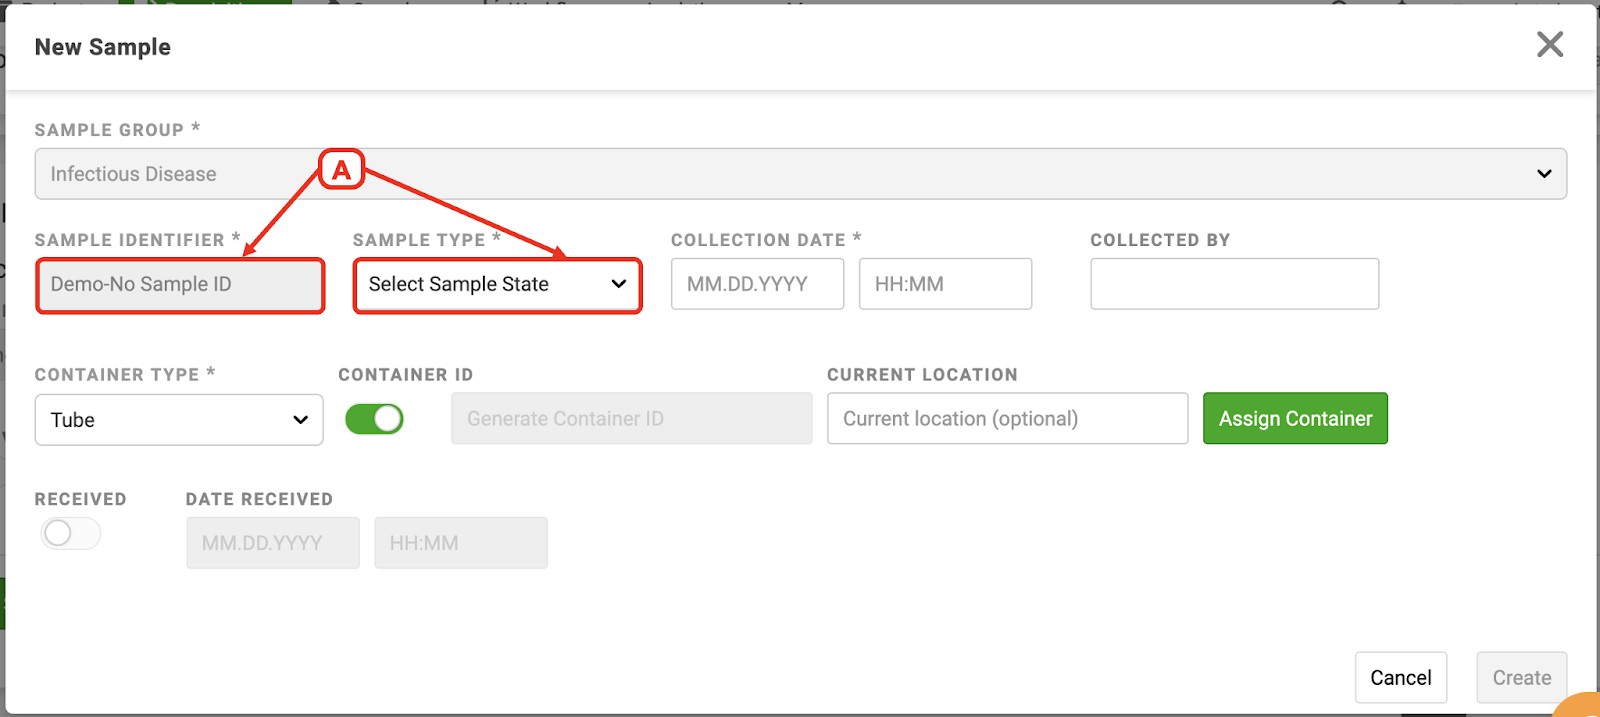
7. Fill in the sample details
A. Enter the Sample ID and Sample Type (these may be auto-selected for you depending on your Requisition Form Template Settings)
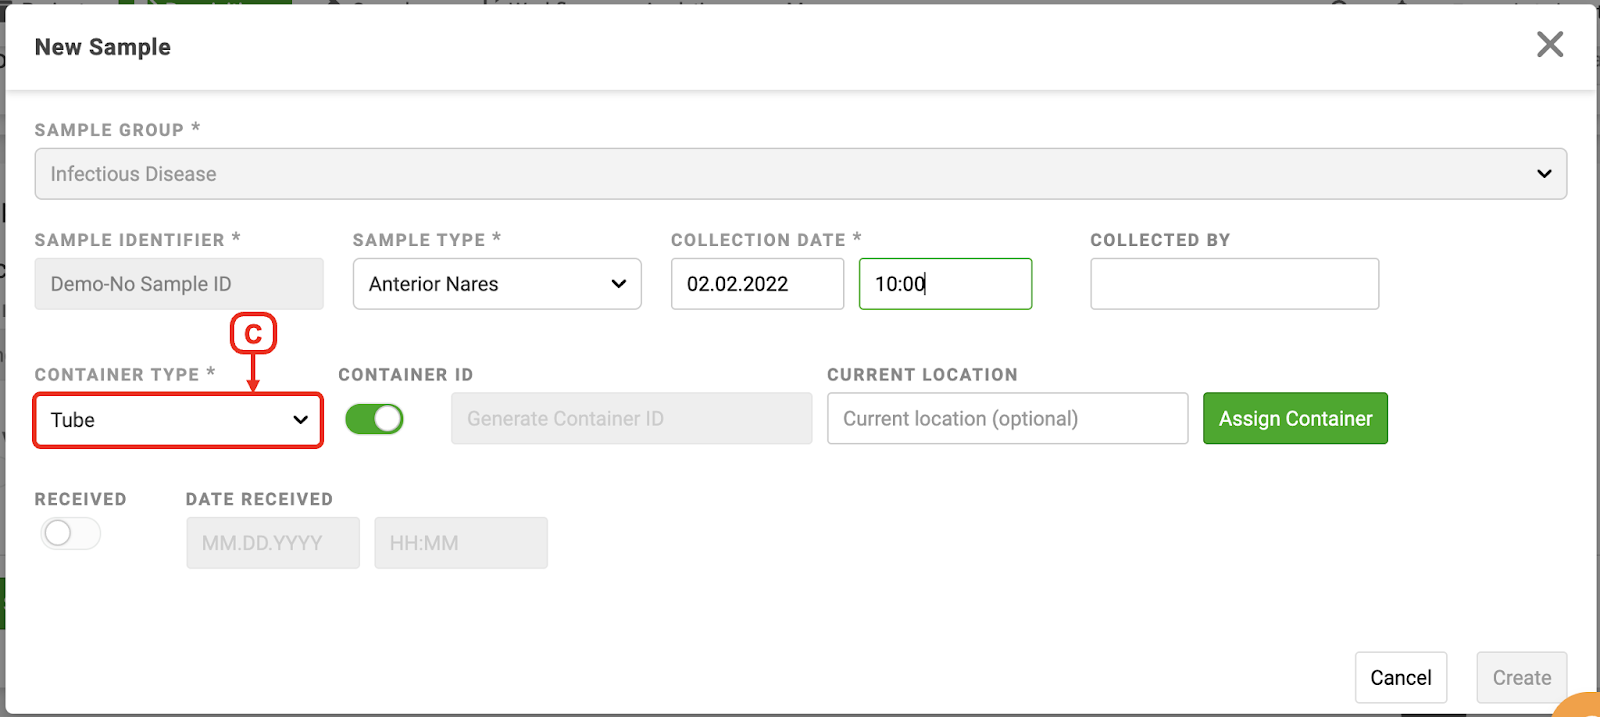
B. Enter the collection date/time

C. Select a container type (this may be auto-selected for you depending on your Requisition Form Template Settings)
D. Answer the question below to add the Container ID
Do you already have an existing Container ID?
Yes, the sample has an existing Container ID…
- Leave the toggle set to green
- Optional: add a current location
- Click the green Assign Container button
No, the sample does not have an existing Container ID…
- Leave the toggle set to gray
- Type or barcode scan the Container ID (123 shown)
- Optional: add a current location
- Click the green Assign Container button

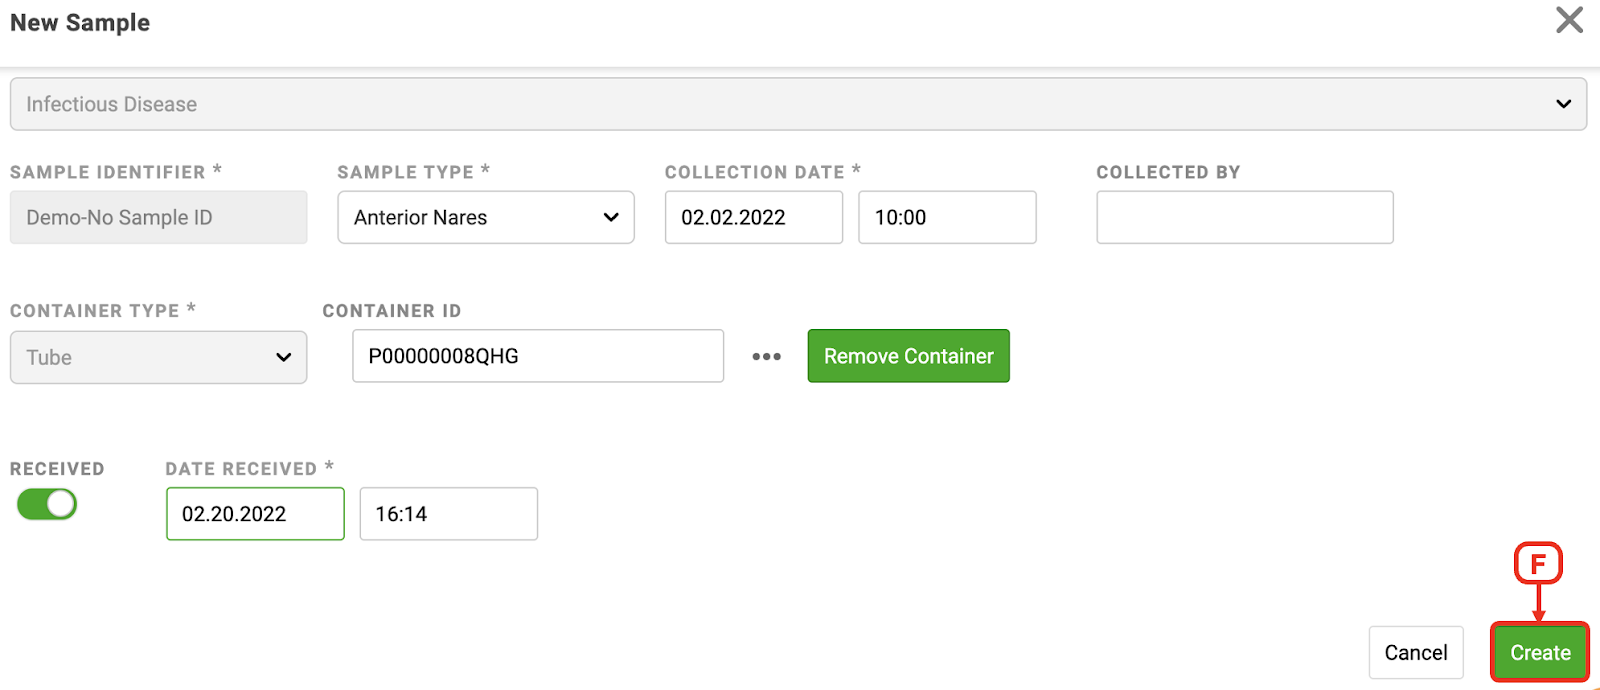
E. Click the Received toggle to green and enter the received date/time

Tip: You can tab through the Date/Time fields to enter the current date/time
F. Hit the green Create button
8. Scroll up to the top of the requisition form and click the green Verify button, if displayed. If there is no Verify button, click the green Save button
The sample’s status will now be “Received”. The sample will also automatically appear in the appropriate Workflow queue(s).
Bulk Sample Receipt
Use this method when you have a high volume of samples coming into the lab and know the Sample ID or Container ID associated with the sample. This method may be used directly to receive samples with a barcode scanner.
Video
Knowledge Base Article
Receive Using Bulk Manual Entry (small batches)
1. Click the Samples tab in the top dashboard to navigate to the Global Samples Page
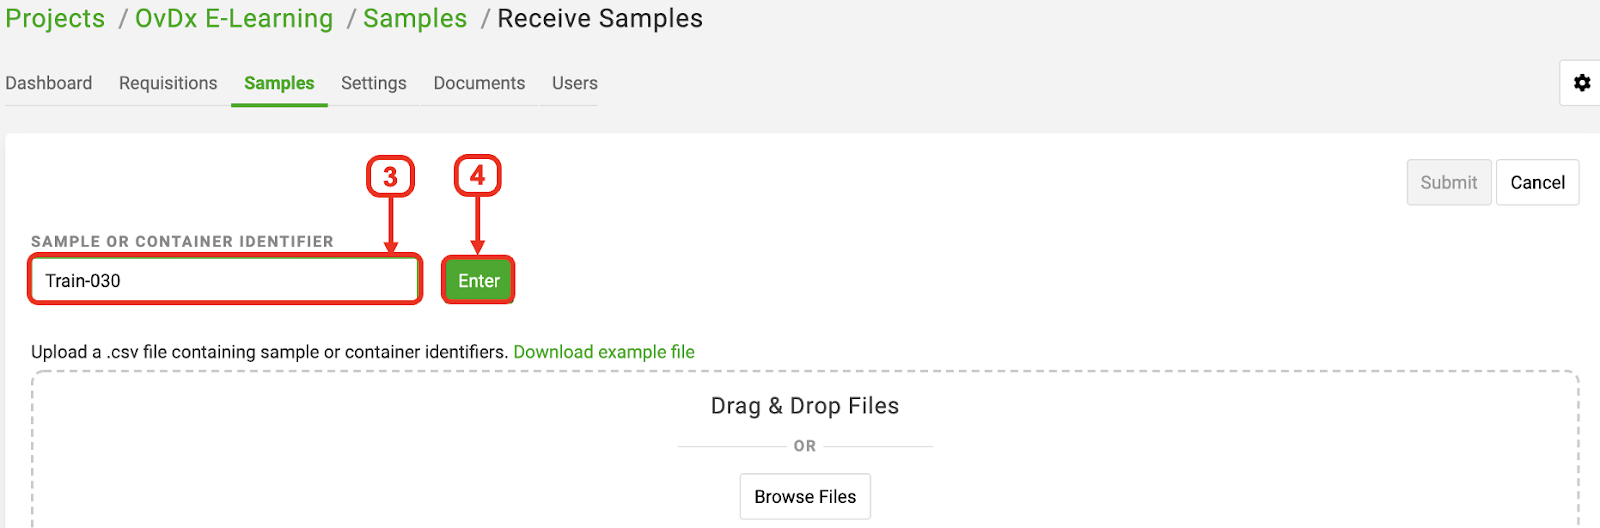
2. Click the green “Receive Samples” button

3. Scan or type the Sample or Container ID of the sample you wish to receive
4. Hit the green Enter button
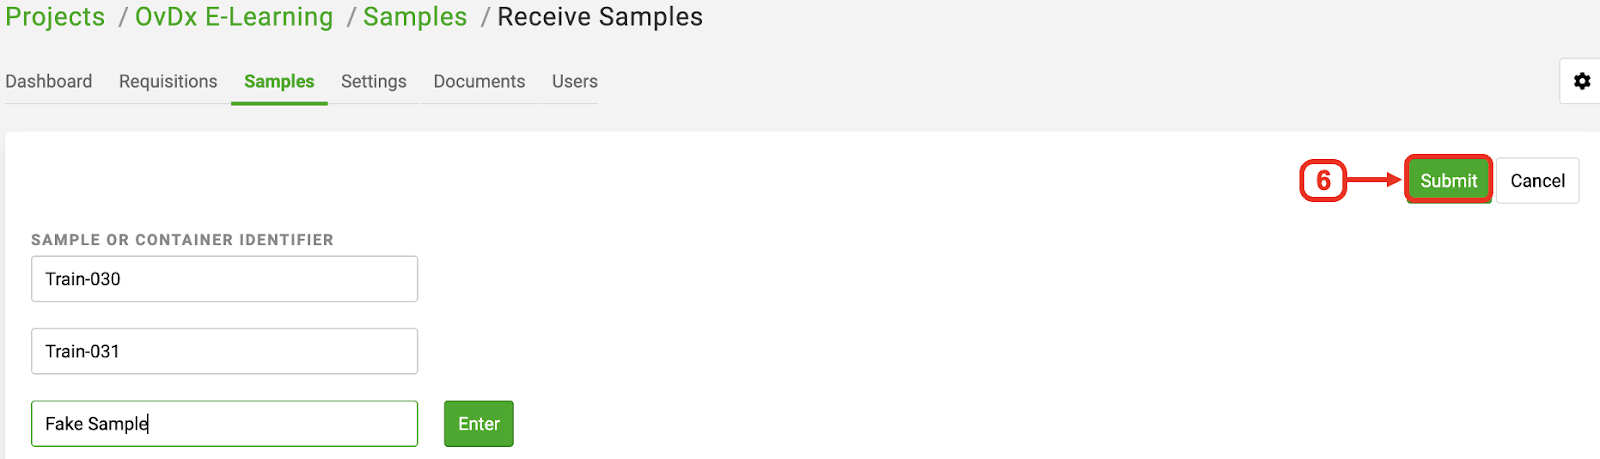
5. Repeat steps 3 and 4 for all samples in the batch
Note: You must hit Enter after scanning of each sample
6. Click the green Submit button
7. Skip to Confirm Samples in the Batch below
Receive Using a .csv File to Import Samples (large batches)
1. Click the Samples tab in the top dashboard to navigate to the Global Samples Page
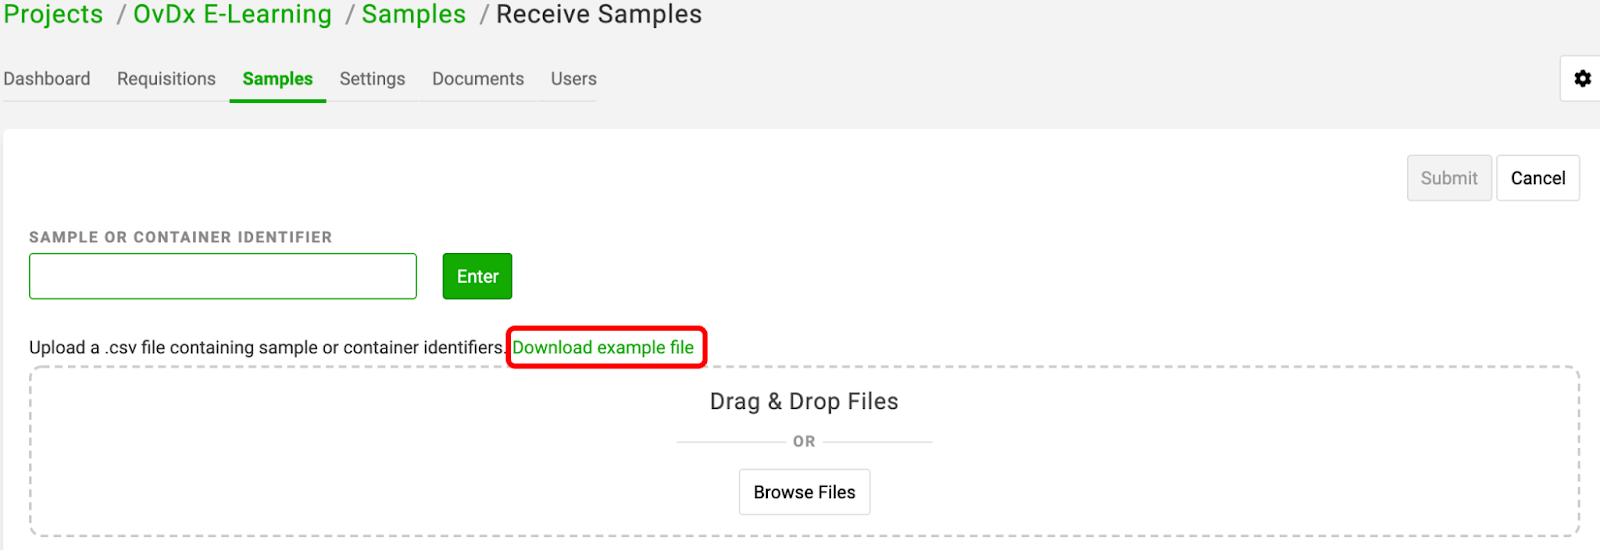
2. Click the green “Receive Samples” button
Tip: Click the green Download Example File on the Receive Samples page to use a template of the import file
3. Type or scan the Sample or Container IDs of all samples into your spreadsheet

Note: Your file must have the column header “Identifier” above your list of Sample/Container IDs.
4. Save your file as a .csv (comma separated values or comma delimited)
5. Drag and drop or click Browse Files and select your file to upload
6. Click the green Process File button

7. Your sample list will display after processing the import file. Click the green Submit button

Confirm Samples in the Batch
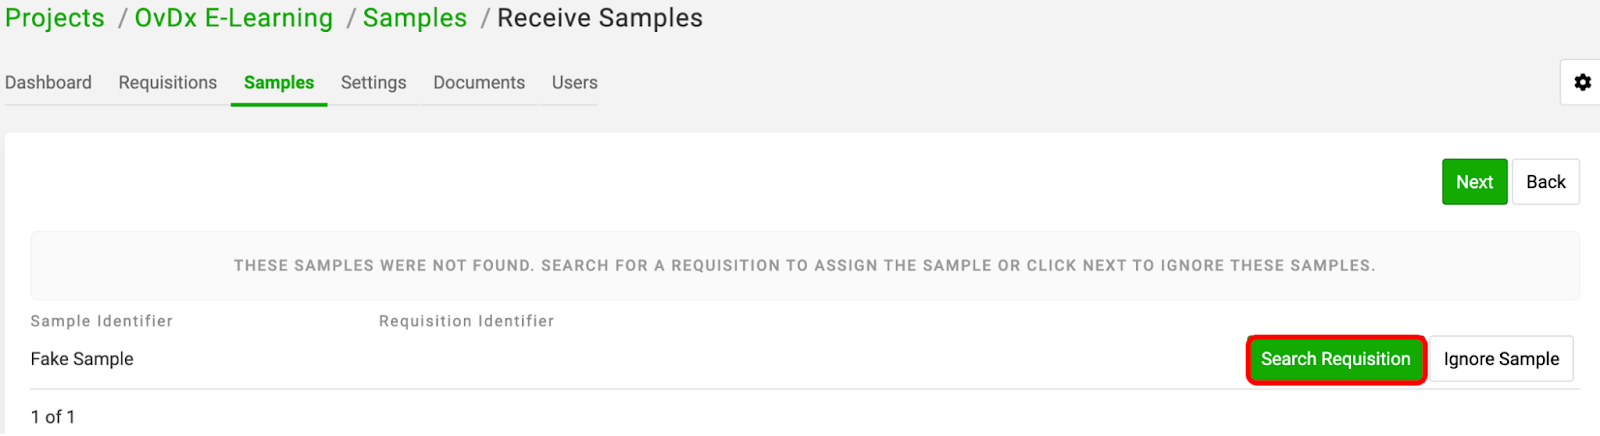
You must review any samples that were not found in the system in order to confirm the batch. If all of your samples were found, skip to Receive the Batch.
1. If a sample is not found, answer the following question:
Do you want to try to look up the missing sample by other identifying information (patient details or Requisition ID) or ignore the missing sample and exclude it from the batch?
Option 1: I want to try to look up the missing sample by other identifying information
A. Click the green Search Requisition button
B. Click the dropdown menu and select to search by Requisition ID or Patient Details
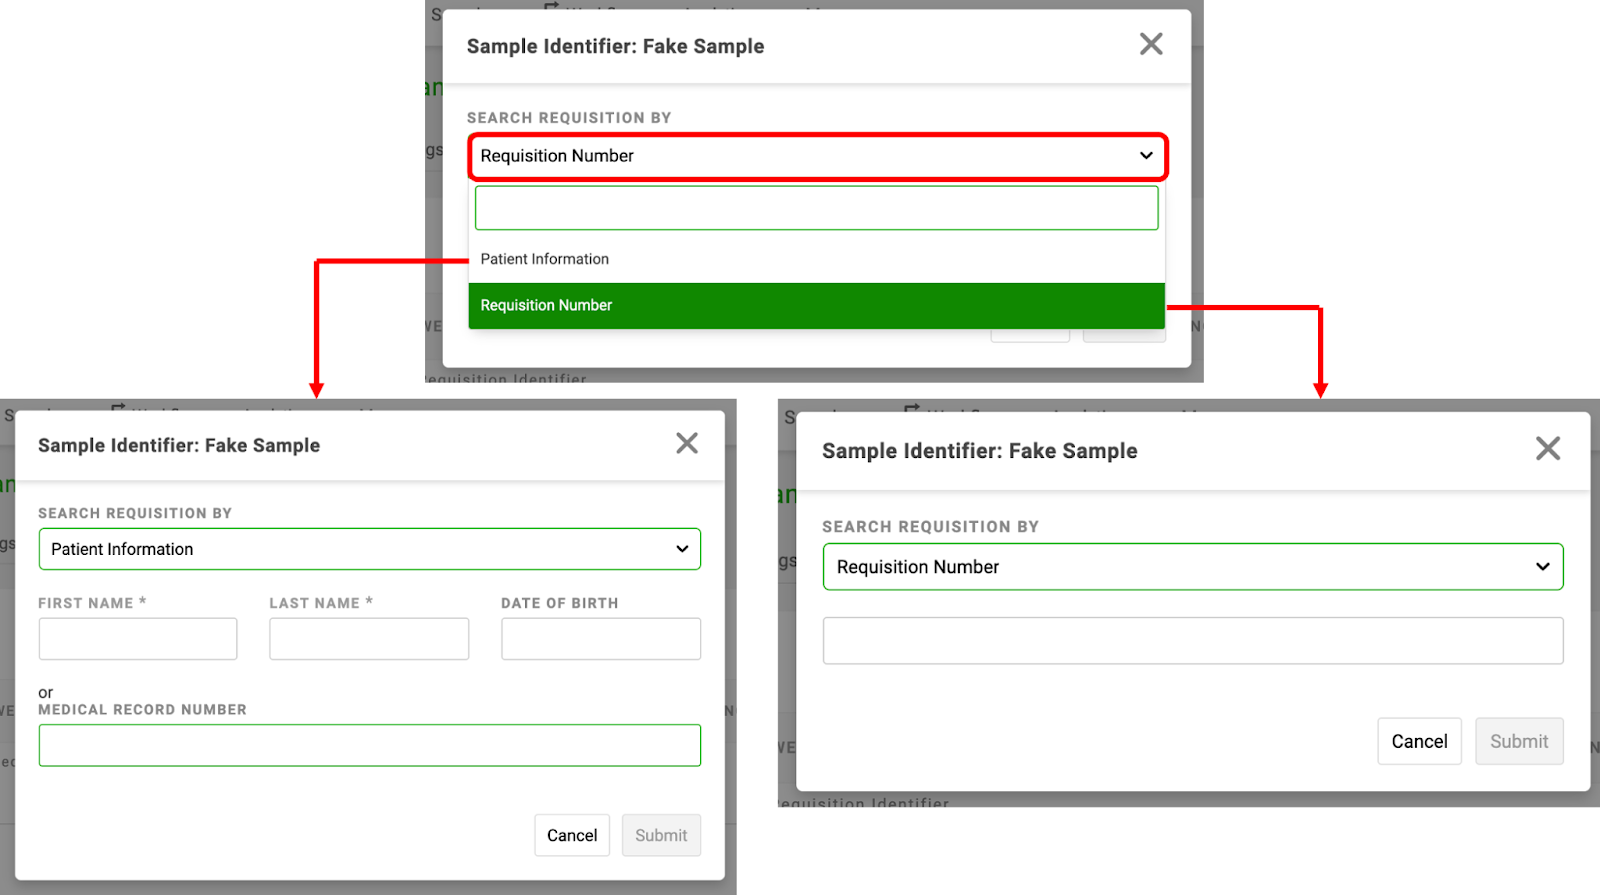
C. Enter the information in the Sample lookup modal and hit the green Submit button
D. Repeat for all samples that were not found
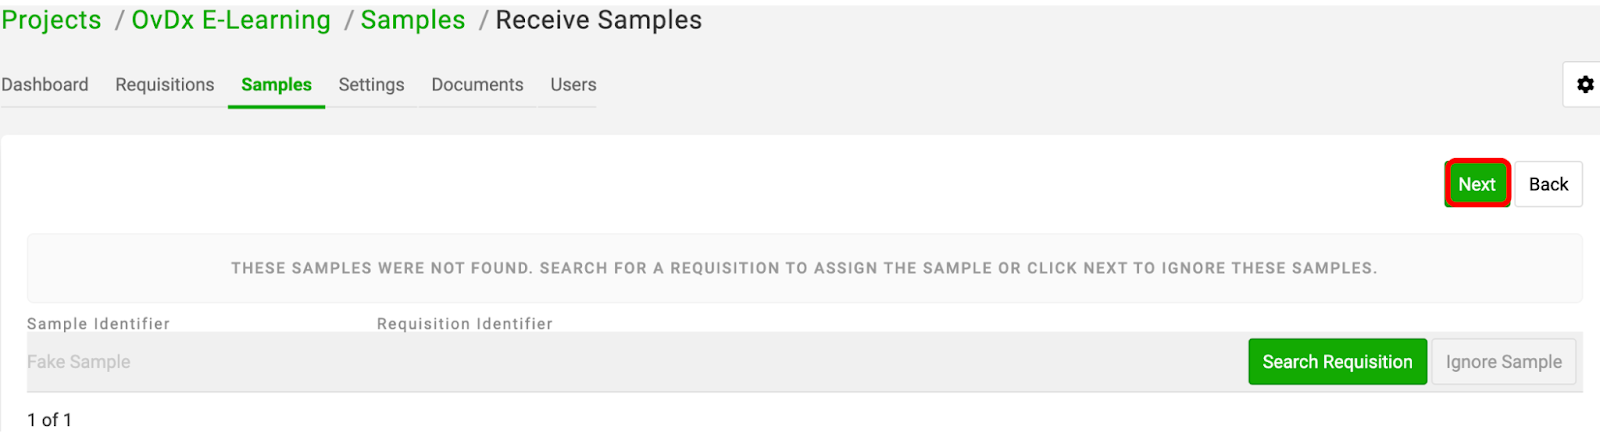
Option 2: I want to ignore and exclude the missing sample from the batch
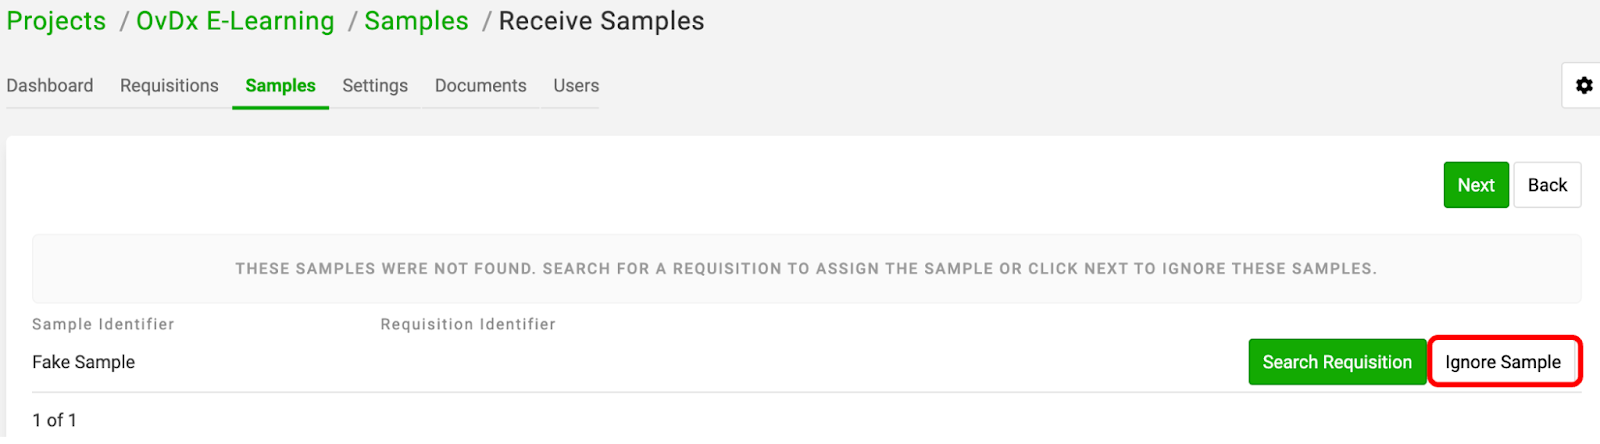
2. Click the green Next button when you have finished reviewing all missing samples in the batch
Receive the Batch
1. Click the green Mark Received button

2. Enter the date and time received in the Receiving Modal
3. Hit the green Receive button
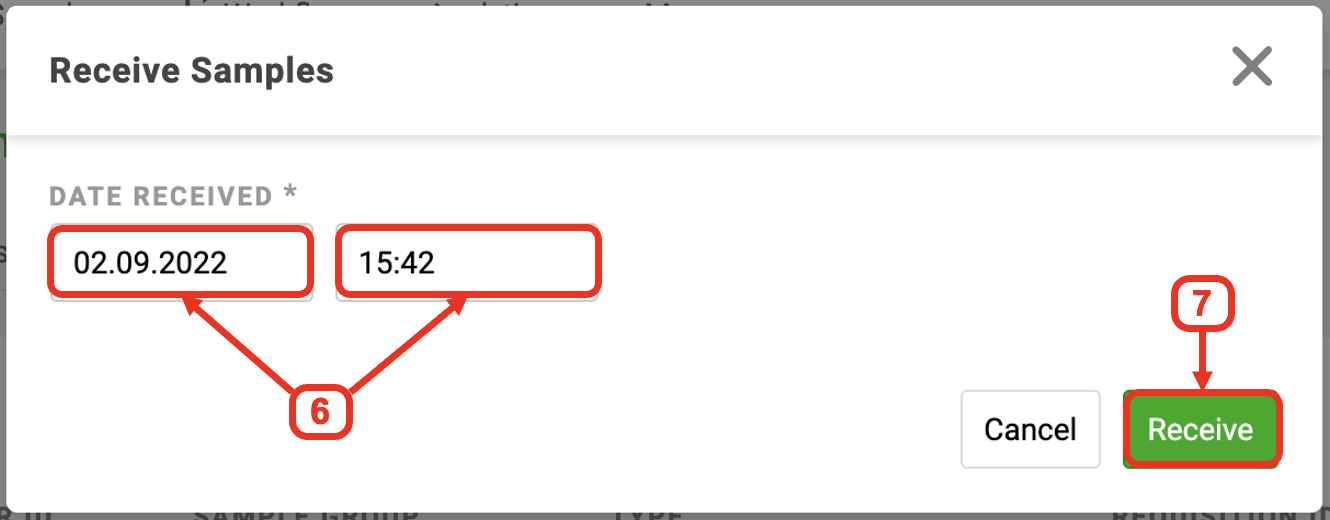
Tip: You can tab through the Date/Time fields to enter the current date/time
You will now see “Received” as the sample status