Onboarding - Customer Support Role (Business Admin)
Welcome to our instructional guide for OvDx LIMS users with a Business Administrator (Customer Support) role. Each Module contains videos and an accompanying article. If you are new to the OvDx LIMS, we recommend viewing the videos and reading the Knowledge Base Articles in the order listed below. Read the whole guide or skip to your section of interest.
Module 2: Setting up Customer Accounts
Module 3: Adding a New User to OvDx
Module 1: Intro to OvDx
Welcome to OvDx! This guide will cover the basics of your dashboard when you log in to Ovation and the Ovation support resources. The following sections are included in this guide:
OvDx Dashboard
Video
Knowledge Base Article
This article describes the OvDx dashboard, which is your landing page upon every first login. All OvDx users will see the dashboard, but your contents may vary based on permission levels. You can always navigate back to the dashboard by clicking your lab’s logo (Home Button) in the top left of the screen from any page.

Tip: The logo at the top left will say “Ov” as a default. To use your lab’s logo as your Home Button on your Ovation page, contact support@ovation.io
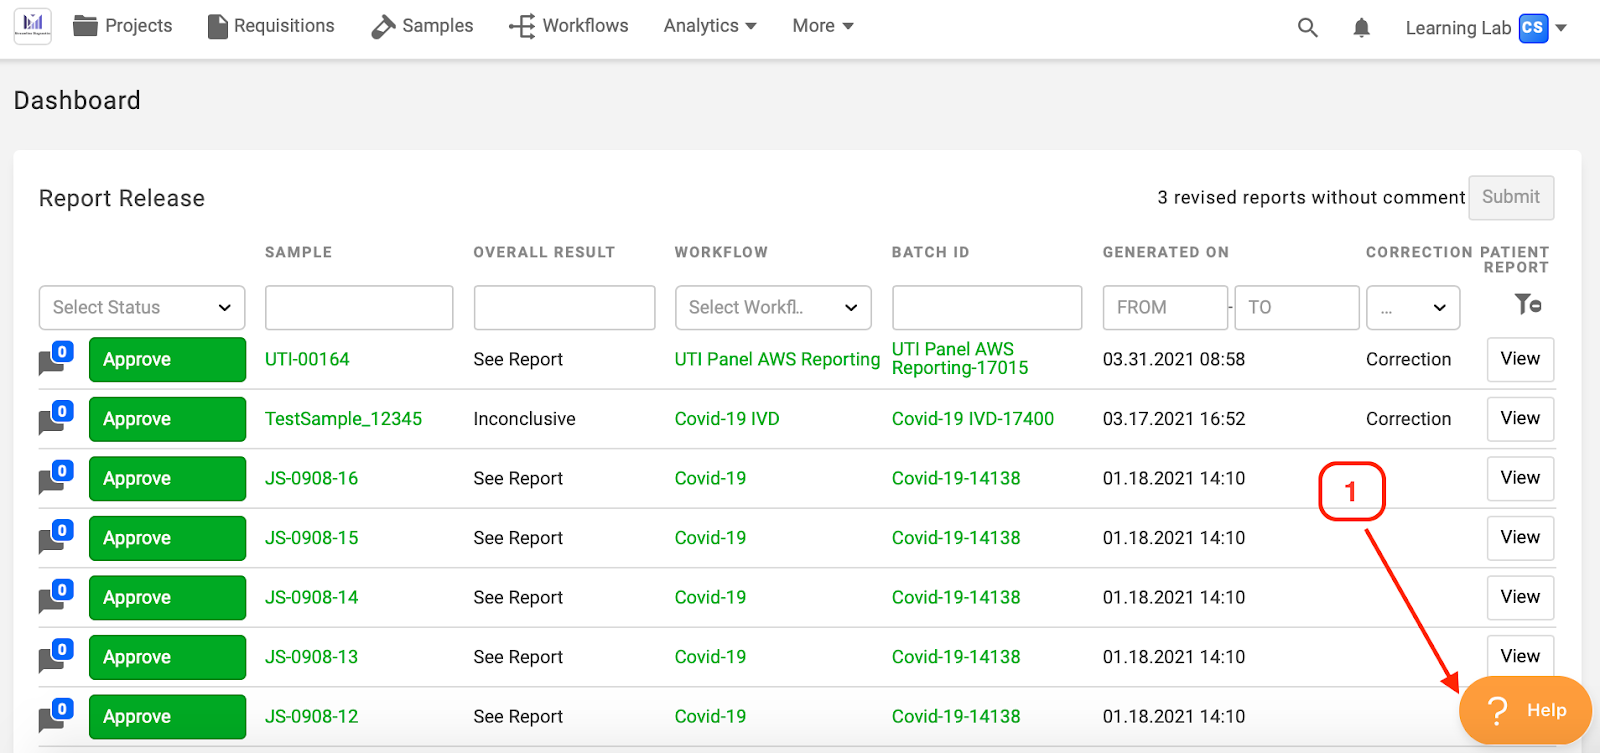
Scrolling down on the dashboard, you will see several quick action shortcuts. These shortcuts are useful for admins and lab directors. The shortcuts and their functions are briefly described in the section below.
Dashboard Quick Action Shortcuts
1. Report Release: Allows the user to release reports to the Provider Portal in bulk. For more details on this feature please see the Batch Report Release article in our knowledge base

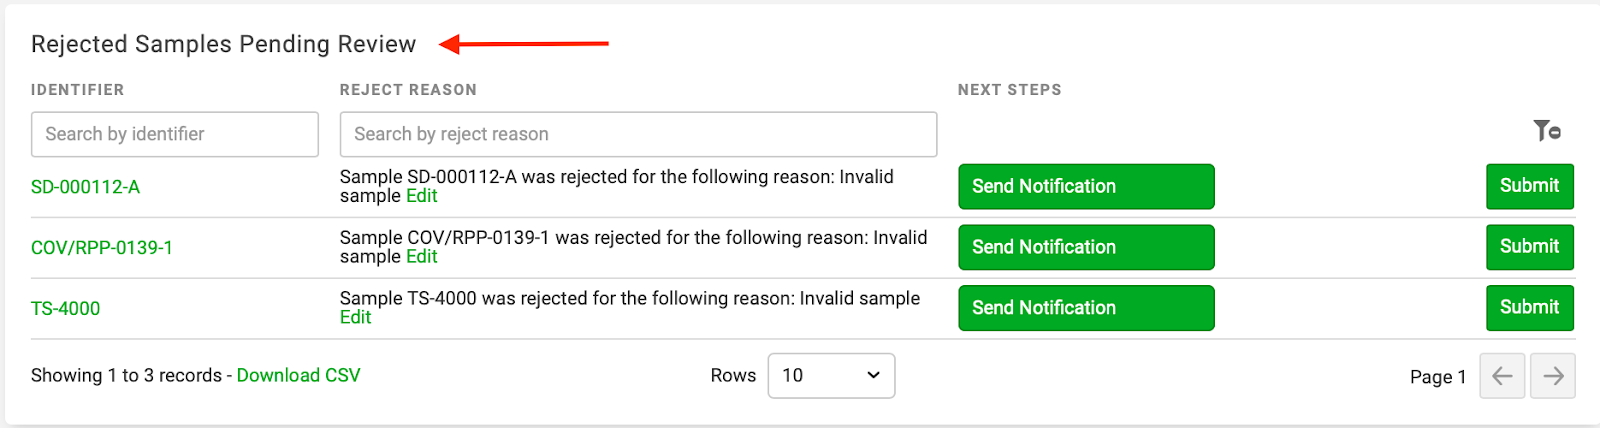
2. Rejected Samples Pending Review: Allows the user to review the rejected samples and confirm the rejection status. Rejecting the sample here removes it from the system. For more details on this feature please see the Rejecting a Sample article in our knowledge base
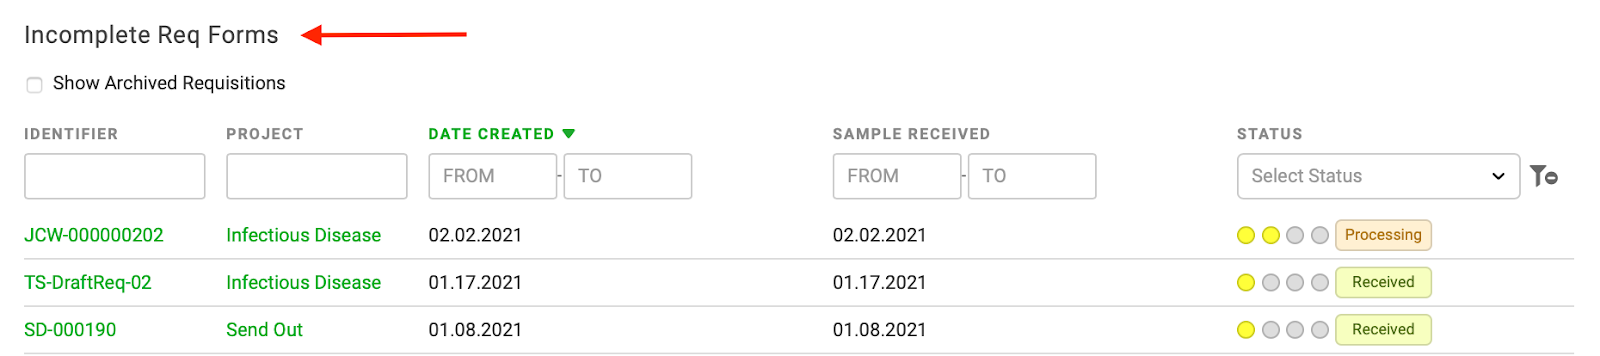
3. Incomplete Req Forms: Allows the user to view all samples that have incomplete requisitions
4. Documents Requiring Signature: Allows the user to sign and review documents that require signatures (e.g., reports that need to be signed before they are released). For more details on this feature please see the Using Documents article in our knowledge base

5. Required Trainings and Trainings Requiring Co-Signature: Users can access their assigned trainings or co-signature requests in Ovation from here. For more details on this feature please see the Training article in our knowledge base.

6. Active Workflows: Allows a user to view and navigate to workflows that are in ‘Processing’ Status. Incomplete workflows do not generate reports.

Help Beacon
Video
Knowledge Base Article
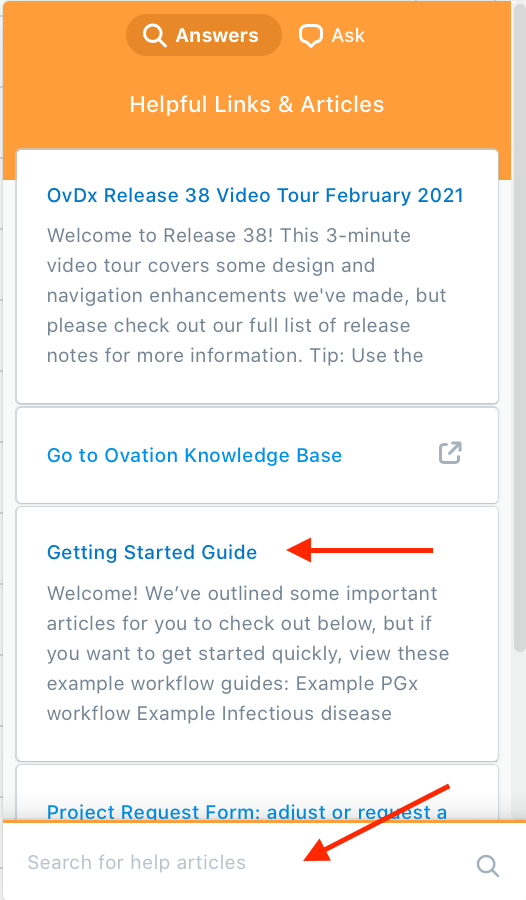
The Help Beacon is located in the bottom right of every Ovation screen. The Help Beacon allows you to search keywords to pull up relevant Knowledge Base Articles. You can also access a Feature/Expansion Request form to modify your existing Ovation environment using the Help Beacon.
1. Click on the orange Help Beacon in the bottom-right corner of any screen
2. Click on the suggested help articles, or search a specific keyword to pull up Knowledge Base articles containing your search term
Knowledge Base Articles
The Knowledge Base contains articles giving detailed instructions on various aspects of the platform. From the Help Beacon or the link above, you can search by keyword to locate articles relevant to your question. The Getting Started Guide is one resource that gathers like articles in a high-level overview of OvDx, and there are also several workflow guides that walk stepwise through a specific workflow.
Project Request Form
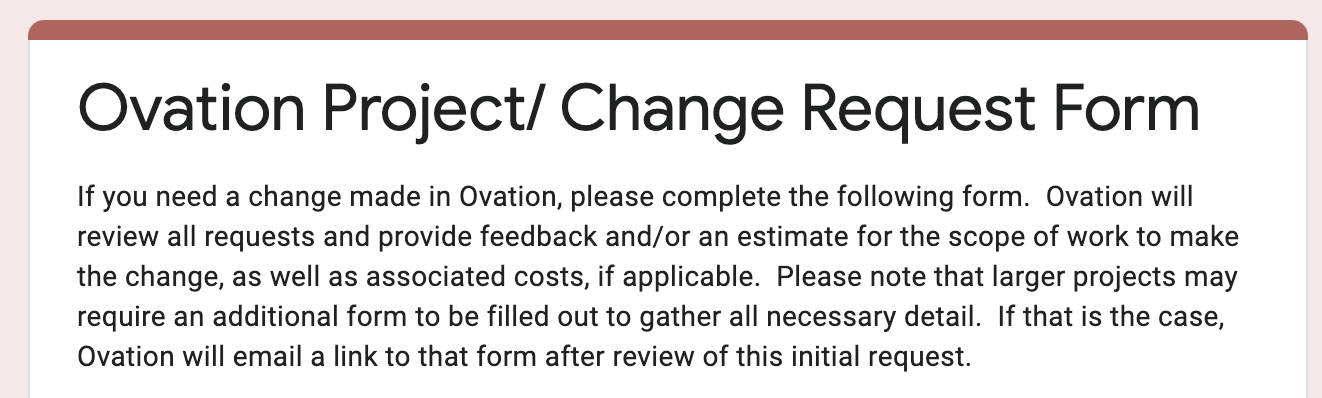
You can request a new feature or expanded functionality using the Help Beacon. Submit a Project Request Form after your project finishes implementation and goes live or if there is a contract amendment during implementation.
1. Click on the Help Beacon and select “ Project Request Form”
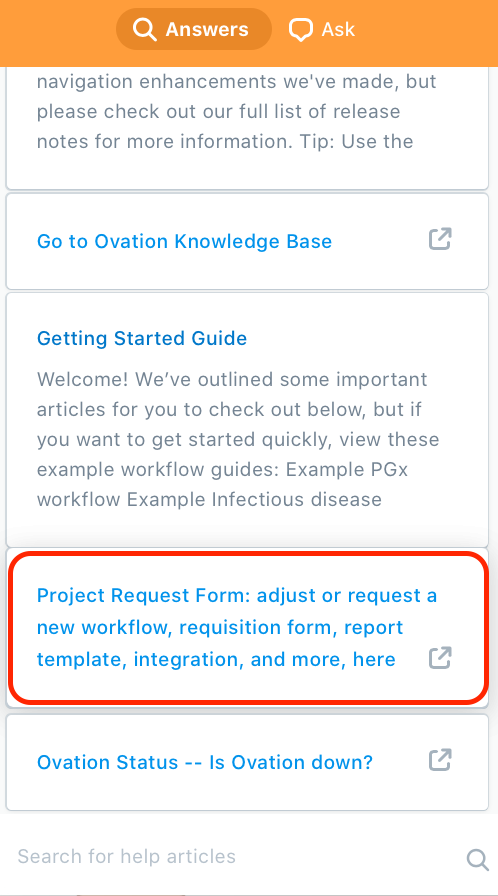
2. Complete the Google form with as much detail as possible and submit
Tip: Your account manager will reach out to you to update you on the status of your project request form
Submit a Support Ticket
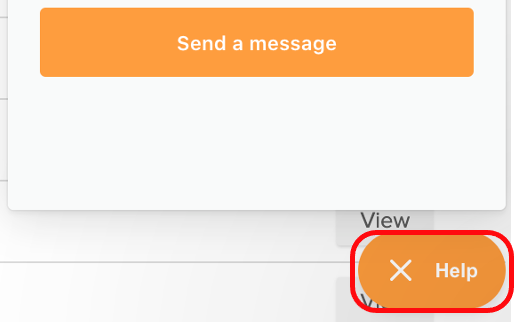
The Help Beacon can also be used to contact a Customer Support Representative at any point once your project has gone live.
1. Click on the “Ask” button at the top of the Help Beacon window

2. Fill in the requested information and hit send

Tip: Be clear and concise in the subject line. Please also provide as much detail as possible in the body of the message. The more information you provide, the faster Ovation can resolve your problem. Also, please avoid including Protected Health Information (PHI) in your message and/or any images
3. Click X to close the Help Beacon after sending your message
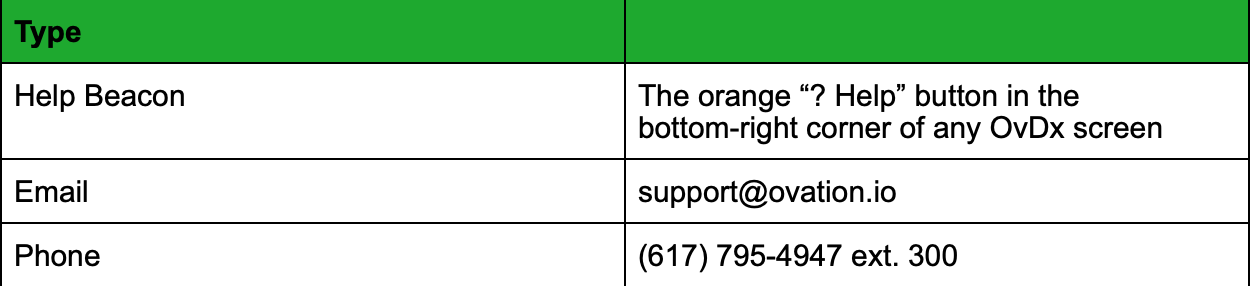
How to Contact:

Individual User Settings
Video
Knowledge Base Article
OvDx users have “roles” and “permissions” that are set up by your System Administrator. Roles and permissions control what information and work you can see and edit in OvDx. For more information, talk to your OvDx Admin or check out the knowledge base article on the Roles and Permissions Matrix
OvDx has a “User Settings” feature that can be set up by each user allowing you to manage your user profile, system email notifications, reset your password, and enable two-step verification
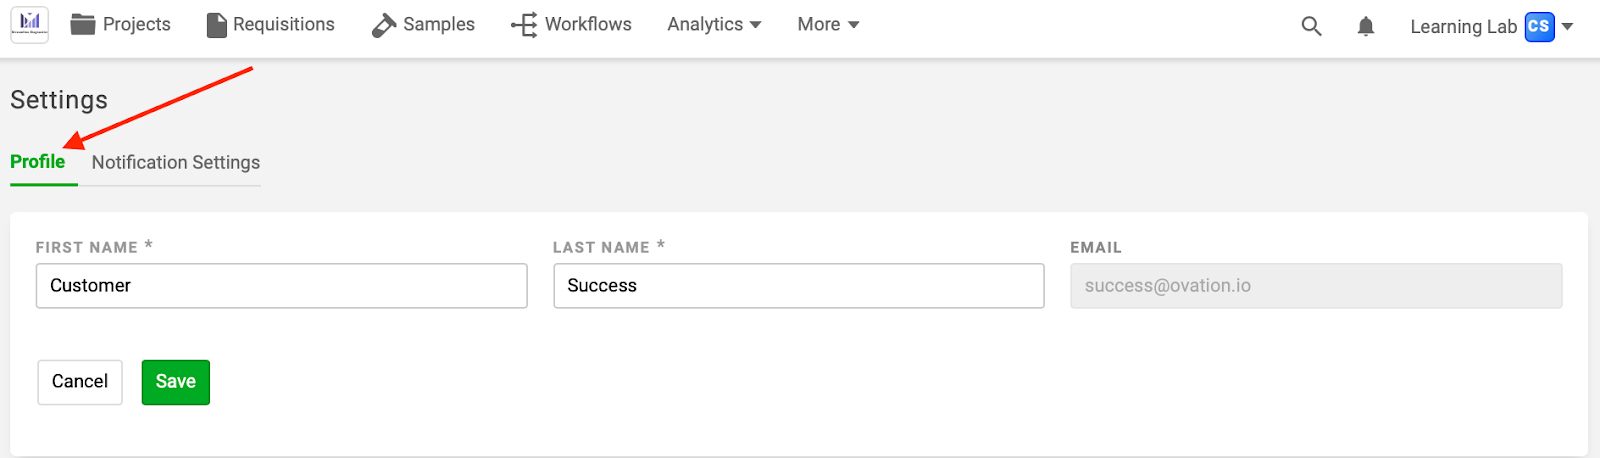
Profile
Under the Profile section, you can change your first and last name. Only an administrator can change your email address after account creation
1. From the dropdown menu next to your user name at the top right of any window, select Settings > Account

2. From the Profile tab, you can edit your first and last name if needed. The email field is grayed out, and can only be altered by an administrator
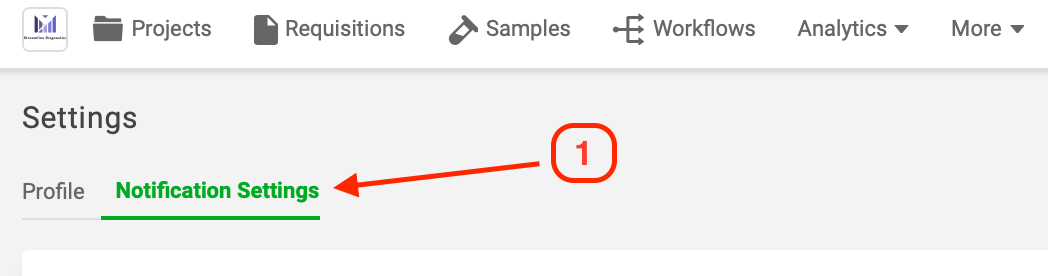
System Email Notifications
You can tailor your email notifications to fit your preferences
1. From the dropdown menu next to your user name at the top right of any window, select Settings > Account and then click the Notification Settings tab
2. System Email Notifications settings will appear with a default setting to receive report complete email notifications instantly
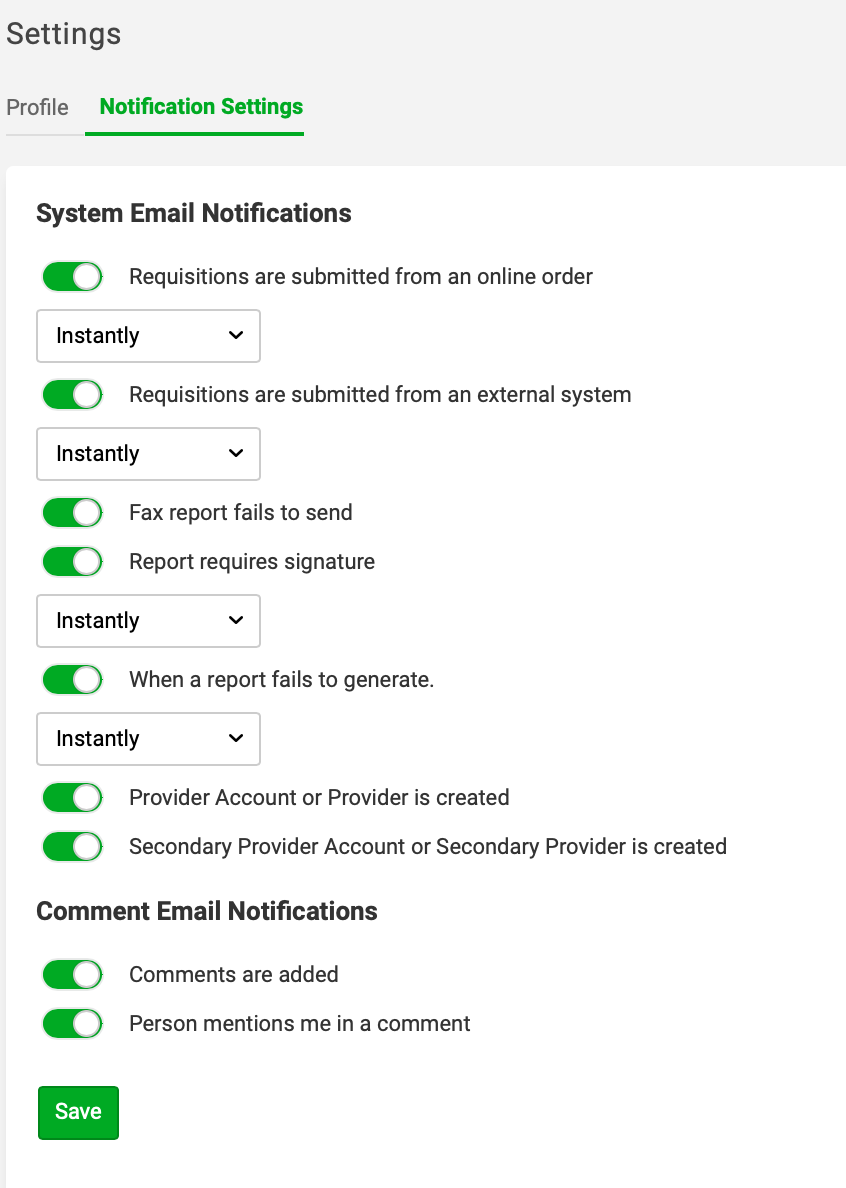
3. To schedule a single daily email with a complete digest of applicable requisitions/reports:
A. Select Daily from the drop down menu
B. Select the time of day you would like to receive the email notification

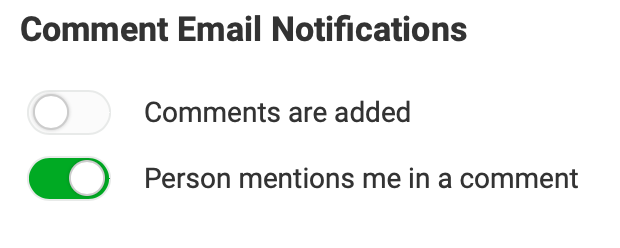
4. If the “Comments” feature is enabled for your portal, you will also see a “Comment Email Notifications” section where you can control email notifications for comments on orders
- To receive an email notification if a comment is added to an order, toggle “Comments are added” to green/On
- To receive an email notification when you are specifically mentioned in a comment, toggle “Person mentions me in a comment” to green/On
Note: If you get a message that says “You don’t have permissions to receive system email notifications. Contact your administrator to be granted permission,” you need to be given the “Notifications” Role. See your system admin to have them enable this role.
Password Reset and Two-Factor Verification
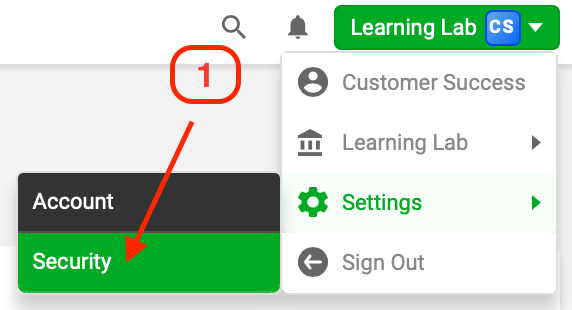
1. From the dropdown menu next to your user name at the top right of any window, select Settings > Security
2. You can reset your password by clicking the Reset Password button and following the prompts. Follow the password requirements format when resetting your password


3. You can enable two-step verification for your account by toggling the Enable button and following the prompts

Global Search
Video
Knowledge Base Article
Global Search allows you to search OvDx for patients, providers, samples, and more. You may search by:
- Requisition/sample identifier
- Patient first and/or last name
- Patient date of birth (Note: the date format must match your date input setting located in Display Preferences)
- Provider name
- Provider account name
- Provider NPI number
- Sample status
- Sales rep name
- Barcode label
- Container type
To use Global Search, click the magnifying glass in the top right corner of your screen, then enter your search term in the box that appears

Results will return sorted by category. To narrow the search results, select/deselect boxes in the Categories table on the left of the screen. You can also download a CSV of each category search results table (please note that the maximum number of records that can be downloaded at once as a CSV is limited to the visible records on the page)
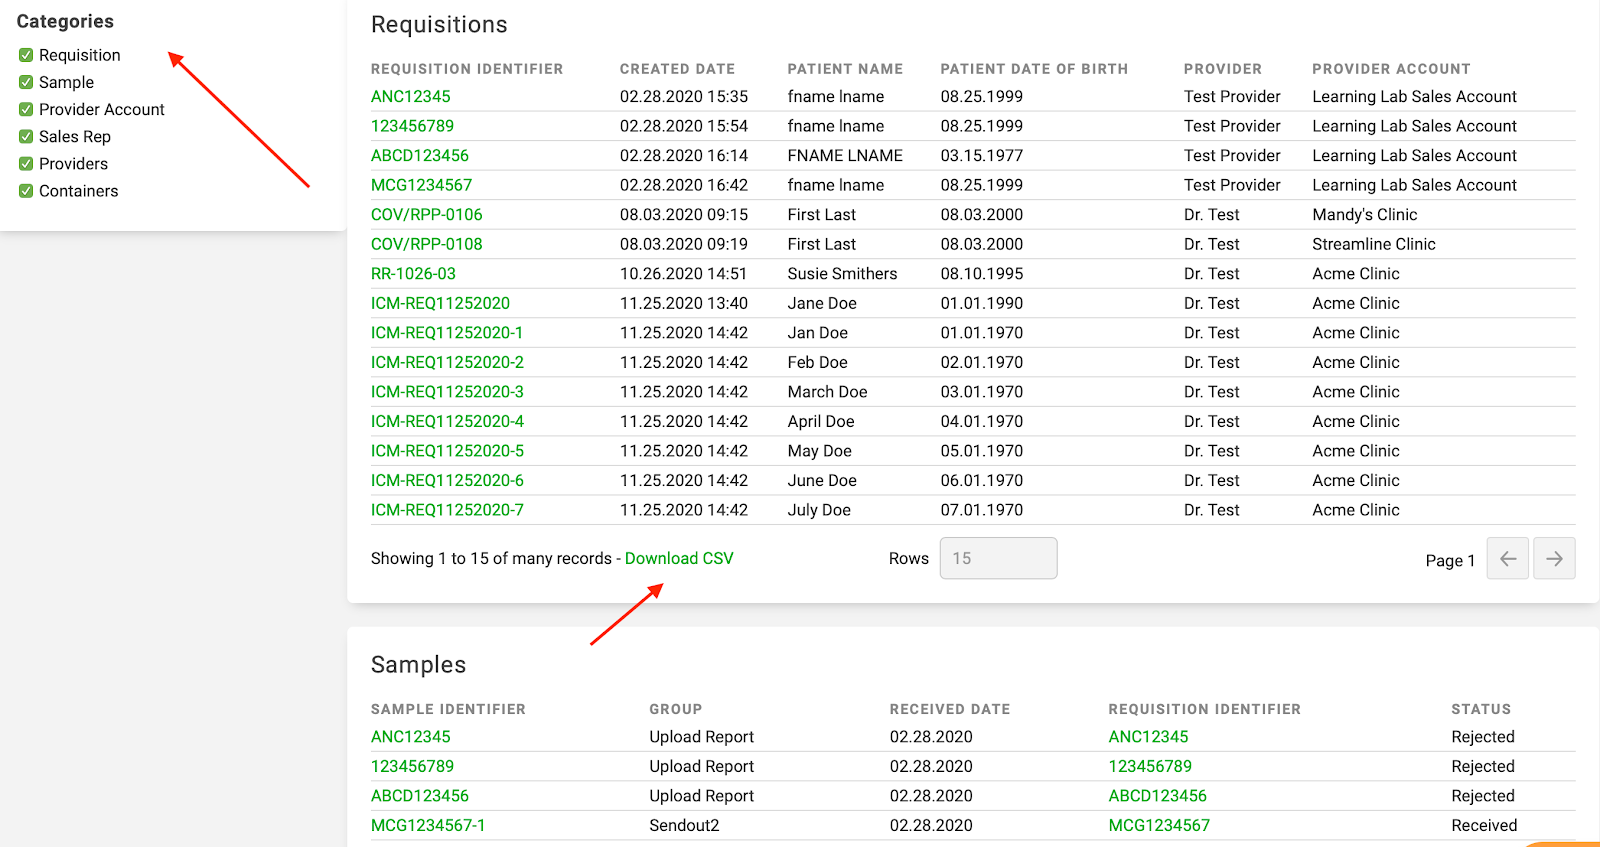
See the table below to see how search data is organized and displayed in category tables that can be downloaded

Notifications
Notifications alert users to newly generated reports and platform wide announcements, displaying only the most recent 25 notifications. The Notification icon is the bell in the top right corner
1. Click on the bell icon in the top right of the page
2. Click on the notification to go directly to the linked material

Module 2: Setting up Customer Accounts
This module describes the necessary steps for Business Administrators (Admins) to get accounts set up in OvDx LIMs and get reports to the right people. Adding Sales Groups, Sales Reps, and Provider Accounts allows you to set up and control access to the OvDx Portal. The OvDx Portal is a separate website url (portal.ovation.io) that can give Sales Reps and Provider Contacts instant visibility to orders and patient reports. The OvDx portal can also be configured to allow contacts from your Provider Accounts to place Online Orders that connect directly to your OvDx LIMs.
- Adding a Sales Group and Group Manager
- Adding a Sales Rep
- Adding a New Provider Account
- Adding Providers
- Adding Provider Contacts
- Optional Additions
Adding a Sales Group and Group Manager
Video
Knowledge Base Article
What are Sales Groups?
Sales Groups are optional in OvDx and can serve as a way to organize Sales teams and assign dedicated Group Managers to the team. If assigned, Group Managers can use the external Sales Portal to see the activity of all Sales Reps in the Sales Group. You can also create Sub Groups, whose activity is also visible by the Group Manager of the parent group.
Tip: Think of Sales Groups as territories or regions, and Sub Groups as states or areas within a territory or region
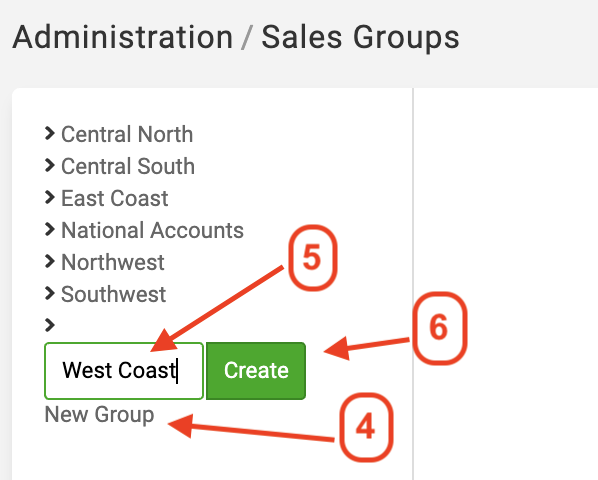
Add a Sales Group
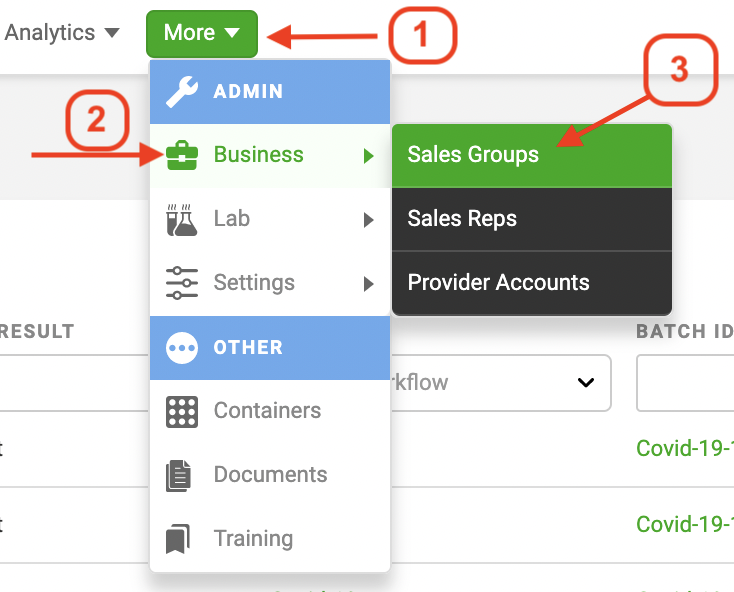
1. Click the “More” button on the top navigation bar
2. Hover over “Business”
3. Select “Sales Groups”
4. Click “New Group”
5. Type a name for your Sales Group in the box (e.g., West Coast)
6. Click “Create”
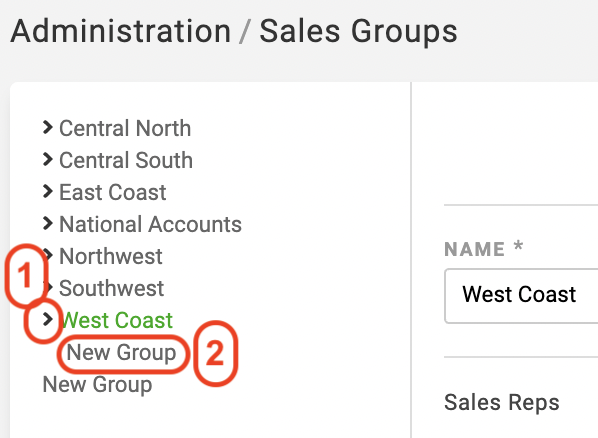
Add a Sub Group to the Sales Group
1. Click the arrow next to the Sales Group
2. Click “New Group” under the existing Sales Group
Remove a Sales Group
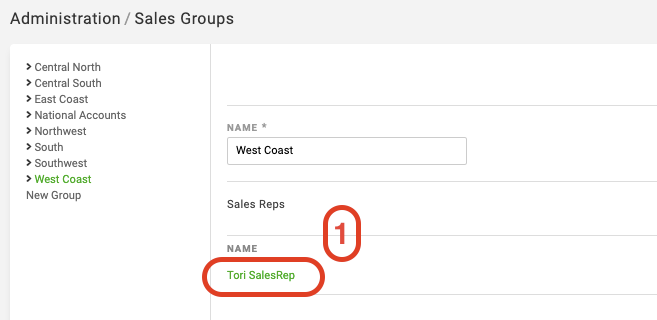
To remove a Sales Group, you must first disassociate any Sales Reps from the Sales Group
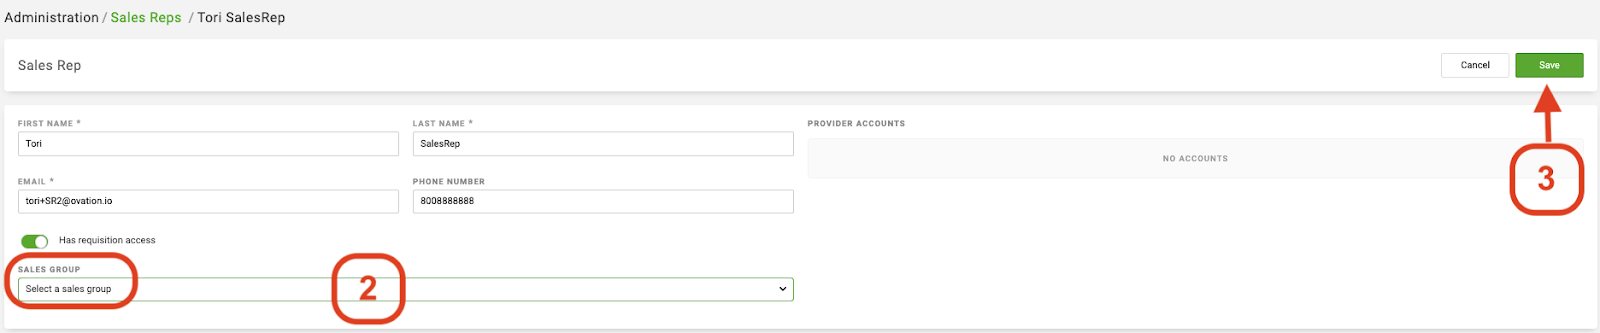
1. From the Sales Group, click on the green link for the Sales Rep Name
2. From the Sales Group dropdown, choose “Select a Sales Group” or select a new Sales Group to clear the association to the Sales Group to be deleted
3. Click “Save” and repeat steps 1-3 for all Sales Reps associated with the Sales Group
4. From More > Business > Sales Group, navigate back to the Sales Group and click the “Remove” button
Adding a Sales Rep
Video
Knowledge Base Article
There are three options to add a Sales Rep in OvDx. Assigning them to a Sales Group is optional, but you must have a Sales Rep added in order to add a Provider (sales) Account. Once you add a Sales Rep, they will receive an email invitation to the OvDx Portal that will only be active for 72 hours. For help on resending the email invitation, see the Resetting Passwords article.
Option 1 - Add a Sales Rep via ‘Sales Rep’ Feature
1. Click the “More” button on the top navigation bar
2. Hover over “Business”
3. Select “Sales Reps”

4. Select “Add Sales Rep” > ”Add New Sales Rep”

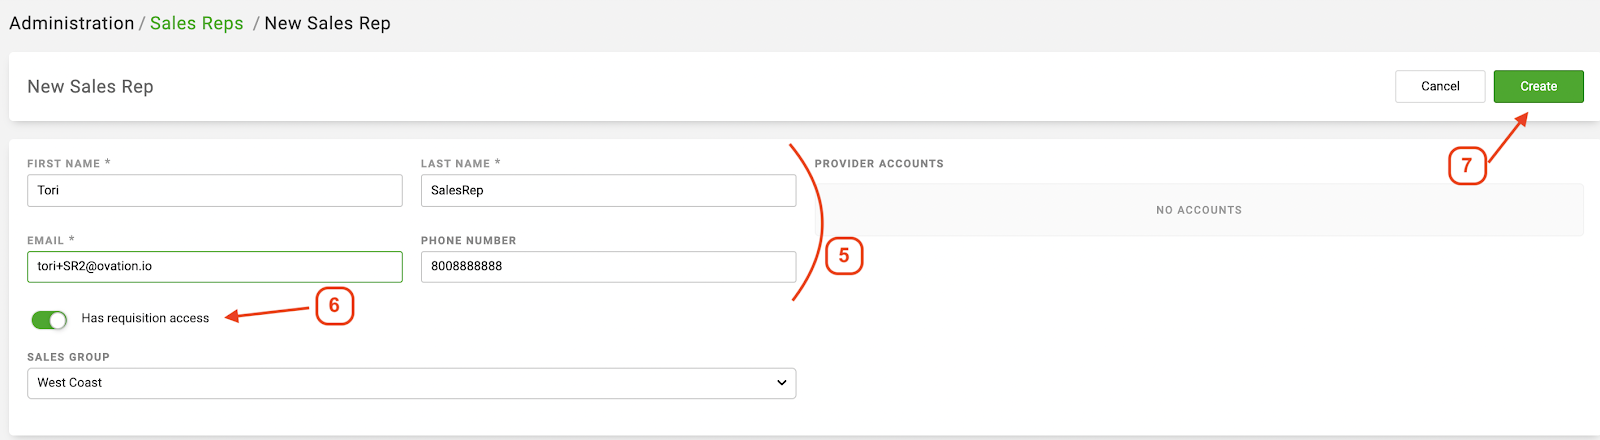
5. Complete the fields for Sales Rep (first name, last name, email, phone number - digits only)
6. Turn on “Has requisition access” toggle if you want the Sales Reps to see requisition information within the Sales Portal
7. Click Create
Option 2 - Import a list of Sales Reps via “Sales Rep” Feature
1. From the Sales Rep feature in Option 1, select Add Sales Rep > Import Sales Rep

2. Click the Download Temple File button
3. Populate the template file with your Sales Rep information and save the file as a .csv. Drag and drop the complete .csv file into the box OR
4. Select the Browse Files button to upload the file from your computer
5. Click “Submit”

Option 3 - Add a Sales Rep via the “Sales Group” Feature
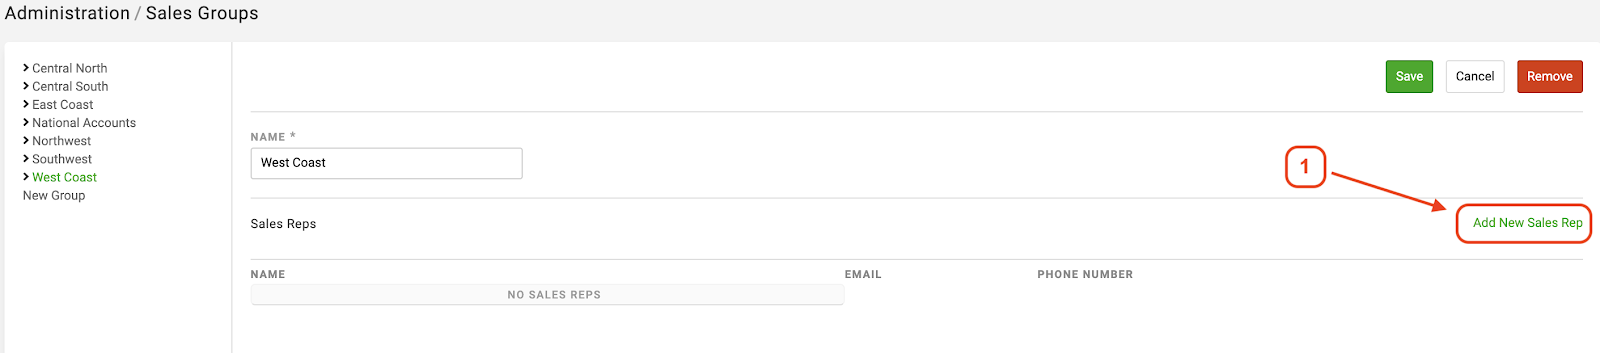
1. From the Sales Group Feature, Select the Sales Group and Click “Add New Sales Rep” link
2. Complete the fields for Sales Rep (first name, last name, email, phone number - digits only)
3. Turn on “Has requisition access” toggle if you want the Sales Reps to see requisition information within the Sales Portal
4. Click Create

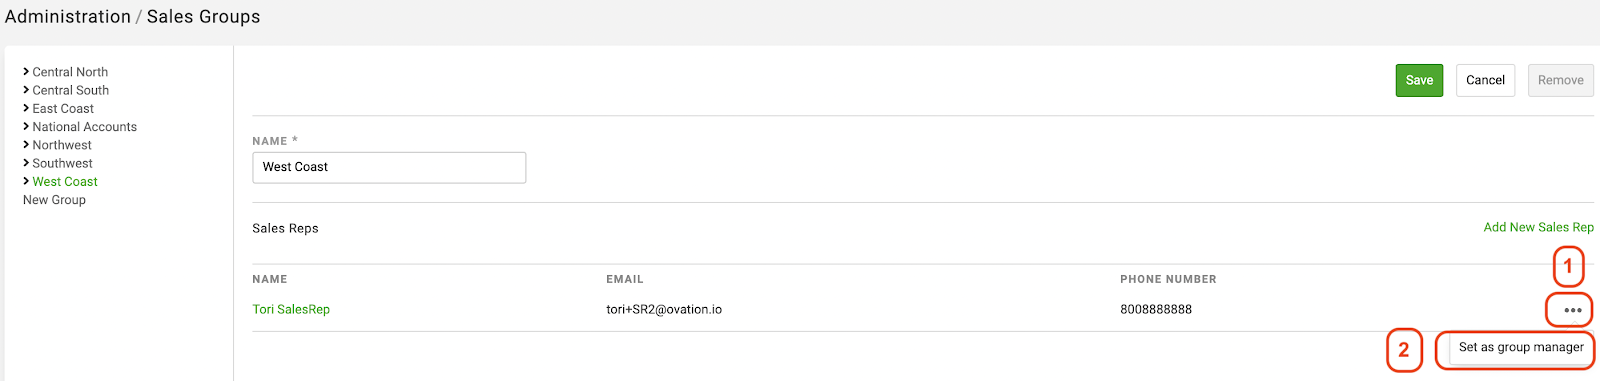
Set a Sales Rep as a Group Manager (optional)
1. Select the three dots to the far right of the Sales Rep
2. Click “Set as Group Manager”
Note: The Sales Rep MUST be added before creating the Provider Account in OvDx. If your lab does not have Sales Reps, you must create a place-holder sales rep before adding any provider accounts.
Tip: Sales Groups are optional and allow for Sales Manager roles and organization of Sales Reps into regions or classes
3. Click the “Create” button. An email will be sent to the newly created Sales Rep to prompt them to set up their password for the sales portal
Tip: Sales Rep fields can be edited/updated after the Sales Rep is created. If the email field is edited, a notification will be sent to that new email to prompt the Sales Rep to set up a new password for the Sales Portal
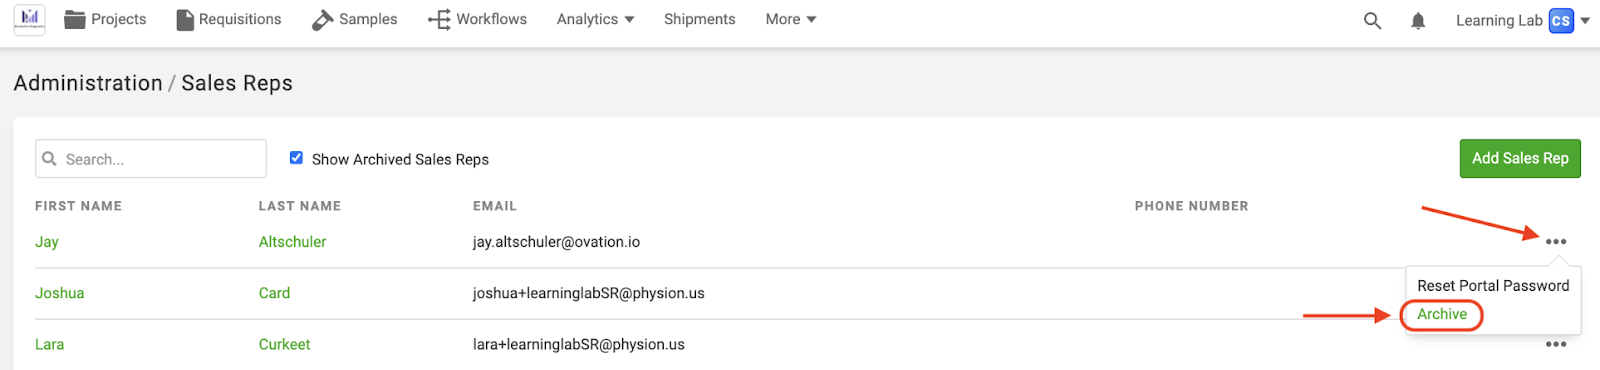
Archive a Sales Rep
To archive a Sales Rep and remove their access to the OvDx Portal follow the steps below:
1. Go to More > Business > Sales Reps

2. Click on the three dots next to the Sales Rep you want to archive and select “Archive” from the drop-down menu
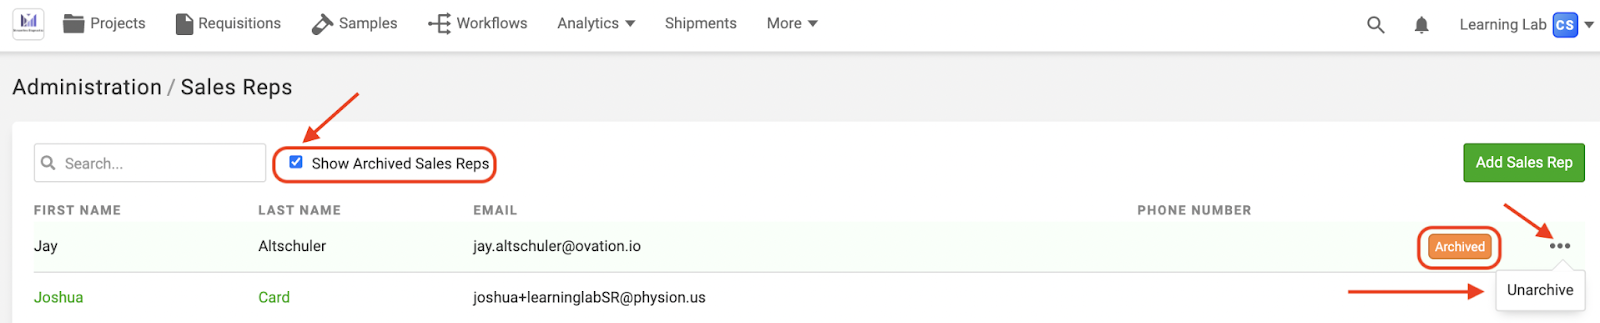
To Unarchive a Sales Rep:
1. Select the checkbox next to “Show Archived Sales Reps”
2. Click the three dots to the right of the Sales Rep’s name
3. Select “Unarchive”
Troubleshooting
For more help with this section, see the following articles:
- Resetting Passwords
- Portal Access from Internet Explorer
- Portal Account Login
- User System Requirements and Supported Browsers
- Clearing a Web Browser’s Cache
Adding a New Provider Account
Video
Knowledge Base Article
Note: The Sales Rep MUST be added before creating the Provider Account in OvDx. If your lab does not have Sales Reps, you must create a place-holder sales rep before adding any provider accounts.
Adding Provider Accounts Manually
1. Go to More > Business > Provider Accounts

2. Click the green “Add Provider Account” button

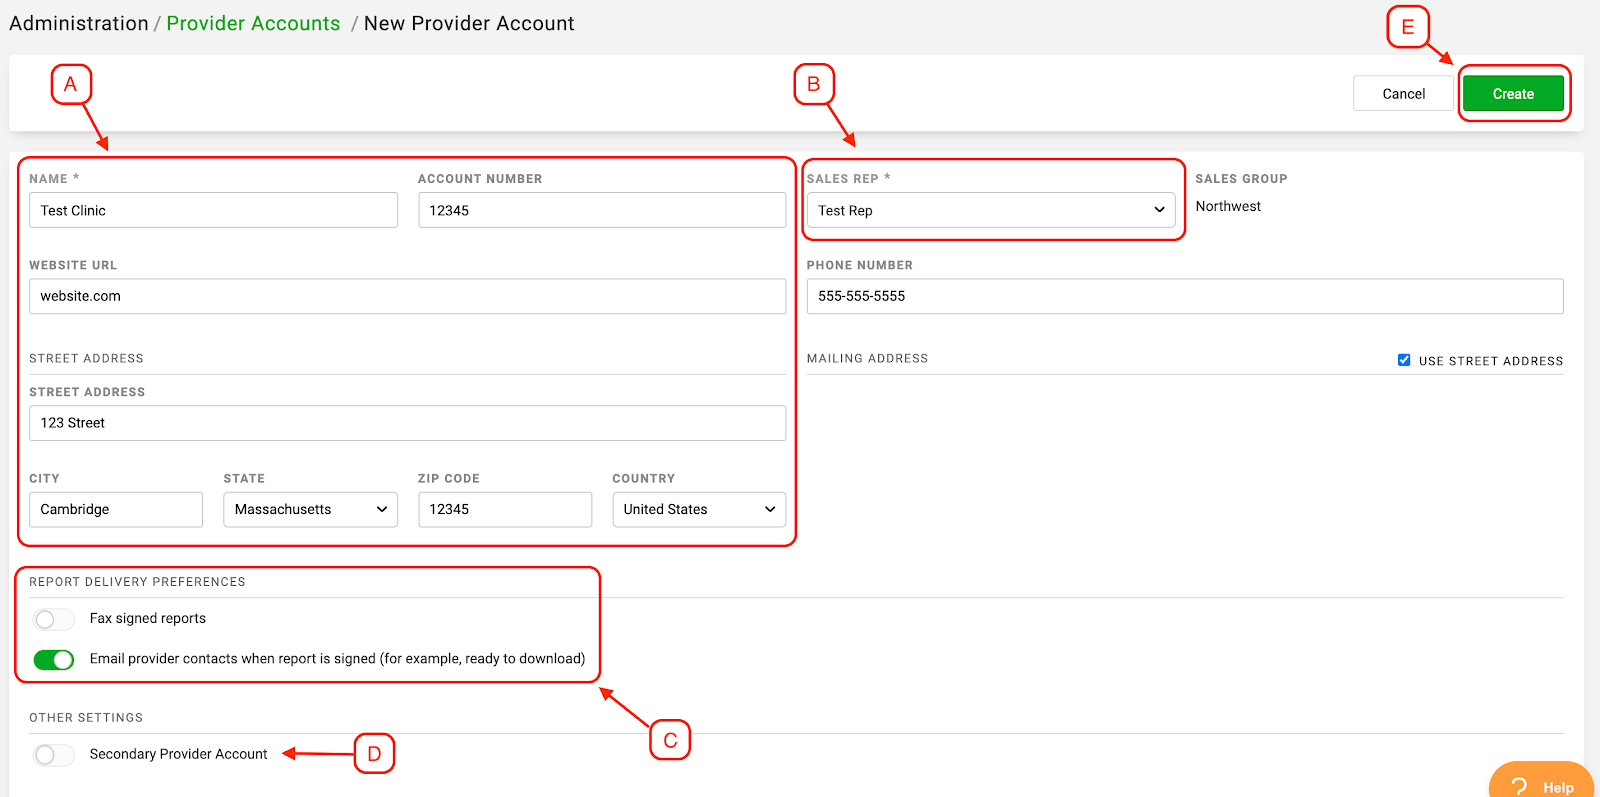
3. Choose “Add New Provider Account,” then fill in the account information:
A. Fill in the demographic information, noting that the account name is a required field.
Tip: Select the “Use Street Address” checkbox if the mailing address is the same as the street address. The mailing address is what will be used as the auto-fill option on requisition forms
B. Select the Sales Rep who will be responsible for this account.
C. Choose whether the account will receive faxed and/or emailed reports under Report Delivery Preferences.
Tip: If adding a fax number, enter only numbers (no dashes) and be sure to include the country code. For example, add a “1” at the beginning of US fax numbers
Tip: For any contacts to receive emailed reports, the Email Report Delivery Preference must be turned on at this Provider Account page, as well as on the contact page - see Adding Provider Contacts, below
D. Optional:Under Other Settings you will see a toggle for “Secondary Service Provider.” This toggle defaults to off but, if you want to associate this account to an existing Sales Account, you may turn this toggle on. Contact support@ovation.io to get help configuring secondary service providers.
E. Click the green “Create” button.
Importing Provider Accounts
1. Go to More > Business > Provider Accounts
2. Click the green “Add Provider Account” button
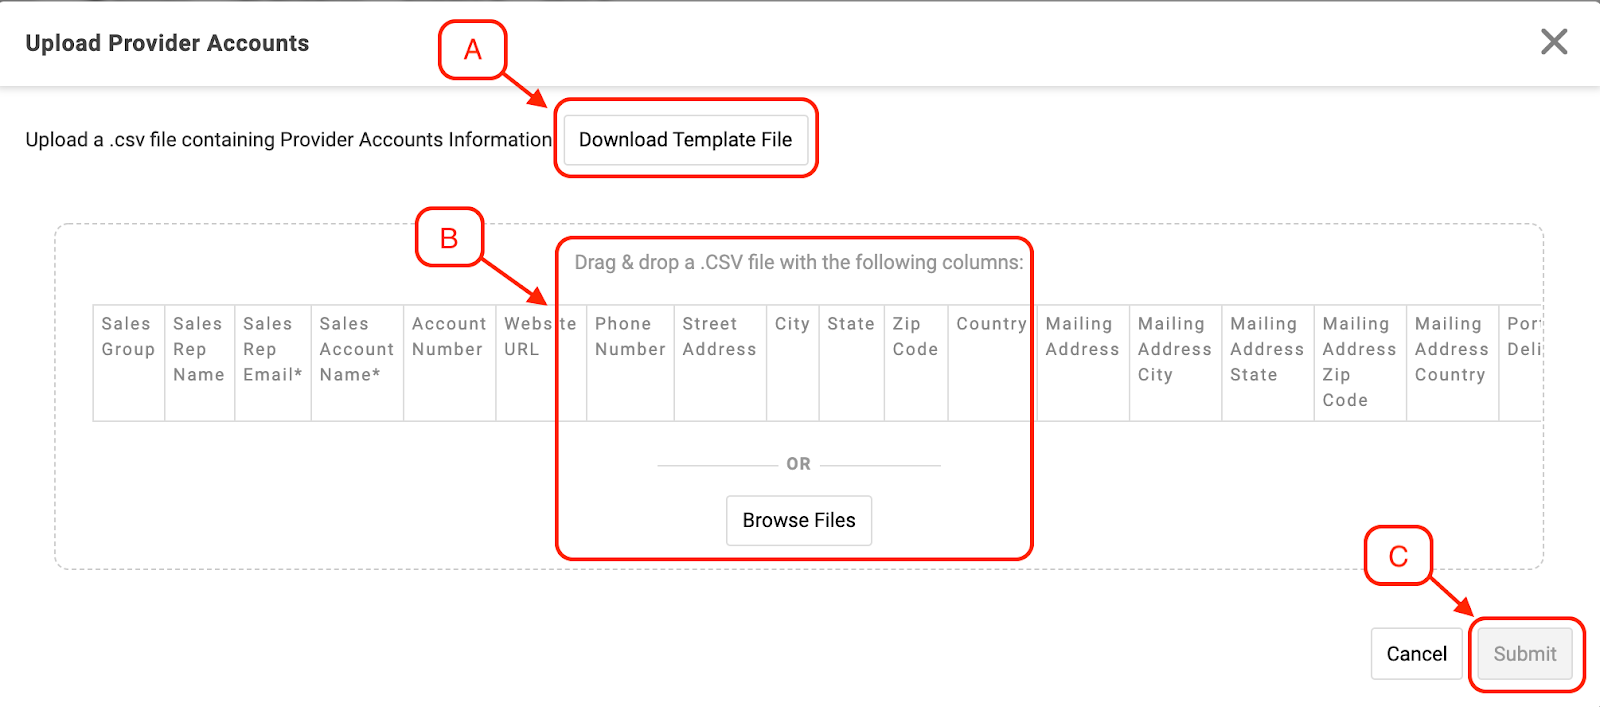
3. Choose “Import Provider Accounts”
A. If a template file is needed, click “Download Template File”
B. Drag & drop or Browse to upload a .csv file with the provider account information
C. Click the “Submit” button
Adding Providers
Video
Knowledge Base Article
In OvDx, a Provider is defined as the person ordering a diagnostic test for a patient. Providers will need a National Provider Identifier (NPI), which is a unique 10-digit identification number issued to health care providers in the United States by the Centers for Medicare and Medicaid Services (CMS). Non-US providers can also be added by selecting the appropriate category from the orange License Registry drop down menu.
1. Select the Providers tab to add providers to this account
2. Click the green “Add Provider” button
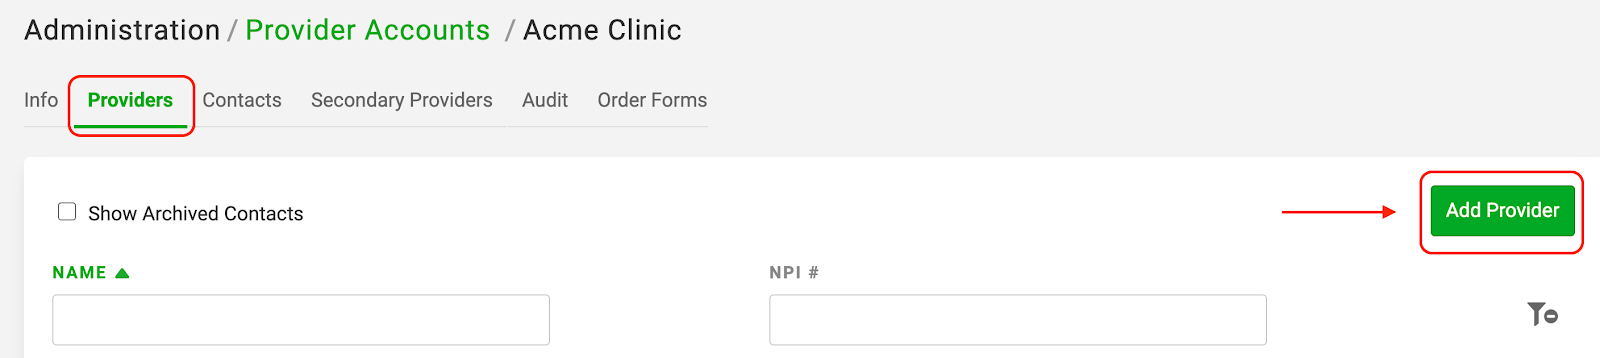
3. Enter the NPI# in the search box provided (the Provider name will appear automatically once a valid NPI# is entered)
4. Click the green “Create” button
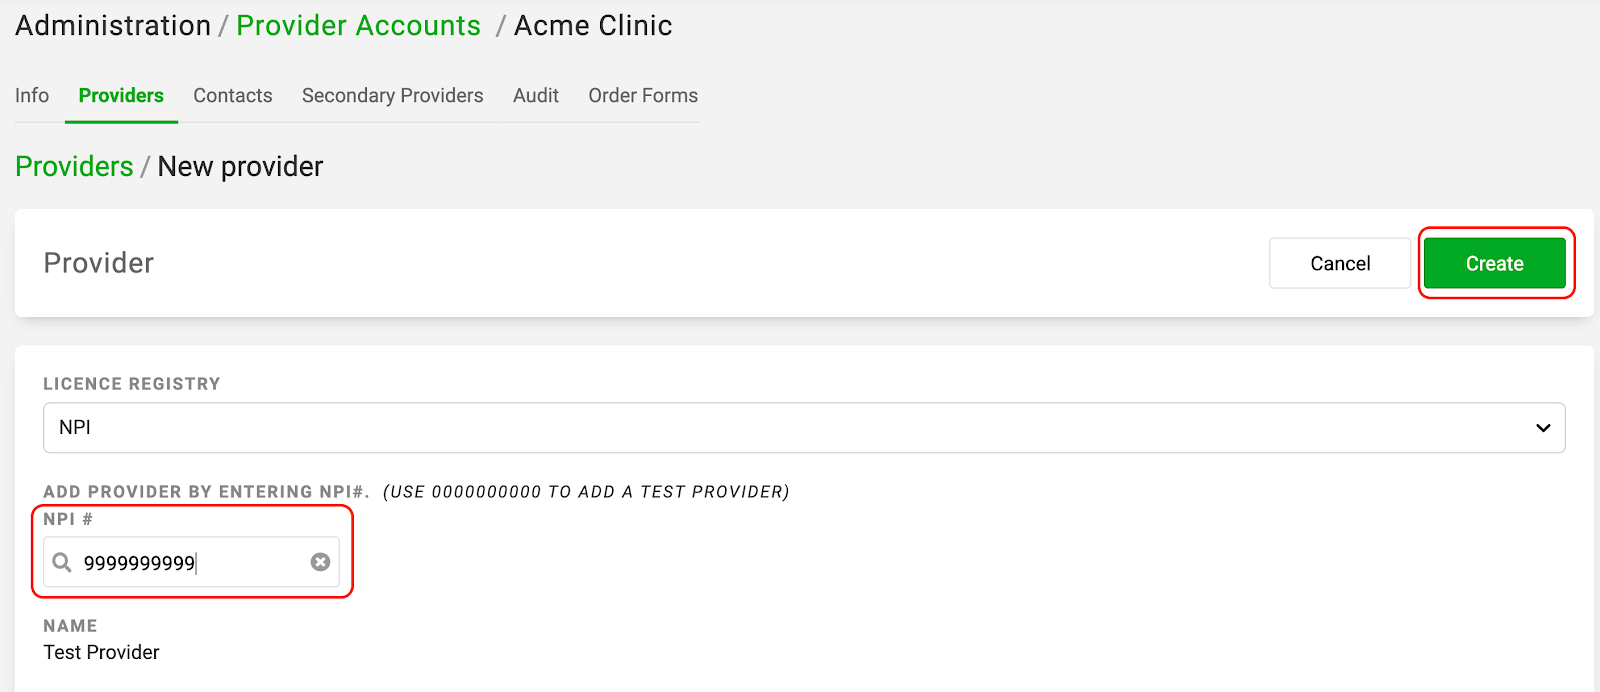
Note: If your Provider doesn’t have an NPI, you can select “ex-US / clinical trial” from the License Registry drop-down and fill in any registration number (will not be validated) and the Provider Name.

Adding Provider Contacts
Video
Knowledge Base Article
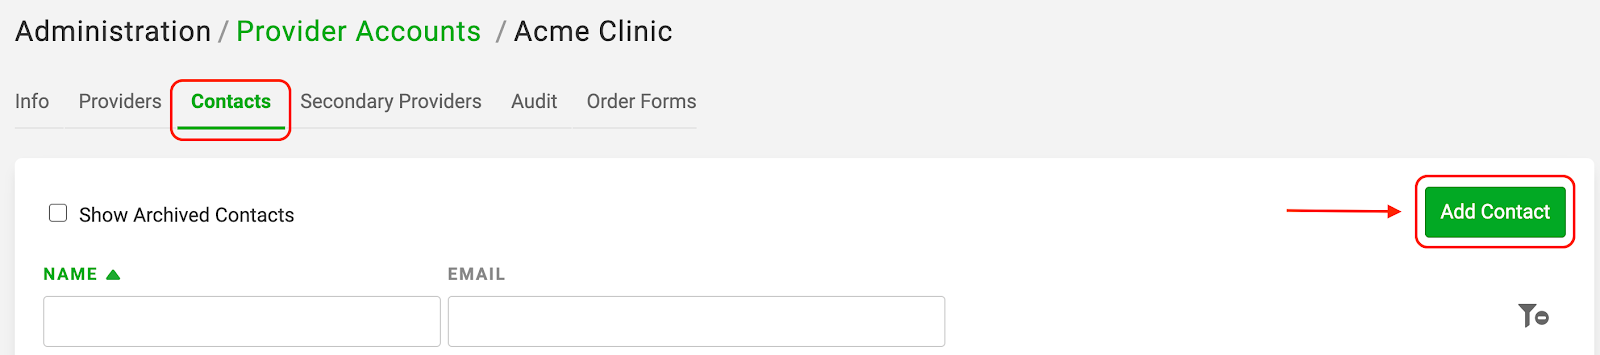
A Provider Contact is an individual that will be given Portal access on a Provider’s behalf.
1. Select the Contacts tab to add provider account contacts
2. Click the green “Add Contact” button
3. Enter the contact information, noting that first name, last name, email and communication preference fields are required
4. If you are using the Portal Provider Signature feature, choose the appropriate Role for the contact. If you are not using the Portal Provider Signature feature, leave the Role as “None.”
5. If needed, select the Primary Contact checkbox to allow access to the Analytics page in the Portal
6. If reports should be delivered to this contact, select the delivery preference of Fax and/or Email
Note: If reports will be emailed to this contact, then the Email toggle must be turned on in this screen, as well as the Email toggle in the Info tab of the Provider Account - see step 4, above.
7. Associate Providers to this Contact in the Choose New Providers drop down menu
Note: At least one Provider must be associated in order for that contact to receive an email prompting them to set up their password for the Provider Portal.
8. Click the green “Create” button

Tip: If adding a fax number, enter only numbers (no dashes) and be sure to include the country code. For example, add a “1” at the beginning of US fax numbers
Tip: Contact fields can be edited/updated after the new contact is created. If the email field is edited, a notification will be sent to that new email to prompt the contact to set up a new password for the Provider Portal
Tip: Portal password emails can be resent by clicking the 3 dots to the far right of the contact on the Contacts page
Optional Additions
The Secondary Providers and Order Forms sections of Provider Accounts are optional and can be set up using the instructions below.
Adding Secondary Providers (optional)
Add secondary service providers in the Secondary Providers tab. Contact support@ovation.io to get help configuring secondary service providers
Associating Order Forms to Provider Accounts (optional)
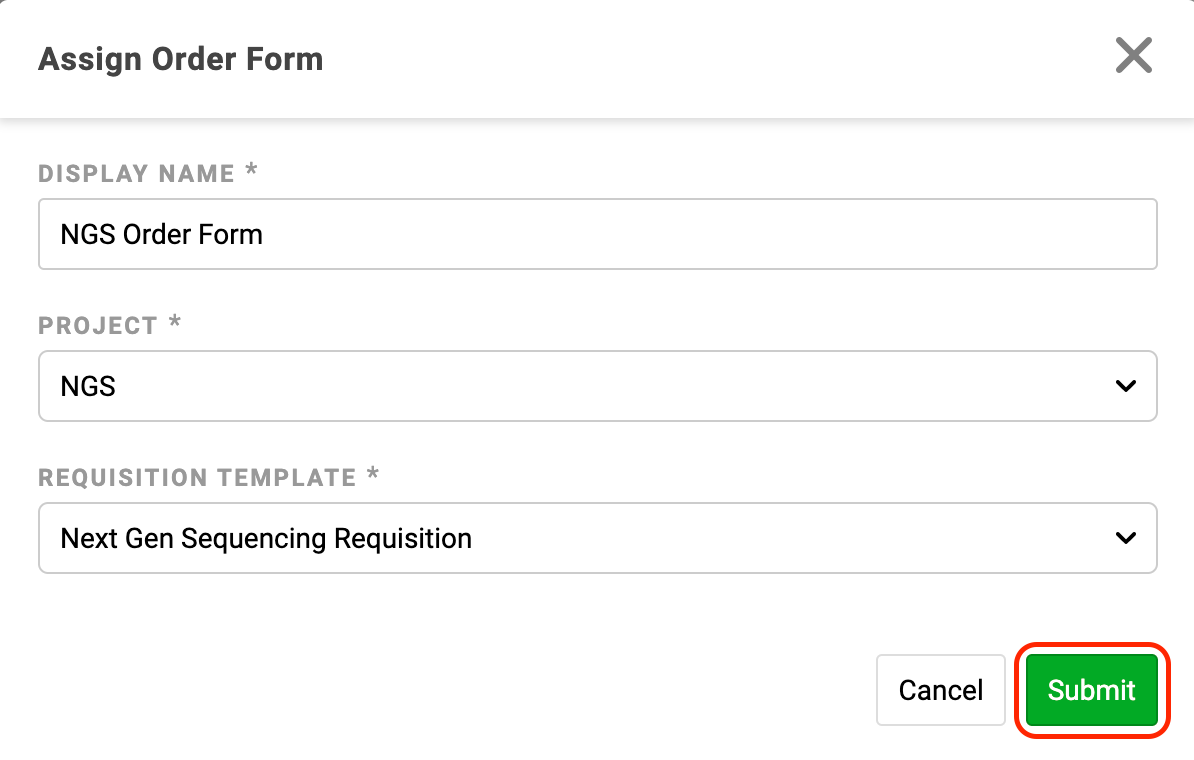
1. Select the Order Forms tab to choose which requisition templates are accessible during Online Order Entry in the Provider Portal
2. Click the green “Add Order Form” button

3. Enter the Display name, then select the Project, and Requisition Template
Tip: The display name is what the contact will see when placing an order via the Provider Portal
4. Click the green “Submit” button
Module 3: Adding a New User to OvDx
New users must be added to the OvDx LIMS by users with an Admin role. Use the following guide if you are an Admin and wish to add or remove users.
Video
Knowledge Base Article
Note: This task is time-sensitive, and after clicking Create, a verification email will be sent to the new user prompting them to create their password and complete the account setup process. The link sent to the new user expires in 72 hours.
This article describes how to:
- Add new users to the LIMs side of your Ovation Platform
- Assign a user role to a user
- Add a user to a project. (To add Ovation Portal users see Adding a New Provider Account or Adding a Sales Rep.)
- Remove a user
Add a User to OvDx
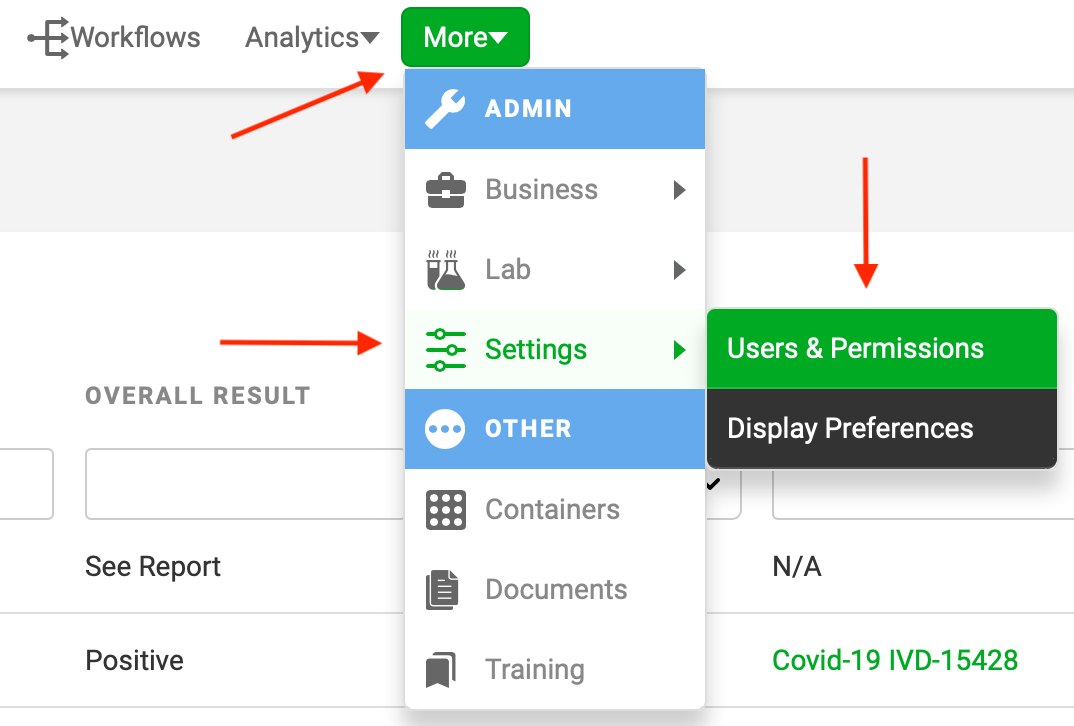
1. Under the “More” button on the Dashboard, navigate to Administration > Settings > Users & Permissions
2. Click the “Add User” button

3. Type the new user’s name and email address, and then click the “Create” button
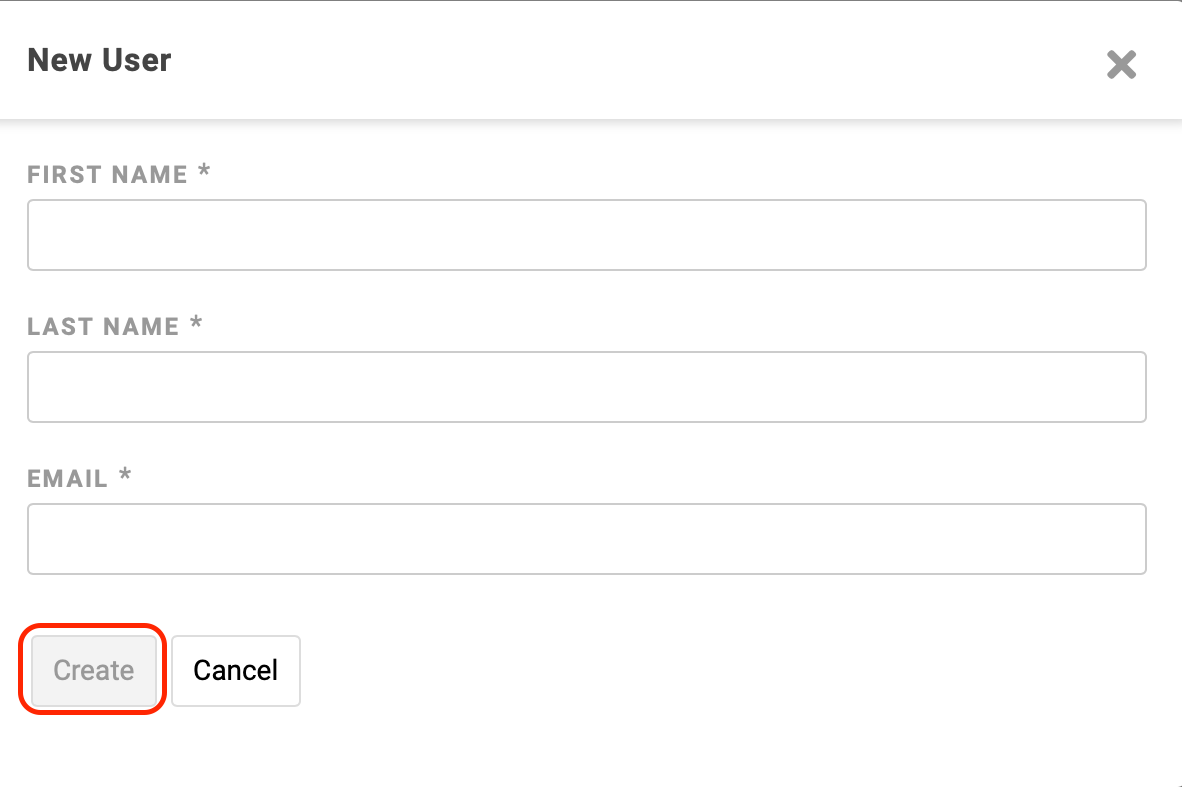
Note: After clicking Create, a verification email will be sent to the new user prompting them to create their password and complete the account setup process. The link sent to the new user expires in 72 hours.
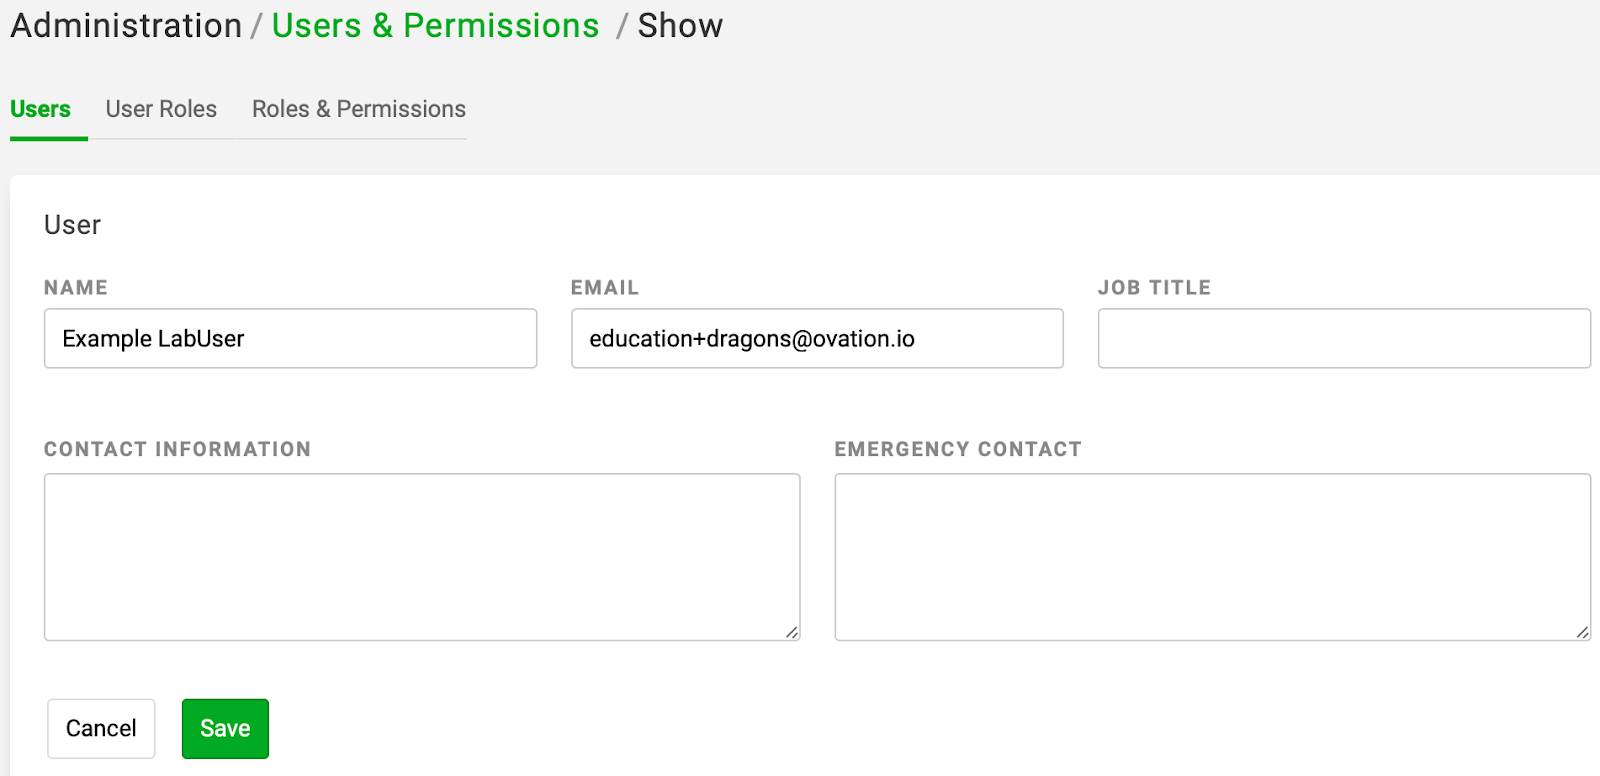
4. Click on the user name that was just created to fill in optional fields such as Job Title, Contact Information, and Emergency Contact. Click the green “Save” button to complete this section
5. If needed, you can resend the invitation email, send an email to reset the user’s password, or remove a user by clicking on the ellipse to the far right of the user name

Assign a User Role
1. Go to More > Settings > Users & Permissions
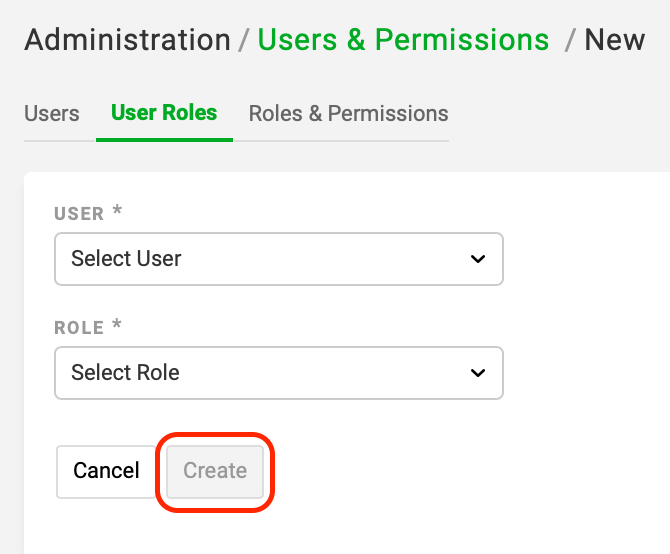
2. Click the User Roles tab, then click the Add User Role button

3. Choose the User and Role from the drop-down menus, and then click the Create button
Tip: A single user can be assigned multiple roles. To learn more about user roles, see the Roles & Permissions article
Add a User to a Project
Users need to be added to a Project before they can view or access the Project
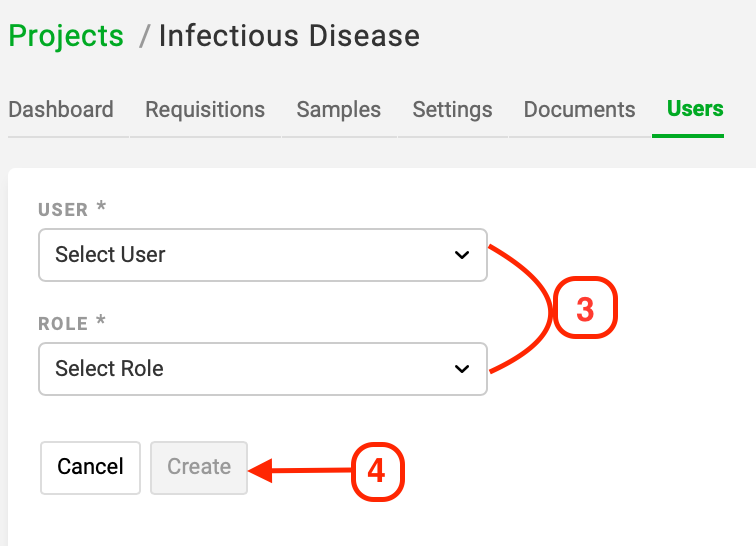
1. Go to Projects > “project name” > Users tab
2. Click the green Add User button

3. Select the User and Role from the dropdown menus
4. Click Create to add the user to the Project
Removing a User
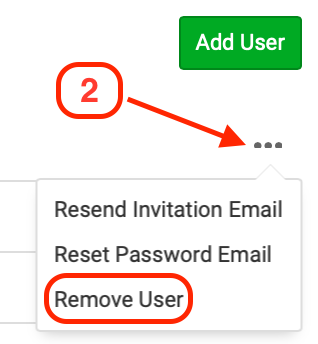
1. Go to More > Settings > Users & Permissions

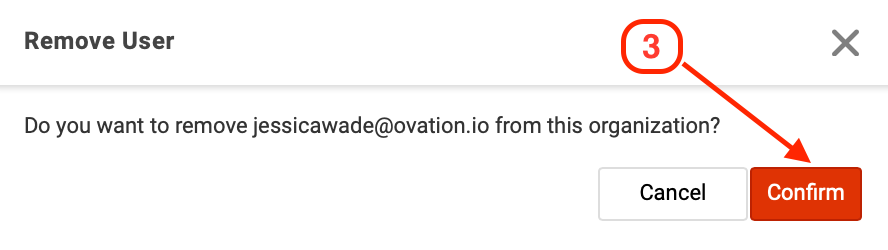
2. Find the user you would like to remove, click the 3 dots to the far right of their name and select Remove User
Tip: Removing a user will take away their ability to login, but any data previously generated by that user (including audit details with their logins) will remain in the system
3. The system will provide a prompt asking you to confirm removal. Click Confirm. The user and all associated roles and permissions will be completely removed from the system